Connect Microsoft Teams Essentials (Microsoft Entra ID) to an existing email system with calendar
Important
Try the "Use your existing email with Teams" setup available at https://admin.microsoft.com. It automates some of the steps in this article.

This guide provides configuration steps for connecting Microsoft Teams Essentials (Microsoft Entra ID) to an existing email system with calendar.
Microsoft Teams Essentials (Microsoft Entra ID) brings together the best of Teams with meetings, chat, calling, and collaboration. Teams Essentials (Microsoft Entra ID) can connect to your existing email system to provide an integrated experience like having all Teams notifications in an existing email inbox, all calendar events in Teams, and the ability to sign into Teams with your existing email address.
Once connected, you can see responses to scheduled meetings and invitations to collaborate in your mailbox and Microsoft Teams. You can also view and interact with incoming meetings from your calendar using Teams and third-party meeting software like Google Workspace.
Prerequisites
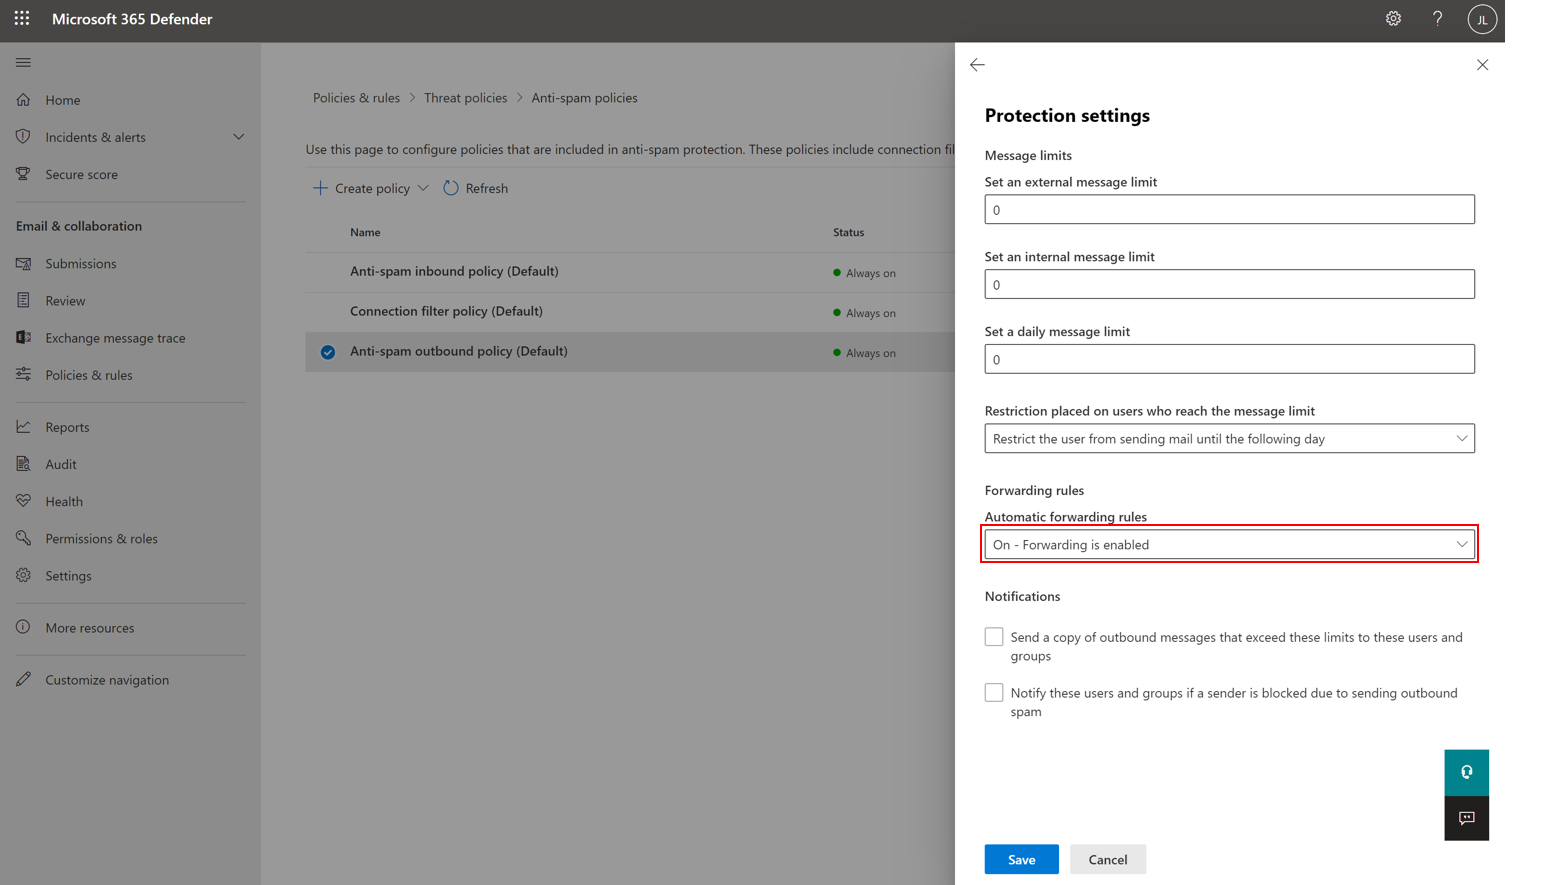
The configuration steps in this article involve the process of automatically forwarding items from Exchange Online. By default, automatic forwarding is disabled by the anti-spam outbound policy. This policy must be enabled to connect Teams Essentials to an existing mailbox and calendar system.
To enable automatic forwarding:
- Go to the Microsoft 365 Defender portal at https://security.microsoft.com/
- Under the left navigation menu, go to Email & collaboration > Policies & rules > Threat policies > Anti-spam in the Policies section
- On the Anti-spam policies page, select Anti-spam outbound policy (Default) from the list
- In the policy details flyout that appears, select Edit protection settings to modify the autoforwarding rule.
- Under Forwarding rules, change the automatic forwarding condition to On – forwarding is enabled and save your changes.
To learn more about configuring outbound spam policies, visit Configure outbound spam filtering - Office 365 | Microsoft Docs.
Connect Teams Essentials to Exchange Online with Exchange on-premises
You can enjoy all that Teams Essentials (Microsoft Entra ID) has to offer by using a hybrid approach to configure the connection between Microsoft Teams and Exchange Online with Exchange on-premises.
To make calendar access work for your on-prem mailboxes, follow the guidance provided atConfiguring Teams calendar access for Exchange on-premises mailboxes - Microsoft Tech Community
To deploy Microsoft Teams Rooms in a hybrid environment with Exchange on premises, visit Deploy Microsoft Teams Rooms with Exchange on-premises - Microsoft Teams | Microsoft Docs
Connect Teams Essentials to third-party email systems with calendar
If you don't plan to switch your organization's mailbox to Microsoft 365, you can connect Teams Essentials to an existing third-party email and calendar system. This connection allows you to receive Teams notifications in your existing email system while viewing existing meeting invites and calendar events in Microsoft Teams.
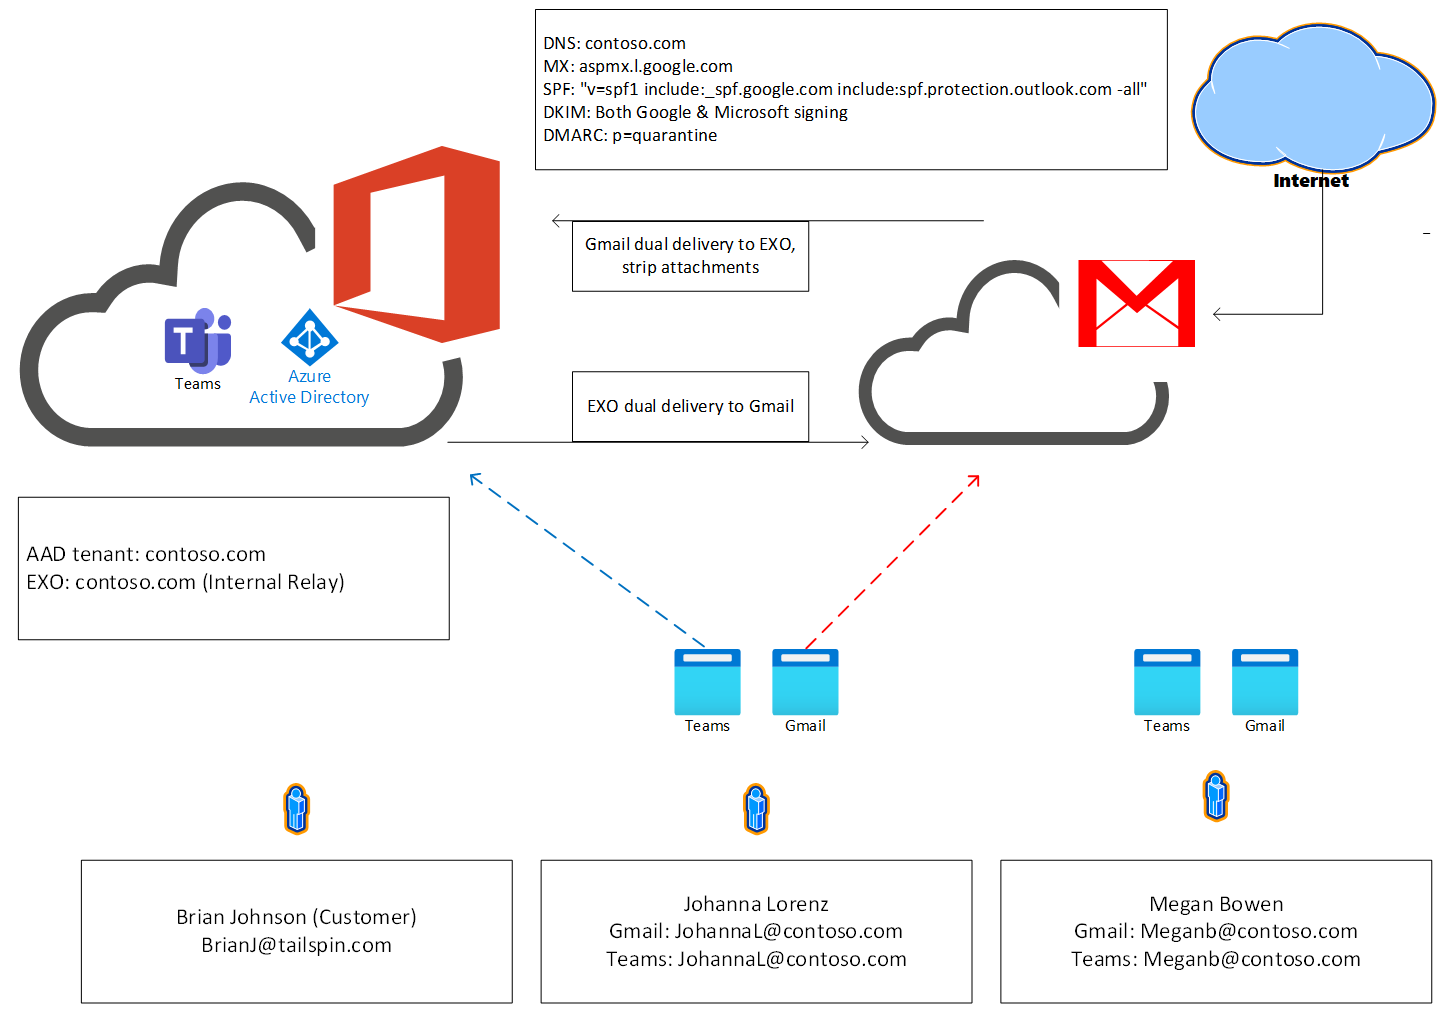
Connect Teams Essentials to third-party email using vanity domain (Google Workspace example)
The following section shows you how to connect Microsoft Teams to an existing email system with calendar, like Google Workspace. You will accomplish this connection by leaving the current email system intact, forwarding all email to Exchange Online, filtering everything except emails of the calendaring type. In doing so, calendaring emails automatically appear in the Teams calendar accepted as tentative and non-calendaring type emails are deleted.
All email generated in Microsoft 365 is forwarded to Google Workspace so that users get Teams reminders and notifications. User identities, like the user's primary email, can be duplicated. Single sign-on is also possible, but not required. Users should be able to join Teams meetings from either the third-party calendar or Teams calendar. Another Teams features will work as expected.
These examples rely on the Connect-ExchangeOnline PowerShell commandlet that is part of the Exchange Online PowerShell V2 module. If you get an error when running Connect-ExchangeOnline, ensure that you've followed the recommended instructions for installing the module using Install the EXO V2 module. When Connect-ExchangeOnline prompts for credentials, be sure to use a tenant administrator account.
Step One: Set up a new Microsoft 365 tenant domain
Go to the admin center at https://admin.microsoft.com.
Go to Set Up > Domains and select Add domain to add your existing domain. If you don't add a domain, people in your organization will use the onmicrosoft.com domain for their email addresses until you do. Be sure to add your domain before adding users, so you don't have to set them up twice.
Verify the domain with a TXT record by following the steps at Verify with a TXT Record.
When prompted, select Do not allow Microsoft 365 to configure DNS.
When prompted, leave the existing MX records in place without altering them.
Update the existing SPF TXT record to include Microsoft 365.
Configure DomainKeys Identified Mail (DKIM) for Microsoft 365 by following these steps to manually set up DKIM.
Sign back into the Microsoft 365 admin center at https://admin.microsoft.com/AdminPortal/ to enable DKIM
In the navigation panel on the left, select Setup > Domains
Using the checkbox, select your existing non-Microsoft domain (ex: TomislavK@thephone-company.com) from the current lists of domains.
Select the button with three vertical dots to open a menu.
From the menu, select Set as default
Confirm set as default in the window that appears to set your existing domain as default.
For more guidance on adding a domain to Microsoft 365, follow the steps described in Add a domain to Microsoft 365.
Step Two: Add users and assign Teams Essentials licenses
Go to the admin center at https://admin.microsoft.com to add an individual user
Go to Users > Active users, and select Add a user
In the Set up the basics pane, fill in the basic user information, then select Next.
- Name: Fill in the first and last name, display name, and username.
- Domain: Choose the domain for the user's account. For example, if the user's username is Jakob, and the domain is contoso.com, they'll sign in by using jakob@contoso.com.
- Password settings: Choose to use the autogenerated password or to create your own strong password for the user. Determine whether you want to send the password in an email when the user is added.
In the Assign product licenses pane, select the location and the appropriate license for the user. If you don't have any licenses available, you can still add a user and buy more licenses. Select Next.
In the Optional settings pane, expand Roles if you would like to make this user an admin. Expand Profile info to add additional information about the user.
Select Next, review your new user's settings, make any other changes if necessary, then select Finish adding, then close.
To add multiple users at the same time, follow the recommend steps at Add users and assign licenses - Microsoft 365 admin | Microsoft Docs
Step Three: Configure Google Workspace
Configure email dual delivery to Microsoft 365 and strip attachments:
Follow Google's steps for setting up dual delivery: https://support.google.com/a/answer/9228551?hl=en
Add route for Office 365
- Go the Google Admin console at https://admin.google.com)
- Go to Apps > Google Workspace > Gmail > Hosts.
- Enter a route name. (For example, Microsoft 365)
- Choose ‘Single host' and enter the MX record specified for domain in Microsoft 365 (For example: ContosoLandscaping2-m365master-com.mail.protection.outlook.com)
Smart host method to resolve ATTR35 response code when mail is sent to Exchange on premises/Exchange Online :
- Choose ‘Single host' and enter the MX record for the initial domain of the tenant as the smart host. The initial domain is in the format GUID.onmicrosoft.com. A GUID is a unique value that's provided to every organization as part of their enrollment in the service. A GUID is a 128-bit integer (16 bytes) that can be used across all computers and networks wherever a unique identifier is required.
- You can use command line: nslookup -type MX GUID.onmicrosoft.com to resolve the MX record (For example: contosolandscaping2.mail.protection.outlook.com)
- Choose Port:25
- Proceed with recommended options
Configure route to Office 365
Open the Google Admin console at https://admin.google.com
Go to Apps > Google Workspace > Gmail > Routing
On the Routing tab, select Configure
Enter Name for rule. (For example, Gmail to Office 365)
For email messages to affect, select both Inbound and Internal receiving
Under For the above types of messages, select Modify message
Under Also deliver to, select Add more recipients then select Add to add the secondary mail route.
Under Recipients, select the down arrow "" and select Advanced.
Select Change route.
From the list, select the secondary mail route you created earlier
Under Attachments, select Remove attachments from message
Scroll down and select Save.
Add your subdomain in Google workspace to receive email from Microsoft 365.
Next, you'll create forwarding rules on Microsoft 365 mailboxes to your subdomain. Choose a subdomain to use in Google Workspace to receive email from Microsoft 365 (For example, g.contosolandscaping2.m365master.com)
Start at Google Admin console (at admin.google.com)
Go to Account > Domains > Manage Domains
Select Add a domain
Enter the domain name you selected
Select user alias domain
Select Add domain & start verification
Wait for verification to complete and refresh the page
Select Activate Gmail
Choose Skip MX record setup and then select NEXT
On the Route mail to another server dialog, take note of the server to route mail to (For example, aspmx.l.google.com) and select I use another mail server
Allow email from Microsoft 365 to bypass SPAM filter
Find an appropriate header from the Microsoft 365 tenant by sending an email to a user on Google workspace.
Open the message and select Show Original
Choose an email header that uniquely identifies mail coming from your Microsoft 365 tenant. (For example, X-MS-Exchange-CrossTenant-id: 92f60fc7-eab3-403b-9d7d-9d683bf0a4b5)
Go to Google Admin console at https://admin.google.com
Go to Apps > Google Workspace > Gmail > Compliance
Navigate to Content Compliance and select Configure
Give the setting a name. For example, Allowlist Microsoft 365 email.
Under email messages to affect check Inbound
Under Add expressions that describe the content you want to search for in each message select if ANY of the following match the message
Under Expressions, select Add xi. Under Add setting, choose Advanced content match
Under Location choose Full Headers
Under Match Type choose Full Text
Under content, enter the email header that uniquely identifies email coming from your Microsoft 365 tenant (For example, X-MS-Exchange-CrossTenant-id: 92f60fc7-eab3-403b-9d7d-9d683bf0a4b5)
Select Save
In the If the above expressions match, do the following field > Modify Message and check Bypass spam filter for this message under Spam.
Select Save
Step Four: Configure Microsoft 365 settings for the integration
Configure connector to route mail from Microsoft 365 to Gmail:
Go to the Microsoft Admin Center at https://admin.microsoft.com/AdminPortal
Select Show all in the left-hand navigation menu.
Under Admin centers, select Exchange to open the Exchange admin center in a new tab
In the Exchange admin center's left-hand navigation menu, select Mail flow > Connectors, open the overflow menu (...) and select Add a connector
Under Connection from in the new connector window, select Office 365
Under Connection to select your organization's email server then select Next
Enter a Name for the new connector (Ex: To Gmail) and continue Next
In the Use of Connector section, select Only when I have a transport rule set up that redirects messages to this connector and select Next.
In the Routing section, enter the appropriate smart mail host (For example, aspmx.l.google.com), select +, and then continue Next.
In the Security restrictions section, accept the default settings by selecting Next
In the Validation email section, enter a valid email address for the Gmail system (For example, johannal@g.contosolandscaping2.m365master.com), select the plus sign (+), and then select Validate
Wait for validation to complete and if successful press Next
Under Review connector, verify configuration is correct and press Create Connector
When you see the Connector created notification, press Done
Forward mail from Microsoft 365 mailboxes to Gmail:
Use the Microsoft 365 Admin Center to update each mailbox or you can use a PowerShell script, such as the following:
$forwardingDomain = "g.contosolandscaping2.m365master.com"
Connect-ExchangeOnline
$Mailboxes = Get-Mailbox -ResultSize Unlimited -Filter {RecipientTypeDetails -eq "UserMailbox"}
Foreach ($mbx in $mailboxes) {

Set-Mailbox $mbx.Identity -DeliverToMailboxAndForward $true -ForwardingSMTPAddress $($mbx.Alias,$forwardingDomain -join "@")
}
Troubleshooting Connect-ExchangeOnline:
Are you experiencing an error when running Connect-ExchangeOnline? This could be the result of your organization's automatic email forwarding rule. By default, automatic forwarding is disabled. In order to connect Teams Essentials to Google Workspace, the rule must be enabled.
Enter the following script:
Set-ExecutionPolicy UnrestrictedAfterwards, run the following commands:
Enable-OrganizationCustomization
Get-HostOutboundSpamFilterPolicy | set-HostedOutboundSpamFilterPolicy -AutoForwardingMode On
Configure Exchange Online direct to calendar transport rule:
Configuring this setting will automatically accept calendar invites so that they show up in Teams calendar without requiring users to interact with the invite in Outlook Web App.
The following script can be used to create the transport rules:
Connect-ExchangeOnline
New-TransportRule -Name "Direct to Calendar" -MessageTypeMatches Calendaring -SetHeaderName "X-MS-Exchange-Organization-CalendarBooking-Response" -SetHeaderValue Tentative
New-TransportRule -Name "Direct to Calendar triage action" -MessageTypeMatches Calendaring -SetHeaderName "X-MS-Exchange-Organization-CalendarBooking-TriageAction" -SetHeaderValue MoveToDeletedItems
Disable Outlook on the web for mailboxes:
Follow the instructions at Enable or disable Outlook on the web for a mailbox in Exchange Online to disable Outlook on the web for mailboxes.
You can disable Outlook on the web using the Exchange Admin Center or PowerShell. You may use the following PowerShell example to disable Outlook on the web for all mailboxes:
Connect-ExchangeOnline
$Mailboxes = Get-Mailbox -ResultSize Unlimited -Filter {RecipientTypeDetails -eq "UserMailbox"}
Foreach ($mbx in $mailboxes) {
Set-CASMailbox $mbx.Identity -OWAEnabled $false
}
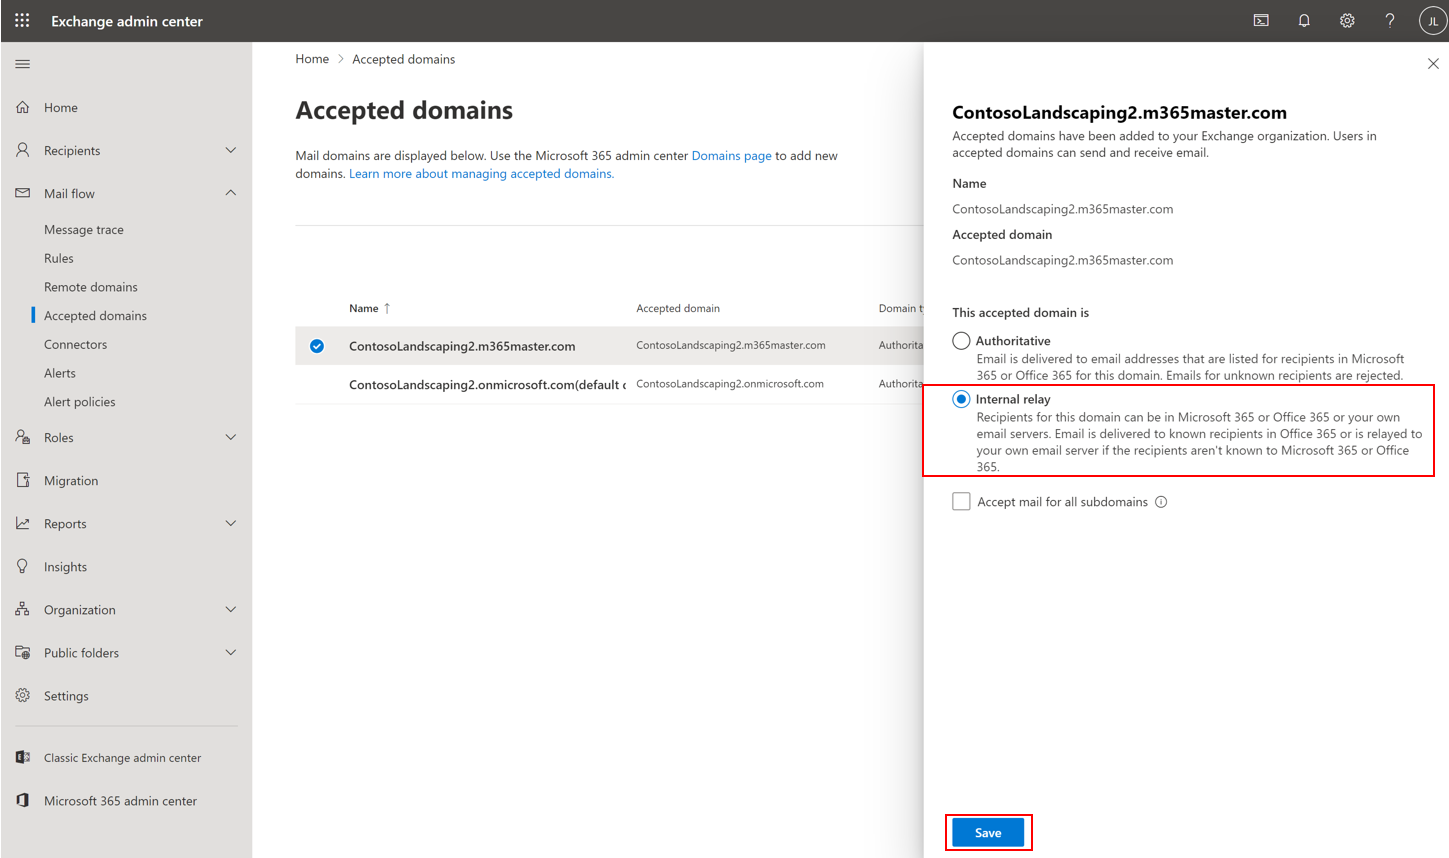
Step Five: Configure Exchange Online domain for internal relay
This step ensures that email is sent to third-party system for final resolution.
Go to the Microsoft Admin Center at https://admin.microsoft.com/AdminPortal
In left-hand navigation, select Show all
Under Admin Centers, select Exchange to open Exchange admin center in a new tab
In Exchange admin center, select Mail flow from the left-hand navigation menu, then select Accepted domains
Tap on the domain name configured in the third-party system (For example, contosoLandscaping2.m365master.com)
Select Internal Relay, then click Save
Step Six: Create a rule to delete all inbound mail to Exchange Online except for Calendaring
You can configure this rule in the Exchange Admin Center or PowerShell. You may use the following PowerShell example to create the rule:
Connect-ExchangeOnline
New-TransportRule -Name "Delete all except Calendaring" -ExceptIfMessageTypeMatches Calendaring -FromScope NotInOrganization -DeleteMessage:$true
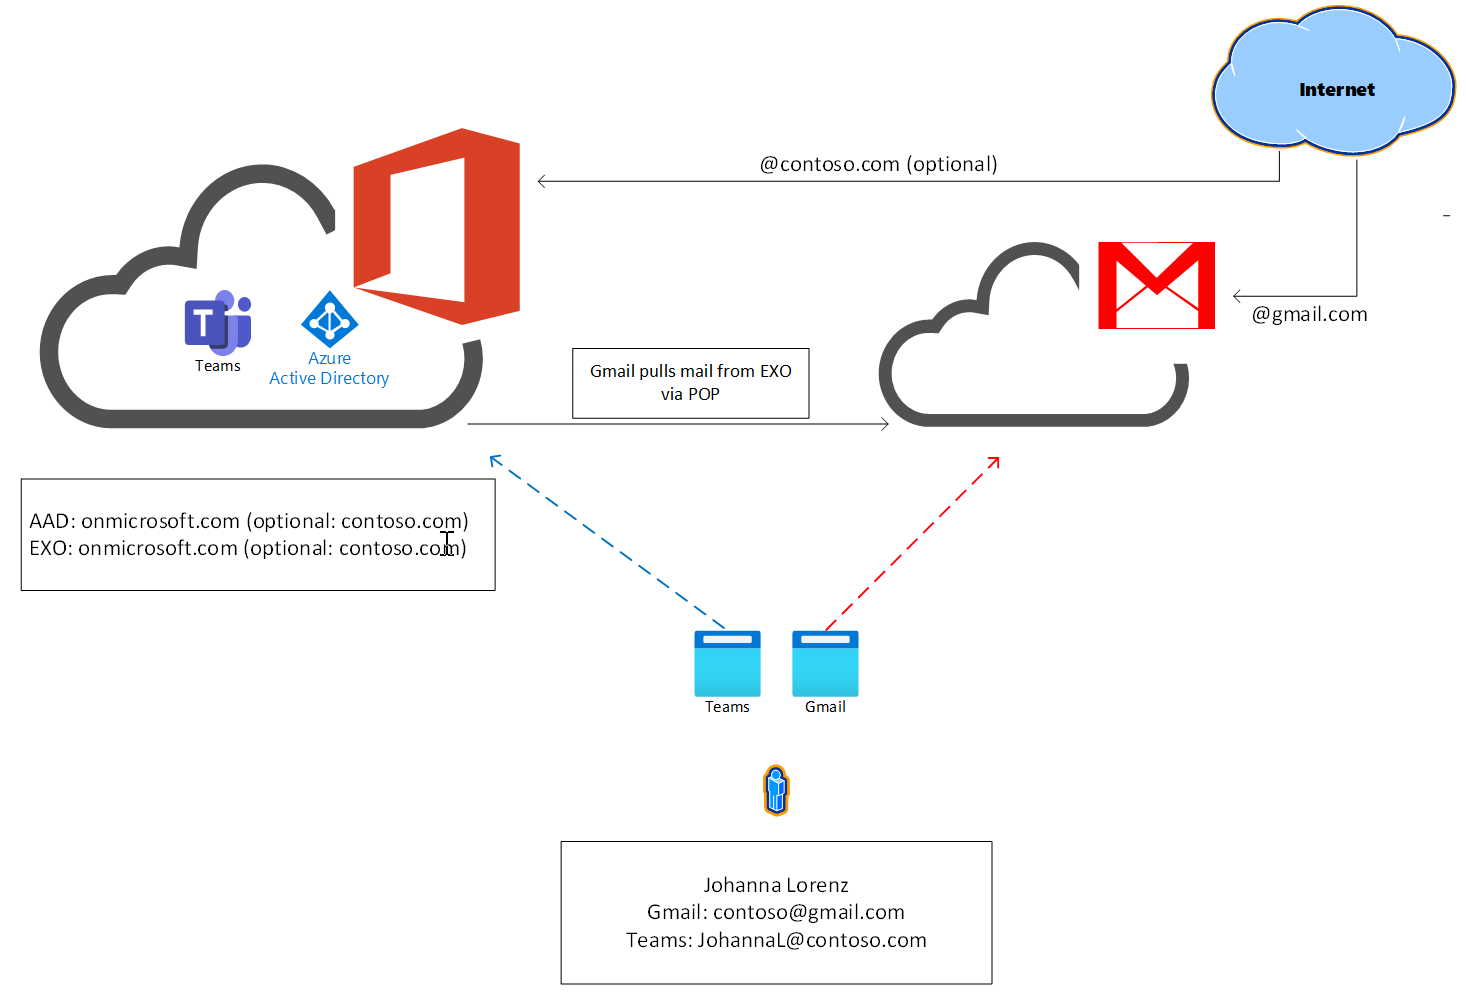
Connect Teams Essentials to third-party email not using vanity domain (Gmail example)
You can schedule and join a Teams meeting directly from Google Workspace by connecting a consumer Gmail account to Teams Essentials with primary reliance on the Teams G Suite Add On. This gives you the opportunity to schedule video and audio conferencing with screen sharing, meeting chat, digital whiteboards, and more.
You will configure Gmail to pull email from Exchange Online to ensure mail generated in Microsoft 365 and Teams arrive successfully in Gmail. Security defaults may need to be disabled to accomplish this connection, which makes using a strong unique password essential. A custom domain isn't required for this scenario, but it can be configured in Microsoft 365 for use in Gmail if you'd like to use one.
1. Ensure that you have a Gmail account set up
If you already have an existing account, you can proceed to the next step. If not, visit Create new Google account to set up a new Gmail account.
2. Set up your Microsoft 365 tenant
Configure Teams Microsoft Entra users:
- Follow the guidance atAdd users and assign licenses to add multiple users
Configure identity protection:
Disable Security defaults if active.
Configure multifactor authentication for users
If using conditional access, be sure to make exception for POP access to mailbox
Add domain to Microsoft 365 Admin Center (optional):
Under navigation, select Settings > Domain, then select Add domain
Enter your domain name in the appropriate field
Follow the instructions on screen to verify your domain with TXT record
When prompted, allow Microsoft to configure DNS
Complete the instructions to verify MX record route to Microsoft 365
Configure SPF TXT record to include Microsoft 365
Complete the instructions for configuring DKIM TXT records for Microsoft 365
Verify DKIM is enabled by logging out and signing back into the Admin center
3. Configure Gmail
Configure Gmail to pull Exchange Online mail into its system
Configure the Teams Calendar add-in
Enable Gmail to use business domain (optional)
Phản hồi
Sắp ra mắt: Trong năm 2024, chúng tôi sẽ dần gỡ bỏ Sự cố với GitHub dưới dạng cơ chế phản hồi cho nội dung và thay thế bằng hệ thống phản hồi mới. Để biết thêm thông tin, hãy xem: https://aka.ms/ContentUserFeedback.
Gửi và xem ý kiến phản hồi dành cho