为联机会议提供商创建 Outlook 加载项
设置联机会议是 Outlook 用户的核心体验,使用 Outlook 创建 Teams 会议很容易。 但是,使用非 Microsoft 服务在 Outlook 中创建联机会议可能很麻烦。 通过实现此功能,服务提供商可以简化其 Outlook 外接程序用户的联机会议创建和加入体验。
重要
Outlook 网页版、Windows (经典版和具有 Microsoft 365 订阅的) ) 、Mac、Android 和 iOS (中 支持此功能。
本文介绍如何设置 Outlook 加载项,使用户能够使用联机会议服务组织和加入会议。 在本文中,我们将使用虚构的联机会议服务提供商“Contoso”。
设置环境
完成 Outlook 快速入门 ,该快速入门使用 Office 加载项的 Yeoman 生成器创建外接程序项目。
配置清单
若要使用户能够使用加载项创建联机会议,必须配置清单。 标记因两个变量而异:
- 目标平台的类型;移动或非移动。
- 清单的类型; Microsoft 365 的 XML 或统一清单 (预览版) 。
如果你的外接程序使用 XML 清单,并且外接程序将仅在 Outlook 网页版、Windows (经典和新 (预览) ) 和 Mac 中受支持,请选择 Windows、Mac、Web 选项卡以获取指导。 但是,如果 Android 版和 iOS 版 Outlook 也支持您的外接程序,请选择“ 移动 ”选项卡。
如果外接程序使用统一清单 (预览版) ,请选择 “Microsoft 365 (开发人员预览版的统一清单) 选项卡。
重要
联机会议提供商尚不支持统一清单 (预览版) 。 我们正在努力尽快提供这种支持。
在代码编辑器中,打开创建的 Outlook 快速入门项目。
打开位于项目根目录处的 manifest.xml 文件。
选择整个 <VersionOverrides> 节点 (包括打开和关闭标记) ,并将其替换为以下 XML。
<VersionOverrides xmlns="http://schemas.microsoft.com/office/mailappversionoverrides" xsi:type="VersionOverridesV1_0">
  <VersionOverrides xmlns="http://schemas.microsoft.com/office/mailappversionoverrides/1.1" xsi:type="VersionOverridesV1_1">
    <Description resid="residDescription"></Description>
    <Requirements>
      <bt:Sets>
        <bt:Set Name="Mailbox" MinVersion="1.3"/>
      </bt:Sets>
    </Requirements>
    <Hosts>
      <Host xsi:type="MailHost">
        <DesktopFormFactor>
          <FunctionFile resid="residFunctionFile"/>
          <ExtensionPoint xsi:type="AppointmentOrganizerCommandSurface">
            <OfficeTab id="TabDefault">
              <Group id="apptComposeGroup">
                <Label resid="residDescription"/>
                <Control xsi:type="Button" id="insertMeetingButton">
                  <Label resid="residLabel"/>
                  <Supertip>
                    <Title resid="residLabel"/>
                    <Description resid="residTooltip"/>
                  </Supertip>
                  <Icon>
                    <bt:Image size="16" resid="icon-16"/>
                    <bt:Image size="32" resid="icon-32"/>
                    <bt:Image size="64" resid="icon-64"/>
                    <bt:Image size="80" resid="icon-80"/>
                  </Icon>
                  <Action xsi:type="ExecuteFunction">
                    <FunctionName>insertContosoMeeting</FunctionName>
                  </Action>
                </Control>
              </Group>
            </OfficeTab>
          </ExtensionPoint>
        </DesktopFormFactor>
      </Host>
    </Hosts>
    <Resources>
      <bt:Images>
        <bt:Image id="icon-16" DefaultValue="https://contoso.com/assets/icon-16.png"/>
        <bt:Image id="icon-32" DefaultValue="https://contoso.com/assets/icon-32.png"/>
        <bt:Image id="icon-48" DefaultValue="https://contoso.com/assets/icon-48.png"/>
        <bt:Image id="icon-64" DefaultValue="https://contoso.com/assets/icon-64.png"/>
        <bt:Image id="icon-80" DefaultValue="https://contoso.com/assets/icon-80.png"/>
      </bt:Images>
      <bt:Urls>
        <bt:Url id="residFunctionFile" DefaultValue="https://contoso.com/commands.html"/>
      </bt:Urls>
      <bt:ShortStrings>
        <bt:String id="residDescription" DefaultValue="Contoso meeting"/>
        <bt:String id="residLabel" DefaultValue="Add a contoso meeting"/>
      </bt:ShortStrings>
      <bt:LongStrings>
        <bt:String id="residTooltip" DefaultValue="Add a contoso meeting to this appointment."/>
      </bt:LongStrings>
    </Resources>
  </VersionOverrides>
</VersionOverrides>
提示
若要了解有关 Outlook 外接程序清单的详细信息,请参阅 Office 加载项清单 和在 移动设备上的 Outlook 中添加对外接程序命令的支持。
实现添加联机会议详细信息
在本部分中,了解加载项脚本如何更新用户的会议以包含联机会议详细信息。 以下内容适用于所有受支持的平台。
在同一快速入门项目中,在代码编辑器中打开文件 ./src/commands/commands.js 。
将 commands.js 文件的全部内容替换为以下 JavaScript。
// 1. How to construct online meeting details.
// Not shown: How to get the meeting organizer's ID and other details from your service.
const newBody = '<br>' +
    '<a href="https://contoso.com/meeting?id=123456789" target="_blank">Join Contoso meeting</a>' +
    '<br><br>' +
    'Phone Dial-in: +1(123)456-7890' +
    '<br><br>' +
    'Meeting ID: 123 456 789' +
    '<br><br>' +
    'Want to test your video connection?' +
    '<br><br>' +
    '<a href="https://contoso.com/testmeeting" target="_blank">Join test meeting</a>' +
    '<br><br>';

let mailboxItem;

// Office is ready.
Office.onReady(function () {
        mailboxItem = Office.context.mailbox.item;
    }
);

// 2. How to define and register a function command named `insertContosoMeeting` (referenced in the manifest)
//    to update the meeting body with the online meeting details.
function insertContosoMeeting(event) {
    // Get HTML body from the client.
    mailboxItem.body.getAsync("html",
        { asyncContext: event },
        function (getBodyResult) {
            if (getBodyResult.status === Office.AsyncResultStatus.Succeeded) {
                updateBody(getBodyResult.asyncContext, getBodyResult.value);
            } else {
                console.error("Failed to get HTML body.");
                getBodyResult.asyncContext.completed({ allowEvent: false });
            }
        }
    );
}
// Register the function.
Office.actions.associate("insertContosoMeeting", insertContosoMeeting);

// 3. How to implement a supporting function `updateBody`
//    that appends the online meeting details to the current body of the meeting.
function updateBody(event, existingBody) {
    // Append new body to the existing body.
    mailboxItem.body.setAsync(existingBody + newBody,
        { asyncContext: event, coercionType: "html" },
        function (setBodyResult) {
            if (setBodyResult.status === Office.AsyncResultStatus.Succeeded) {
                setBodyResult.asyncContext.completed({ allowEvent: true });
            } else {
                console.error("Failed to set HTML body.");
                setBodyResult.asyncContext.completed({ allowEvent: false });
            }
        }
    );
}
测试和验证
按照常规指南测试和验证加载项,然后在 Outlook 网页版、Windows (经典版或新版 (预览版) ) 或 Mac 上旁加载清单。 如果加载项还支持移动设备,请在旁加载后在 Android 或 iOS 设备上重启 Outlook。 旁加载加载项后,创建一个新会议,并验证是否已将 Microsoft Teams 或 Skype 切换开关替换为你自己的。
创建会议 UI
作为会议组织者,在创建会议时,应会看到类似于以下三个图像的屏幕。


加入会议 UI
作为会议与会者,在查看会议时,应会看到类似于下图的屏幕。

重要
“加入”按钮仅在 Outlook 网页版、Mac、Android、iOS 和新的 Outlook on Windows (预览版) 中受支持。 如果只看到会议链接,但在受支持的客户端中看不到“ 加入 ”按钮,则可能是你的服务的联机会议模板未在我们的服务器上注册。 有关详细信息,请参阅 注册联机会议模板 部分。
注册联机会议模板
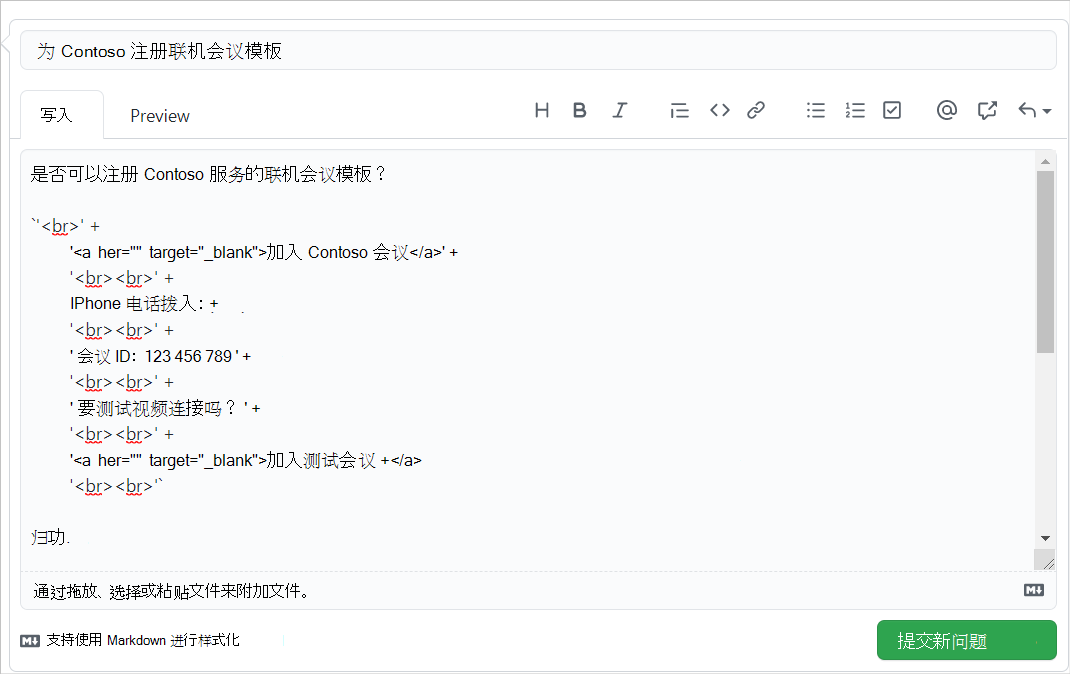
注册联机会议加载项是可选的。 仅当你想要在会议中显示“ 加入 ”按钮以及会议链接时,它才适用。 开发联机会议加载项并想要注册它后,请使用以下指南创建 GitHub 问题。 我们将联系你以协调注册时间线。
重要
“加入”按钮仅在 Outlook 网页版、Mac、Android、iOS 和新的 Outlook on Windows (预览版) 中受支持。
- 创建新的 GitHub 问题。
- 将新问题的 标题 设置为“Outlook:为 my-service 注册联机会议模板”,并将
my-service替换为服务名称。 - 在问题正文中,将现有文本替换为在本文前面实现添加联机会议详细信息部分中的 或类似变量中设置
newBody的字符串。 - 单击“ 提交新问题”。
可用 API
以下 API 可用于此功能。
- 约会组织者 API
- Office.context.mailbox.item.body (Body.getAsync、 Body.setAsync)
- Office.context.mailbox.item.end (Time)
- Office.context.mailbox.item.loadCustomPropertiesAsync (CustomProperties)
- Office.context.mailbox.item.location (Location)
- Office.context.mailbox.item.optionalAttendees (收件人)
- Office.context.mailbox.item.requiredAttendees (收件人)
- Office.context.mailbox.item.start (Time)
- Office.context.mailbox.item.subject (Subject)
- Office.context.roamingSettings (RoamingSettings)
- 处理身份验证流
限制
存在一些限制。
- 仅适用于联机会议服务提供商。
- 只有管理员安装的加载项会显示在会议撰写屏幕上,并替换默认的 Teams 或 Skype 选项。 用户安装的加载项不会激活。
- 加载项图标应采用灰度,使用十六进制代码
#919191或其等效的其他 颜色格式。 - 约会组织者 (撰写) 模式中仅支持一个函数命令。
- 加载项应在一分钟的超时期限内更新约会表单中的会议详细信息。 但是,例如,在打开加载项进行身份验证的对话框中花费的任何时间都排除在超时期限之外。
另请参阅
反馈
即将发布:在整个 2024 年,我们将逐步淘汰作为内容反馈机制的“GitHub 问题”,并将其取代为新的反馈系统。 有关详细信息,请参阅:https://aka.ms/ContentUserFeedback。
提交和查看相关反馈