建立彈性磚
彈性磚範本是 Windows 10 中的新功能,可讓您使用配合不同螢幕密度調整的簡易靈活標記語言,設計專屬的磚通知內容。 本文會告訴您如何為 Windows 應用程式建立彈性動態磚。 如需彈性元素和屬性的完整清單,請參閱彈性磚結構描述。
(在設計適用於 Windows 10 的通知時,您仍然可以依喜好使用 Windows 8 磚範本目錄中的預設範本。)
開始使用
安裝通知程式庫。 如果您想要使用 C# 而非 XML 來產生通知,請安裝名為 Microsoft.Toolkit.Uwp.Notifications (搜尋「notifications uwp」) 的 NuGet 套件。 本文提供的 C# 範例是使用 NuGet 套件 1.0.0 版。
安裝通知視覺化工具。 這個免費的 Windows 應用程式可透過在您編輯磚時提供立即的視覺效果預覽,類似 Visual Studio 的 XAML 編輯器/設計檢視,以協助您設計彈性動態磚。 如需詳細資訊,請參閱通知視覺化工具,或從商店下載通知視覺化工具。
如何傳送磚通知
請閱讀我們有關傳送本機磚通知的快速入門。 下面的文件將說明使用彈性磚時擁有的所有可能的視覺效果 UI。
使用方式指導
彈性範本的設計在於應用到不同的外形規格和通知類型。 像是群組和子群組這類元素會將內容連結在一起,而且本身不會影響特定視覺效果行為。 通知的最終外觀應以顯示通知所在的特定裝置為準,無論是手機、平板電腦或桌面裝置,還是另一部裝置。
提示是選用的屬性,可新增至元素以實現特定的視覺效果行為。 提示可以是裝置專用或通知專用。
基本範例
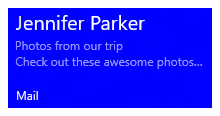
此範例示範彈性磚範本可產生什麼內容。
<tile>
  <visual>

    <binding template="TileMedium">
      ...
    </binding>

    <binding template="TileWide">
      <text hint-style="subtitle">Jennifer Parker</text>
      <text hint-style="captionSubtle">Photos from our trip</text>
      <text hint-style="captionSubtle">Check out these awesome photos I took while in New Zealand!</text>
    </binding>

    <binding template="TileLarge">
      ...
    </binding>

  </visual>
</tile>
TileContent content = new TileContent()
{
    Visual = new TileVisual()
    {
        TileMedium = ...

        TileWide = new TileBinding()
        {
            Content = new TileBindingContentAdaptive()
            {
                Children =
                {
                    new AdaptiveText()
                    {
                        Text = "Jennifer Parker",
                        HintStyle = AdaptiveTextStyle.Subtitle
                    },

                    new AdaptiveText()
                    {
                        Text = "Photos from our trip",
                        HintStyle = AdaptiveTextStyle.CaptionSubtle
                    },

                    new AdaptiveText()
                    {
                        Text = "Check out these awesome photos I took while in New Zealand!",
                        HintStyle = AdaptiveTextStyle.CaptionSubtle
                    }
                }
            }
        },

        TileLarge = ...
    }
};
結果:
磚大小
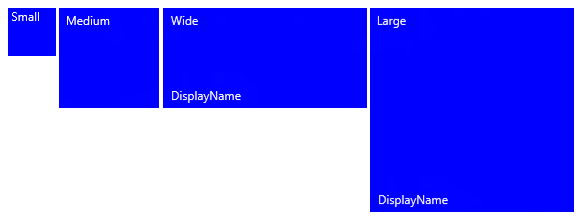
每一種磚大小的內容都會在 XML 承載內個別的 TileBinding 元素中分別指定。 將範本屬性設定為下列其中一個值,以選擇目標大小:
- TileSmall
- TileMedium
- TileWide
- TileLarge (僅適用桌面)
針對單一磚通知 XML 承載,請為您要支援的每一種磚大小提供 <binding> 元素,如下列範例所示:
<tile>
  <visual>

    <binding template="TileSmall">
      <text>Small</text>
    </binding>

    <binding template="TileMedium">
      <text>Medium</text>
    </binding>

    <binding template="TileWide">
      <text>Wide</text>
    </binding>

    <binding template="TileLarge">
      <text>Large</text>
    </binding>

  </visual>
</tile>
TileContent content = new TileContent()
{
    Visual = new TileVisual()
    {
        TileSmall = new TileBinding()
        {
            Content = new TileBindingContentAdaptive()
            {
                Children =
                {
                    new AdaptiveText() { Text = "Small" }
                }
            }
        },

        TileMedium = new TileBinding()
        {
            Content = new TileBindingContentAdaptive()
            {
                Children =
                {
                    new AdaptiveText() { Text = "Medium" }
                }
            }
        },

        TileWide = new TileBinding()
        {
            Content = new TileBindingContentAdaptive()
            {
                Children =
                {
                    new AdaptiveText() { Text = "Wide" }
                }
            }
        },

        TileLarge = new TileBinding()
        {
            Content = new TileBindingContentAdaptive()
            {
                Children =
                {
                    new AdaptiveText() { Text = "Large" }
                }
            }
        }
    }
};
結果:
商標
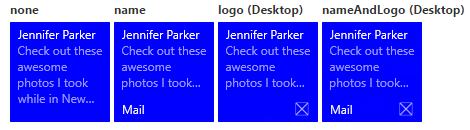
您可以使用通知承載上的商標屬性來控制動態磚底部的商標 (顯示名稱和角落標誌)。 您可以選擇「none」代表不顯示、「name」代表僅顯示名稱、「logo」代表僅顯示標誌,或「nameAndLogo」代表兩者同時顯示。
請注意,Windows Mobile 不支援角落標誌,因此選擇「logo」和「nameAndLogo」的行為在行動裝置上會預設為「name」。
<visual branding="logo">
  ...
</visual>
new TileVisual()
{
    Branding = TileBranding.Logo,
    ...
}
結果:
商標可透過兩種方式之一套用到特定磚大小:
- 藉由在 TileBinding 元素上套用屬性
- 藉由在 TileVisual 元素上套用屬性,這會影響整個通知承載,如果您未指定要繫結的商標,則會使用視覺效果元素上提供的商標。
<tile>
  <visual branding="nameAndLogo">

    <binding template="TileMedium" branding="logo">
      ...
    </binding>

    <!--Inherits branding from visual-->
    <binding template="TileWide">
      ...
    </binding>

  </visual>
</tile>
TileContent content = new TileContent()
{
    Visual = new TileVisual()
    {
        Branding = TileBranding.NameAndLogo,

        TileMedium = new TileBinding()
        {
            Branding = TileBranding.Logo,
            ...
        },

        // Inherits branding from Visual
        TileWide = new TileBinding()
        {
            ...
        }
    }
};
預設商標結果:
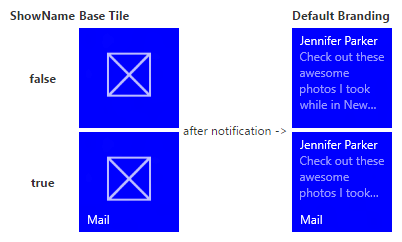
如果您未在通知承載中指定商標,基底磚的屬性將會決定商標。 如果基底磚顯示顯示名稱,則商標將預設為「name」。否則,如果未顯示顯示名稱,商標將會預設為「none」。
請注意,這是從 Windows 8.x 開始的變更,預設商標為「logo」。
Display name
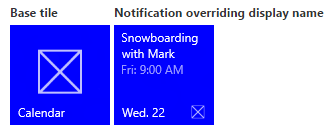
您可以在 displayName 屬性中輸入您選擇的文字字串,以覆寫通知的顯示名稱。 如同商標一樣,您可以在 TileVisual 元素上指定此項,這樣會影響整個通知承載,或在 TileBinding 元素上指定,這樣只會影響個別磚。
Windows Mobile 上的已知問題:如果您為磚指定 ShortName,則不會使用通知中提供的顯示名稱 (一律顯示 ShortName)。
<tile>
  <visual branding="nameAndLogo" displayName="Wednesday 22">

    <binding template="TileMedium" displayName="Wed. 22">
      ...
    </binding>

    <!--Inherits displayName from visual-->
    <binding template="TileWide">
      ...
    </binding>

  </visual>
</tile>
TileContent content = new TileContent()
{
    Visual = new TileVisual()
    {
        Branding = TileBranding.NameAndLogo,
        DisplayName = "Wednesday 22",

        TileMedium = new TileBinding()
        {
            DisplayName = "Wed. 22",
            ...
        },

        // Inherits DisplayName from Visual
        TileWide = new TileBinding()
        {
            ...
        }
    }
};
結果:
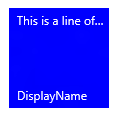
Text
AdaptiveText 元素是用來顯示文字。 您可以使用提示來修改文字顯示的方式。
<text>This is a line of text</text>
new AdaptiveText()
{
    Text = "This is a line of text"
};
結果:
文字換行
根據預設,文字不會換行,而且會繼續超出磚的邊緣。 使用 hint-wrap 屬性可在文字元素上設定文字換行。 您也可以使用 hint-minLines 和 hint-maxLines 來控制最小行數和最大行數,兩者都接受正整數。
<text hint-wrap="true">This is a line of wrapping text</text>
new AdaptiveText()
{
    Text = "This is a line of wrapping text",
    HintWrap = true
};
結果:

文字樣式
樣式可控制文字元素的字型大小、色彩和粗細。 有許多種可用的樣式,包括每一種樣式的「淡色」變化,可將不透明度設定為 60%,通常會使文字色彩帶有淺灰色陰影。
<text hint-style="base">Header content</text>
<text hint-style="captionSubtle">Subheader content</text>
new AdaptiveText()
{
    Text = "Header content",
    HintStyle = AdaptiveTextStyle.Base
},

new AdaptiveText()
{
    Text = "Subheader content",
    HintStyle = AdaptiveTextStyle.CaptionSubtle
}
結果:
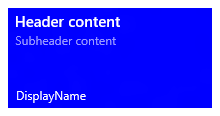
請注意,如果未指定 hint-style,樣式會預設為標題。
基本文字樣式
| <text hint-style="*" /> | 字型高度 | 字型粗細 |
|---|---|---|
| 標題 | 12 個有效像素 (epx) | 一般 |
| 本文 | 15 epx | 一般 |
| base | 15 epx | 半粗體 |
| 子標題 | 20 epx | 一般 |
| title | 24 epx | 半細體 |
| 子標頭 | 34 epx | 淺色 |
| 標頭 | 46 epx | 淺色 |
數字文字樣式變化
這些變化會減少行高,讓上方和下方的內容更靠近文字。
titleNumeral
subheaderNumeral
headerNumeral
淡色文字樣式變化
每一種樣式都有一種淡色變化,可讓文字具有 60% 不透明度,通常會使文字色彩帶有淺灰色陰影。
captionSubtle
bodySubtle
baseSubtle
subtitleSubtle
titleSubtle
titleNumeralSubtle
subheaderSubtle
subheaderNumeralSubtle
headerSubtle
headerNumeralSubtle
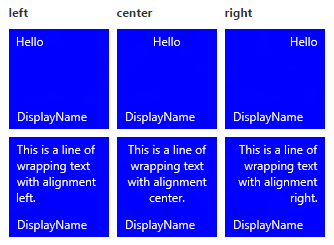
文字對齊
文字可以水平靠左、置中或靠右。 像是英文這類由左至右的語言,文字預設為靠左對齊。 像是阿拉伯文這類由右至左的語言,文字預設為靠右對齊。 您可以使用元素上的 hint-align 屬性手動設定對齊方式。
<text hint-align="center">Hello</text>
new AdaptiveText()
{
    Text = "Hello",
    HintAlign = AdaptiveTextAlign.Center
};
結果:
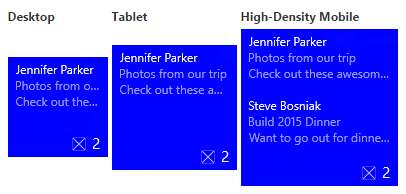
群組和子群組
群組可讓您以語意方式宣告群組內的內容相關,而且必須完整顯示內容才有意義。 例如,您可能有兩個文字元素,一個標頭和一個子標頭,而只顯示標頭無法正確傳達意義。 藉由將這些元素組成子群組,元素將會全部顯示 (如果可容納) 或全部不顯示 (因為無法容納)。
為了在所有裝置和螢幕上提供最佳體驗,請提供多個群組。 擁有多個群組可讓您的磚針對較大的螢幕進行調整。
請注意,群組唯一有效的子系就是子群組。
<binding template="TileWide" branding="nameAndLogo">
  <group>
    <subgroup>
      <text hint-style="subtitle">Jennifer Parker</text>
      <text hint-style="captionSubtle">Photos from our trip</text>
      <text hint-style="captionSubtle">Check out these awesome photos I took while in New Zealand!</text>
    </subgroup>
  </group>

  <text />

  <group>
    <subgroup>
      <text hint-style="subtitle">Steve Bosniak</text>
      <text hint-style="captionSubtle">Build 2015 Dinner</text>
      <text hint-style="captionSubtle">Want to go out for dinner after Build tonight?</text>
    </subgroup>
  </group>
</binding>
TileWide = new TileBinding()
{
    Branding = TileBranding.NameAndLogo,
    Content = new TileBindingContentAdaptive()
    {
        Children =
        {
            CreateGroup(
                from: "Jennifer Parker",
                subject: "Photos from our trip",
                body: "Check out these awesome photos I took while in New Zealand!"),

            // For spacing
            new AdaptiveText(),

            CreateGroup(
                from: "Steve Bosniak",
                subject: "Build 2015 Dinner",
                body: "Want to go out for dinner after Build tonight?")
        }
    }
}

...

private static AdaptiveGroup CreateGroup(string from, string subject, string body)
{
    return new AdaptiveGroup()
    {
        Children =
        {
            new AdaptiveSubgroup()
            {
                Children =
                {
                    new AdaptiveText()
                    {
                        Text = from,
                        HintStyle = AdaptiveTextStyle.Subtitle
                    },
                    new AdaptiveText()
                    {
                        Text = subject,
                        HintStyle = AdaptiveTextStyle.CaptionSubtle
                    },
                    new AdaptiveText()
                    {
                        Text = body,
                        HintStyle = AdaptiveTextStyle.CaptionSubtle
                    }
                }
            }
        }
    };
}
結果:
子群組 (欄)
子群組也可讓您將資料分割成群組內的語意區段。 若是動態磚,這會透過視覺化的方式轉譯為欄。
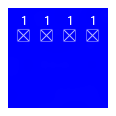
hint-weight 屬性可讓您控制欄寬。 hint-weight 的值是以可用空間的加權比例表示,與 GridUnitType.Star 行為一致。 若是等寬欄,請將每個權數指定為 1。
| hint-weight | 寬度的百分比 |
| 1 | 25% |
| 1 | 25% |
| 1 | 25% |
| 1 | 25% |
| 總權數:4 |
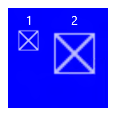
若要將某一欄設為另一欄的兩倍大,請將較小欄的權數指定為 1,並將較大欄的權數指定為 2。
| hint-weight | 寬度的百分比 |
| 1 | 33.3% |
| 2 | 66.7% |
| 總權數:3 |
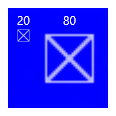
如果您想要讓第一欄佔總寬度的 20%,且第二欄佔總寬度的 80%,請將第一個權數指定為 20,並將第二個權數指定為 80。 如果您的總權數等於 100,則全部都會以百分比顯示。
| hint-weight | 寬度的百分比 |
| 20 | 20% |
| 80 | 80% |
| 總權數:100 |
請注意,欄之間會自動新增 8 像素的邊界。
如果您有兩個以上的子群組,則應指定 hint-weight,它只接受正整數。 如果您未指定第一個子群組的 hint-weight,則會為其指定權數 50。 對於下一個未指定 hint-weight 的子群組,指定的權數會等於 100 減去先前權數的總和,如果結果為零,則會指定 1。 對於其餘未指定 hint-weight 的子群組,將會指定權數 1。
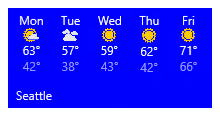
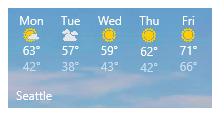
以下是天氣磚的範例程式碼,將示範如何完成具有五個等寬欄的磚:
<binding template="TileWide" displayName="Seattle" branding="name">
  <group>
    <subgroup hint-weight="1">
      <text hint-align="center">Mon</text>
      <image src="Assets\Weather\Mostly Cloudy.png" hint-removeMargin="true"/>
      <text hint-align="center">63°</text>
      <text hint-align="center" hint-style="captionsubtle">42°</text>
    </subgroup>
    <subgroup hint-weight="1">
      <text hint-align="center">Tue</text>
      <image src="Assets\Weather\Cloudy.png" hint-removeMargin="true"/>
      <text hint-align="center">57°</text>
      <text hint-align="center" hint-style="captionsubtle">38°</text>
    </subgroup>
    <subgroup hint-weight="1">
      <text hint-align="center">Wed</text>
      <image src="Assets\Weather\Sunny.png" hint-removeMargin="true"/>
      <text hint-align="center">59°</text>
      <text hint-align="center" hint-style="captionsubtle">43°</text>
    </subgroup>
    <subgroup hint-weight="1">
      <text hint-align="center">Thu</text>
      <image src="Assets\Weather\Sunny.png" hint-removeMargin="true"/>
      <text hint-align="center">62°</text>
      <text hint-align="center" hint-style="captionsubtle">42°</text>
    </subgroup>
    <subgroup hint-weight="1">
      <text hint-align="center">Fri</text>
      <image src="Assets\Weather\Sunny.png" hint-removeMargin="true"/>
      <text hint-align="center">71°</text>
      <text hint-align="center" hint-style="captionsubtle">66°</text>
    </subgroup>
  </group>
</binding>
TileWide = new TileBinding()
{
    DisplayName = "Seattle",
    Branding = TileBranding.Name,
    Content = new TileBindingContentAdaptive()
    {
        Children =
        {
            new AdaptiveGroup()
            {
                Children =
                {
                    CreateSubgroup("Mon", "Mostly Cloudy.png", "63°", "42°"),
                    CreateSubgroup("Tue", "Cloudy.png", "57°", "38°"),
                    CreateSubgroup("Wed", "Sunny.png", "59°", "43°"),
                    CreateSubgroup("Thu", "Sunny.png", "62°", "42°"),
                    CreateSubgroup("Fri", "Sunny.png", "71°", "66°")
                }
            }
        }
    }
}

...

private static AdaptiveSubgroup CreateSubgroup(string day, string image, string highTemp, string lowTemp)
{
    return new AdaptiveSubgroup()
    {
        HintWeight = 1,
        Children =
        {
            new AdaptiveText()
            {
                Text = day,
                HintAlign = AdaptiveTextAlign.Center
            },
            new AdaptiveImage()
            {
                Source = "Assets/Weather/" + image,
                HintRemoveMargin = true
            },
            new AdaptiveText()
            {
                Text = highTemp,
                HintAlign = AdaptiveTextAlign.Center
            },
            new AdaptiveText()
            {
                Text = lowTemp,
                HintAlign = AdaptiveTextAlign.Center,
                HintStyle = AdaptiveTextStyle.CaptionSubtle
            }
        }
    };
}
結果:
影像
<image> 元素用來在磚通知上顯示影像。 影像可內嵌在磚內容中 (預設)、做為內容後方的背景影像,或是從通知頂端以動畫方式進場顯示的預覽影像。
注意
您可以使用來自應用程式套件、應用程式的本機儲存體,或 Web 的影像。 自 Fall Creators Update 開始,一般連線的 Web 影像上限可達 3 MB,計量付費連線可達 1 MB。 在尚未執行 Fall Creators Update 的裝置上,Web 影像不得超過 200 KB。
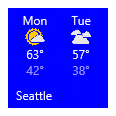
若未指定額外的行為,影像將統一縮小或放大以填滿可用寬度。 此範例示範使用兩欄和內嵌影像的磚。 內嵌影像會延伸以填滿欄寬。
<binding template="TileMedium" displayName="Seattle" branding="name">
  <group>
    <subgroup>
      <text hint-align="center">Mon</text>
      <image src="Assets\Apps\Weather\Mostly Cloudy.png" hint-removeMargin="true"/>
      <text hint-align="center">63°</text>
      <text hint-style="captionsubtle" hint-align="center">42°</text>
    </subgroup>
    <subgroup>
      <text hint-align="center">Tue</text>
      <image src="Assets\Apps\Weather\Cloudy.png" hint-removeMargin="true"/>
      <text hint-align="center">57°</text>
      <text hint-style="captionSubtle" hint-align="center">38°</text>
    </subgroup>
  </group>
</binding>
TileMedium = new TileBinding()
{
    DisplayName = "Seattle",
    Branding = TileBranding.Name,
    Content = new TileBindingContentAdaptive()
    {
        Children =
        {
            new AdaptiveGroup()
            {
                Children =
                {
                    CreateSubgroup("Mon", "Mostly Cloudy.png", "63°", "42°"),
                    CreateSubgroup("Tue", "Cloudy.png", "57°", "38°")
                }
            }
        }
    }
}
...
private static AdaptiveSubgroup CreateSubgroup(string day, string image, string highTemp, string lowTemp)
{
    return new AdaptiveSubgroup()
    {
        Children =
        {
            new AdaptiveText()
            {
                Text = day,
                HintAlign = AdaptiveTextAlign.Center
            },
            new AdaptiveImage()
            {
                Source = "Assets/Weather/" + image,
                HintRemoveMargin = true
            },
            new AdaptiveText()
            {
                Text = highTemp,
                HintAlign = AdaptiveTextAlign.Center
            },
            new AdaptiveText()
            {
                Text = lowTemp,
                HintAlign = AdaptiveTextAlign.Center,
                HintStyle = AdaptiveTextStyle.CaptionSubtle
            }
        }
    };
}
結果:
放置在 <binding> 根目錄中或在第一個群組中的影像,也會配合可用高度進行延伸。
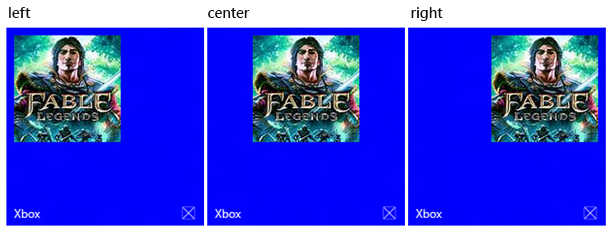
影像對齊
您可以使用 hint-align 屬性將影像設定為靠左、置中或靠右對齊。 這也會使得影像以原生解析度顯示,而不會延伸以填滿寬度。
<binding template="TileLarge">
  <image src="Assets/fable.jpg" hint-align="center"/>
</binding>
TileLarge = new TileBinding()
{
    Content = new TileBindingContentAdaptive()
    {
        Children =
        {
            new AdaptiveImage()
            {
                Source = "Assets/fable.jpg",
                HintAlign = AdaptiveImageAlign.Center
            }
        }
    }
}
結果:
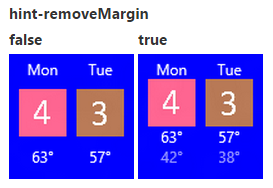
影像邊界
根據預設,內嵌影像與其上方或下方內容之間有 8 個像素的邊界。 您可以使用影像上的 hint-removeMargin 屬性移除此邊界。 不過,影像一律會與磚邊緣之間保留 8 個像素邊界,而子群組 (欄) 一律會在欄之間保留 8 個像素邊框間距。
<binding template="TileMedium" branding="none">
  <group>
    <subgroup>
      <text hint-align="center">Mon</text>
      <image src="Assets\Numbers\4.jpg" hint-removeMargin="true"/>
      <text hint-align="center">63°</text>
      <text hint-style="captionsubtle" hint-align="center">42°</text>
    </subgroup>
    <subgroup>
      <text hint-align="center">Tue</text>
      <image src="Assets\Numbers\3.jpg" hint-removeMargin="true"/>
      <text hint-align="center">57°</text>
      <text hint-style="captionsubtle" hint-align="center">38°</text>
    </subgroup>
  </group>
</binding>
TileMedium = new TileBinding()
{
    Branding = TileBranding.None,
    Content = new TileBindingContentAdaptive()
    {
        Children =
        {
            new AdaptiveGroup()
            {
                Children =
                {
                    CreateSubgroup("Mon", "4.jpg", "63°", "42°"),
                    CreateSubgroup("Tue", "3.jpg", "57°", "38°")
                }
            }
        }
    }
}

...

private static AdaptiveSubgroup CreateSubgroup(string day, string image, string highTemp, string lowTemp)
{
    return new AdaptiveSubgroup()
    {
        HintWeight = 1,
        Children =
        {
            new AdaptiveText()
            {
                Text = day,
                HintAlign = AdaptiveTextAlign.Center
            },
            new AdaptiveImage()
            {
                Source = "Assets/Numbers/" + image,
                HintRemoveMargin = true
            },
            new AdaptiveText()
            {
                Text = highTemp,
                HintAlign = AdaptiveTextAlign.Center
            },
            new AdaptiveText()
            {
                Text = lowTemp,
                HintAlign = AdaptiveTextAlign.Center,
                HintStyle = AdaptiveTextStyle.CaptionSubtle
            }
        }
    };
}
影像裁剪
使用 hint-crop 屬性可以將影像裁剪成圓形,此屬性目前僅支援「none」(預設) 或「circle」值。
<binding template="TileLarge" hint-textStacking="center">
  <group>
    <subgroup hint-weight="1"/>
    <subgroup hint-weight="2">
      <image src="Assets/Apps/Hipstame/hipster.jpg" hint-crop="circle"/>
    </subgroup>
    <subgroup hint-weight="1"/>
  </group>

  <text hint-style="title" hint-align="center">Hi,</text>
  <text hint-style="subtitleSubtle" hint-align="center">MasterHip</text>
</binding>
TileLarge = new TileBinding()
{
    Content = new TileBindingContentAdaptive()
    {
        TextStacking = TileTextStacking.Center,
        Children =
        {
            new AdaptiveGroup()
            {
                Children =
                {
                    new AdaptiveSubgroup() { HintWeight = 1 },
                    new AdaptiveSubgroup()
                    {
                        HintWeight = 2,
                        Children =
                        {
                            new AdaptiveImage()
                            {
                                Source = "Assets/Apps/Hipstame/hipster.jpg",
                                HintCrop = AdaptiveImageCrop.Circle
                            }
                        }
                    },
                    new AdaptiveSubgroup() { HintWeight = 1 }
                }
            },
            new AdaptiveText()
            {
                Text = "Hi,",
                HintStyle = AdaptiveTextStyle.Title,
                HintAlign = AdaptiveTextAlign.Center
            },
            new AdaptiveText()
            {
                Text = "MasterHip",
                HintStyle = AdaptiveTextStyle.SubtitleSubtle,
                HintAlign = AdaptiveTextAlign.Center
            }
        }
    }
}
結果:

背景圖像
若要設定背景影像,請將影像元素放在 <binding> 的根目錄中,並將位置屬性設定為「background」。
<binding template="TileWide">
  <image src="Assets\Mostly Cloudy-Background.jpg" placement="background"/>
  <group>
    <subgroup hint-weight="1">
      <text hint-align="center">Mon</text>
      <image src="Assets\Weather\Mostly Cloudy.png" hint-removeMargin="true"/>
      <text hint-align="center">63°</text>
      <text hint-align="center" hint-style="captionsubtle">42°</text>
    </subgroup>
    ...
  </group>
</binding>
TileWide = new TileBinding()
{
    Content = new TileBindingContentAdaptive()
    {
        BackgroundImage = new TileBackgroundImage()
        {
            Source = "Assets/Mostly Cloudy-Background.jpg"
        },

        Children =
        {
            new AdaptiveGroup()
            {
                Children =
                {
                    CreateSubgroup("Mon", "Mostly Cloudy.png", "63°", "42°")
                    ...
                }
            }
        }
    }
}

...

private static AdaptiveSubgroup CreateSubgroup(string day, string image, string highTemp, string lowTemp)
{
    return new AdaptiveSubgroup()
    {
        HintWeight = 1,
        Children =
        {
            new AdaptiveText()
            {
                Text = day,
                HintAlign = AdaptiveTextAlign.Center
            },
            new AdaptiveImage()
            {
                Source = "Assets/Weather/" + image,
                HintRemoveMargin = true
            },
            new AdaptiveText()
            {
                Text = highTemp,
                HintAlign = AdaptiveTextAlign.Center
            },
            new AdaptiveText()
            {
                Text = lowTemp,
                HintAlign = AdaptiveTextAlign.Center,
                HintStyle = AdaptiveTextStyle.CaptionSubtle
            }
        }
    };
}
結果:
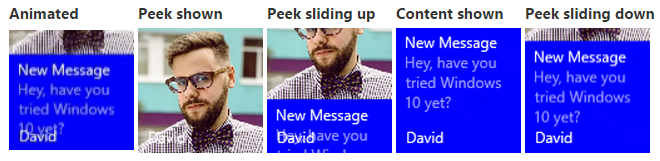
預覽影像
您可以指定從磚頂端進場顯示的「預覽」影像。 預覽影像使用動畫從磚頂端向下/向上滑動、預覽檢視,接著再向外滑動以顯示磚上的主要內容。 若要設定預覽影像,請將影像元素放在 <binding> 的根目錄中,並將位置屬性設定為「peek」。
<binding template="TileMedium" branding="name">
  <image placement="peek" src="Assets/Apps/Hipstame/hipster.jpg"/>
  <text>New Message</text>
  <text hint-style="captionsubtle" hint-wrap="true">Hey, have you tried Windows 10 yet?</text>
</binding>
TileWide = new TileBinding()
{
    Branding = TileBranding.Name,
    Content = new TileBindingContentAdaptive()
    {
        PeekImage = new TilePeekImage()
        {
            Source = "Assets/Apps/Hipstame/hipster.jpg"
        },
        Children =
        {
            new AdaptiveText()
            {
                Text = "New Message"
            },
            new AdaptiveText()
            {
                Text = "Hey, have you tried Windows 10 yet?",
                HintStyle = AdaptiveTextStyle.CaptionSubtle,
                HintWrap = true
            }
        }
    }
}
預覽和背景影像的圓形裁剪
在預覽和背景影像上使用 hint-crop 屬性執行圓形裁剪:
<image placement="peek" hint-crop="circle" src="Assets/Apps/Hipstame/hipster.jpg"/>
new TilePeekImage()
{
    HintCrop = TilePeekImageCrop.Circle,
    Source = "Assets/Apps/Hipstame/hipster.jpg"
}
結果如下所示:

同時使用預覽和背景影像
若要在磚通知上同時使用預覽和背景影像,請在通知承載中同時指定預覽影像和背景影像。
結果如下所示:

預覽和背景影像重疊
您可以使用 hint-overlay 在背景和預覽影像上設定黑色重疊,此屬性可接受 0 到 100 的整數,0 表示無重疊,100 表示全黑重疊。 使用重疊有助於確保磚上的文字可供閱讀。
在背景影像上使用 hint-overlay
您的背景影像會預設為 20% 重疊,前提是您的承載中已有一些文字元素 (否則會預設為 0% 重疊)。
<binding template="TileWide">
  <image placement="background" hint-overlay="60" src="Assets\Mostly Cloudy-Background.jpg"/>
  ...
</binding>
TileWide = new TileBinding()
{
    Content = new TileBindingContentAdaptive()
    {
        BackgroundImage = new TileBackgroundImage()
        {
            Source = "Assets/Mostly Cloudy-Background.jpg",
            HintOverlay = 60
        },

        ...
    }
}
hint-overlay 結果:

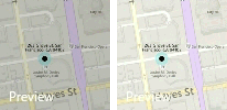
在預覽影像上使用 hint-overlay
在 Windows 10 的 1511 版中,我們也支援預覽影像重疊,就如同背景影像。 在預覽影像元素上指定 0-100 整數的 hint-overlay。 預覽影像的預設重疊為 0 (無重疊)。
<binding template="TileMedium">
  <image hint-overlay="20" src="Assets\Map.jpg" placement="peek"/>
  ...
</binding>
TileMedium = new TileBinding()
{
    Content = new TileBindingContentAdaptive()
    {
        PeekImage = new TilePeekImage()
        {
            Source = "Assets/Map.jpg",
            HintOverlay = 20
        },
        ...
    }
}
此範例顯示 20% 不透明度 (左) 和 0% 不透明度 (右) 的預覽影像:
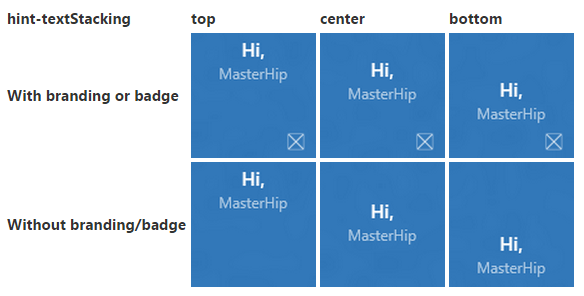
垂直對齊 (文字堆疊)
您可以在 TileBinding 元素和 AdaptiveSubgroup 元素上使用 hint-textStacking 屬性來控制磚上內容的垂直對齊方式。 根據預設,所有內容都會垂直靠上對齊,但您也可以將內容靠下或置中對齊。
binding 元素上的文字堆疊
在 TileBinding 層級套用時,文字堆疊會整體設定通知內容的垂直對齊方式,也就是對齊商標/徽章區域上方的可用垂直空間。
<binding template="TileMedium" hint-textStacking="center" branding="logo">
  <text hint-style="base" hint-align="center">Hi,</text>
  <text hint-style="captionSubtle" hint-align="center">MasterHip</text>
</binding>
TileMedium = new TileBinding()
{
    Branding = TileBranding.Logo,
    Content = new TileBindingContentAdaptive()
    {
        TextStacking = TileTextStacking.Center,
        Children =
        {
            new AdaptiveText()
            {
                Text = "Hi,",
                HintStyle = AdaptiveTextStyle.Base,
                HintAlign = AdaptiveTextAlign.Center
            },

            new AdaptiveText()
            {
                Text = "MasterHip",
                HintStyle = AdaptiveTextStyle.CaptionSubtle,
                HintAlign = AdaptiveTextAlign.Center
            }
        }
    }
}
subgroup 元素上的文字堆疊
在 AdaptiveSubgroup 層級套用時,文字堆疊會設定子群組 (欄) 內容的垂直對齊方式,也就是對齊整個群組內可用的垂直空間。
<binding template="TileWide" branding="nameAndLogo">
  <group>
    <subgroup hint-weight="33">
      <image src="Assets/Apps/Hipstame/hipster.jpg" hint-crop="circle"/>
    </subgroup>
    <subgroup hint-textStacking="center">
      <text hint-style="subtitle">Hi,</text>
      <text hint-style="bodySubtle">MasterHip</text>
    </subgroup>
  </group>
</binding>
TileWide = new TileBinding()
{
    Branding = TileBranding.NameAndLogo,
    Content = new TileBindingContentAdaptive()
    {
        Children =
        {
            new AdaptiveGroup()
            {
                Children =
                {
                    // Image column
                    new AdaptiveSubgroup()
                    {
                        HintWeight = 33,
                        Children =
                        {
                            new AdaptiveImage()
                            {
                                Source = "Assets/Apps/Hipstame/hipster.jpg",
                                HintCrop = AdaptiveImageCrop.Circle
                            }
                        }
                    },

                    // Text column
                    new AdaptiveSubgroup()
                    {
                        // Vertical align its contents
                        TextStacking = TileTextStacking.Center,
                        Children =
                        {
                            new AdaptiveText()
                            {
                                Text = "Hi,",
                                HintStyle = AdaptiveTextStyle.Subtitle
                            },

                            new AdaptiveText()
                            {
                                Text = "MasterHip",
                                HintStyle = AdaptiveTextStyle.BodySubtle
                            }
                        }
                    }
                }
            }
        }
    }
}
相關主題

意見反應
即將登場:在 2024 年,我們將逐步淘汰 GitHub 問題作為內容的意見反應機制,並將它取代為新的意見反應系統。 如需詳細資訊,請參閱:https://aka.ms/ContentUserFeedback。
提交並檢視相關的意見反應