快速入門:Windows 應用程式 SDK 的應用程式通知
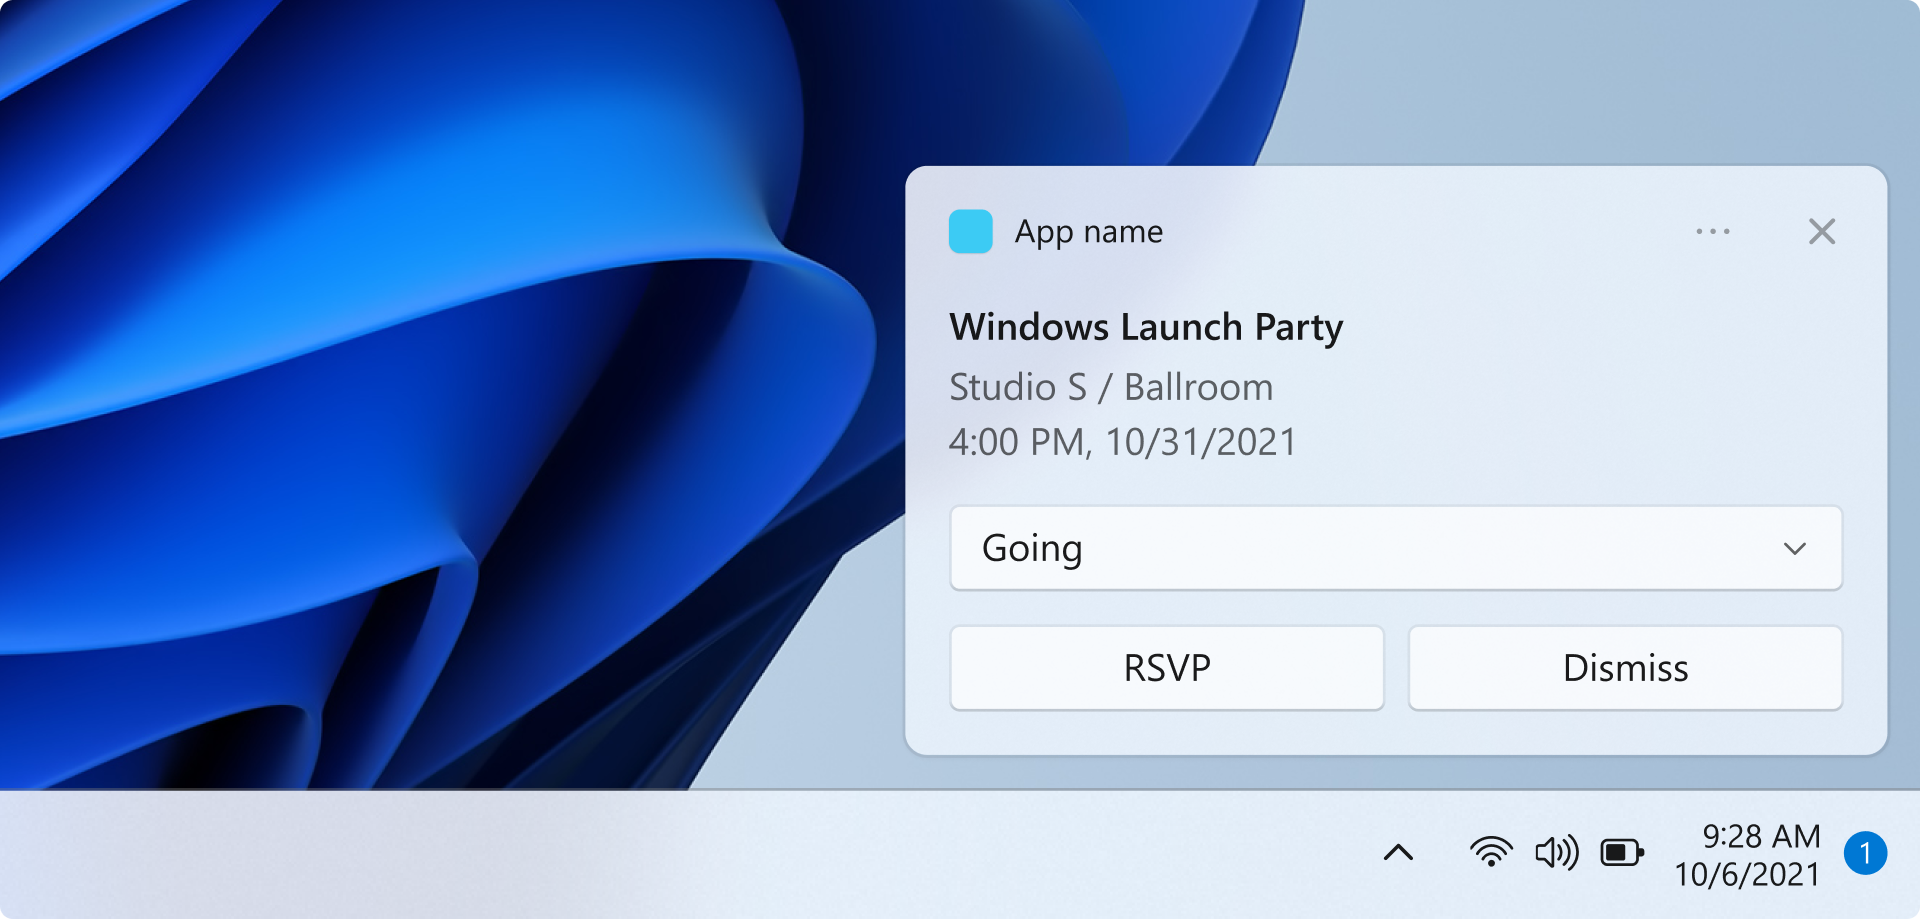
在本快速入門中,您將使用 Windows 應用程式 SDK 建立桌面 Windows 應用程式,讓它傳送與接收本機應用程式通知,亦即快顯通知。
重要
目前不支援高權限 (管理員) 應用程式通知。
必要條件
範例應用程式
本快速入門涵蓋的程式碼來自範例應用程式從 GitHub 找到的通知。
API 參考
如需應用程式通知的 API 參考文件,請參閱 Microsoft.Windows.AppNotifications 命名空間。
步驟 1:新增命名空間宣告
為 Windows 應用程式 SDK 的應用程式通知 Microsoft.Windows.AppNotifications 新增命名空間。
using Microsoft.Windows.AppNotifications;
步驟 2:更新應用程式的資訊清單
如果您的應用程式是未封裝 (亦即在執行階段缺少套件身分識別),請跳至步驟 3:註冊以處理應用程式通知。
如果應用程式已封裝 (包含具有外部位置的封裝):
- 開啟 Package.appxmanifest。
- 新增
xmlns:com="http://schemas.microsoft.com/appx/manifest/com/windows10"和xmlns:desktop="http://schemas.microsoft.com/appx/manifest/desktop/windows10"命名空間到<Package> - 為
windows.toastNotificationActivation新增<desktop:Extension>以宣告 COM 啟動器 CLSID。 您可以在 Visual Studio 中前往 [工具] 之下的 [建立 GUID],藉此取得 CLSID。 - 使用相同 CLSID 為 COM 啟動器新增
<com:Extension>。- 在
Executable屬性指定 .exe 檔案。 登錄應用程式通知時,.exe 檔案呼叫Register()的程序必須相同,詳情請見步驟 3。 在以下範例,我們使用Executable="SampleApp\SampleApp.exe"。 - 指定
Arguments="----AppNotificationActivated:",以便確保 Windows 應用程式 SDK 可將通知的承載視為 AppNotification 類型來處理。 - 指定
DisplayName。
- 在
重要
警告:如果您以 <uap:Protocol> 在應用程式資訊清單定義 Windows.Protocol 應用程式擴充性類型,那麼在按一下通知時,即使應用程式已經在執行,同一個應用程式也會啟動新程序。
<!--Packaged apps only-->
<!--package.appxmanifest-->

<Package
  xmlns:com="http://schemas.microsoft.com/appx/manifest/com/windows10"
  xmlns:desktop="http://schemas.microsoft.com/appx/manifest/desktop/windows10"
  ...
  <Applications>
    <Application>
      ...
      <Extensions>

        <!--Specify which CLSID to activate when notification is clicked-->
        <desktop:Extension Category="windows.toastNotificationActivation">
          <desktop:ToastNotificationActivation ToastActivatorCLSID="replaced-with-your-guid-C173E6ADF0C3" />
        </desktop:Extension>

        <!--Register COM CLSID-->
        <com:Extension Category="windows.comServer">
          <com:ComServer>
            <com:ExeServer Executable="SampleApp\SampleApp.exe" DisplayName="SampleApp" Arguments="----AppNotificationActivated:">
              <com:Class Id="replaced-with-your-guid-C173E6ADF0C3" />
            </com:ExeServer>
          </com:ComServer>
        </com:Extension>

      </Extensions>
    </Application>
  </Applications>
 </Package>
步驟 3:登錄以處理應用程式通知
登錄應用程式以處理通知,並在應用程式終止時取消登錄。
在 App.xaml 檔案中登錄 AppNotificationManager::Default().NotificationInvoked,然後呼叫 AppNotificationManager::Default().Register。 呼叫的順序相當重要。
重要
您必須先呼叫 AppNotificationManager::Default().Register,之後再呼叫 AppInstance.GetCurrent.GetActivatedEventArgs。
應用程式終止時,呼叫 AppNotificationManager::Default().Unregister() 即可清出 COM 伺服器,讓後續的叫用作業可以啟動新程序。
// App.xaml.cs
namespace CsUnpackagedAppNotifications
{

    public partial class App : Application
    {
        private Window mainWindow;
        private NotificationManager notificationManager;

        public App()
        {
            this.InitializeComponent();
            notificationManager = new NotificationManager();
            AppDomain.CurrentDomain.ProcessExit += new EventHandler(OnProcessExit);
        }

        protected override void OnLaunched(LaunchActivatedEventArgs args)
        {
            mainWindow = new MainWindow();

            notificationManager.Init();

            // Complete in Step 5

            mainWindow.Activate();
        }

        void OnProcessExit(object sender, EventArgs e)
        {
            notificationManager.Unregister();
        }
    }
}


// NotificationManager.cs
namespace CsUnpackagedAppNotifications
{
    internal class NotificationManager
    {
        private bool m_isRegistered;

        private Dictionary<string, Action<AppNotificationActivatedEventArgs>> c_map;

        public NotificationManager()
        {
            m_isRegistered = false;

            // When adding new a scenario, be sure to add its notification handler here.
            c_map = new Dictionary<int, Action<AppNotificationActivatedEventArgs>>();
            c_map.Add(ToastWithAvatar.ScenarioId, ToastWithAvatar.NotificationReceived);
            c_map.Add(ToastWithTextBox.ScenarioId, ToastWithTextBox.NotificationReceived);
        }

        ~NotificationManager()
        {
            Unregister();
        }

        public void Init()
        {
            // To ensure all Notification handling happens in this process instance, register for
            // NotificationInvoked before calling Register(). Without this a new process will
            // be launched to handle the notification.
            AppNotificationManager notificationManager = AppNotificationManager.Default;

            notificationManager.NotificationInvoked += OnNotificationInvoked;

            notificationManager.Register();
            m_isRegistered = true;
        }

        public void Unregister()
        {
            if (m_isRegistered)
            {
                AppNotificationManager.Default.Unregister();
                m_isRegistered = false;
            }
        }

        public void ProcessLaunchActivationArgs(AppNotificationActivatedEventArgs notificationActivatedEventArgs)
        {
            // Complete in Step 5
        }

    }
}
步驟 4:顯示應用程式通知
您必須完成步驟 3:註冊以處理應用程式通知再繼續操作。
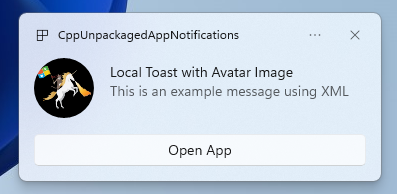
接下來您會使用 appLogoOverride 影像和按鈕顯示簡單的應用程式通知。
使用 AppNotificationBuilder 類別建構應用程式通知,然後呼叫 Show。 如需詳細了解如何使用 XML 建構應用程式通知,請參考快顯內容和通知的 XML 結構描述的範例。
注意
如果應用程式已封裝 (包含具有外部位置的封裝),則位於通知左上角的應用程式圖示會取自 package.manifest。 如果應用程式未封裝,則系統首先會尋找捷徑,再查看應用程式程序中的資源檔案,從中取得圖示。 如果所有嘗試都失敗,系統就會使用 Windows 預設應用程式圖示。 支援的圖示檔案類型有 .jpg、.png、.bmp 和 .ico。
// ToastWithAvatar.cs
class ToastWithAvatar
{
    public const int ScenarioId = 1;
    public const string ScenarioName = "Local Toast with Avatar Image";

    public static bool SendToast()
    {
        var appNotification = new AppNotificationBuilder()
            .AddArgument("action", "ToastClick")
            .AddArgument(Common.scenarioTag, ScenarioId.ToString())
            .SetAppLogoOverride(new System.Uri("file://" + App.GetFullPathToAsset("Square150x150Logo.png")), AppNotificationImageCrop.Circle)
            .AddText(ScenarioName)
            .AddText("This is an example message using XML")
            .AddButton(new AppNotificationButton("Open App")
                .AddArgument("action", "OpenApp")
                .AddArgument(Common.scenarioTag, ScenarioId.ToString()))
            .BuildNotification();

        AppNotificationManager.Default.Show(appNotification);

        return appNotification.Id != 0; // return true (indicating success) if the toast was sent (if it has an Id)
    }

    public static void NotificationReceived(AppNotificationActivatedEventArgs notificationActivatedEventArgs)
    {
        // Complete in Step 5
    }
}

// Call SendToast() to send a notification.
步驟 5:處理使用者選取通知的方式
使用者可能選取通知的內文或按鈕。 您的應用程式必須處理系統回應使用者與通知互動時的引動過程。
這個處理過程有兩種常見方式:
- 您可以選擇讓應用程式以特定 UI 脈絡啟動,或
- 您可以選擇讓應用程式評估特定動作的行為 (比如按下通知內文),但不呈現任何 UI。 這也稱為背景動作。
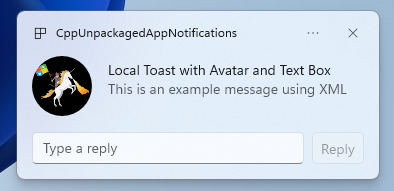
下方的程式碼範例並非來自範本應用程式,但它可說明這兩種處理使用者產生動作的方式。 將 launch 值 (對應使用者按一下通知內文)、input 元素 (快速回應文字框) 及內含 arguments 值的按鈕 (對應使用者按一下按鈕) 新增到通知的 XML 承載。 在 ProcessLaunchActivationArgs,封裝每個引數。
重要
桌面應用程式會忽視您在通知的 XML 承載設定的 activationType="background"。 您必須處理啟動引數,並決定是否要按照本步驟的描述顯示視窗。
// Example of how to process a user either selecting the notification body or inputting a quick reply in the text box.
// Notification XML payload
//<toast launch="action=openThread&threadId=92187">
// <visual>
// <binding template="ToastGeneric">
// <image placement="appLogoOverride" hint-crop="circle" src="C:\<fullpath>\Logo.png"/>
// <text>Local Toast with Avatar and Text box</text>
// <text>This is an example message using</text>
// </binding>
// </visual>
// <actions>
// <input id="replyBox" type="text" placeHolderContent="Reply" />
// <action
// content="Send"
// hint-inputId="replyBox"
// arguments="action=reply&threadId=92187" />
// </actions>
//</toast>
void ProcessLaunchActivationArgs(const winrt::AppNotificationActivatedEventArgs& notificationActivatedEventArgs)
{
// If the user clicks on the notification body, your app needs to launch the chat thread window
if (std::wstring(notificationActivatedEventArgs.Argument().c_str()).find(L"openThread") != std::wstring::npos)
{
GenerateChatThreadWindow();
}
else // If the user responds to a message by clicking a button in the notification, your app needs to reply back to the other user with no window launched
if (std::wstring(notificationActivatedEventArgs.Argument().c_str()).find(L"reply") != std::wstring::npos)
{
auto input = notificationActivatedEventArgs.UserInput();
auto replyBoxText = input.Lookup(L"replyBox");
// Process the reply text
SendReplyToUser(replyBoxText);
}
}
請按照以下指引操作:
- 如果使用者選取通知時應用程式並非正在執行,應用程式預期會啟動,使用者可依照通知脈絡看到前景視窗。
- 如果使用者選取通知時應用程式已最小化,應用程式預期會顯示在前景,並依照通知的脈絡呈現新視窗。
- 如果使用者引發了通知背景動作 (比如使用者在通知的文字框輸入文字並點擊回覆,藉此回應通知),應用程式會處理承載,但不會呈現前景視窗。
請參閱 GitHub 的範例應用程式程式碼查看詳細範例。
步驟 6:移除通知
通知如與使用者不再相關,將之移除。
在本範例,使用者已看過應用程式中所有群組聊天的訊息,因此您要清除群組聊天的全部通知。 接下來,使用者會將好友設為靜音,因此您要清除該好友的全部通知。 顯示通知之前,您要先將 Group 和 Tag 屬性新增到通知,接下來才能識別通知。
void SendNotification(winrt::hstring const& payload, winrt::hstring const& friendId, winrt::hstring const& groupChatId)
{
    winrt::AppNotification notification(payload);

    // Setting Group Id here allows clearing notifications from a specific chat group later
    notification.Group(groupChatId);

    // Setting Tag Id here allows clearing notifications from a specific friend later
    notification.Tag(friendId);

    winrt::AppNotificationManager::Default().Show(notification);
}

winrt::Windows::Foundation::IAsyncAction RemoveAllNotificationsFromGroupChat(const std::wstring groupChatId)
{
    winrt::AppNotificationManager manager = winrt::AppNotificationManager::Default();
    co_await manager.RemoveByGroupAsync(groupChatId);
}

winrt::Windows::Foundation::IAsyncAction RemoveAllNotificationsFromFriend(const std::wstring friendId)
{
    winrt::AppNotificationManager manager = winrt::AppNotificationManager::Default();
    co_await manager.RemoveByTagAsync(friendId);
}
其他功能
傳送取自雲端的應用程式通知
若要從雲端傳送應用程式通知,請依照快速入門:Windows 應用程式 SDK 中的推播通知傳送雲端來源應用程式通知。
設定到期時間。
如果通知中的訊息為時效限定,請使用 Expiration 屬性為應用程式通知設定到期時間。 舉例來說,如果您要傳送行事曆事件提醒,請對行事曆事件設定結束的到期時間。
注意
預設的最大到期時間為 3 天。
class ToastWithAvatar
{
    public static bool SendToast()
    {

        var appNotification = new AppNotificationBuilder()
            .SetAppLogoOverride(new System.Uri("ms-appx:///images/logo.png"), AppNotificationImageCrop.Circle)
            .AddText("Example expiring notification")
            .AddText("This is an example message")
            .BuildNotification();


        appNotification.Expiration = DateTime.Now.AddDays(1);
        AppNotificationManager.Default.Show(appNotification);

        return appNotification.Id != 0; // return true (indicating success) if the toast was sent (if it has an Id)
    }
}
確保通知於重新啟動時到期
如果您想在重新啟動時刪除通知,請將 ExpiresOnReboot 屬性設為 True。
class ToastWithAvatar
{
    public static bool SendToast()
    {

        var appNotification = new AppNotificationBuilder()
            .SetAppLogoOverride(new System.Uri("ms-appx:///images/logo.png"), AppNotificationImageCrop.Circle)
            .AddText("Example ExpiresOnReboot notification")
            .AddText("This is an example message")
            .BuildNotification();


            appNotification.ExpiresOnReboot = true;
            AppNotificationManager.Default.Show(appNotification);

            return appNotification.Id != 0; // return true (indicating success) if the toast was sent (if it has an Id)
    }
}
傳誦與更新進度列通知
您可以在通知中顯示與更新相關的進度列:
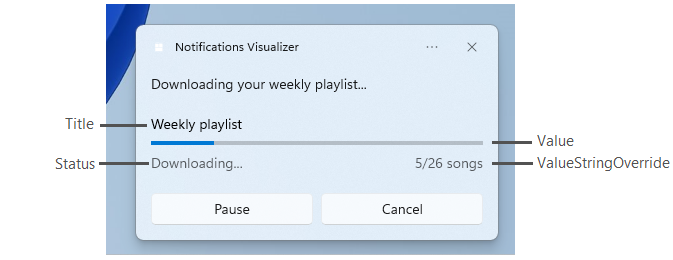
使用 AppNotificationProgressData 建構來更新進度列通知。
const winrt::hstring c_tag = L"weekly-playlist";
const winrt::hstring c_group = L"downloads";

// Send first Notification Progress Update
void SendUpdatableNotificationWithProgress()
{
    auto notification{ winrt::AppNotificationBuilder()
            .AddText(L"Downloading this week's new music...")
            .AddProgressBar(winrt::AppNotificationProgressBar()
                .BindTitle()
                .BindValue()
                .BindValueStringOverride()
                .BindStatus())
            .BuildNotification() }

    notification.Tag(c_tag);
    notification.Group(c_group);

    // Assign initial values for first notification progress UI
    winrt::AppNotificationProgressData data(1); // Sequence number
    data.Title(L"Weekly playlist"); // Binds to {progressTitle} in xml payload
    data.Value(0.6); // Binds to {progressValue} in xml payload
    data.ValueStringOverride(L"15/26 songs"); // Binds to {progressValueString} in xml payload
    data.Status(L"Downloading..."); // Binds to {progressStatus} in xml payload

    notification.Progress(data);
    winrt::AppNotificationManager::Default().Show(notification);
}

// Send subsequent progress updates
winrt::Windows::Foundation::IAsyncAction UpdateProgressAsync()
{
    // Assign new values
    winrt::AppNotificationProgressData data(2 /* Sequence number */ );
    data.Title(L"Weekly playlist"); // Binds to {progressTitle} in xml payload
    data.Value(0.7); // Binds to {progressValue} in xml payload
    data.ValueStringOverride(L"18/26 songs"); // Binds to {progressValueString} in xml payload
    data.Status(L"Downloading..."); // Binds to {progressStatus} in xml payload

    auto result = co_await winrt::AppNotificationManager::Default().UpdateAsync(data, c_tag, c_group);
    if (result == winrt::AppNotificationProgressResult::AppNotificationNotFound)
    {
        // Progress Update failed since the previous notification update was dismissed by the user! So account for this in your logic by stopping updates or starting a new Progress Update flow.
    }
}
資源

意見反應
即將登場:在 2024 年,我們將逐步淘汰 GitHub 問題作為內容的意見反應機制,並將它取代為新的意見反應系統。 如需詳細資訊,請參閱:https://aka.ms/ContentUserFeedback。
提交並檢視相關的意見反應