How To: Migrate to AlwaysOn AlwaysOn from Prior Deployments Combining Database Mirroring and Log Shipping – Part 1
Writer: Cephas Lin (Microsoft)
Contributors: Oleg Bulanyy (Microsoft), Jimmy May (Microsoft)
This blog series is a follow-up to my whitepaper Migration Guide: Migrating to AlwaysOn Availability Groups from Prior Deployments Combining Database Mirroring and Log Shipping. In this series, I will walk you through the following end-to-end migration scenario inside a test environment:
- From a SQL Server 2008 R2 solution: Database mirroring for high availability and log shipping for disaster recovery
- To a SQL Server 2012 solution: Availability Group for both high availability and disaster recovery
Before I go further, l want to refer you to a whitepaper AlwaysOn Architecture Guide: Building a High Availability and Disaster Recovery Solution by Using AlwaysOn Availability Groups. This is a great architectural guide for anyone who is interested about the end-to-end deployment of the AlwaysOn scenario I'm discussing in this blog.
How to Use This Blog Series
This is a disclaimer similar to the one I have in How To: Migrate from Failover Cluster Instances and Database Mirroring to SQL Server AlwaysOn. My walkthrough steps are to help people get started on implementing a end-to-end migration scenario in a test environment. I have already published prescriptive guidance on the migration scenario in Migration Guide: Migrating to AlwaysOn Availability Groups from Prior Deployments Combining Database Mirroring and Log Shipping. If you are a database architect seeking guidance on migrating your production system to SQL Server AlwaysOn, I advise you to look there first. If you are a database administrator who needs help to get started on migrating your company's database system to SQL Server AlwaysOn, then my blog is for you. To expedite the testing phase of you migration scenario, I recommend that you walk through the entirety of this blog series, which can help you recognize and avoid many issues that can trip you up along the way. Once you have successfully completed the walkthrough in your test environment, you will know what success looks for a generalized scenario. The next natural step continue the testing phase with the specification of your SQL Server deployment.
I cannot emphasize enough: DO NOT apply these migration steps blindly to your production system. To minimize the risks of your actual migration to SQL Server AlwaysOn, test these steps thoroughly against every aspect of your SQL Server deployment (I repeat, in a test environment) and incorporate all the necessary tweaks to accommodate your specific scenario.
Migration Walkthrough Overview
You will walk through the migration procedures as covered in Migration Guide: Migrating to AlwaysOn Availability Groups from Prior Deployments Combining Database Mirroring and Log Shipping Par I – Prescriptive Guidance.
The following table outlines the starting point and the end point of the walkthrough.
Start |
End |
|
|
The four stages of migration as covered in the whitepaper are as follows:
- Online upgrade of the log shipping secondary database server (REMOTE1).
- Online upgrade of the mirror database server (PRIMARY2).
- Online upgrade of the principal database server (PRIMARY1).
- Configuration of an availability group.
If you build the base configuration I prescribe here, you will find a clear path to success in the migration procedure. You can instead use your existing HADR solution as the base configuration, but just realize that I cannot guarantee that my migration steps will work as-is with your HADR solution. In all likelihood, you will need to tweaks as you follow along. Make sure that you test the migration steps thoroughly before attempting the same steps on your production environment.
As client connectivity is an important part of the migration scenario, you will simulate a client workload on the database system to test the HADR capabilities of the system before, during, and after the migration process. In addition, the client workload is used to demonstrate how to configure client applications to work with AlwaysOn Availability Groups.
Industry Best Practices
You should observe all industry best practices in the implementation of your HADR system in general. For example, network redundancy is crucial for a production environment to circumvent outages due to network anomalies. You may notice that I simplify such elements especially in some screenshots, so that they don't become a distraction from the migration steps themselves.
Success Criteria
This walkthrough attempts to balance between a real-life migration environment and requirements and the generalized use case. While it does not possess the complexity of a real-life scenario, a few common migration criteria are included.
- Maintain separation of roles, where applicable (domain administrator, database administrator, application developer).
- Minimize downtime during migration.
- Approximate the high availability and disaster recovery capabilities during migration.
Prerequisites
To prepare the base configuration, you need the following hardware and/or software:
- Hardware to implement the network topology, including servers, switches, and so on. You can simulate the network topology using Hyper-V.
- Windows Server 2008 R2
- SQL Server 2008 R2 SP1 (see note below)
- Visual Studio
- Windows 7
To complete the migration process successfully, you need the following additional software:
- SQL Server 2012 (see note below)
- KB 2494036
NOTE: For more information on all supported version upgrades, see Supported Version and Edition Upgrades. The in-place upgrade described in this blog series does not support upgrade paths from or to Evaluation Editions of SQL Server. Furthermore, you must use an edition of SQL Server that supports database mirroring, log shipping, and AlwaysOn Availability Groups where applicable. The minimum license requirement for completing the walkthrough is summarized below.
SQL Server Developer |
PRIMARY1, PRIMARY2, and REMOTE1 |
SQL Server Express |
WITNESS |
For more information, see Features Supported by the Editions of SQL Server 2012.
Step 0: Setup Base Configuration
So, let's start!
First, you implement the network topology shown in the diagram below. The two subnets simulate the two sites in Contoso Corporation. The client machine simulates a write workload on the SQL Server instances during the migration process.
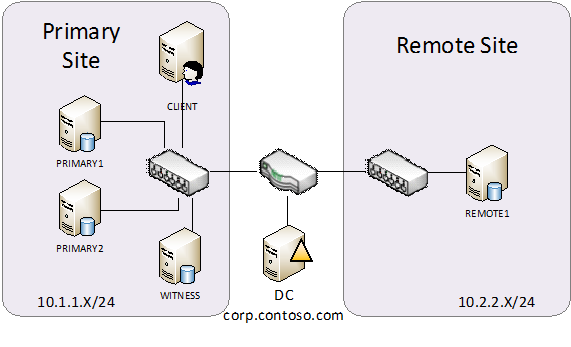
The walkthrough steps focus on the software configuration on the server nodes and not on the implementation of the network topology.
Set up the Domain Controller and Accounts
Role: Domain Administrator
Set up the domain controller(DC) for DNS service with the domain specifications below.
Domain Name
CORP
FQDN
corp.contoso.com
Create the domain user accounts show below:
Domain Administrator
CORP\Administrator
SQL Installation
CORP\Install
Database Administrator
CORP\DBAdmin
Client Application
CORP\SQLClient
SQL Service Accounts
CORP\SQLSvc1
CORP\SQLSvc2
CORP\SQLSvc3
CORP\SQLSvc4
CORP\SQLAgent1
CORP\SQLAgent2
CORP\SQLAgent3
CORP\SQLAgent4
Deploy SQL Server 2008 R2 Solution
Role: Database Administrator
Perform the following steps on PRIMARY1, PRIMARY2, WITNESS, and REMOTE1:
Install Windows Server 2008 R2 SP1, and then join the machine to the domain.
Give CORP\Install administrative privileges on the local machine.
Install the default SQL Server 2008 R2 instance with the respective service accounts shown below.
Machine
SQL Service Account
SQL Agent Account
PRIMARY1
SQLSvc1
SQLAgent1
PRIMARY2
SQLSvc2
SQLAgent2
WITNESS
SQLSvc3
SQLAgent3
REMOTE1
SQLSvc4
SQLAgent4
Open the firewall for remote access of the default SQL Server instance with the following command:
netsh advfirewall firewall add rule name='SQL Server (TCP-In)' dir=in action=allow protocol=TCP localport=1433 profile=domain
In SQL Server Configuration Manager, under the SQL Server Network Configuration node, enable the TCP/IP protocol.
Restart the database instance.
Create Databases and Configure Database Mirroring
Role: Database Administrator
Perform the following steps to create the databases and configure database mirroring sessions.
On both PRIMARY1 and PRIMARY2, open port 5022, the default port SQL Server uses for database mirroring with the following command:
netsh advfirewall firewall add rule name='SQL Server Mirroring (TCP-In)' dir=in action=allow protocol=TCP localport=5022 profile=domain
In SQL Server Management Studio (SSMS), create two databases on PRIMARY1, named test1 and test2.
Create a table in both test1 and test2, called table1, using the following script:
CREATE TABLE dbo.table1(col1 nchar(10), col2 nchar(10))
Prepare the mirror databases for test1 and test2 on PRIMARY2.
Establish the database mirroring sessions on the two databases using the specifications below.
Principal Role
PRIMARY1
Principal Service Account
CORP\SQLSvc1
Principal Endpoint
TCP://primary1.corp.contoso.local:5022
Mirror Role
PRIMARY2
Mirror Service Account
CORP\SQLSvc2
Mirror Endpoint
TCP://primary2.corp.contoso.local:5022
Witness Role
WITNESS
Witness Service Account
CORP\SQLSvc3
Witness Endpoint
TCP://witness.corp.contoso.local:5022
Operating Mode
High safety
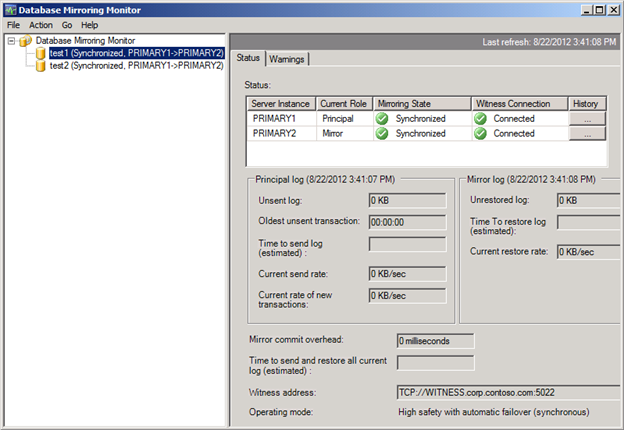
After you configure database mirroring on table1 and table2, you can use the Database Mirroring Monitor to make sure that the servers have connectivity and are synchronized for both databases. It should look similar to the screenshot below.
Configure Log Shipping
Role: Database Administrator
Perform the following steps to set up log shipping for the two databases.
On PRIMARY1, PRIMARY2, and REMOTE1, in SQL Server Configuration Manager, set the SQL Server Agent service to start automatically.
Start the SQL Server Agent service on all three machines.
Create the following share folders:
Network Name
Permissions
\\WITNESS\test1
\\WITNESS\test2
SQLSvc1: Read and Write
SQLSvc2: Read and Write
SQLSvc4: Read
SQLAgent4: Read
\\REMOTE1\test1
\\REMOTE1\test2
SQLSvc4: Read
SQLAgent4: Read and Write
On PRIMARY1 and PRIMARY2, set up log shipping of test1 and test2 to REMOTE1 using the following parameters:
Database
Backup Folder
Destination Folder for Copied Files
Restore Mode
test1
\\WITNESS\test1
\\REMOTE1\test1
No recovery
test2
\\WITNESS\test2
\\REMOTE1\test2
No recovery
NOTE: Since you are mixing database mirroring and log shipping, you cannot perform this step using the SSMS user interface alone. For instructions, see the Log Shipping to a Third Destination from a Database Mirroring Pair section in Database Mirroring and Log Shipping Working Together.
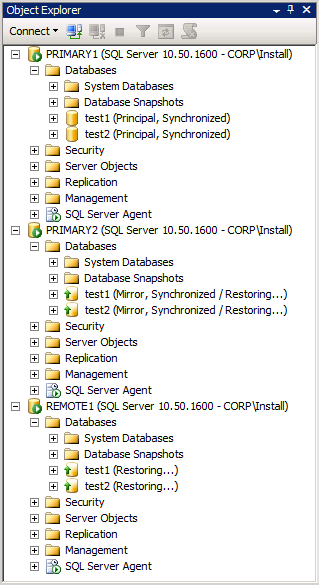
When you are finished, the SSMS view of the three database instances in Object Explorer should look similar to the screenshot below. PRIMARY1 is the principal database server for both databases and PRIMARY2 is the mirror database server.
Configure Access for the Client Application
Role: Database Administrator
For client access to the databases, perform the following steps in SSMS for the various database instances:
- On PRIMARY1, add CORP\SQLClient as a login, and then give CORP\SQLClient the following database memberships for both test1 and test2:
- db_datareader
- db_datawriter
- Perform a manual database mirroring failover for both test1 and test2 to PRIMARY2.
- In PRIMARY2, add CORP\SQLClient as a login, and then give CORP\SQLClient the following database memberships for both test1 and test2:
- db_datareader
- db_datawriter
- Perform a manual database mirroring failover back to PRIMARY1.
You will use CORP\SQLClient to connect to the databases from the client application in later steps. If a failure happens during your migration process, you have ensured that clients have access to the automatic failover partner. In a disaster recovery scenario, you must bring REMOTE1 online, and then add CORP\SQLClient to REMOTE1, and then configure the same database memberships so that client applications can connect to it.
Role: Application Developer
On CLIENT, perform the following steps to run the client application.
Install Windows 7.
Join the machine to the corp.contoso.com domain using the CORP\Administrator account.
Logout and login as CORP\Install.
Install SQL Server 2008 R2 Management Studio.
Start SSMS and connect to PRIMARY1 and PRIMARY2 to verify that the database instances can accept remote connections.
Install Visual Studio.
Logout and login as CORP\SQLClient.
Create a console application (named ConsoleApplication1 by default), and then replace the code in Program.cs with the code below. This code continually attempts to connect to test1 and insert a record. Each connection attempt has three retries and a 5-second interval between each retry. The connection logic is taken from Implementing Application Failover with Database Mirroring.
using System;
using System.Data;
using System.Data.SqlClient;
using System.Threading;
namespace ConsoleApplication1
{
class Program
{
const string connString = @"Server=PRIMARY1;Failover Partner=PRIMARY2;Initial Catalog=test1;Integrated Security=True";
static bool ExecuteSQLWithRetry_NoResults(string strConn, string strCmd, int iRetryInterval, int iMaxRetries)
{
SqlConnection conn = null;
SqlCommand cmd = null;
for (int iRetryCount = 0; iRetryCount < iMaxRetries; iRetryCount++)
{
try
{
conn = new SqlConnection(strConn);
conn.Open();
if (null != conn && ConnectionState.Open == conn.State)
{
cmd = new SqlCommand(strCmd, conn);
cmd.ExecuteNonQuery();
return true;
}
}
catch (Exception ex) { }
finally
{
try
{
if (null != cmd)
cmd.Dispose();
if (null != conn && ConnectionState.Closed != conn.State)
conn.Close();
}
catch (Exception ex) { }
}
if (iRetryCount < iMaxRetries)
Thread.Sleep(iRetryInterval * 1000);
}
return false;
}
static void Main(string[] args)
{
while (true)
{
Random rand = new Random();
string cmdString = "Insert into table1 values (N'" + rand.Next() + "',N'" + rand.Next() + "')";
if (ExecuteSQLWithRetry_NoResults(connString, cmdString, 5, 3))
Console.WriteLine("Success: " + cmdString);
else Console.WriteLine("Error: " + cmdString);
}
}
}
}
Run the application by opening the Debug menu and clicking Start Debugging.
You have now finished setting up the base configuration and are ready to start the migration scenario to the SQL Server AlwaysOn solution in SQL Server 2012.
But wait, this blog has gotten too long already! In the next installment, you will actually start the migration steps. Stay tuned!