ASDK 的部署后配置
安装 Azure Stack 开发工具包 (ASDK) 之后,当你在 ASDK 主计算机上以 AzureStack\AzureStackAdmin 身份登录时,应进行一些建议的部署后配置更改。
安装 Azure Stack PowerShell
需要安装与 Azure Stack 兼容的 Azure PowerShell 模块才能使用 Azure Stack。
通过 PowerShell 库安装适用于 Azure Stack 的 PowerShell 命令。 若要注册 PSGallery 存储库,请打开权限提升的 PowerShell 会话并运行以下命令:
Set-PSRepository -Name "PSGallery" -InstallationPolicy Trusted
使用 API 版本配置文件来指定与 Azure Stack 兼容的 Az 模块。 API 版本配置文件提供一种管理 Azure 与 Azure Stack 之间版本差异的方式。 API 版本配置文件是一组具有特定 API 版本的 Az PowerShell 模块。 可通过 PowerShell 库获得的 Az.BootStrapper 模块会提供使用 API 版本配置文件所需的 PowerShell cmdlet。
无论是否与 ASDK 主机建立了 Internet 连接,都可以安装最新的 Azure Stack PowerShell 模块。
- 在 Windows 计算机上验证先决条件。 有关说明,请参阅 Windows 先决条件。
- 在安装所需 PowerShell 版本之前,请务必卸载任何现有的 Azure PowerShell 模块。
- 已从 ASDK 主计算机建立 Internet 连接:运行以下 PowerShell 脚本,以在 ASDK 安装中安装以下模块:
  [Net.ServicePointManager]::SecurityProtocol = [Net.SecurityProtocolType]::Tls12

  Install-Module -Name Az.BootStrapper -Force
  Install-AzProfile -Profile 2020-09-01-hybrid -Force
  Install-Module -Name AzureStack -RequiredVersion 2.1.0

  Get-Module -Name "Az*" -ListAvailable
  Get-Module -Name "Azs*" -ListAvailable
如果安装成功,输出中会显示 Az 和 AzureStack 模块。
- 未从 ASDK 主计算机建立 Internet 连接:在离线场景中,必须先使用以下 PowerShell 命令,将 PowerShell 模块下载到已建立 Internet 连接的计算机:
$Path = "<Path that is used to save the packages>"

Save-Package `
  -ProviderName NuGet -Source https://www.powershellgallery.com/api/v2 -Name Az -Path $Path -Force -RequiredVersion 1.10.0

Save-Package `
  -ProviderName NuGet -Source https://www.powershellgallery.com/api/v2 -Name AzureStack -Path $Path -Force -RequiredVersion 2.1.0
接下来,将下载的包复制到 ASDK 计算机,将该位置注册为默认存储库,并从此存储库安装 Az 和 AzureStack 模块:
$SourceLocation = "<Location on the development kit that contains the PowerShell packages>"
$RepoName = "MyNuGetSource"

Register-PSRepository -Name $RepoName -SourceLocation $SourceLocation -InstallationPolicy Trusted

Install-Module Az -Repository $RepoName

Install-Module AzureStack -Repository $RepoName
下载 Azure Stack 工具
AzureStack-Tools 是托管 PowerShell 模块的 GitHub 存储库,可用于管理资源并将其部署到 Azure Stack。 可通过 Az PowerShell 模块或 AzureRM 模块来使用这些工具。
若要获取这些工具,请从 az 分支克隆 GitHub 存储库,或运行以下脚本来下载 AzureStack-Tools 文件夹:
# Change directory to the root directory.
cd \

# Download the tools archive.
[Net.ServicePointManager]::SecurityProtocol = [Net.SecurityProtocolType]::Tls12
invoke-webrequest `
  https://github.com/Azure/AzureStack-Tools/archive/az.zip `
  -OutFile az.zip

# Expand the downloaded files.
expand-archive az.zip `
  -DestinationPath . `
  -Force

# Change to the tools directory.
cd AzureStack-Tools-az
验证 ASDK 安装
若要确保 ASDK 部署成功,可以遵循以下步骤使用 Test-AzureStack cmdlet:
- 以 AzureStack\AzureStackAdmin 身份登录到 ASDK 主计算机。
- 以管理员身份打开 PowerShell(非 PowerShell ISE)。
- 运行:
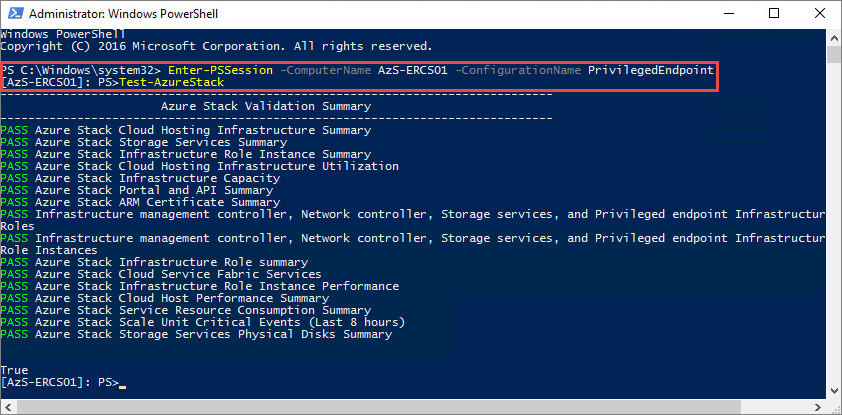
Enter-PSSession -ComputerName AzS-ERCS01 -ConfigurationName PrivilegedEndpoint - 运行:
Test-AzureStack
此项测试可能需要几分钟时间才能完成。 如果安装成功,将返回如下所示的输出:
如果失败,请遵循故障排除步骤来获取帮助。
启用多租户
对于使用 Microsoft Entra ID 的部署,需要为 ASDK 安装启用多租户。
注意
当使用非用于注册 Azure Stack 的域的管理员或用户帐户登录 Azure Stack 门户时,用于注册 Azure Stack 的域名必须追加到门户 URL 后面。 例如,如果 Azure Stack 已注册到 fabrikam.onmicrosoft.com 并且登录的用户帐户为 admin@contoso.com,则用于登录用户门户的 URL 将为:https://portal.local.azurestack.external/fabrikam.onmicrosoft.com.
后续步骤
反馈
即将发布:在整个 2024 年,我们将逐步淘汰作为内容反馈机制的“GitHub 问题”,并将其取代为新的反馈系统。 有关详细信息,请参阅:https://aka.ms/ContentUserFeedback。
提交和查看相关反馈