你当前正在访问 Microsoft Azure Global Edition 技术文档网站。 如果需要访问由世纪互联运营的 Microsoft Azure 中国技术文档网站,请访问 https://docs.azure.cn。
开始在 Python 中使用中继混合连接 WebSocket 请求
在本快速入门中,请创建 Python 发送者和接收者应用程序,用于通过 WebSocket 协议发送和接收消息。 这些应用程序使用 Azure 中继的混合连接功能。 若要了解 Azure 中继的常规信息,请参阅 Azure 中继。
在本快速入门中,你将执行以下步骤:
- 使用 Azure 门户创建中继命名空间。
- 使用 Azure 门户在该命名空间中创建混合连接。
- 生成 config.json 属性文件以存储连接详细信息
- 为帮助程序函数开发 relaylib.py(SAS 令牌、URL)
- 编写服务器(侦听器)脚本以接收消息。
- 编写客户端(发送方)脚本以发送消息。
- 执行服务器(侦听器)脚本和客户端(发送方)脚本(可选)。
先决条件
使用 Azure 门户创建命名空间
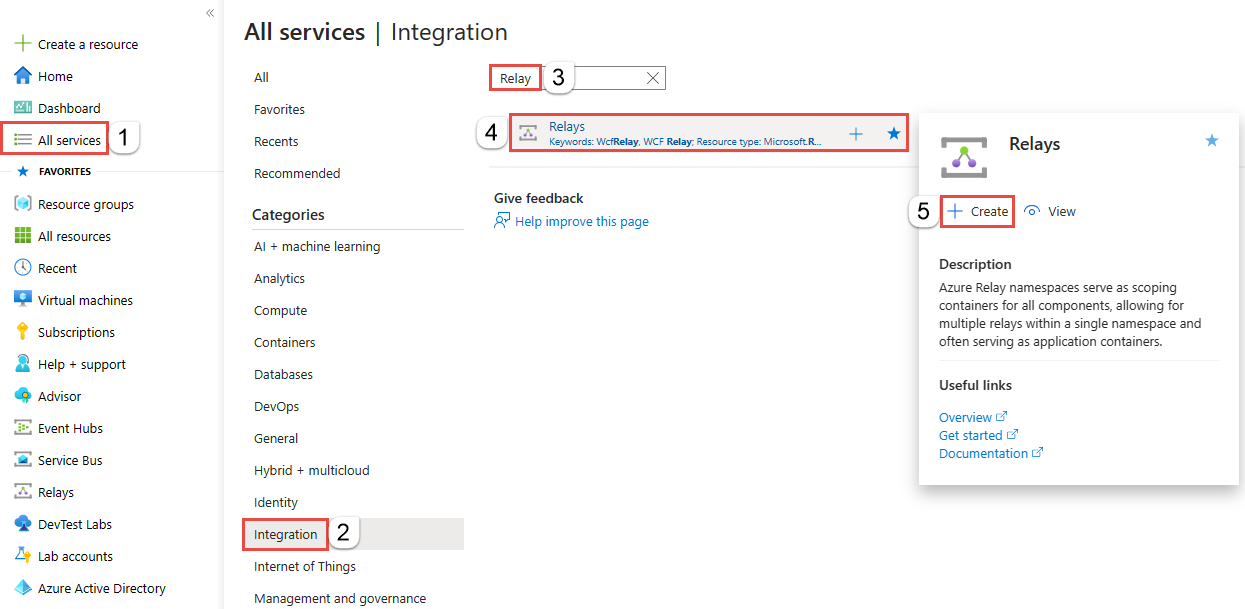
登录 Azure 门户。
在左侧菜单中,选择“所有服务” 。 选择“集成”,搜索“中继”,将鼠标移到“中继”上方,然后选择“创建”。
在“创建命名空间”页上,执行以下步骤:
选择要在其中创建命名空间的 Azure 订阅。
对于资源组,选择一个要在其中放置命名空间的现有资源组,或创建一个新资源组。
输入中继命名空间的名称。
选择应托管该命名空间的区域。
在页面底部选择查看 + 创建。
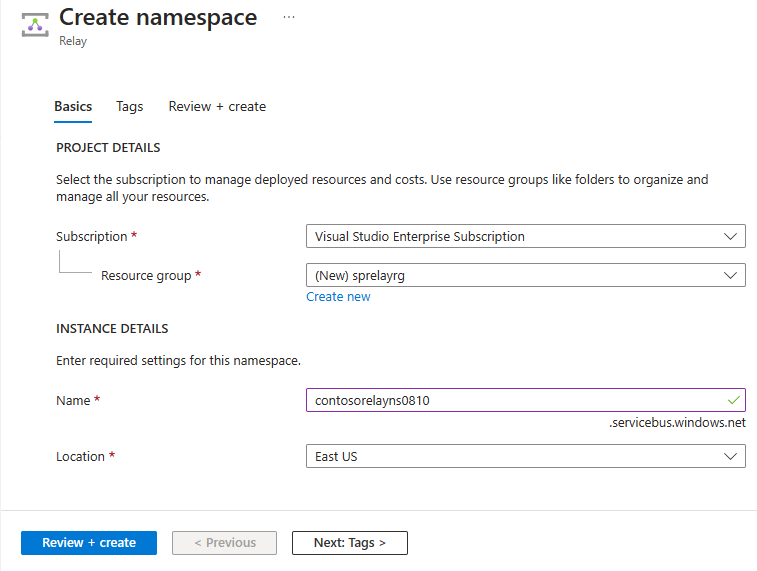
在“查看 + 创建”页面上,选择“创建”。
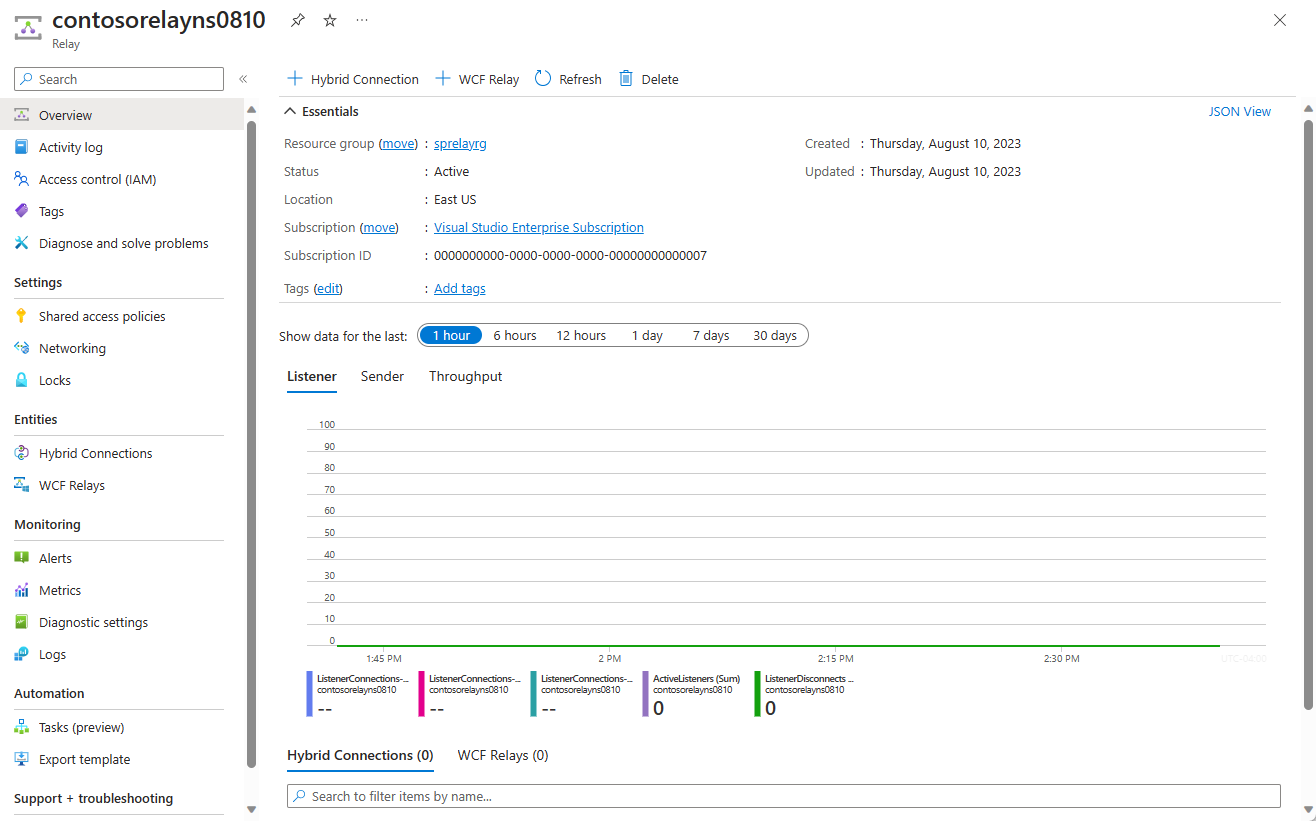
几分钟后,将看到该命名空间的“中继”页面。
获取管理凭据
在“中继”页上,选择左侧菜单的“共享访问策略”。 `
在“共享访问策略”页,选择“RootManageSharedAccessKey” 。
在“SAS 策略:RootManageSharedAccessKey”下,选择“主连接字符串”旁边的“复制”按钮。 此操作会将连接字符串复制到剪贴板,供以后使用。 将此值粘贴到记事本或其他某个临时位置。
重复上述步骤,将主密钥的值复制和粘贴到临时位置,供以后使用。

使用 Azure 门户创建混合连接
在命名空间的“中继”页上,按照以下步骤创建混合连接。
请在左侧菜单中的“实体”下选择“混合连接”,然后选择“+ 混合连接”。

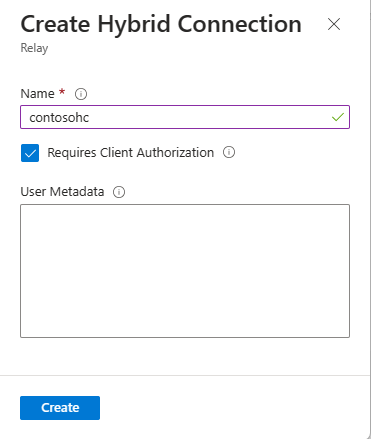
在“创建混合连接”页上,输入混合连接的名称,然后选择“创建”。
开发帮助程序函数
创建 Python 脚本
此脚本为使用 Azure 中继混合连接的应用程序提供帮助程序函数。 这些函数可能有助于生成 SAS 令牌和建立 WebSocket 连接以进行安全通信等任务。
依赖项
在生成帮助程序函数脚本之前,请使用 pip 安装以下 Python 库:base64、hashlib、hmac、math、time、urllib
可以使用以下命令安装这些库:
pip install <package name>
编写帮助程序函数脚本
relaylib.py 文件的内容应如下所示:
import base64
import hashlib
import hmac
import math
import time
import urllib

# Function which generates the HMAC-SHA256 of a given message
def hmac_sha256(key, msg):
   hash_obj = hmac.new(key=key, msg=msg, digestmod=hashlib._hashlib.openssl_sha256)
   return hash_obj.digest()

# Function to create a WebSocket URL for listening for a server application
def createListenUrl(serviceNamespace, entityPath, token = None):
   url = 'wss://' + serviceNamespace + '/$hc/' + entityPath + '?sb-hc-action=listen&sb-hc-id=123456'
   if token is not None:
       url = url + '&sb-hc-token=' + urllib.parse.quote(token)
   return url

# Function which creates the url for the client application
def createSendUrl(serviceNamespace, entityPath, token = None):
   url = 'wss://' + serviceNamespace + '/$hc/' + entityPath + '?sb-hc-action=connect&sb-hc-id=123456'
   if token is not None:
	url = url + '&sb-hc-token=' + urllib.parse.quote(token)
   return url

# Function which creates the Service Bus SAS token.
def createSasToken(serviceNamespace, entityPath, sasKeyName, sasKey):
   uri = "http://" + serviceNamespace + "/" + entityPath
   encodedResourceUri = urllib.parse.quote(uri, safe = '')

   # Define the token validity period in seconds (48 hours in this case)
   tokenValidTimeInSeconds = 60 * 60 * 48
   unixSeconds = math.floor(time.time())
   expiryInSeconds = unixSeconds + tokenValidTimeInSeconds

   # Create the plain signature string by combining the encoded URI and the expiry time
   plainSignature = encodedResourceUri + "\n" + str(expiryInSeconds)

   # Encode the SAS key and the plain signature as bytes
   sasKeyBytes = sasKey.encode("utf-8")
   plainSignatureBytes = plainSignature.encode("utf-8")
   hashBytes = hmac_sha256(sasKeyBytes, plainSignatureBytes)
   base64HashValue = base64.b64encode(hashBytes)

    # Construct the SAS token string
   token = "SharedAccessSignature sr=" + encodedResourceUri + "&sig=" +  urllib.parse.quote(base64HashValue) + "&se=" + str(expiryInSeconds) + "&skn=" + sasKeyName
   return token
创建服务器应用程序(侦听程序)
若要侦听和接收来自中继的消息,请编写 Python WebSocket 服务器脚本。
创建 Python 脚本
如果创建中继时已禁用“需要客户端授权”选项,可使用任何浏览器向混合连接 URL 发送请求。 若要访问受保护的终结点,需创建并传递 SAS 令牌,如下所示。
下面是一个简单的 Python 脚本,演示如何使用 WebSocket 将请求发送到具有 SAS 令牌的混合连接 URL。
依赖项
在运行服务器应用程序之前使用 pip 安装以下 Python 库
asyncio、json、logging、websockets可以使用以下命令安装这些库:
pip install <package name>生成用于存储连接详细信息的
config.json文件{ "namespace": "HYBRID_CONNECTION_NAMESPACE", "path": "HYBRID_CONNECTION_ENTITY_NAME", "keyrule": "SHARED_ACCESS_KEY_NAME", "key": "SHARED_ACCESS_PRIMARY_KEY" }将括号中的占位符替换为在创建混合连接时获得的值。
namespace- 中继命名空间。 请务必使用完全限定的命名空间名称,例如{namespace}.servicebus.windows.net。path- 混合连接的名称。keyrule- 共享访问策略密钥的名称,默认为RootManageSharedAccessKey。key- 先前保存的命名空间的主密钥。
为帮助程序函数生成帮助程序函数文件
以下文件用作
relaylib.py,并具有用于 WebSocket URL 生成和 SAS 令牌的帮助程序函数创建 Python 脚本
此脚本为使用 Azure 中继混合连接的应用程序提供帮助程序函数。 这些函数可能有助于生成 SAS 令牌和建立 WebSocket 连接以进行安全通信等任务。
依赖项
在生成帮助程序函数脚本之前,请使用 pip 安装以下 Python 库:
base64、hashlib、hmac、math、time、urllib可以使用以下命令安装这些库:
pip install <package name>编写帮助程序函数脚本
relaylib.py文件的内容应如下所示:import base64 import hashlib import hmac import math import time import urllib # Function which generates the HMAC-SHA256 of a given message def hmac_sha256(key, msg): hash_obj = hmac.new(key=key, msg=msg, digestmod=hashlib._hashlib.openssl_sha256) return hash_obj.digest() # Function to create a WebSocket URL for listening for a server application def createListenUrl(serviceNamespace, entityPath, token = None): url = 'wss://' + serviceNamespace + '/$hc/' + entityPath + '?sb-hc-action=listen&sb-hc-id=123456' if token is not None: url = url + '&sb-hc-token=' + urllib.parse.quote(token) return url # Function which creates the url for the client application def createSendUrl(serviceNamespace, entityPath, token = None): url = 'wss://' + serviceNamespace + '/$hc/' + entityPath + '?sb-hc-action=connect&sb-hc-id=123456' if token is not None: url = url + '&sb-hc-token=' + urllib.parse.quote(token) return url # Function which creates the Service Bus SAS token. def createSasToken(serviceNamespace, entityPath, sasKeyName, sasKey): uri = "http://" + serviceNamespace + "/" + entityPath encodedResourceUri = urllib.parse.quote(uri, safe = '') # Define the token validity period in seconds (48 hours in this case) tokenValidTimeInSeconds = 60 * 60 * 48 unixSeconds = math.floor(time.time()) expiryInSeconds = unixSeconds + tokenValidTimeInSeconds # Create the plain signature string by combining the encoded URI and the expiry time plainSignature = encodedResourceUri + "\n" + str(expiryInSeconds) # Encode the SAS key and the plain signature as bytes sasKeyBytes = sasKey.encode("utf-8") plainSignatureBytes = plainSignature.encode("utf-8") hashBytes = hmac_sha256(sasKeyBytes, plainSignatureBytes) base64HashValue = base64.b64encode(hashBytes) # Construct the SAS token string token = "SharedAccessSignature sr=" + encodedResourceUri + "&sig=" + urllib.parse.quote(base64HashValue) + "&se=" + str(expiryInSeconds) + "&skn=" + sasKeyName return token
编写一些代码来发送消息
确保依赖项
config.json和relaylib.py在路径中可用listener.py文件的内容应如下所示:import asyncio import json import logging import relaylib import websockets async def run_application(config): serviceNamespace = config["namespace"] entityPath = config["path"] sasKeyName = config["keyrule"] sasKey = config["key"] serviceNamespace += ".servicebus.windows.net" # Configure logging logging.basicConfig(level=logging.INFO) # Enable DEBUG/INFO logging as appropriate try: logging.debug("Generating SAS Token for: %s", serviceNamespace) token = relaylib.createSasToken(serviceNamespace, entityPath, sasKeyName, sasKey) logging.debug("Generating WebSocket URI") wssUri = relaylib.createListenUrl(serviceNamespace, entityPath, token) async with websockets.connect(wssUri) as websocket: logging.info("Listening for messages on Azure Relay WebSocket...") while True: message = await websocket.recv() logging.info("Received message: %s", message) except KeyboardInterrupt: logging.info("Exiting listener.") if __name__ == "__main__": # Load configuration from JSON file with open("config.json") as config_file: config = json.load(config_file) asyncio.run(run_application(config))
创建客户端应用程序(发送程序)
若要将消息发送到中继,可以使用任何 HTTP 或 WebSocket 客户端,包含的示例是 Python 实现。
创建 Python 脚本
如果创建中继时已禁用“需要客户端授权”选项,可使用任何浏览器向混合连接 URL 发送请求。 若要访问受保护的终结点,需创建并传递 SAS 令牌,如下所示。
下面是一个简单的 Python 脚本,演示如何使用 WebSocket 将请求发送到具有 SAS 令牌的混合连接 URL。
依赖项
在运行客户端应用程序之前使用 pip 安装以下 Python 库
asyncio、json、logging、websockets可以使用以下命令安装这些库:
pip install <package name>生成用于存储连接详细信息的
config.json文件{ "namespace": "HYBRID_CONNECTION_NAMESPACE", "path": "HYBRID_CONNECTION_ENTITY_NAME", "keyrule": "SHARED_ACCESS_KEY_NAME", "key": "SHARED_ACCESS_PRIMARY_KEY" }将括号中的占位符替换为在创建混合连接时获得的值。
namespace- 中继命名空间。 请务必使用完全限定的命名空间名称,例如{namespace}.servicebus.windows.net。path- 混合连接的名称。keyrule- 共享访问策略密钥的名称,默认为RootManageSharedAccessKey。key- 先前保存的命名空间的主密钥。
为帮助程序函数生成帮助程序函数文件
以下文件用作
relaylib.py,并具有用于 WebSocket URL 生成和 SAS 令牌的帮助程序函数创建 Python 脚本
此脚本为使用 Azure 中继混合连接的应用程序提供帮助程序函数。 这些函数可能有助于生成 SAS 令牌和建立 WebSocket 连接以进行安全通信等任务。
依赖项
在生成帮助程序函数脚本之前,请使用 pip 安装以下 Python 库:
base64、hashlib、hmac、math、time、urllib可以使用以下命令安装这些库:
pip install <package name>编写帮助程序函数脚本
relaylib.py文件的内容应如下所示:import base64 import hashlib import hmac import math import time import urllib # Function which generates the HMAC-SHA256 of a given message def hmac_sha256(key, msg): hash_obj = hmac.new(key=key, msg=msg, digestmod=hashlib._hashlib.openssl_sha256) return hash_obj.digest() # Function to create a WebSocket URL for listening for a server application def createListenUrl(serviceNamespace, entityPath, token = None): url = 'wss://' + serviceNamespace + '/$hc/' + entityPath + '?sb-hc-action=listen&sb-hc-id=123456' if token is not None: url = url + '&sb-hc-token=' + urllib.parse.quote(token) return url # Function which creates the url for the client application def createSendUrl(serviceNamespace, entityPath, token = None): url = 'wss://' + serviceNamespace + '/$hc/' + entityPath + '?sb-hc-action=connect&sb-hc-id=123456' if token is not None: url = url + '&sb-hc-token=' + urllib.parse.quote(token) return url # Function which creates the Service Bus SAS token. def createSasToken(serviceNamespace, entityPath, sasKeyName, sasKey): uri = "http://" + serviceNamespace + "/" + entityPath encodedResourceUri = urllib.parse.quote(uri, safe = '') # Define the token validity period in seconds (48 hours in this case) tokenValidTimeInSeconds = 60 * 60 * 48 unixSeconds = math.floor(time.time()) expiryInSeconds = unixSeconds + tokenValidTimeInSeconds # Create the plain signature string by combining the encoded URI and the expiry time plainSignature = encodedResourceUri + "\n" + str(expiryInSeconds) # Encode the SAS key and the plain signature as bytes sasKeyBytes = sasKey.encode("utf-8") plainSignatureBytes = plainSignature.encode("utf-8") hashBytes = hmac_sha256(sasKeyBytes, plainSignatureBytes) base64HashValue = base64.b64encode(hashBytes) # Construct the SAS token string token = "SharedAccessSignature sr=" + encodedResourceUri + "&sig=" + urllib.parse.quote(base64HashValue) + "&se=" + str(expiryInSeconds) + "&skn=" + sasKeyName return token
编写一些代码来发送消息
确保依赖项
config.json和relaylib.py在路径中可用sender.py文件的内容应如下所示:import asyncio import json import logging import relaylib import websockets async def run_application(message, config): service_namespace = config["namespace"] entity_path = config["path"] sas_key_name = config["keyrule"] sas_key = config["key"] service_namespace += ".servicebus.windows.net" # Configure logging logging.basicConfig(level=logging.DEBUG) # Enable debug logging token = relaylib.createSasToken(service_namespace, entity_path, sas_key_name, sas_key) logging.debug("Token: %s", token) wss_uri = relaylib.createListenUrl(service_namespace, entity_path, token) logging.debug("WssURI: %s", wss_uri) try: async with websockets.connect(wss_uri) as websocket: logging.info("Sending message to Azure Relay WebSocket...") await websocket.send(json.dumps({"message": message})) logging.info("Message sent: %s", message) except Exception as e: logging.error("An error occurred: %s", str(e)) if __name__ == "__main__": # Load configuration from JSON file with open("config.json") as config_file: config = json.load(config_file) asyncio.run(run_application("This is a message to Azure Relay Hybrid Connections!", config))
注意
本文中的示例代码使用连接字符串对 Azure 中继命名空间进行身份验证,以简化教程。 建议在生产环境中使用 Microsoft Entra ID 身份验证,而不要使用更容易泄密的连接字符串或共享访问签名。 有关使用 Microsoft Entra ID 身份验证的详细信息和示例代码,请参阅使用 Microsoft Entra ID 对访问 Azure 中继实体的应用程序进行身份验证和授权和使用 Microsoft Entra ID 对访问 Azure 中继资源的托管标识进行身份验证。
运行应用程序
- 运行服务器应用程序:在命令提示符处,键入
python3 listener.py。 - 运行客户端应用程序:从命令提示符处,键入
python3 sender.py。
恭喜,现已使用 Python 创建端到端混合连接应用程序!
后续步骤
在本快速入门中,你创建了 Python 客户端和服务器应用程序,此类程序使用 WebSocket 来发送和接收消息。 Azure 中继的混合连接功能也支持使用 HTTP 发送和接收消息。 若要了解如何将 HTTP 与 Azure 中继混合连接配合使用,请参阅 HTTP 快速入门。
在本快速入门中,你使用了 Python 来创建客户端和服务器应用程序。 若要了解如何使用 .NET Framework 编写客户端和服务器应用程序,请参阅 .NET HTTP 快速入门或 .NET HTTP 快速入门。