设置 Visual Studio 项目
确保使用最新版本的 Visual Studio IDE。
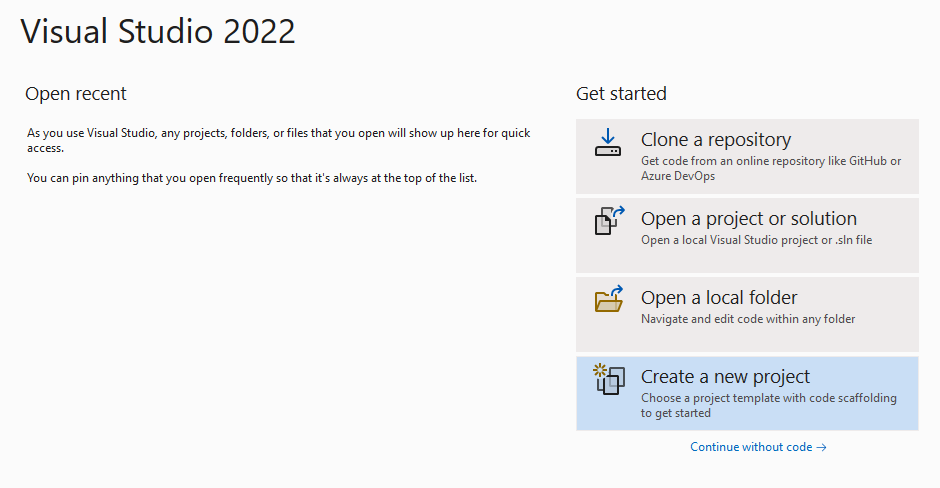
打开 Visual Studio。
在“开始”页上,选择“创建新项目”。
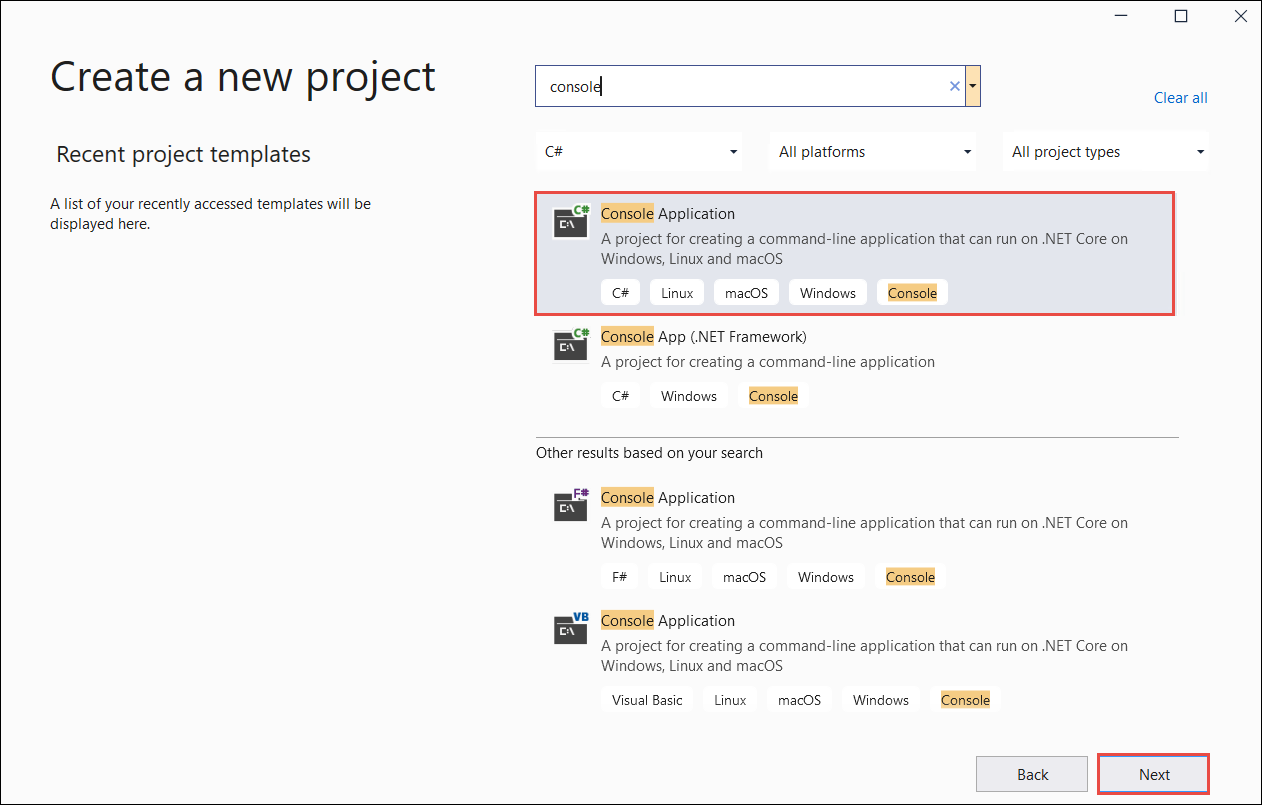
在“创建新项目”页面上,在搜索框中输入“控制台” 。 选择“控制台应用程序”模板,然后选择“下一步” 。
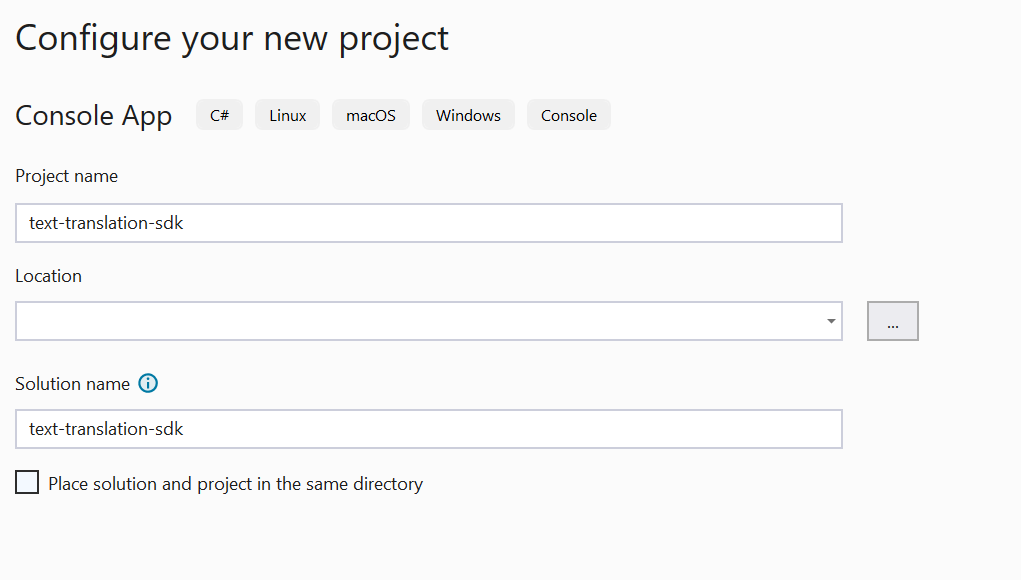
在“配置新项目”对话框中,在项目名称框中输入 translator_quickstart。 将“将解决方案和项目置于同一目录中”复选框保持未选中状态,然后选择“下一步”。
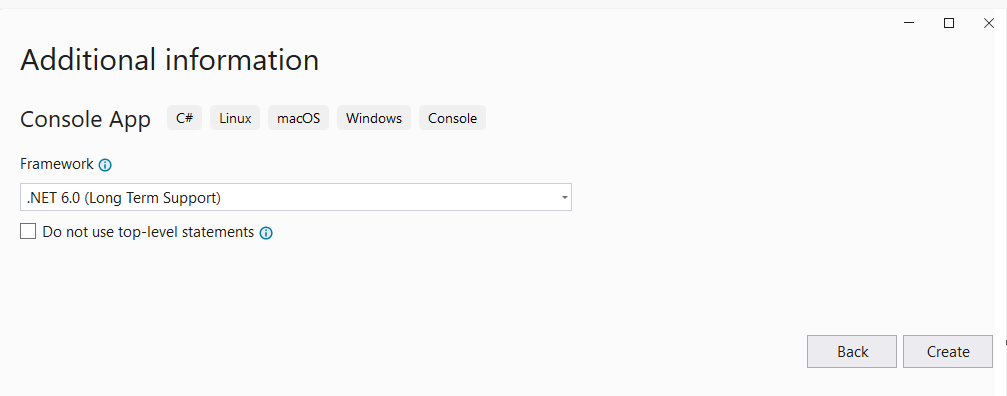
在“其他信息”对话框窗口中,确保选择“.NET 6.0 (长期支持)”。 将“不使用顶级语句”复选框保持未选中状态,然后选择“创建”。
使用 NuGet 安装 Newtonsoft.json 包
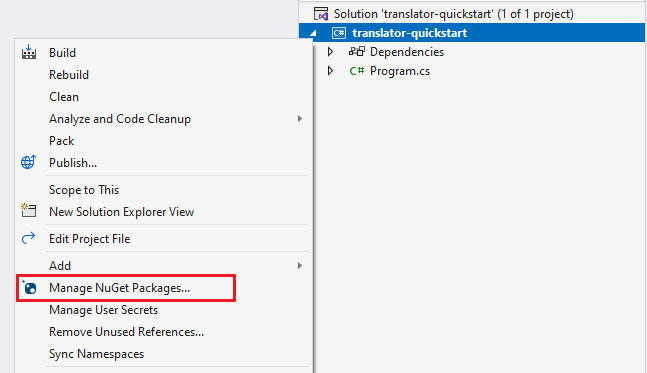
右键单击“translator_quickstart”项目并选择“管理 NuGet 包...”。
选择“浏览”选项卡并键入“Newtonsoft.json”。
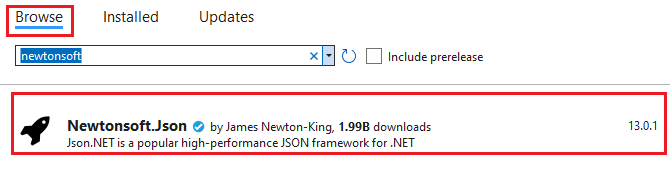
若要将包添加到项目,请从右侧的包管理器窗口中选择“安装”。

运行 C# 应用程序
注意
- 从 .NET 6 开始,使用
console 模板的新项目将生成与以前版本不同的新程序样式。
- 新的输出使用最新的 C# 功能,这些功能简化了你需要编写的代码。
- 使用较新版本时,只需编写
Main 方法的主体。 无需包括顶级语句、全局 using 指令或隐式 using 指令。
- 有关详细信息,请参阅新的 C# 模板生成顶级语句。
打开 Program.cs 文件。
删除现有的代码,包括 Console.WriteLine("Hello World!") 行。 将代码示例复制并粘贴到应用程序的 Program.cs 文件中。 确保使用 Azure 门户翻译器实例中的值更新密钥变量:
using System.Text;
using Newtonsoft.Json;
class Program
{
private static readonly string key = "<your-translator-key>";
private static readonly string endpoint = "https://api.cognitive.microsofttranslator.com";
// location, also known as region.
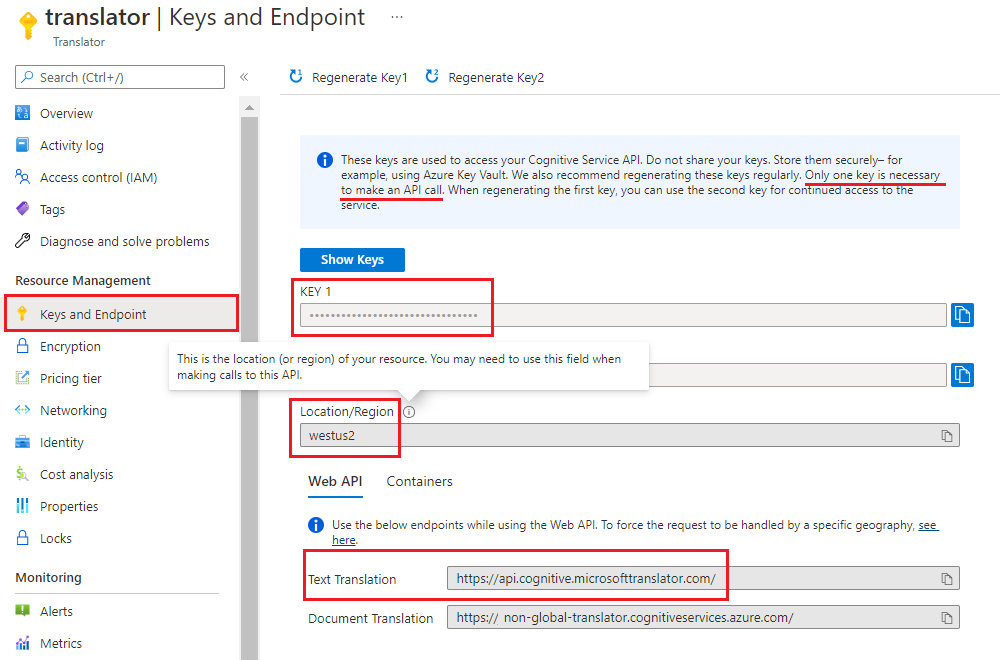
// required if you're using a multi-service or regional (not global) resource. It can be found in the Azure portal on the Keys and Endpoint page.
private static readonly string location = "<YOUR-RESOURCE-LOCATION>";
static async Task Main(string[] args)
{
// Input and output languages are defined as parameters.
string route = "/translate?api-version=3.0&from=en&to=fr&to=zu";
string textToTranslate = "I would really like to drive your car around the block a few times!";
object[] body = new object[] { new { Text = textToTranslate } };
var requestBody = JsonConvert.SerializeObject(body);
using (var client = new HttpClient())
using (var request = new HttpRequestMessage())
{
// Build the request.
request.Method = HttpMethod.Post;
request.RequestUri = new Uri(endpoint + route);
request.Content = new StringContent(requestBody, Encoding.UTF8, "application/json");
request.Headers.Add("Ocp-Apim-Subscription-Key", key);
// location required if you're using a multi-service or regional (not global) resource.
request.Headers.Add("Ocp-Apim-Subscription-Region", location);
// Send the request and get response.
HttpResponseMessage response = await client.SendAsync(request).ConfigureAwait(false);
// Read response as a string.
string result = await response.Content.ReadAsStringAsync();
Console.WriteLine(result);
}
}
}
运行 C# 应用程序
将代码示例添加到应用程序后,选择 formRecognizer_quickstart 旁边的绿色“开始”按钮以生成和运行程序,或按 F5。

翻译输出:
成功调用后,应会看到以下响应:
[
    {
        "detectedLanguage": {
            "language": "en",
            "score": 1.0
        },
        "translations": [
            {
                "text": "J'aimerais vraiment conduire votre voiture autour du pâté de maisons plusieurs fois!",
                "to": "fr"
            },
            {
                "text": "Ngingathanda ngempela ukushayela imoto yakho endaweni evimbelayo izikhathi ezimbalwa!",
                "to": "zu"
            }
        ]
    }
]
设置 Go 环境
你可以使用任何文本编辑器来编写 Go 应用程序。 建议使用最新版本的 Visual Studio Code 和 Go 扩展。
提示
如果你不熟悉 Go,请尝试学习 Go 入门 Learn 模块。
请确保安装了最新版本的 Go:
生成 Go 应用程序
在控制台窗口(例如 cmd、PowerShell 或 Bash)中,为应用创建名为 "translator-app" 的新目录,并导航到该目录。
在 "translator-app" 目录中创建名为 "translation.go" 的新 GO 文件。
将提供的代码示例复制并粘贴到 "translation.go" 文件中。 确保使用 Azure 门户翻译器实例中的值更新密钥变量:
package main

import (
    "bytes"
    "encoding/json"
    "fmt"
    "log"
    "net/http"
    "net/url"
)

func main() {
    key := "<YOUR-TRANSLATOR-KEY>"
    endpoint := "https://api.cognitive.microsofttranslator.com/"
    uri := endpoint + "/translate?api-version=3.0"

    // location, also known as region.
    // required if you're using a multi-service or regional (not global) resource. It can be found in the Azure portal on the Keys and Endpoint page.
    location := "<YOUR-RESOURCE-LOCATION>"

    // Build the request URL. See: https://go.dev/pkg/net/url/#example_URL_Parse
    u, _ := url.Parse(uri)
    q := u.Query()
    q.Add("from", "en")
    q.Add("to", "fr")
    q.Add("to", "zu")
    u.RawQuery = q.Encode()

    // Create an anonymous struct for your request body and encode it to JSON
    body := []struct {
        Text string
    }{
        {Text: "I would really like to drive your car around the block a few times."},
    }
    b, _ := json.Marshal(body)

    // Build the HTTP POST request
    req, err := http.NewRequest("POST", u.String(), bytes.NewBuffer(b))
    if err != nil {
        log.Fatal(err)
    }
    // Add required headers to the request
    req.Header.Add("Ocp-Apim-Subscription-Key", key)
    // location required if you're using a multi-service or regional (not global) resource.
    req.Header.Add("Ocp-Apim-Subscription-Region", location)
    req.Header.Add("Content-Type", "application/json")

    // Call the Translator API
    res, err := http.DefaultClient.Do(req)
    if err != nil {
        log.Fatal(err)
    }

    // Decode the JSON response
    var result interface{}
    if err := json.NewDecoder(res.Body).Decode(&result); err != nil {
        log.Fatal(err)
    }
    // Format and print the response to terminal
    prettyJSON, _ := json.MarshalIndent(result, "", "  ")
    fmt.Printf("%s\n", prettyJSON)
}
运行 Go 应用程序
将代码示例添加到应用程序后,可以在命令提示符或终端提示符下执行 Go 程序。 确保提示符的路径设置为 "translator-app" 文件夹,并使用以下命令:
go run translation.go
翻译输出:
成功调用后,应会看到以下响应:
[
    {
        "detectedLanguage": {
            "language": "en",
            "score": 1.0
        },
        "translations": [
            {
                "text": "J'aimerais vraiment conduire votre voiture autour du pâté de maisons plusieurs fois!",
                "to": "fr"
            },
            {
                "text": "Ngingathanda ngempela ukushayela imoto yakho endaweni evimbelayo izikhathi ezimbalwa!",
                "to": "zu"
            }
        ]
    }
]
设置 Java 环境
创建新的 Gradle 项目
在控制台窗口(例如 cmd、PowerShell 或 Bash)中,为应用创建名为 "translator-text-app" 的新目录,并导航到该目录。
mkdir translator-text-app && translator-text-app
mkdir translator-text-app; cd translator-text-app
从 translator-text-app 目录运行 gradle init 命令。 此命令将创建 Gradle 的基本生成文件,其中包括 build.gradle.kts - 在运行时将使用该文件创建并配置应用程序。
gradle init --type basic
当提示你选择一个 DSL 时,选择 Kotlin。
按回车键或 Enter 接受默认项目名称 (translator-text-app)。
使用以下代码更新 build.gradle.kts:
plugins {
  java
  application
}
application {
  mainClass.set("TranslatorText")
}
repositories {
  mavenCentral()
}
dependencies {
  implementation("com.squareup.okhttp3:okhttp:4.10.0")
  implementation("com.google.code.gson:gson:2.9.0")
}
创建 Java 应用程序
从 translator-text-app 目录运行以下命令:
mkdir -p src/main/java
创建以下目录结构:

导航到 java 目录,创建一个名为 TranslatorText.java 的文件。
提示
可以使用 Powershell 创建新文件。
按住 Shift 键并右键单击该文件夹,在项目目录中打开 Powershell 窗口。
输入以下命令:New-Item TranslatorText.java。
还可以在 IDE 中创建名为 TranslatorText.java 的新文件并将其保存到 java 目录。
在 IDE 中打开 TranslatorText.java 文件,然后将以下代码示例复制并粘贴到应用程序中。 确保将密钥更新为 Azure 门户翻译器实例中的某个密钥值:
import java.io.IOException;

import com.google.gson.*;
import okhttp3.MediaType;
import okhttp3.OkHttpClient;
import okhttp3.Request;
import okhttp3.RequestBody;
import okhttp3.Response;

public class TranslatorText {
    private static String key = "<your-translator-key";

    // location, also known as region.
   // required if you're using a multi-service or regional (not global) resource. It can be found in the Azure portal on the Keys and Endpoint page.
    private static String location = "<YOUR-RESOURCE-LOCATION>";


    // Instantiates the OkHttpClient.
    OkHttpClient client = new OkHttpClient();

    // This function performs a POST request.
    public String Post() throws IOException {
        MediaType mediaType = MediaType.parse("application/json");
        RequestBody body = RequestBody.create(mediaType,
                "[{\"Text\": \"I would really like to drive your car around the block a few times!\"}]");
        Request request = new Request.Builder()
                .url("https://api.cognitive.microsofttranslator.com/translate?api-version=3.0&from=en&to=fr&to=zu")
                .post(body)
                .addHeader("Ocp-Apim-Subscription-Key", key)
                // location required if you're using a multi-service or regional (not global) resource.
                .addHeader("Ocp-Apim-Subscription-Region", location)
                .addHeader("Content-type", "application/json")
                .build();
        Response response = client.newCall(request).execute();
        return response.body().string();
    }

    // This function prettifies the json response.
    public static String prettify(String json_text) {
        JsonParser parser = new JsonParser();
        JsonElement json = parser.parse(json_text);
        Gson gson = new GsonBuilder().setPrettyPrinting().create();
        return gson.toJson(json);
    }

    public static void main(String[] args) {
        try {
            TranslatorText translateRequest = new TranslatorText();
            String response = translateRequest.Post();
            System.out.println(prettify(response));
        } catch (Exception e) {
            System.out.println(e);
        }
    }
}
生成和运行 Java 试应用程序
将代码示例添加到应用程序后,导航回到主项目目录 translator-text-app,打开控制台窗口,然后输入以下命令:
使用 build 命令生成应用程序:
gradle build
使用 run 命令运行应用程序:
gradle run
翻译输出:
成功调用后,应会看到以下响应:
[
  {
    "translations": [
      {
        "text": "J'aimerais vraiment conduire votre voiture autour du pâté de maisons plusieurs fois!",
        "to": "fr"
      },
      {
        "text": "Ngingathanda ngempela ukushayela imoto yakho endaweni evimbelayo izikhathi ezimbalwa!",
        "to": "zu"
      }
    ]
  }
]
设置 Node.js Express 项目
请确保安装了最新版本的 Node.js。 Node.js 安装中包含了 Node 包管理器 (npm)。
在控制台窗口(例如 cmd、PowerShell 或 Bash)中,为应用创建名为 translator-app 的新目录,并导航到该目录。
mkdir translator-app && cd translator-app
mkdir translator-app; cd translator-app
运行 npm init 命令以初始化应用程序并为项目构建基架。
npm init
使用终端中提供的提示指定项目的属性。
- 最重要的属性包括名称、版本号和入口点。
- 建议保留
index.js 作为入口点名称。 描述、测试命令、GitHub 存储库、关键字、作者和许可证信息均为可选属性 —— 在此项目中可跳过。
- 通过选择“返回”或“Enter”,接受括号中的建议。
- 完成提示后,translator-app 目录中会创建一个
package.json 文件。
打开控制台窗口,并使用 npm 安装 axios HTTP 库和 uuid 包:
npm install axios uuid
在应用程序目录中创建 index.js 文件。
提示
可以使用 Powershell 创建新文件。
按住 Shift 键并右键单击该文件夹,在项目目录中打开 Powershell 窗口。
键入以下命令:New-Item index.js。
还可以在 IDE 中创建名为 index.js 的新文件并将其保存到 translator-app 目录。
生成 JavaScript 应用程序
将以下代码示例添加到 index.js 文件中。 确保使用 Azure 门户翻译器实例中的值更新密钥变量:
    const axios = require('axios').default;
    const { v4: uuidv4 } = require('uuid');

    let key = "<your-translator-key>";
    let endpoint = "https://api.cognitive.microsofttranslator.com";

    // location, also known as region.
    // required if you're using a multi-service or regional (not global) resource. It can be found in the Azure portal on the Keys and Endpoint page.
    let location = "<YOUR-RESOURCE-LOCATION>";

    axios({
        baseURL: endpoint,
        url: '/translate',
        method: 'post',
        headers: {
            'Ocp-Apim-Subscription-Key': key,
             // location required if you're using a multi-service or regional (not global) resource.
            'Ocp-Apim-Subscription-Region': location,
            'Content-type': 'application/json',
            'X-ClientTraceId': uuidv4().toString()
        },
        params: {
            'api-version': '3.0',
            'from': 'en',
            'to': 'fr,zu'
        },
        data: [{
            'text': 'I would really like to drive your car around the block a few times!'
        }],
        responseType: 'json'
    }).then(function(response){
        console.log(JSON.stringify(response.data, null, 4));
    })
运行 JavaScript 应用程序
将代码示例添加到应用程序后,运行程序:
导航到应用程序目录 (translator-app)。
在终端中键入以下命令:
node index.js
翻译输出:
成功调用后,应会看到以下响应:
[
    {
        "translations": [
            {
                "text": "J'aimerais vraiment conduire votre voiture autour du pâté de maisons plusieurs fois!",
                "to": "fr"
            },
            {
                "text": "Ngingathanda ngempela ukushayela imoto yakho endaweni evimbelayo izikhathi ezimbalwa!",
                "to": "zu"
            }
        ]
    }
]
设置 Python 项目
请确保安装了最新版本的 Python 3.x。 Python 安装中包含了 Python 安装程序包 (pip)。
打开终端窗口,并使用 pip 安装 Requests 库和 uuid0 包:
pip install requests uuid
注意
我们还将使用一个名为 json 的 Python 内置包。 它用于处理 JSON 数据。
生成 Python 应用程序
在首选的编辑器或 IDE 中创建名为 "translator-app.py" 的新 Python 文件。
将以下代码示例添加到 translator-app.py 文件中。 确保将密钥更新为 Azure 门户翻译器实例中的某个值。
import requests, uuid, json

# Add your key and endpoint
key = "<your-translator-key>"
endpoint = "https://api.cognitive.microsofttranslator.com"

# location, also known as region.
# required if you're using a multi-service or regional (not global) resource. It can be found in the Azure portal on the Keys and Endpoint page.
location = "<YOUR-RESOURCE-LOCATION>"

path = '/translate'
constructed_url = endpoint + path

params = {
    'api-version': '3.0',
    'from': 'en',
    'to': ['fr', 'zu']
}

headers = {
    'Ocp-Apim-Subscription-Key': key,
    # location required if you're using a multi-service or regional (not global) resource.
    'Ocp-Apim-Subscription-Region': location,
    'Content-type': 'application/json',
    'X-ClientTraceId': str(uuid.uuid4())
}

# You can pass more than one object in body.
body = [{
    'text': 'I would really like to drive your car around the block a few times!'
}]

request = requests.post(constructed_url, params=params, headers=headers, json=body)
response = request.json()

print(json.dumps(response, sort_keys=True, ensure_ascii=False, indent=4, separators=(',', ': ')))
运行 Python 应用程序
将代码示例添加到应用程序后,构建并运行程序:
导航到 "translator-app.py" 文件。
在控制台中键入以下命令:
python translator-app.py
翻译输出:
成功调用后,应会看到以下响应:
[
  {
    "translations": [
      {
        "text": "J'aimerais vraiment conduire votre voiture autour du pâté de maisons plusieurs fois!",
        "to": "fr"
      },
      {
        "text": "Ngingathanda ngempela ukushayela imoto yakho endaweni evimbelayo izikhathi ezimbalwa!",
        "to": "zu"
      }
    ]
  }
]