你当前正在访问 Microsoft Azure Global Edition 技术文档网站。 如果需要访问由世纪互联运营的 Microsoft Azure 中国技术文档网站,请访问 https://docs.azure.cn。
通过 Azure 虚拟网络连接到 Apache Kafka on HDInsight
了解如何通过 Azure 虚拟网络直接连接到 Apache Kafka on HDInsight。 本文档提供有关使用以下配置连接到 Kafka 的信息:
- 从本地网络中的资源。 使用本地网络上的 VPN 设备(软件或硬件)建立此连接。
- 使用 VPN 软件客户端从开发环境。
注意
建议使用 Azure Az PowerShell 模块与 Azure 交互。 请参阅安装 Azure PowerShell 以开始使用。 若要了解如何迁移到 Az PowerShell 模块,请参阅 将 Azure PowerShell 从 AzureRM 迁移到 Az。
架构与规划
HDInsight 不允许通过公共 Internet 直接连接到 Kafka。 Kafka 客户端(生成者和使用者)必须使用以下连接方法之一:
在 Kafka on HDInsight 所在的同一个虚拟网络中运行客户端。 Apache Kafka on HDInsight 快速入门中使用了此配置。 客户端直接在 HDInsight 群集节点上运行,或者在同一网络中的另一个虚拟机上运行。
将专用网络(例如本地网络)连接到虚拟网络。 此配置允许本地网络中的客户端直接使用 Kafka。 若要启用此配置,请执行以下任务:
创建虚拟网络。
创建使用站点到站点配置的 VPN 网关。 本文档中使用的配置连接到本地网络中的 VPN 网关设备。
在虚拟网络中创建 DNS 服务器。
在每个网络中的 DNS 服务器之间配置转发。
在虚拟网络中创建 Kafka on HDInsight 群集。
有关详细信息,请参阅从本地网络连接到 Apache Kafka 部分。
使用 VPN 网关和 VPN 客户端将单个计算机连接到虚拟网络。 若要启用此配置,请执行以下任务:
创建虚拟网络。
创建使用点到站点配置的 VPN 网关。 此配置可同时用于 Windows 和 MacOS 客户端。
在虚拟网络中创建 Kafka on HDInsight 群集。
为 IP 播发配置 Kafka。 此配置允许客户端使用中转站 IP 地址而不是域名进行连接。
在开发系统上下载并使用 VPN 客户端。
有关详细信息,请参阅使用 VPN 客户端连接到 Apache Kafka 部分。
警告
由于存在以下限制,只建议将此配置用于开发目的:
- 每个客户端必须使用 VPN 软件客户端建立连接。
- VPN 客户端不会向虚拟网络传递名称解析请求,因此,必须使用 IP 寻址来与 Kafka 通信。 IP 通信需要在 Kafka 群集上完成其他配置。
有关在虚拟网络中使用 HDInsight 的详细信息,请参阅为 Azure HDInsight 群集规划虚拟网络。
从本地网络连接到 Apache Kafka
若要创建可与本地网络通信的 Kafka 群集,请遵循将 HDInsight 连接到本地网络文档中所述的步骤。
重要
创建 HDInsight 群集时,请选择“Kafka”群集类型。
这些步骤创建以下配置:
- Azure 虚拟网络
- 站点到站点 VPN 网关
- Azure 存储帐户(由 HDInsight 使用)
- Kafka on HDInsight
若要验证 Kafka 客户端是否可从本地连接到群集,请使用示例:Python 客户端部分中的步骤。
使用 VPN 客户端连接到 Apache Kafka
使用本部分中的步骤创建以下配置:
- Azure 虚拟网络
- 点到站点 VPN 网关
- Azure 存储帐户(由 HDInsight 使用)
- Kafka on HDInsight
遵循为点到站点连接使用自签名证书文档中所述的步骤。 本文档创建网关所需的证书。
打开 PowerShell 提示符,然后使用下列代码登录 Azure 订阅:
Connect-AzAccount
# If you have multiple subscriptions, uncomment to set the subscription
#Select-AzSubscription -SubscriptionName "name of your subscription"
使用下列代码创建包含配置信息的变量:
# Prompt for generic information
$resourceGroupName = Read-Host "What is the resource group name?"
$baseName = Read-Host "What is the base name? It is used to create names for resources, such as 'net-basename' and 'kafka-basename':"
$location = Read-Host "What Azure Region do you want to create the resources in?"
$rootCert = Read-Host "What is the file path to the root certificate? It is used to secure the VPN gateway."

# Prompt for HDInsight credentials
$adminCreds = Get-Credential -Message "Enter the HTTPS user name and password for the HDInsight cluster" -UserName "admin"
$sshCreds = Get-Credential -Message "Enter the SSH user name and password for the HDInsight cluster" -UserName "sshuser"

# Names for Azure resources
$networkName = "net-$baseName"
$clusterName = "kafka-$baseName"
$storageName = "store$baseName" # Can't use dashes in storage names
$defaultContainerName = $clusterName
$defaultSubnetName = "default"
$gatewaySubnetName = "GatewaySubnet"
$gatewayPublicIpName = "GatewayIp"
$gatewayIpConfigName = "GatewayConfig"
$vpnRootCertName = "rootcert"
$vpnName = "VPNGateway"

# Network settings
$networkAddressPrefix = "10.0.0.0/16"
$defaultSubnetPrefix = "10.0.0.0/24"
$gatewaySubnetPrefix = "10.0.1.0/24"
$vpnClientAddressPool = "172.16.201.0/24"

# HDInsight settings
$hdiWorkerNodes = 4
$hdiVersion = "3.6"
$hdiType = "Kafka"
使用下列代码创建 Azure 资源组和虚拟网络:
# Create the resource group that contains everything
New-AzResourceGroup -Name $resourceGroupName -Location $location

# Create the subnet configuration
$defaultSubnetConfig = New-AzVirtualNetworkSubnetConfig -Name $defaultSubnetName `
    -AddressPrefix $defaultSubnetPrefix
$gatewaySubnetConfig = New-AzVirtualNetworkSubnetConfig -Name $gatewaySubnetName `
    -AddressPrefix $gatewaySubnetPrefix

# Create the subnet
New-AzVirtualNetwork -Name $networkName `
    -ResourceGroupName $resourceGroupName `
    -Location $location `
    -AddressPrefix $networkAddressPrefix `
    -Subnet $defaultSubnetConfig, $gatewaySubnetConfig

# Get the network & subnet that were created
$network = Get-AzVirtualNetwork -Name $networkName `
    -ResourceGroupName $resourceGroupName
$gatewaySubnet = Get-AzVirtualNetworkSubnetConfig -Name $gatewaySubnetName `
    -VirtualNetwork $network
$defaultSubnet = Get-AzVirtualNetworkSubnetConfig -Name $defaultSubnetName `
    -VirtualNetwork $network

# Set a dynamic public IP address for the gateway subnet
$gatewayPublicIp = New-AzPublicIpAddress -Name $gatewayPublicIpName `
    -ResourceGroupName $resourceGroupName `
    -Location $location `
    -AllocationMethod Dynamic
$gatewayIpConfig = New-AzVirtualNetworkGatewayIpConfig -Name $gatewayIpConfigName `
    -Subnet $gatewaySubnet `
    -PublicIpAddress $gatewayPublicIp

# Get the certificate info
# Get the full path in case a relative path was passed
$rootCertFile = Get-ChildItem $rootCert
$cert = New-Object System.Security.Cryptography.X509Certificates.X509Certificate2($rootCertFile)
$certBase64 = [System.Convert]::ToBase64String($cert.RawData)
$p2sRootCert = New-AzVpnClientRootCertificate -Name $vpnRootCertName `
    -PublicCertData $certBase64

# Create the VPN gateway
New-AzVirtualNetworkGateway -Name $vpnName `
    -ResourceGroupName $resourceGroupName `
    -Location $location `
    -IpConfigurations $gatewayIpConfig `
    -GatewayType Vpn `
    -VpnType RouteBased `
    -EnableBgp $false `
    -GatewaySku Standard `
    -VpnClientAddressPool $vpnClientAddressPool `
    -VpnClientRootCertificates $p2sRootCert
警告
这个过程可能需要几分钟才能完成。
使用下列代码创建 Azure 存储帐户和 BLob 容器:
# Create the storage account
New-AzStorageAccount `
    -ResourceGroupName $resourceGroupName `
    -Name $storageName `
    -SkuName Standard_GRS `
    -Location $location `
    -Kind StorageV2 `
    -EnableHttpsTrafficOnly 1

# Get the storage account keys and create a context
$defaultStorageKey = (Get-AzStorageAccountKey -ResourceGroupName $resourceGroupName `
    -Name $storageName)[0].Value
$storageContext = New-AzStorageContext -StorageAccountName $storageName `
    -StorageAccountKey $defaultStorageKey

# Create the default storage container
New-AzStorageContainer -Name $defaultContainerName `
    -Context $storageContext
使用下列代码创建 HDInsight 群集:
# Create the HDInsight cluster
New-AzHDInsightCluster `
    -ResourceGroupName $resourceGroupName `
    -ClusterName $clusterName `
    -Location $location `
    -ClusterSizeInNodes $hdiWorkerNodes `
    -ClusterType $hdiType `
    -OSType Linux `
    -Version $hdiVersion `
    -HttpCredential $adminCreds `
    -SshCredential $sshCreds `
    -DefaultStorageAccountName "$storageName.blob.core.windows.net" `
    -DefaultStorageAccountKey $defaultStorageKey `
    -DefaultStorageContainer $defaultContainerName `
    -DisksPerWorkerNode 2 `
    -VirtualNetworkId $network.Id `
    -SubnetName $defaultSubnet.Id
警告
此过程完成时间大约为 15 分钟。
为 IP 播发配置 Kafka
默认情况下,Apache Zookeeper 向客户端返回 Kafka 中转站的域名。 此配置不使用 VPN 软件客户端,因为它无法对虚拟网络中的实体使用名称解析。 对于此配置,请使用以下步骤来配置 Kafka,以播发 IP 地址而不是域名:
使用 Web 浏览器转到
https://CLUSTERNAME.azurehdinsight.net。 将CLUSTERNAME替换为 HDInsight 群集中 Kafka 的名称。出现提示时,使用群集的 HTTPS 用户名称密码。 将显示群集的 Ambari Web UI。
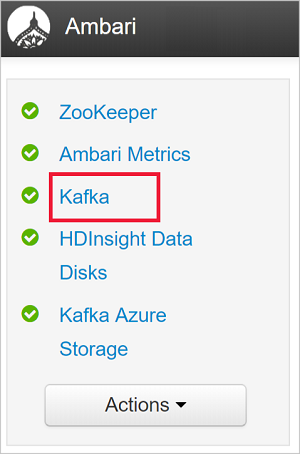
要查看 Kafka 的相关信息,请从左侧列表中选择“Kafka”。
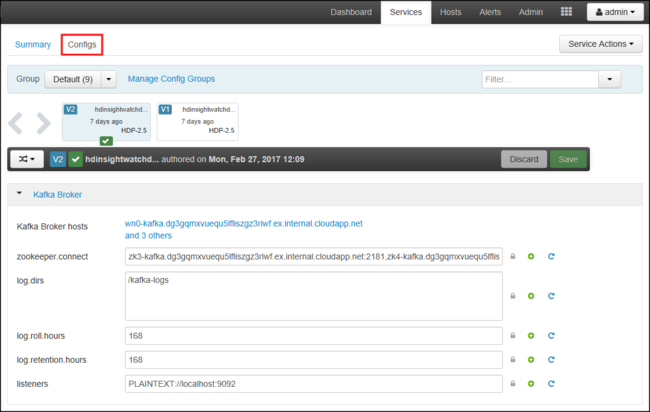
要查看 Kafka 配置,请在顶端的中间位置选择“配置”。
要查找“kafka-env” 配置,请在右上方的“筛选器”字段中输入
kafka-env。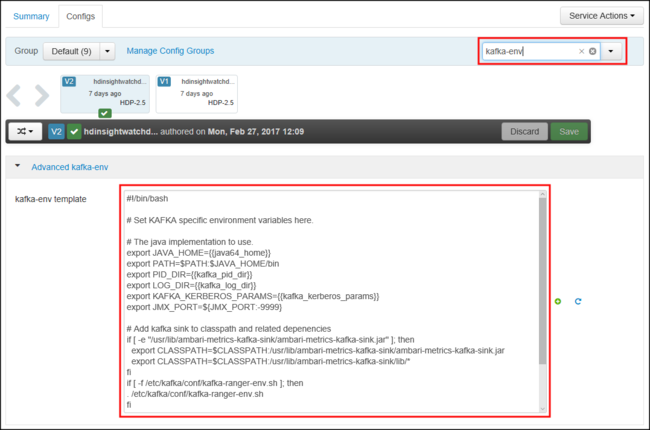
要配置 Kafka 来播发 IP 地址,请将下列文本添加到“kafka-env-template”字段的底部:
# Configure Kafka to advertise IP addresses instead of FQDN
IP_ADDRESS=$(hostname -i)
echo advertised.listeners=$IP_ADDRESS
sed -i.bak -e '/advertised/{/advertised@/!d;}' /usr/hdp/current/kafka-broker/conf/server.properties
echo "advertised.listeners=PLAINTEXT://$IP_ADDRESS:9092" >> /usr/hdp/current/kafka-broker/conf/server.properties
要配置 Kafka 侦听的接口,请在右上方的“筛选器”字段中输入
listeners。要将 Kafka 配置为侦听所有网络接口,请将“侦听器”字段的值更改为
PLAINTEXT://0.0.0.0:9092。单击“保存”按钮保存配置。 输入描述更改的文本消息。 保存更改后,请选择“确定”。

要防止在重启 Kafka 时出错,请使用“服务操作”按钮,并选择“打开维护模式”。 选择“确定”完成操作。
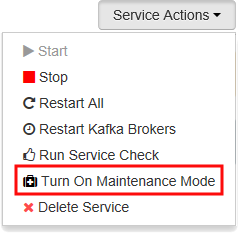
要重启 Kafka,请使用“重启”按钮,并选择“重启所有受影响的项”。 确认重启,在操作完成后再使用“确定”按钮。

要禁用维护模式,请使用“服务操作”按钮,并选择“关闭维护模式”。 选择“确定”完成操作。
连接到 VPN 网关
若要连接到 VPN 网关,请按配置点到站点连接文档中连接到 Azure 部分进行操作。
示例:Python 客户端
若要验证与 Kafka 的连接,请使用以下步骤来创建并运行 Python 生成者和使用者:
使用以下方法之一检索 Kafka 群集中节点的完全限定域名 (FQDN) 和 IP 地址:
$resourceGroupName = "The resource group that contains the virtual network used with HDInsight"

$clusterNICs = Get-AzNetworkInterface -ResourceGroupName $resourceGroupName | where-object {$_.Name -like "*node*"}

$nodes = @()
foreach($nic in $clusterNICs) {
    $node = new-object System.Object
    $node | add-member -MemberType NoteProperty -name "Type" -value $nic.Name.Split('-')[1]
    $node | add-member -MemberType NoteProperty -name "InternalIP" -value $nic.IpConfigurations.PrivateIpAddress
    $node | add-member -MemberType NoteProperty -name "InternalFQDN" -value $nic.DnsSettings.InternalFqdn
    $nodes += $node
}
$nodes | sort-object Type
az network nic list --resource-group <resourcegroupname> --output table --query "[?contains(name,'node')].{NICname:name,InternalIP:ipConfigurations[0].privateIpAddress,InternalFQDN:dnsSettings.internalFqdn}"此脚本假设
$resourceGroupName是包含虚拟网络的 Azure 资源组的名称。保存返回的信息供后续步骤使用。
使用下列命令安装 kafka-python 客户端:
pip install kafka-python要将数据发送到 Kafka,请使用下列 Python 代码:
from kafka import KafkaProducer
# Replace the `ip_address` entries with the IP address of your worker nodes
# NOTE: you don't need the full list of worker nodes, just one or two.
producer = KafkaProducer(bootstrap_servers=['kafka_broker_1','kafka_broker_2'])
for _ in range(50):
   producer.send('testtopic', b'test message')
将
'kafka_broker'条目替换为本部分中步骤 1 返回的地址:如果使用软件 VPN 客户端,请将
kafka_broker条目替换为工作节点的 IP 地址。如果已启用通过自定义 DNS 服务器进行名称解析,请将
kafka_broker条目替换为工作节点的 FQDN。注意
此代码将字符串
test message发送给主题testtopic。 Kafka on HDInsight 的默认配置是不创建主题(如果它尚不存在)。 请参阅如何将 Apache Kafka on HDInsight 配置为自动创建主题。 或者,可以在生成消息之前手动创建主题。
要从 Kafka 检索消息,请使用下列 Python 代码:
from kafka import KafkaConsumer
# Replace the `ip_address` entries with the IP address of your worker nodes
# Again, you only need one or two, not the full list.
# Note: auto_offset_reset='earliest' resets the starting offset to the beginning
#       of the topic
consumer = KafkaConsumer(bootstrap_servers=['kafka_broker_1','kafka_broker_2'],auto_offset_reset='earliest')
consumer.subscribe(['testtopic'])
for msg in consumer:
  print (msg)
将
'kafka_broker'条目替换为本部分中步骤 1 返回的地址:如果使用软件 VPN 客户端,请将
kafka_broker条目替换为工作节点的 IP 地址。如果已启用通过自定义 DNS 服务器进行名称解析,请将
kafka_broker条目替换为工作节点的 FQDN。
后续步骤
有关在虚拟网络中使用 HDInsight 的详细信息,请参阅为 Azure HDInsight 群集规划虚拟网络部署文档。
有关使用点到站点 VPN 网关创建 Azure 虚拟网络的详细信息,请参阅下列文档:
有关使用 Apache Kafka on HDInsight 的详细信息,请参阅以下文档: