步骤 2:对适配器和连接属性分类

完成时间: 30 分钟
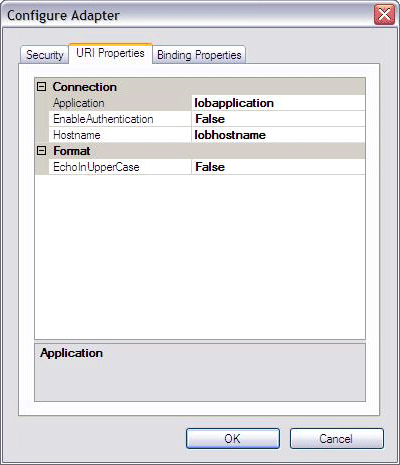
在此步骤中,将更新 EchoAdapterBindingElement 和 EchoAdapterBindingElementExtensionElement 类,以将类别分配给适配器和连接属性。 这样,属性将按“添加适配器服务引用插件”和“使用适配器服务加载项”工具中的类别进行逻辑分组。 例如,如果希望 “应用程序”、“ EnableAuthentication”和“ 主机名” 属性显示在“ 连接 ”类别下,如下所示,则需要将“连接”类别分配给每个“应用程序”、“EnableAuthentication”和“主机名”属性。

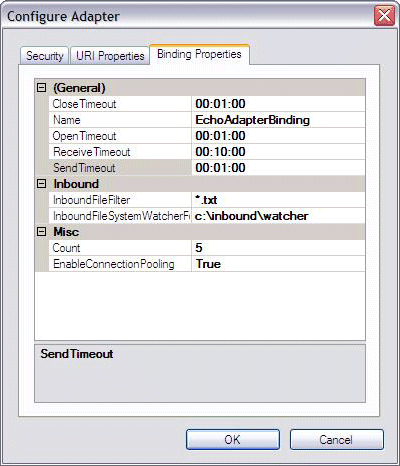
同样,如果希望 InboundFileFilter 和 InboundFleSystemWatcherFolder 属性显示在“ 入站” 类别下,如下所示,则需要为每个属性分配入站类别。 如果希望 Count 和 EnableConnectionPooling 显示在 “杂项 ”类别下,则需要将杂项类别分配给每个类别。

请记住,可以使用所选的任何类别名称分配属性。 在此示例中,由于 EnableConnnectionPooling 属性不属于任何其他类别,因此将其分类为杂项 (杂项) 。 至于 InboundFileFilter 属性,由于它在示例中的入站处理期间使用,因此更适合将 Inbound 分配给 属性,而不是杂项。 下面是回显适配器的完整自定义属性分类。
| 属性 | 类别 |
|---|---|
| InboundFileFilter | 入站 |
| InboundFileSystemWatcherFolder | 入站 |
| 计数 | 杂项 |
| EnableConnectionPooling | 杂项 |
| 应用程序 | 连接 |
| EnableAuthentication | 连接 |
| 主机名 | 连接 |
| EchoInUpperCase | 格式 |
除了这些更改,还可以修改 EchoAdapterHandlerBase 的 Dispose 方法。
有关回显适配器公开的适配器属性,请参阅 教程 1:开发回显适配器的适配器属性部分。
必备条件
在开始此步骤之前,必须完成 步骤 1:使用 WCF LOB 适配器开发向导创建回显适配器项目。 还应熟悉 System.ServiceModel.Configuration.BindingElementExtensionElement 和 System.ServiceModel.Configuration.StandardBindingElement 类。
更新 EchoAdapterHandlerBase Dispose 方法
在解决方案资源管理器中,双击 EchoAdapterHandlerBase.cs 文件。
从 Dispose 方法中删除以下语句:
throw new NotImplementedException("The method or operation is not implemented.");修改后的方法应如下所示:
protected virtual void Dispose(bool disposing)
{
   //
   //TODO: Implement Dispose. Override this method in respective Handler classes
   //
}
更新适配器属性类
在解决方案资源管理器中,双击 EchoAdapterBindingElement.cs 文件。
在 Visual Studio 编辑器中,展开 “自定义生成的属性” 区域。
若要将 杂项 类别分配给 Count 属性,请将以下单个语句添加到 Count 实现的开头。
[System.ComponentModel.Category("")]Count 实现现在应与以下内容匹配:
[System.ComponentModel.Category("")]
[System.Configuration.ConfigurationProperty("count", DefaultValue = 5)]
public int Count
{
    get
    {
        return ((int)(base["Count"]));
    }
    set
    {
        base["Count"] = value;
    }
}
若要将 Misc 类别分配给 EnableConnectionPooling 属性,请将以下单个语句添加到 EnableConnectionPooling 实现的开头。
[System.ComponentModel.Category("")]若要将 Inbound 类别分配给 InboundFileFilter 属性,请将以下单个语句添加到 InboundFileFilter 实现的开头。
[System.ComponentModel.Category("Inbound")]若要将 Inbound 类别分配到 inboundFleSystemWatcherFolder 属性,请将以下单个语句添加到 inboundFleSystemWatcherFolder 实现的开头。
[System.ComponentModel.Category("Inbound")]检查以确保 自定义生成的属性 区域中的代码与以下内容匹配:
[System.ComponentModel.Category("")]
[System.Configuration.ConfigurationProperty("count", DefaultValue = 5)]
public int Count
{
    get
    {
        return ((int)(base["Count"]));
    }
    set
    {
        base["Count"] = value;
    }
}

[System.ComponentModel.Category("")]
[System.Configuration.ConfigurationProperty("enableConnectionPooling", DefaultValue = true)]
public bool EnableConnectionPooling
{
    get
    {
        return ((bool)(base["EnableConnectionPooling"]));
    }
    set
    {
        base["EnableConnectionPooling"] = value;
    }
}

[System.ComponentModel.Category("Inbound")]
[System.Configuration.ConfigurationProperty("inboundFileFilter", DefaultValue = "*.txt")]
public string InboundFileFilter
{
    get
    {
        return ((string)(base["InboundFileFilter"]));
    }
    set
    {
        base["InboundFileFilter"] = value;
    }
}

[System.ComponentModel.Category("Inbound")]
[System.Configuration.ConfigurationProperty("inboundFileSystemWatcherFolder", DefaultValue = "{InboundFileSystemWatcherFolder}")]
public string InboundFileSystemWatcherFolder
{
    get
    {
        return ((string)(base["InboundFileSystemWatcherFolder"]));
    }
    set
    {
        base["InboundFileSystemWatcherFolder"] = value;
    }
}

#endregion Custom Generated Properties
更新连接属性
在解决方案资源管理器中,双击 EchoAdapterConnectionUri.cs 文件。
在 Visual Studio 编辑器中,展开 “自定义生成的属性” 区域。
若要将 Format 类别分配给 EchoInUpperCase 属性,请将以下单个语句添加到 EchoInUpperCase 实现的开头。
[System.ComponentModel.Category("Format")]若要将 Connection 类别分配给 Hostname 属性,请将以下单个语句添加到 Hostname 实现的开头。
[System.ComponentModel.Category("Connection")]若要将 Connection 类别分配给 Application 属性,请将以下单个语句添加到 Application 实现的开头。
[System.ComponentModel.Category("Connection")]若要将 Connection 类别分配给 EnableAuthentication 属性,请将以下单个语句添加到 EnableAuthentication 实现的开头。
[System.ComponentModel.Category("Connection")]检查以确保 自定义生成的属性 区域中的代码与以下内容匹配:
#region Custom Generated Properties
        [System.ComponentModel.Category("Format")]
        public bool EchoInUpperCase
        {
            get
            {
                return this.echoInUpperCase;
            }
            set
            {
                this.echoInUpperCase = value;
            }
        }

        [System.ComponentModel.Category("Connection")]
        public string Hostname
        {
            get
            {
                return this.hostname;
            }
            set
            {
                this.hostname = value;
            }
        }

        [System.ComponentModel.Category("Connection")]
        public string Application
        {
            get
            {
                return this.application;
            }
            set
            {
                this.application = value;
            }
        }

        [System.ComponentModel.Category("Connection")]
        public bool EnableAuthentication
        {
            get
            {
                return this.enableAuthentication;
            }
            set
            {
                this.enableAuthentication = value;
            }
        }
        #endregion Custom Generated Properties
在 Visual Studio 的“ 文件 ”菜单中,单击“ 全部保存”。
注意
保存所做的工作。 此时可以安全地关闭 Visual Studio,也可以转到下一步 ,即步骤 3:实现 Echo 适配器的连接。
我刚才做了些什么?
你刚刚更新了类,将类别分配给每个适配器以及由回显适配器公开的连接属性。
后续步骤
实现连接、元数据浏览、搜索和解析功能以及出站消息交换。 最后,生成并部署回显适配器。
另请参阅
反馈
即将发布:在整个 2024 年,我们将逐步淘汰作为内容反馈机制的“GitHub 问题”,并将其取代为新的反馈系统。 有关详细信息,请参阅:https://aka.ms/ContentUserFeedback。
提交和查看相关反馈