ISAPI/CGI 限制 <isapiCgiRestriction>
概述
<security> 元素的 <isapiCgiRestriction> 元素可用于指定一份清单,其中包含可以在 Internet Information Services (IIS) 7 上运行的通用网关接口 (CGI) 和 Internet 服务器应用程序编程接口 (ISAPI) 应用程序。 此元素允许你确保恶意用户无法将未经授权的 CGI 和 ISAPI 二进制文件复制到 Web 服务器,然后运行它们。
仅当站点或应用程序使用以经典模式运行的应用程序池时,才需要使用此元素来配置 Web 服务器。 <isapiCgiRestriction> 元素中配置的限制仅适用于 ISAPI 和 CGI 代码。
<isapiCgiRestriction> 元素包含 <add> 元素的集合。 每个 <add> 元素定义一个不同的二进制文件,该二进制文件不能以经典模式下在 IIS 7 服务器上运行。
例如,如果创建了 ASP.NET 2.0 应用程序,并将应用程序配置为使用在经典模式下运行的应用程序池,则 ASP.NET 应用程序的任何请求都必须经由 aspnet_isapi.dll 处理。 为了确保 IIS 处理 ASP.NET 请求,IIS 将以 <add> 元素填充 <isapiCgiRestriction> 元素,前者包含允许的属性,属性值设置为 true。
如果将允许的属性更改为 false,并以经典模式离开应用程序池,ASP.NET 请求将失败。 但是,如果将应用程序池更改为集成模式,IIS 将使用集成请求管道来处理 ASP.NET 请求,这会绕过你已配置的 ISAPI 和 CGI 限制。
<isapiCgiRestriction> 元素与 <applicationDependencies> 元素协同工作,以定义哪些应用程序依赖于一个或多个 CGI 或 ISAPI 扩展限制。
兼容性
| 版本 | 说明 |
|---|---|
| IIS 10.0 | <isapiCgiRestriction> 元素在 IIS 10.0 中未进行修改。 |
| IIS 8.5 | <isapiCgiRestriction> 元素在 IIS 8.5 中未进行修改。 |
| IIS 8.0 | <isapiCgiRestriction> 元素在 IIS 8.0 中未进行修改。 |
| IIS 7.5 | <isapiCgiRestriction> 元素未在 IIS 7.5 中进行修改。 |
| IIS 7.0 | <isapiCgiRestriction> 元素是在 IIS 7.0 中引入的。 |
| IIS 6.0 | <isapiCgiRestriction> 集合取代了 IIS 6.0 的 IIsWebService 源数据库对象的 WebSvcExtRestrictionList 属性。 |
安装
只有在 IIS 7 及更高版本的服务器上安装了 CGI 或 ISAPI 扩展模块后,<isapiCgiRestriction> 集合才可用。 不能独立于这些功能进行安装。
Windows Server 2012 或 Windows Server 2012 R2
- 在任务栏上,单击 “服务器管理器”。
- 在“服务器管理器”中,单击“管理”菜单,然后单击“添加角色和功能”。
- 在“添加角色和功能”向导中,单击“下一步”。 选择安装类型,然后单击“下一步”。 选择目标服务器,然后单击“下一步”。
- 在“服务器角色”页上,依次展开“Web 服务器 (IIS)”、“Web 服务器”、“应用程序开发”,然后选择“CGI”或“ISAPI 扩展”。 单击 “下一步” 。
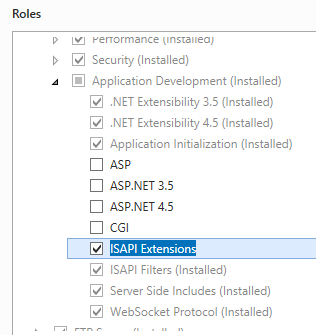 .
. - 在“选择功能”页上,单击“下一步”。
- 在“确认安装选择”页上,单击“安装”。
- 在“结果” 页面中单击“关闭” 。
Windows 8 或 Windows 8.1
- 在“开始”屏幕上,将指针一直移动到左下角,右键单击“开始”按钮,然后单击“控制面板”。
- 在“控制面板”中,单击“程序与功能”,然后单击“打开或关闭 Windows 功能”。
- 依次展开“Internet 信息服务”、“万维网服务”和“应用程序开发功能”,然后选择“CGI”或“ISAPI 扩展”。
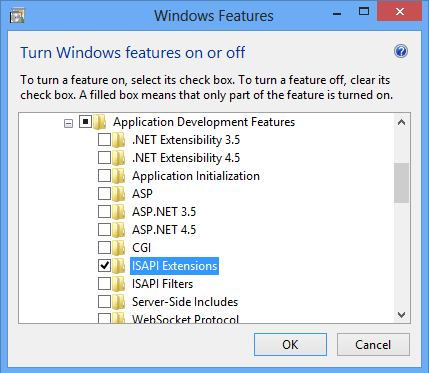
- 单击“确定”。
- 单击“关闭” 。
Windows Server 2008 或 Windows Server 2008 R2
- 在任务栏上,单击“开始”,指向“管理工具”,然后单击“服务器管理器”。
- 在“服务器管理器”层次结构窗格中,展开“角色”,然后单击“Web 服务器 (IIS)”。
- 在“Web 服务器 (IIS)”窗格中,滚动到“角色服务”部分,然后单击“添加角色服务”。
- 在“添加角色服务向导”的“选择角色服务”页上,选择“CGI”或“ISAPI 扩展”。
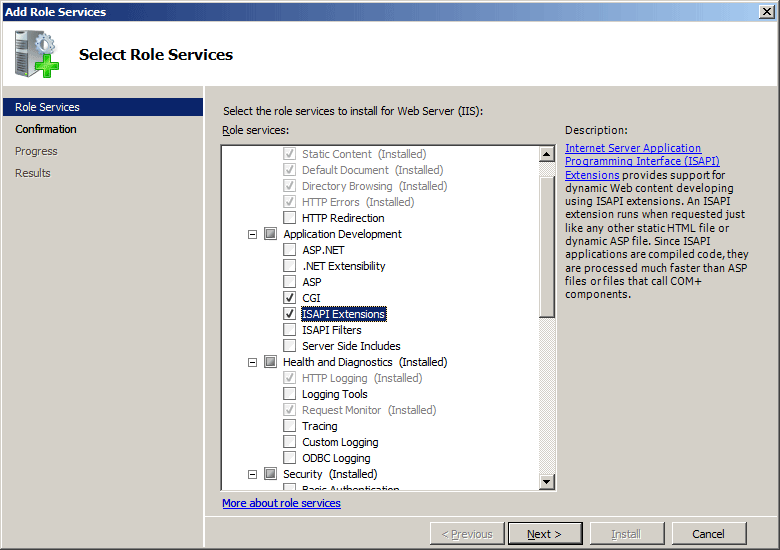
- 如果出现“添加角色服务”对话框,请单击“添加所需的角色服务”。 (仅当尚未在服务器上安装任何必备角色服务时,才会显示此页面。)
- 在“选择角色服务”页上,单击“下一步”。
- 在“确认安装选择”页中,单击“安装”。
- 在“结果” 页面中单击“关闭” 。
Windows Vista 或 Windows 7
- 在任务栏上,单击“开始”,然后单击“控制面板”。
- 在“控制面板”中,单击“程序与功能”,然后单击“打开或关闭 Windows 功能”。
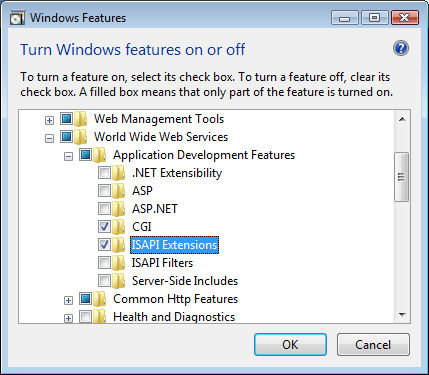
- 在“Windows 功能”对话框中,依次展开“Internet Information Services”、“万维网服务”、“应用程序开发功能”。
- 选择“CGI”或“ISAPI 扩展”,然后单击“确定”。
操作方式
如何添加 ISAPI 或 CGI 限制
打开 Internet Information Services (IIS) 管理器:
如果使用的是 Windows Server 2012 或 Windows Server 2012 R2:
- 在任务栏上,单击“服务器管理器”,单击“工具”,然后单击“Internet Information Services (IIS)管理器”。
如果使用的是 Windows 8 或 Windows 8.1:
- 按住 Windows 键,按字母 X,然后单击“控制面板”。
- 单击“管理工具”,然后双击“Internet 信息服务(IIS)管理器”。
如果使用的是 Windows Server 2008 或 Windows Server 2008 R2:
- 在任务栏上,单击“开始”,指向“管理工具”,然后单击“Internet Information Services (IIS)管理器”。
如果使用的是 Windows Vista 或 Windows 7:
- 在任务栏上,单击“开始”,然后单击“控制面板”。
- 双击“管理工具”,然后双击“Internet 信息服务(IIS)管理器”。
在“连接”窗格中,单击服务器名称。
在“开始”窗格中,双击“ISAPI 和 CGI 限制”。
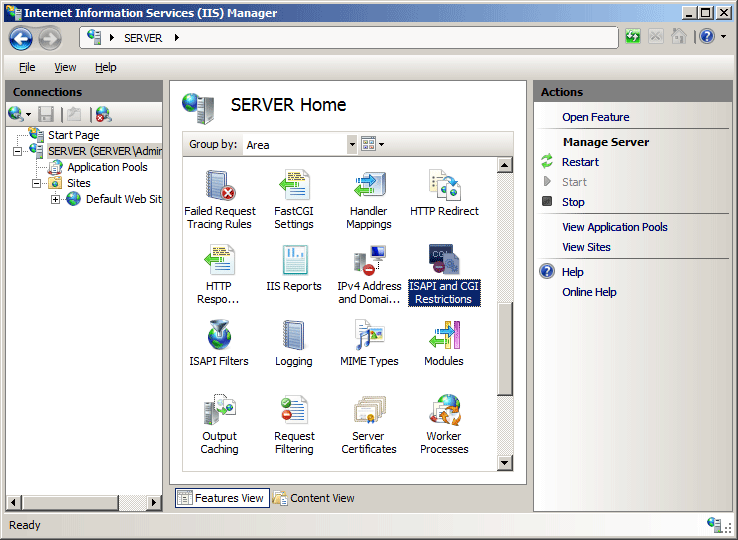
在“操作”窗格中,单击“添加...”。
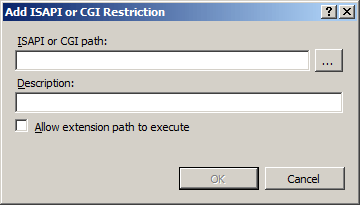
在“添加 ISAPI 或 CGI 限制”对话框中,在“ISAPI 或 CGI 路径”框键入要添加的二进制文件路径,在“说明”框中键入二进制文件的说明,选中“允许执行扩展路径选项”复选框以允许二进制文件在服务器上运行,然后单击“确定”。
配置
只能在服务器级别的 ApplicationHost.config 文件中配置 <isapiCgiRestriction> 集合。
特性
| 属性 | 说明 |
|---|---|
notListedIsapisAllowed |
可选布尔属性。 指定是否允许在此服务器上运行未列出的 ISAPI 模块。 默认值为 false。 |
notListedCgisAllowed |
可选布尔属性。 指定是否允许在此服务器上运行未列出的 CGI 程序。 默认值为 false。 |
子元素
| 元素 | 说明 |
|---|---|
add |
可选元素。 向 ISAPI 和 CGI 限制的集合中添加限制。 |
remove |
可选元素。 从 isapiCgiRestriction 集合中移除对限制的引用。 |
clear |
可选元素。 从 isapiCgiRestriction 集合中移除对限制的所有引用。 |
配置示例
以下配置示例是安装 ASP 和 ASP.NET 2.0 版之后,IIS 7.0 的 <isapiCgiRestriction> 元素配置。
<security>
   <isapiCgiRestriction>
      <add allowed="true" groupId="ASP"
         path="%windir%\system32\inetsrv\asp.dll"
         description="Active Server Pages" />
      <add allowed="true" groupId="ASP.NET v2.0.50727"
         path="%windir%\Microsoft.NET\Framework\v2.0.50727\aspnet_isapi.dll"
         description="ASP.NET v2.0.50727" />
   </isapiCgiRestriction>
</security>
代码示例
以下示例为位于 C:\Inetpub\www.contoso.com\wwwroot 的网站的内容文件夹中的自定义 ISAPI 扩展添加一个 ISAPI/CGI 限制。 这些示例指定 ISAPI 扩展的名称、路径和组,并启用扩展。
AppCmd.exe
appcmd.exe set config -section:system.webServer/security/isapiCgiRestriction /+"[path='C:\Inetpub\www.contoso.com\wwwroot\isapi\custom.dll',allowed='True',groupId='ContosoGroup',description='Contoso Extension']" /commit:apphost
注意
使用 AppCmd.exe 配置这些设置时,必须确保将 commit 参数设置为 apphost。 这会将配置设置提交到 ApplicationHost.config 文件中的相应位置部分。
C#
using System;
using System.Text;
using Microsoft.Web.Administration;

internal static class Sample
{
   private static void Main()
   {
      using (ServerManager serverManager = new ServerManager())
      {
         Configuration config = serverManager.GetApplicationHostConfiguration();
         ConfigurationSection isapiCgiRestrictionSection = config.GetSection("system.webServer/security/isapiCgiRestriction");
         ConfigurationElementCollection isapiCgiRestrictionCollection = isapiCgiRestrictionSection.GetCollection();

         ConfigurationElement addElement = isapiCgiRestrictionCollection.CreateElement("add");
         addElement["path"] = @"C:\Inetpub\www.contoso.com\wwwroot\isapi\custom.dll";
         addElement["allowed"] = true;
         addElement["groupId"] = @"ContosoGroup";
         addElement["description"] = @"Contoso Extension";
         isapiCgiRestrictionCollection.Add(addElement);

         serverManager.CommitChanges();
      }
   }
}
VB.NET
Imports System
Imports System.Text
Imports Microsoft.Web.Administration

Module Sample
   Sub Main()
      Dim serverManager As ServerManager = New ServerManager
      Dim config As Configuration = serverManager.GetApplicationHostConfiguration
      Dim isapiCgiRestrictionSection As ConfigurationSection = config.GetSection("system.webServer/security/isapiCgiRestriction")
      Dim isapiCgiRestrictionCollection As ConfigurationElementCollection = isapiCgiRestrictionSection.GetCollection

      Dim addElement As ConfigurationElement = isapiCgiRestrictionCollection.CreateElement("add")
      addElement("path") = "C:\Inetpub\www.contoso.com\wwwroot\isapi\custom.dll"
      addElement("allowed") = True
      addElement("groupId") = "ContosoGroup"
      addElement("description") = "Contoso Extension"
      isapiCgiRestrictionCollection.Add(addElement)

      serverManager.CommitChanges()
   End Sub
End Module
JavaScript
var adminManager = new ActiveXObject('Microsoft.ApplicationHost.WritableAdminManager');
adminManager.CommitPath = "MACHINE/WEBROOT/APPHOST";
var isapiCgiRestrictionSection = adminManager.GetAdminSection("system.webServer/security/isapiCgiRestriction", "MACHINE/WEBROOT/APPHOST");
var isapiCgiRestrictionCollection = isapiCgiRestrictionSection.Collection;

var addElement = isapiCgiRestrictionCollection.CreateNewElement("add");
addElement.Properties.Item("path").Value = "C:\\Inetpub\\www.contoso.com\\wwwroot\\isapi\\custom.dll";
addElement.Properties.Item("allowed").Value = true;
addElement.Properties.Item("groupId").Value = "ContosoGroup";
addElement.Properties.Item("description").Value = "Contoso Extension";
isapiCgiRestrictionCollection.AddElement(addElement);

adminManager.CommitChanges();
VBScript
Set adminManager = createObject("Microsoft.ApplicationHost.WritableAdminManager")
adminManager.CommitPath = "MACHINE/WEBROOT/APPHOST"
Set isapiCgiRestrictionSection = adminManager.GetAdminSection("system.webServer/security/isapiCgiRestriction", "MACHINE/WEBROOT/APPHOST")
Set isapiCgiRestrictionCollection = isapiCgiRestrictionSection.Collection

Set addElement = isapiCgiRestrictionCollection.CreateNewElement("add")
addElement.Properties.Item("path").Value = "C:\Inetpub\www.contoso.com\wwwroot\isapi\custom.dll"
addElement.Properties.Item("allowed").Value = True
addElement.Properties.Item("groupId").Value = "ContosoGroup"
addElement.Properties.Item("description").Value = "Contoso Extension"
isapiCgiRestrictionCollection.AddElement(addElement)

adminManager.CommitChanges()
反馈
即将发布:在整个 2024 年,我们将逐步淘汰作为内容反馈机制的“GitHub 问题”,并将其取代为新的反馈系统。 有关详细信息,请参阅:https://aka.ms/ContentUserFeedback。
提交和查看相关反馈