在 Windows PowerShell 中进行 Planner 更改的先决条件
此过程完整介绍了如何下载在 PowerShell 中运行 Planner 管理命令所需的文件。
如果刚接触 Windows PowerShell,请查看 Windows PowerShell 入门。
下载 Planner 租户管理员 PowerShell 命令
注意
只有全局管理员才能运行 Planner 租户管理员 Powershell 命令。
注意
下载此程序包即表示你同意随附的许可证和条款。
下载 Planner 租户管理员 PowerShell 文件。 将其解压缩到可从 PowerShell 访问的位置。
取消阻止文件
你需要“取消阻止”在 Planner 租户管理员 PowerShell 包中下载的两个文件,以便在 PowerShell 中使用这些文件。 这是因为默认情况下,不允许执行从 Internet 下载的脚本。 需要取消阻止的文件包括:
- plannertenantadmin.psm1
- microsoft.identity.client.dll
请执行以下操作以取消阻止这些文件:
在文件资源管理器中,转到解压文件的位置。
右键单击上面提到的解压缩文件之一,然后选择“属性”。
在“常规”选项卡上,选择“取消阻止”。
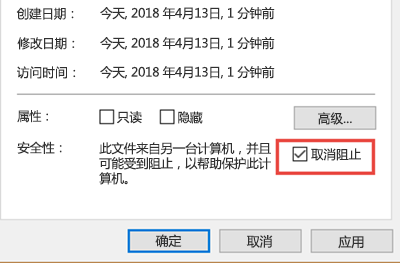
选择“确定”。
对其余两个文件重复这些步骤。
加载 Planner 租户管理员 PowerShell 模块
取消阻止文件后,执行以下操作以加载 Planner 租户管理员 PowerShell 模块:
启动 Windows PowerShell。 在 PowerShell 中,键入以下内容以仅为此会话运行从 Internet 下载的脚本。 它可能会提示你通过键入“Y”进行确认。
Set-ExecutionPolicy -ExecutionPolicy Unrestricted -Scope Process键入以下内容以运行 PlannerTenantAdmin PowerShell 脚本。 这将导入包含所有可用的 cmdlet 的模块。
Import-module "<location of the plannertenantadmin.psm1 file you unzipped>"例如,如果文件存储在 C:\AdminScript 中,请键入:
Import-module "C:\AdminScript\PlannerTenantAdmin.psm1"
现在,你已准备好使用 PowerShell 在组织级别上对 Planner 进行更改。