检测和跟踪多个触摸点
以下步骤说明如何使用 Windows Touch 跟踪多个触摸点。
- 创建应用程序并启用 Windows Touch。
- 为 WM_TOUCH 和跟踪点添加处理程序。
- 绘制点。
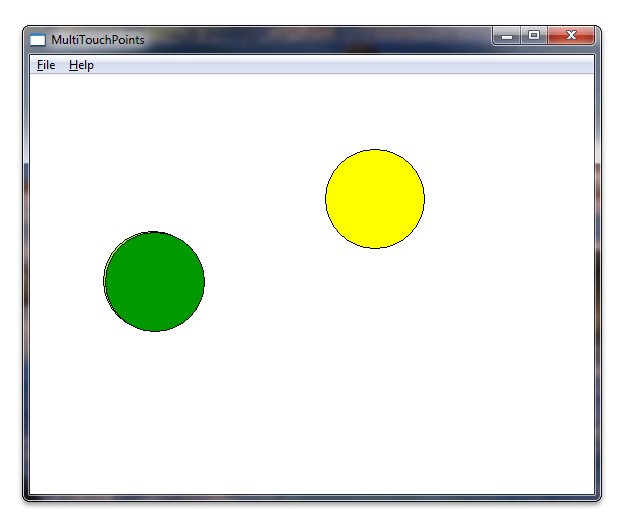
运行应用程序后,它将在每次触摸下呈现圆圈。 以下屏幕截图显示了应用程序在运行时的外观。
创建应用程序并启用 Windows Touch
从使用 Microsoft Visual Studio 向导的 Microsoft Win32 应用程序开始。 完成向导后,通过在 targetver.h 中设置 Windows 版本并在应用程序中包括 windows.h 和 windowsx.h 来添加对 Windows Touch 消息的支持。 以下代码演示如何在 targetver.h 中设置 Windows 版本。
#ifndef WINVER                  // Specifies that the minimum required platform is Windows 7.
#define WINVER 0x0601           // Change this to the appropriate value to target other versions of Windows.
#endif

#ifndef _WIN32_WINNT            // Specifies that the minimum required platform is Windows 7.
#define _WIN32_WINNT 0x0601     // Change this to the appropriate value to target other versions of Windows.
#endif

#ifndef _WIN32_WINDOWS          // Specifies that the minimum required platform is Windows 98.
#define _WIN32_WINDOWS 0x0410 // Change this to the appropriate value to target Windows Me or later.
#endif

#ifndef _WIN32_IE                       // Specifies that the minimum required platform is Internet Explorer 7.0.
#define _WIN32_IE 0x0700        // Change this to the appropriate value to target other versions of IE.
#endif
以下代码演示如何添加 include 指令。 此外,还可以创建稍后将使用的一些全局变量。
#include <windows.h>    // included for Windows Touch
#include <windowsx.h>   // included for point conversion

#define MAXPOINTS 10

// You will use this array to track touch points
int points[MAXPOINTS][2];

// You will use this array to switch the color / track ids
int idLookup[MAXPOINTS];


// You can make the touch points larger
// by changing this radius value
static int radius      = 50;

// There should be at least as many colors
// as there can be touch points so that you
// can have different colors for each point
COLORREF colors[] = { RGB(153,255,51),
                      RGB(153,0,0),
                      RGB(0,153,0),
                      RGB(255,255,0),
                      RGB(255,51,204),
                      RGB(0,0,0),
                      RGB(0,153,0),
                      RGB(153, 255, 255),
                      RGB(153,153,255),
                      RGB(0,51,153)
                    };
为WM_TOUCH和跟踪点添加处理程序
首先,声明 WndProc 中WM_TOUCH处理程序使用的一些变量。
int wmId, wmEvent, i, x, y;

UINT cInputs;
PTOUCHINPUT pInputs;
POINT ptInput;
现在,初始化用于存储触摸点的变量,并从 InitInstance 方法注册触摸输入窗口。
BOOL InitInstance(HINSTANCE hInstance, int nCmdShow)
{
   HWND hWnd;

   hInst = hInstance; // Store instance handle in our global variable

   hWnd = CreateWindow(szWindowClass, szTitle, WS_OVERLAPPEDWINDOW,
      CW_USEDEFAULT, 0, CW_USEDEFAULT, 0, NULL, NULL, hInstance, NULL);

   if (!hWnd) {
      return FALSE;
   }

   // register the window for touch instead of gestures
   RegisterTouchWindow(hWnd, 0);

   // the following code initializes the points
   for (int i=0; i< MAXPOINTS; i++){
     points[i][0] = -1;
     points[i][1] = -1;
     idLookup[i]  = -1;
   }

   ShowWindow(hWnd, nCmdShow);
   UpdateWindow(hWnd);

   return TRUE;
}
接下来,处理 WndProc 方法中的WM_TOUCH消息。 以下代码演示 WM_TOUCH 处理程序的实现。
case WM_TOUCH:
  cInputs = LOWORD(wParam);
  pInputs = new TOUCHINPUT[cInputs];
  if (pInputs){
    if (GetTouchInputInfo((HTOUCHINPUT)lParam, cInputs, pInputs, sizeof(TOUCHINPUT))){
      for (int i=0; i < static_cast<INT>(cInputs); i++){
        TOUCHINPUT ti = pInputs[i];
        index = GetContactIndex(ti.dwID);
        if (ti.dwID != 0 && index < MAXPOINTS){
          // Do something with your touch input handle
          ptInput.x = TOUCH_COORD_TO_PIXEL(ti.x);
          ptInput.y = TOUCH_COORD_TO_PIXEL(ti.y);
          ScreenToClient(hWnd, &ptInput);

          if (ti.dwFlags & TOUCHEVENTF_UP){
            points[index][0] = -1;
            points[index][1] = -1;
          }else{
            points[index][0] = ptInput.x;
            points[index][1] = ptInput.y;
          }
        }
      }

      InvalidateRect(hWnd, NULL, FALSE);
    }
    // If you handled the message and don't want anything else done with it, you can close it
    CloseTouchInputHandle((HTOUCHINPUT)lParam);
    delete [] pInputs;
  }else{
    // Handle the error here
  }
注意
若要使用 ScreenToClient 函数,必须在应用程序中提供高 DPI 支持。 有关支持高 DPI 的详细信息,请参阅 高 DPI。
现在,当用户触摸屏幕时,他/她正在触摸的位置将存储在点数组中。 TOUCHINPUT 结构的 dwID 成员存储将依赖于硬件的标识符。
为了解决 dwID 成员依赖于硬件的问题,WM_TOUCH事例处理程序使用函数 GetContactIndex,该函数将 TOUCHINPUT 结构的 dwID 成员映射到屏幕上绘制的点。 以下代码演示此函数的实现。
// This function is used to return an index given an ID
int GetContactIndex(int dwID){
  for (int i=0; i < MAXPOINTS; i++){
    if (idLookup[i] == -1){
      idLookup[i] = dwID;
      return i;
    }else{
      if (idLookup[i] == dwID){
        return i;
      }
    }
  }
  // Out of contacts
  return -1;
}
重要
Windows 11 及更高版本
默认情况下,某些三指和四指触摸交互在 Windows 应用中不起作用。
默认情况下,系统现在使用三指和四指触摸交互来执行窗口切换或最小化和虚拟桌面更改等操作。 由于这些交互现在在系统级别进行处理,因此应用的功能可能会受此更改的影响。
为支持应用程序中的三指或四指交互,引入了新的用户设置,用于指定系统是否要处理这些交互:
蓝牙 & 设备 > 触摸 > “三指和四指触摸手势”
当设置为“开”(默认)时,系统将处理所有三指和四指交互(应用将不能支持它们)。
当设置为“关”时,应用可支持三指和四指交互(不会交由系统处理)。
如果应用程序必须支持这些交互,建议你告知用户此设置,并提供一个链接,将设置应用启动到相关页面(ms-settings:设备触摸)。 有关更多详细信息,请参阅 Launcher.LaunchUriAsync 方法。
绘制点
为绘图例程声明以下变量。
    // For double buffering
    static HDC memDC       = 0;
    static HBITMAP hMemBmp = 0;
    HBITMAP hOldBmp        = 0;

    // For drawing / fills
    PAINTSTRUCT ps;
    HDC hdc;
    HBRUSH hBrush;

    // For tracking dwId to points
    int index;
内存显示上下文 memDC 用于存储临时图形上下文,该上下文与呈现的显示上下文 hdc 交换,以消除闪烁。 实现绘图例程,该例程采用已存储的点并在点处绘制一个圆。 以下代码演示如何实现 WM_PAINT 处理程序。
  case WM_PAINT:
    hdc = BeginPaint(hWnd, &ps);
    RECT client;
    GetClientRect(hWnd, &client);

    // start double buffering
    if (!memDC){
      memDC = CreateCompatibleDC(hdc);
    }
    hMemBmp = CreateCompatibleBitmap(hdc, client.right, client.bottom);
    hOldBmp = (HBITMAP)SelectObject(memDC, hMemBmp);

    hBrush = CreateSolidBrush(RGB(255, 255, 255));
    FillRect(memDC, &client, hBrush);
    DeleteObject(hBrush);

    //Draw Touched Points
    for (i=0; i < MAXPOINTS; i++){
      hBrush = CreateSolidBrush(colors[i]);
      SelectObject( memDC, hBrush);

      x = points[i][0];
      y = points[i][1];
      if  (x >0 && y>0){
        Ellipse(memDC, x - radius, y - radius, x+ radius, y + radius);
      }

      DeleteObject(hBrush);
    }

    BitBlt(hdc, 0,0, client.right, client.bottom, memDC, 0,0, SRCCOPY);
    EndPaint(hWnd, &ps);

    SelectObject(memDC, hOldBmp);
    DeleteObject(hMemBmp);

    break;
运行应用程序时,它现在应类似于本部分开头的插图。
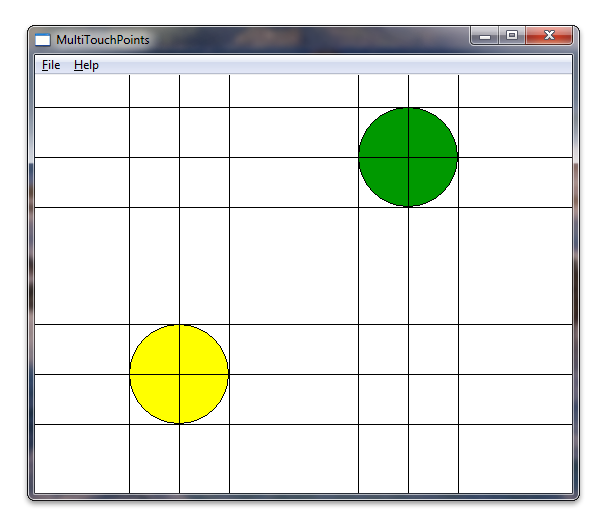
为了获得乐趣,你可以在触摸点周围绘制一些额外的线条。 以下屏幕截图显示了应用程序的外观,并围绕圆圈绘制了几个额外的线条。
相关主题
反馈
即将发布:在整个 2024 年,我们将逐步淘汰作为内容反馈机制的“GitHub 问题”,并将其取代为新的反馈系统。 有关详细信息,请参阅:https://aka.ms/ContentUserFeedback。
提交和查看相关反馈