Run Star-CCM+ in an Azure HPC Cluster
Authored by Taylor Newill. Edited by Nanette Ray. Reviewed by Steve Roach, Ben Hummerstone, and Xavier Pillons.
This article is also available as a Whitepaper PDF download on Azure.com:
With this template, you can quickly set up and benchmark a high-performance computing (HPC) cluster in the Microsoft Azure environment as a proof of concept for running Star-CCM+ version 11.02.010-R8 from CD-adapco, a Siemens Business. This template creates the cluster, provides benchmarking options, and installs the Star-CCM+ simulation software so you can test its performance on Azure.
This How-To Guide is to be used with the following template on GitHub:
NOTE: To use this template, you must have a valid Power-on-Demand (POD) license for Star-CCM+. For details, see the Licensing section later in this article. Your Azure subscription must also have a sufficient quota to run this workload, which requires A8-A9 or H-Series virtual machines (VMs).
Architecture
This template creates a simple architecture you can use to demonstrate Star-CCM+ running in a high-performance cluster based on virtual machine scale sets. This architecture is intended for test purposes.
Scale sets make it quick to deploy this cluster. A scale set is an Azure compute resource you can use to deploy and manage a collection of identical VMs as a set. Scale sets support autoscaling, making them well suited for building large-scale services targeting big compute and big data workloads.
You use an Azure Resource Manager (ARM) template to deploy the cluster shown in the following figure.
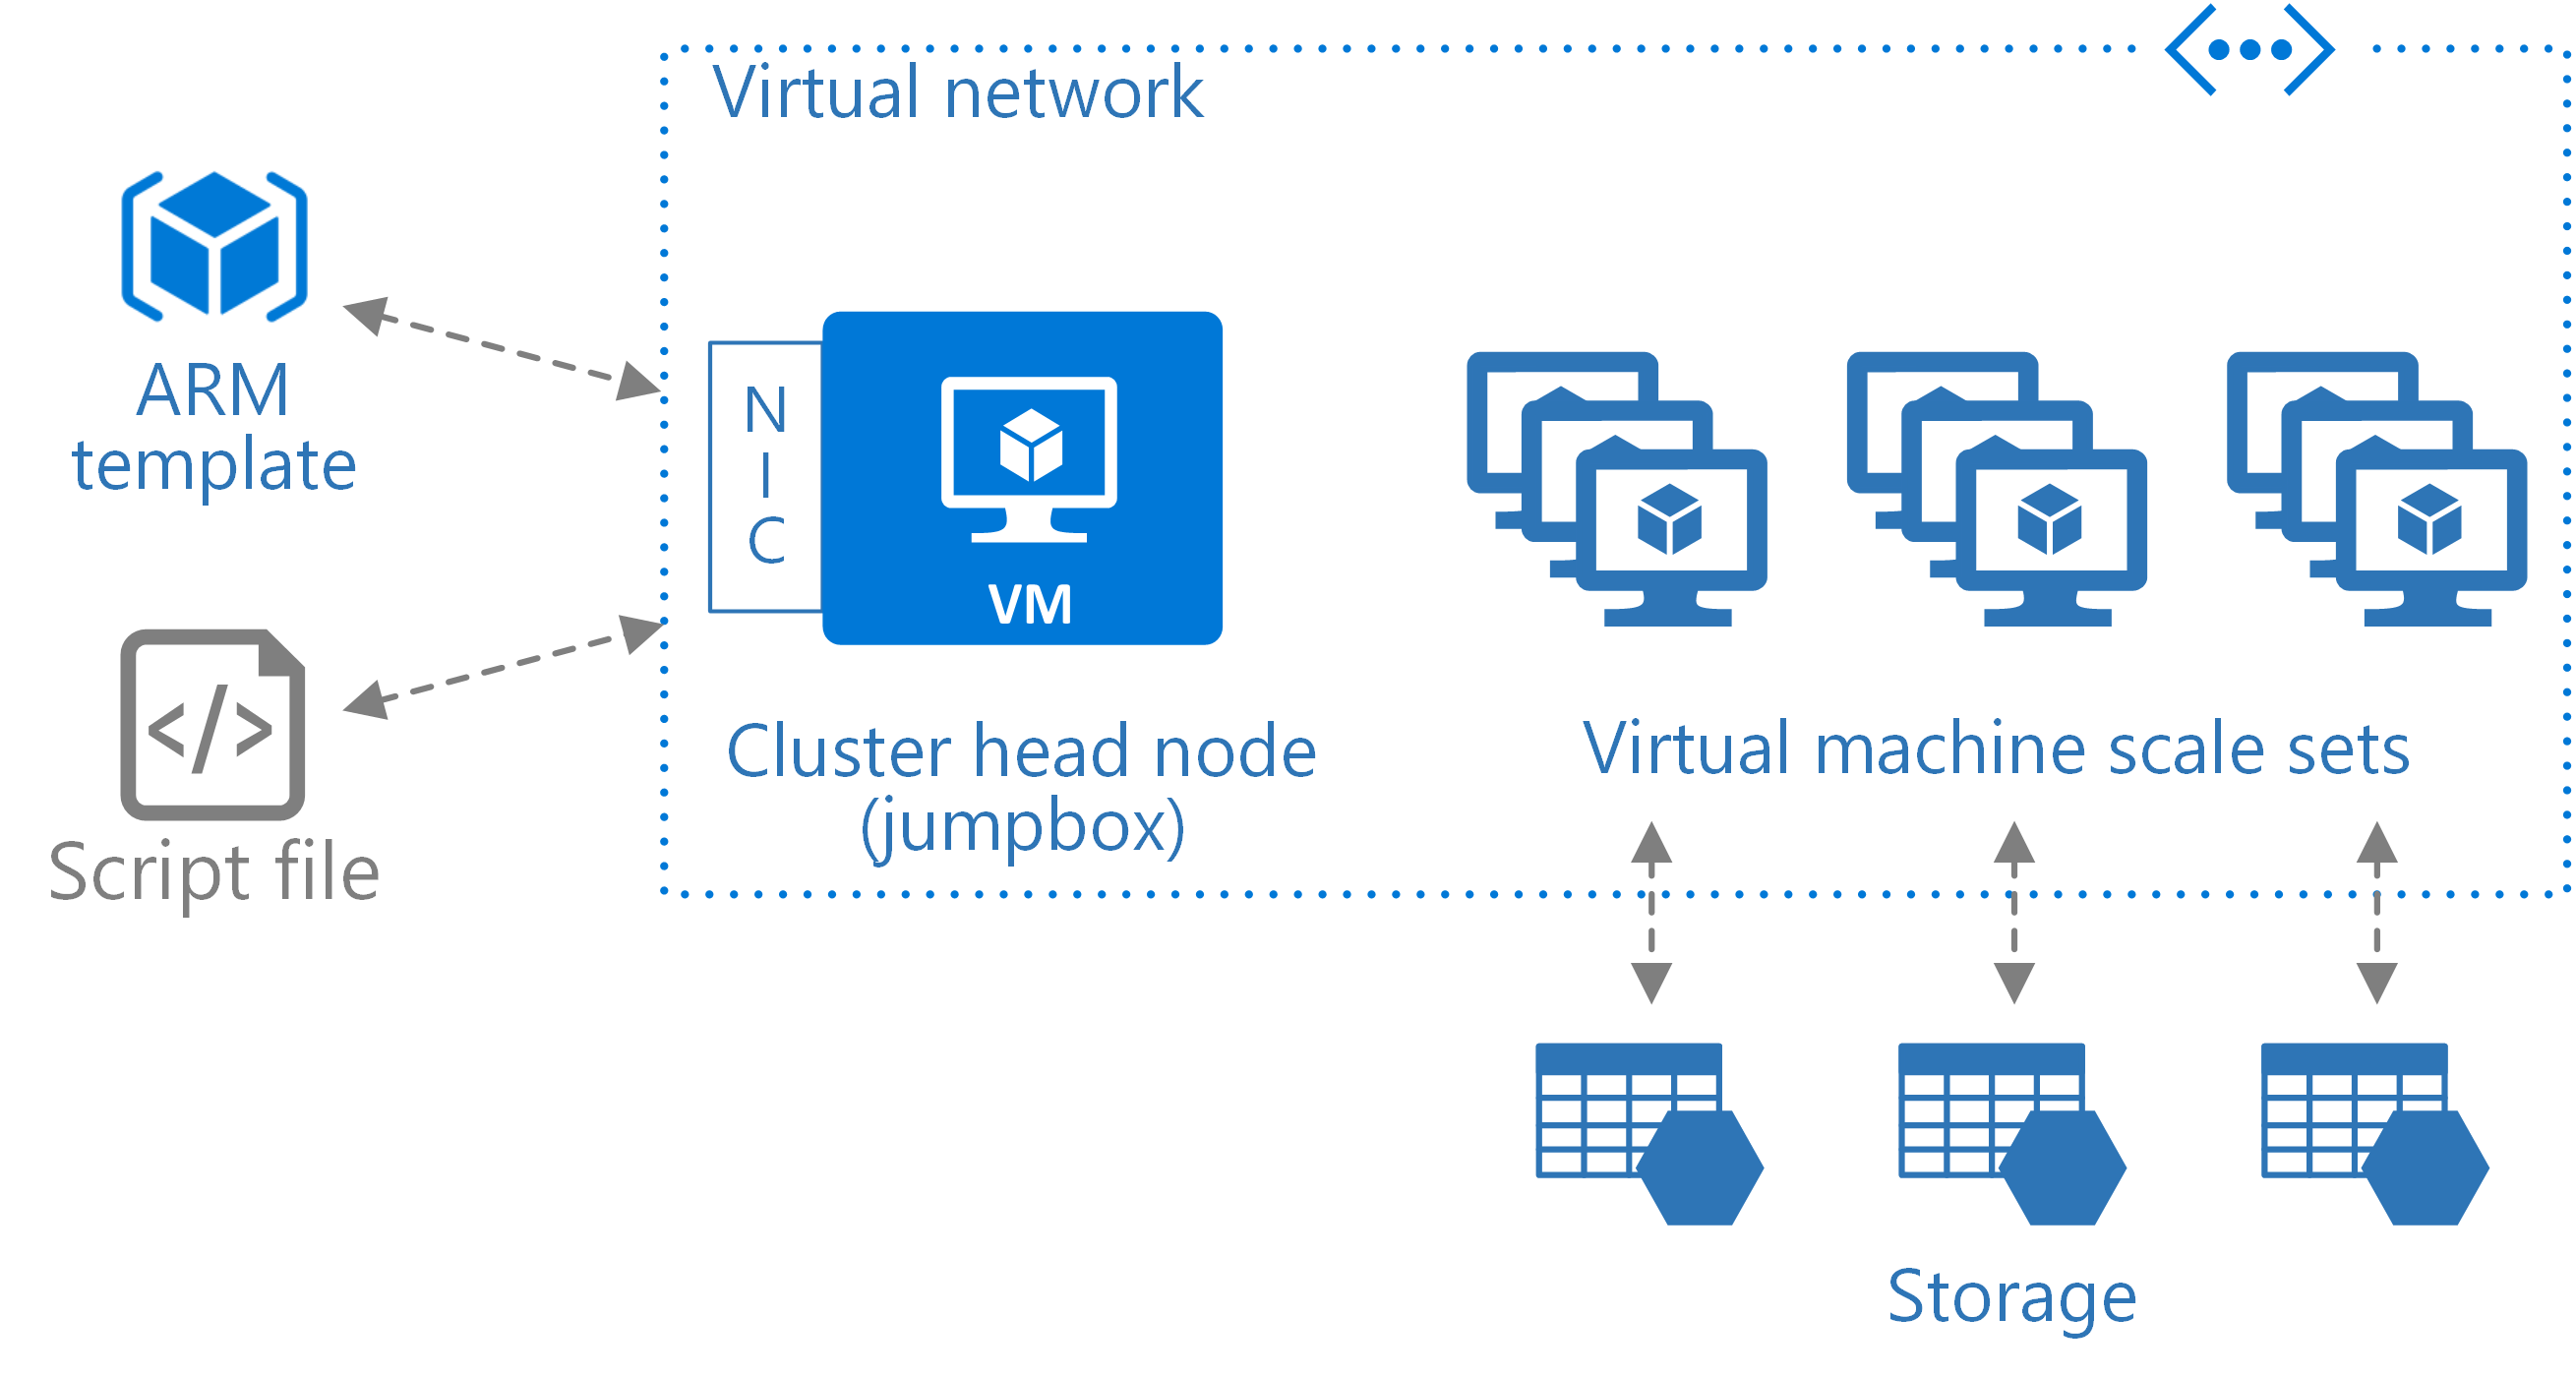
Figure 1 . High-performance cluster for running Star-CCM+ in Azure
After downloading and configuring Star-CCM+, the template authenticates all the nodes in the cluster and creates a common share directory used by each node. One VM is designated as the jumpbox and head node. A network interface (NIC) is added to the jumpbox, which is placed in a virtual network together with the scale set. A public IP is assigned to the jumpbox NIC and port 22 is left open for SSH.
To access the jumpbox, use the following command:
ssh {username}@{vm-public-ip-address}
Storage
For this architecture, the template creates four storage accounts for the scale set and one for the jumpbox. The following NFS file shares are created:
- /mnt/nfsshare is created from the head node's operating system disk and shared with the scale set nodes.
- /mnt/resource/scratch is created on the temp disk of the head node. The temp disk is a physically attached disk that typically provides faster performance on each of the nodes. If the jumpbox is deallocated, the data in this directory will be lost.
This template does not take advantage of Azure Managed Disks to manage the storage accounts associated with the VM disks. We plan to add this feature in a future update of this template.
Authentication
To support the NFS share and the tools used to set up authentication, several packages are installed during deployment. During the authentication phase, the nodenames.txt and nodeips.txt files are placed in ~/bin. These files contain the names and IP addresses of the nodes in the scale set. A copy of nodenames.txt is placed in /mnt/resource/hosts.
The VMs that are part of the scale set, which is inside a private network, are accessible only from the jumpbox by using a private IP address. To access one of these nodes from the jumpbox, use the following command in an SSH client:
ssh {username}@{vm-private-ip-address}
Star-CCM+
During deployment, you select the model of benchmark you want to use, and this model is installed along with Star-CCM+ version 11.02.010-R8. The application is installed in the /mnt/resource/scratch/applications/ directory, and a path to the binary is added to ~.bashrc. The benchmark model is unpacked in the jumpbox’s /mnt/resource/scratch/benchmark directory.
The runAndRecord.java file contains the scripting commands for Star-CCM+. To run a benchmark, issue the following command, where {podkey} is your license and {filename.sim} is the name of the Star-CCM+ simulation you want to run.
time(Star-CCM+ -np 80 -machinefile ../hosts -power -podkey {podkey} -rsh ssh -mpi intel -cpubind bandwidth,v -mppflags " -ppn 8 -genv I_MPI_DAPL_PROVIDER=ofa-v2-ib0 -genv I_MPI_DAPL_UD=0 -genv I_MPI_DYNAMIC_CONNECTION=0 -genv I_MPI_FABRICS=shm:dapl" -batch /mnt/resource/scratch/benchmark/runAndRecord.java /mnt/resource/scratch/benchmark/{filename.sim)
Licensing
During deployment, you are asked for the POD key associated with your Star-CCM+ license.
- If you’re using this template to demonstrate Star-CCM+ for sales purposes, before deployment, you can add your customer’s POD key as a parameter in the azuredeploy.parameters file.
- If you work for Microsoft, you can sign up to receive an existing POD key for benchmarking, performance testing, and other non-sales related activities.
Deploy the ARM template
- Click Deploy to Azure or copy this URL to a browser: https://portal.azure.com/#create/Microsoft.Template/uri/https%3A%2F%2Fraw.githubusercontent.com%2Ftanewill%2F5clickTemplates%2Fmaster%2FRawStarCCMCluster%2Fazuredeploy.json
- In the Azure portal, enter values for the following settings:
- For Resource group, select Create New and type a name for the resource group associated with this template’s deployment.
- For Location box, select a region.
- For Resource Location, select a region where HPC is available. The resources will be deployed to this region. For the latest information, see Products by Region.
- For Vm Sku, choose the VM size that works in your region, such as H16r or H16mr.
- For Vmss Name, enter a base name of 3 to 10 characters used in naming resources. The name must be unique across Azure. For some resources, a hash is prefixed to this name. Other resource-specific information is appended to this name.
- For Instance Count, choose the number of VMs you want. To see if you have the quota for the quantity you choose, see how to check core and storage usage using PowerShell.
- For Admin Username and Admin Password, enter the values you want to use for the administrator account, which applies to all the VMs.
- In the POD Key box, enter your product license.
- For Download Model, select the benchmark model you want to use.
- Review the terms and conditions, then click the I agree to the terms and conditions stated above checkbox.
- Click the Purchase button, then wait for the deployment to finish, which may take some time depending on the VM sizes selected. The deployment status is shown under Notifications.
- In Azure portal, navigate to the resource group where this was deployed, click the Public IP resource, copy the IP address, then log on to the VM.
- Navigate to /mnt/resource/scratch/benchmark.
- To run Star-CCM+ , use the following command, substituting your POD key number and the name of the .sim file you want to run. In this code sample, np 80 is the number of cores to run on.
time(Star-CCM+ -np 80 -machinefile ../hosts -power -podkey {podkey} -rsh ssh -mpi intel -cpubind bandwidth,v -mppflags " -ppn 8 -genv I_MPI_DAPL_PROVIDER=ofa-v2-ib0 -genv I_MPI_DAPL_UD=0 -genv I_MPI_DYNAMIC_CONNECTION=0 -genv I_MPI_FABRICS=shm:dapl" -batch /mnt/resource/scratch/benchmark/runAndRecord.java /mnt/resource/scratch/benchmark/{filename.sim)