ASP.NET Core 中的 Razor Pages 與 Entity Framework Core 教學課程 - 1/8
作者:Tom Dykstra、Jeremy Likness 和 Jon P Smith
這是一系列教學課程的第一篇,示範如何在 ASP.NET Core Razor Pages 應用程式中使用 Entity Framework (EF) Core。 教學課程會為虛構的 Contoso 大學建置網站。 網站包含學生入學許可、課程建立和講師指派等功能。 本教學課程使用程式碼第一種方法。 如需使用資料庫第一種方法遵循本教學課程的詳細資訊,請參閱此 Github 問題。
必要條件
- 若您是第一次使用 Razor Pages,請先前往開始使用 Razor Pages 教學課程系列,再開始進行本教學課程。
- Visual Studio 2022 和 ASP.NET 與 Web 開發工作負載。
- .NET 6.0 SDK
資料庫引擎
Visual Studio 說明會使用 SQL Server LocalDB,它是一種只在 Windows 上執行的 SQL Server Express 版本。
疑難排解
若您遇到無法解決的問題,請將您的程式碼與已完成的專案進行比較。 取得協助的其中一種好方法是將問題張貼到 StackOverflow.com,並使用 ASP.NET Core 標籤或 EF Core 標籤。
範例應用程式
在教學課程中建立的應用程式,是一個基本的大學網站。 使用者可以檢視和更新學生、課程和教師資訊。 以下是幾個在教學課程中建立的畫面。
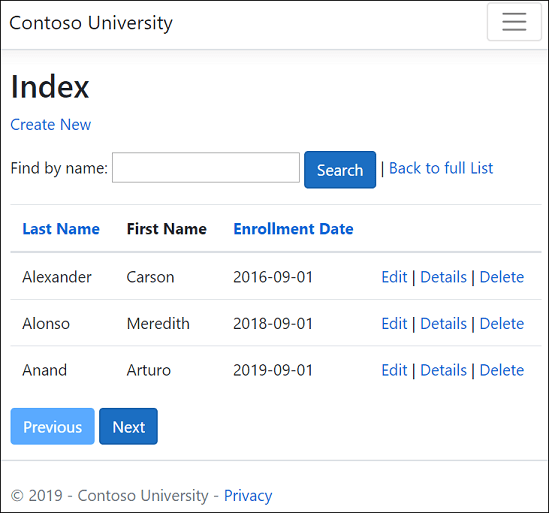

本網站的 UI 風格是以內建的專案範本為基礎。 教學課程的重點在於如何使用 EF Core 搭配 ASP.NET Core,而非如何自訂 UI。
選擇性:建置範例下載
此步驟是選擇性的。 當您有無法解決的問題時,建議您建置已完成的應用程式。 若您遇到無法解決的問題,請將您的程式碼與已完成的專案進行比較。 下載指示。
選取 ContosoUniversity.csproj 以開啟專案。
組建專案。
在套件管理器主控台 (PMC) 中,執行下列命令:
Update-Database
執行專案來植入資料庫。
建立 Web 應用程式專案
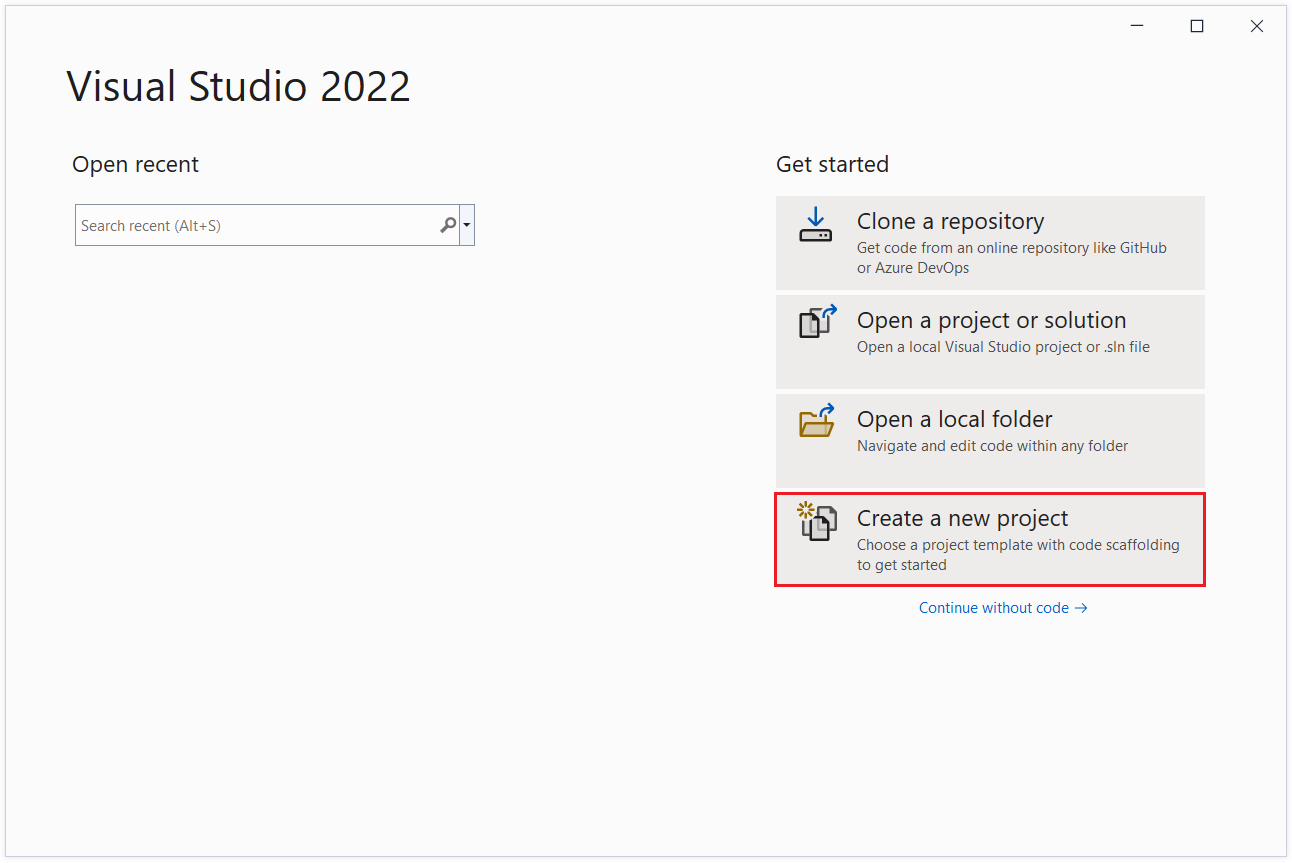
啟動 Visual Studio 2022 並選取 [建立新專案]。
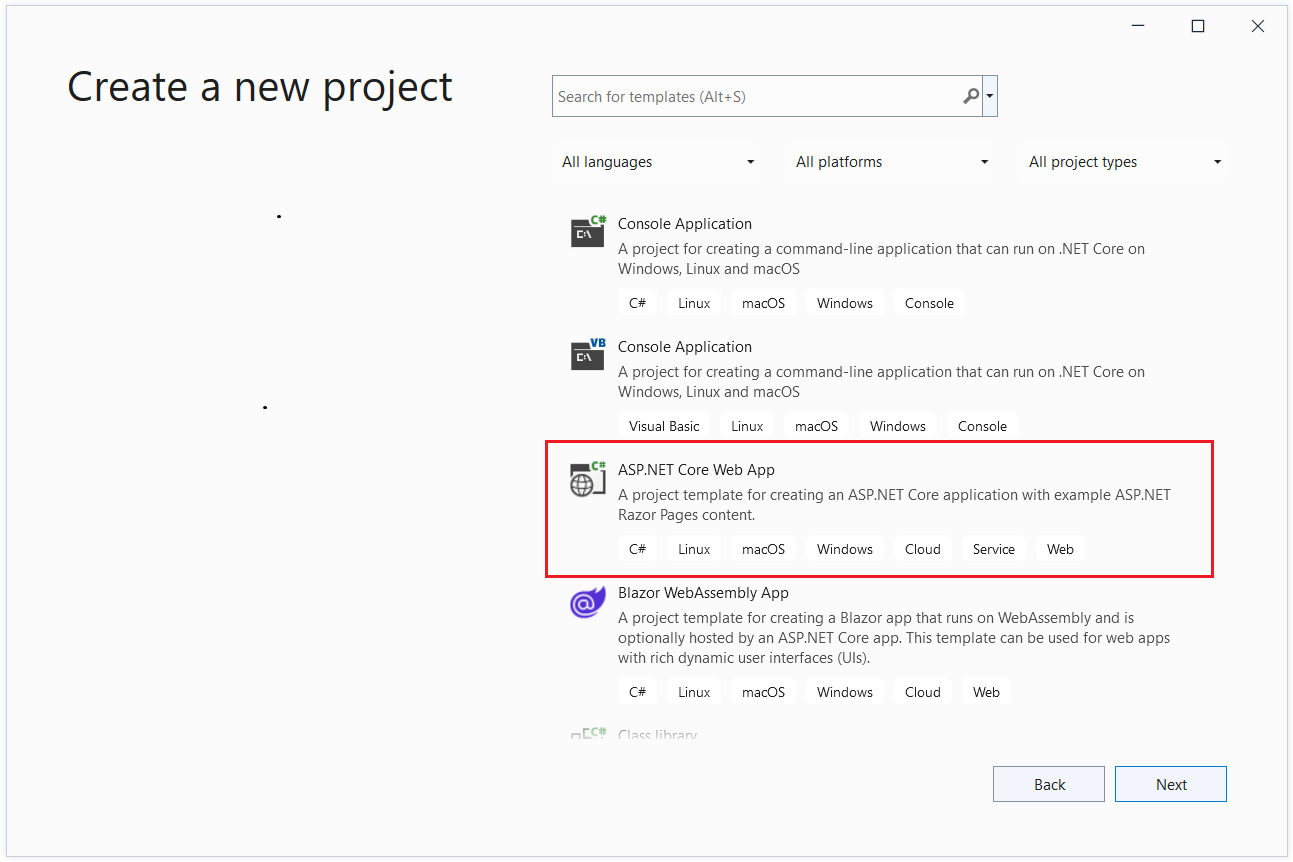
在 [建立新專案] 對話方塊中,選取 [ASP.NET Core Web 應用程式],然後選取 [下一步]。
在 [設定新專案] 對話方塊中,輸入
ContosoUniversity作為 [專案名稱]。 請務必將專案命名為 ContosoUniversity (大小寫需相符),如此,在您複製並貼上範例程式碼時命名空間才會相符。選取 [下一步] 。
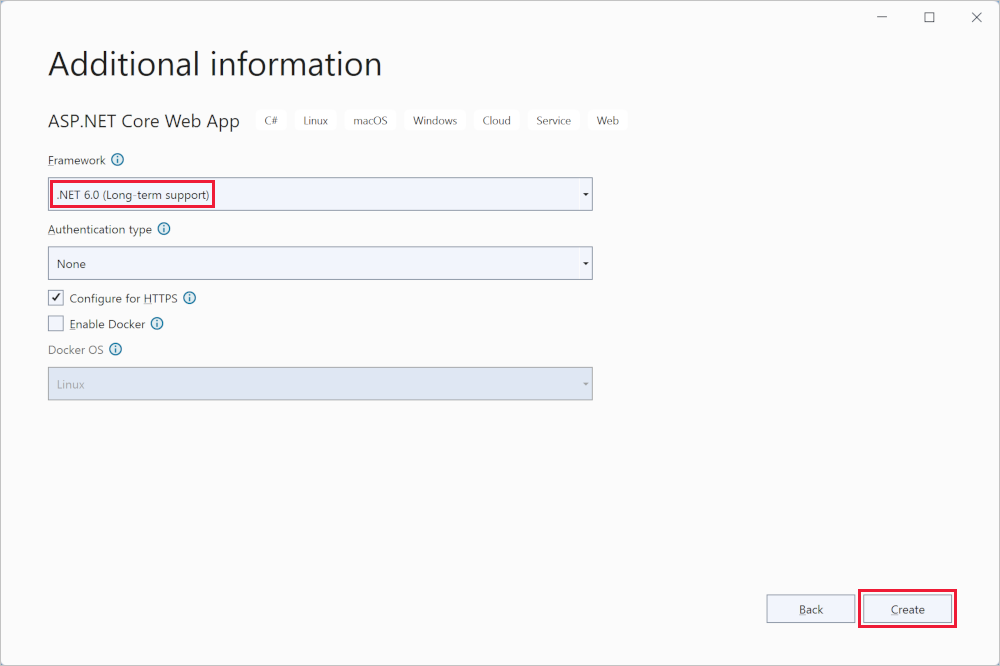
在 [其他資訊] 對話方塊中,選取 [.NET 6.0 (長期支援)],然後選取 [建立]。
設定網站樣式
將下列程式碼複製並貼入 Pages/Shared/_Layout.cshtml 檔案中:
<!DOCTYPE html>
<html lang="en">
<head>
<meta charset="utf-8" />
<meta name="viewport" content="width=device-width, initial-scale=1.0" />
<title>@ViewData["Title"] - Contoso University</title>
<link rel="stylesheet" href="~/lib/bootstrap/dist/css/bootstrap.css" />
<link rel="stylesheet" href="~/css/site.css" asp-append-version="true" />
<link rel="stylesheet" href="~/ContosoUniversity.styles.css" asp-append-version="true" />
</head>
<body>
<header>
<nav class="navbar navbar-expand-sm navbar-toggleable-sm navbar-light bg-white border-bottom box-shadow mb-3">
<div class="container">
<a class="navbar-brand" asp-area="" asp-page="/Index">Contoso University</a>
<button class="navbar-toggler" type="button" data-bs-toggle="collapse" data-bs-target=".navbar-collapse" aria-controls="navbarSupportedContent"
aria-expanded="false" aria-label="Toggle navigation">
<span class="navbar-toggler-icon"></span>
</button>
<div class="navbar-collapse collapse d-sm-inline-flex justify-content-between">
<ul class="navbar-nav flex-grow-1">
<li class="nav-item">
<a class="nav-link text-dark" asp-area="" asp-page="/About">About</a>
</li>
<li class="nav-item">
<a class="nav-link text-dark" asp-area="" asp-page="/Students/Index">Students</a>
</li>
<li class="nav-item">
<a class="nav-link text-dark" asp-area="" asp-page="/Courses/Index">Courses</a>
</li>
<li class="nav-item">
<a class="nav-link text-dark" asp-area="" asp-page="/Instructors/Index">Instructors</a>
</li>
<li class="nav-item">
<a class="nav-link text-dark" asp-area="" asp-page="/Departments/Index">Departments</a>
</li>
</ul>
</div>
</div>
</nav>
</header>
<div class="container">
<main role="main" class="pb-3">
@RenderBody()
</main>
</div>
<footer class="border-top footer text-muted">
<div class="container">
© 2021 - Contoso University - <a asp-area="" asp-page="/Privacy">Privacy</a>
</div>
</footer>
<script src="~/lib/jquery/dist/jquery.js"></script>
<script src="~/lib/bootstrap/dist/js/bootstrap.bundle.js"></script>
<script src="~/js/site.js" asp-append-version="true"></script>
@await RenderSectionAsync("Scripts", required: false)
</body>
</html>
版面配置檔案會設定網站頁首、頁尾和功能表。 上述程式碼會進行下列變更:
- 將每個出現的「ContosoUniversity」都變更為「Contoso University」。 共有三個發生次數。
- Home 和 Privacy 功能表項目會被刪除。
- [關於]、[學生]、[課程]、[講師] 和 [部門] 會新增項目。
在 Pages/Index.cshtml 中,以下列程式碼來取代檔案的內容:
@page
@model IndexModel
@{
    ViewData["Title"] = "Home page";
}

<div class="row mb-auto">
    <div class="col-md-4">
        <div class="row no-gutters border mb-4">
            <div class="col p-4 mb-4 ">
                <p class="card-text">
                    Contoso University is a sample application that
                    demonstrates how to use Entity Framework Core in an
                    ASP.NET Core Razor Pages web app.
                </p>
            </div>
        </div>
    </div>
    <div class="col-md-4">
        <div class="row no-gutters border mb-4">
            <div class="col p-4 d-flex flex-column position-static">
                <p class="card-text mb-auto">
                    You can build the application by following the steps in a series of tutorials.
                </p>
                <p>
@*                    <a href="https://docs.microsoft.com/aspnet/core/data/ef-rp/intro" class="stretched-link">See the tutorial</a>
*@                </p>
            </div>
        </div>
    </div>
    <div class="col-md-4">
        <div class="row no-gutters border mb-4">
            <div class="col p-4 d-flex flex-column">
                <p class="card-text mb-auto">
                    You can download the completed project from GitHub.
                </p>
                <p>
@*                    <a href="https://github.com/dotnet/AspNetCore.Docs/tree/main/aspnetcore/data/ef-rp/intro/samples" class="stretched-link">See project source code</a>
*@                </p>
            </div>
        </div>
    </div>
</div>
上述程式碼會將有關 ASP.NET Core 的文字取代為此應用程式的相關文字。
執行應用程式來驗證首頁是否正常顯示。
資料模型
下列各節會建立資料模型:
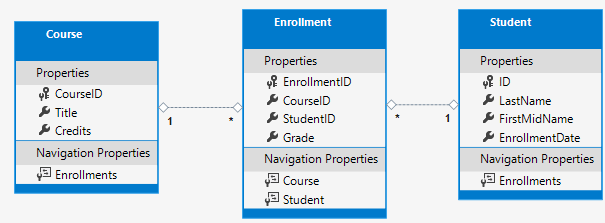
學生可以註冊任何數量的課程,課程也能讓任意數量的學生註冊。
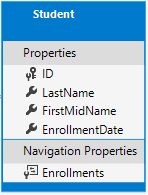
Student 實體
- 在專案資料夾中建立 Models 資料夾。
- 使用下列程式碼建立
Models/Student.cs:namespace ContosoUniversity.Models { public class Student { public int ID { get; set; } public string LastName { get; set; } public string FirstMidName { get; set; } public DateTime EnrollmentDate { get; set; } public ICollection<Enrollment> Enrollments { get; set; } } }
ID 屬性會成為對應到此類別資料庫資料表的主索引鍵資料行。 EF Core 預設會將名為 ID 或 classnameID 的屬性解譯為主索引鍵。 因此 Student 類別主索引鍵的替代自動識別名稱為 StudentID。 如需詳細資訊,請參閱 EF Core - 索引鍵。
Enrollments 屬性為導覽屬性。 導覽屬性會保留與此實體相關的其他實體。 在這種情況下,Student 實體的 Enrollments 屬性會保留所有與該 Student 相關的 Enrollment 實體。 例如,若資料庫中的 Student 資料列有兩個相關的 Enrollment 資料列,則 Enrollments 導覽屬性便會包含這兩個 Enrollment 項目。
在資料庫中,若 Enrollment 資料列的 StudentID 資料行包含學生的識別碼值,則該資料列便會與 Student 資料列相關。 例如,假設某 Student 資料列的識別碼為 1。 相關的 Enrollment 資料列將會擁有 StudentID = 1。 StudentID 是 Enrollment 資料表中的「外部索引鍵」。
Enrollments 屬性會定義為 ICollection<Enrollment>,因為可能會有多個相關的 Enrollment 實體。 您可以使用其他集合型別,例如 List<Enrollment> 或 HashSet<Enrollment>。 若使用 ICollection<Enrollment>,EF Core 預設將建立 HashSet<Enrollment> 集合。
Enrollment 實體
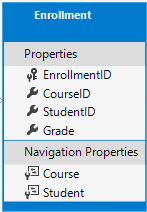
使用下列程式碼建立 Models/Enrollment.cs:
using System.ComponentModel.DataAnnotations;

namespace ContosoUniversity.Models
{
    public enum Grade
    {
        A, B, C, D, F
    }

    public class Enrollment
    {
        public int EnrollmentID { get; set; }
        public int CourseID { get; set; }
        public int StudentID { get; set; }
        [DisplayFormat(NullDisplayText = "No grade")]
        public Grade? Grade { get; set; }

        public Course Course { get; set; }
        public Student Student { get; set; }
    }
}
EnrollmentID 屬性是主索引鍵;這個實體會使用 classnameID 模式,而非 ID 本身。 針對生產資料模型,許多開發人員會選擇一個模式並從一而終使用該模式。 本教學課程同時使用兩者的方式只是為了示範兩者都可運作。 在不使用 classname 的情況下使用 ID 可讓實作某些類型的資料模型變更更容易。
Grade 屬性為 enum。 Grade 型別宣告後方的問號表示 Grade 屬性可為 Null。 為 Null 的成績不同於成績為零:Null 表示成績未知或尚未指派。
StudentID 屬性是外部索引鍵,對應的導覽屬性是 Student。 一個 Enrollment 實體與一個 Student 實體建立關聯,因此該屬性包含單一 Student 實體。
CourseID 屬性是外部索引鍵,對應的導覽屬性是 Course。 一個 Enrollment 實體與一個 Course 實體建立關聯。
如果實體名為 <navigation property name><primary key property name>,則 EF Core 會將之解釋為外部索引鍵。 例如,StudentID 是 Student 導覽屬性的外部索引鍵,因為 Student 實體的主索引鍵是 ID。 外部索引鍵屬性也可命名為 <primary key property name>。 例如 CourseID,因為 Course 實體的主索引鍵是 CourseID。
Course 實體
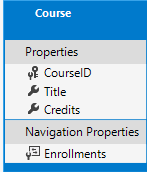
使用下列程式碼建立 Models/Course.cs:
using System.ComponentModel.DataAnnotations.Schema;

namespace ContosoUniversity.Models
{
    public class Course
    {
        [DatabaseGenerated(DatabaseGeneratedOption.None)]
        public int CourseID { get; set; }
        public string Title { get; set; }
        public int Credits { get; set; }

        public ICollection<Enrollment> Enrollments { get; set; }
    }
}
Enrollments 屬性為導覽屬性。 Course 實體可以與任何數量的 Enrollment 實體相關。
DatabaseGenerated 屬性可讓應用程式指定主索引鍵,而非讓資料庫產生它。
建置應用程式。 編譯器會產生數個關於如何處理 null 值的警告。 如需詳細資訊,請參閱此 GitHub 問題、可為 Null 的參考類型,以及教學課程:使用可為 Null 與不可為 Null 的參考類型更清楚地表達您的設計意圖。
若要排除可為 Null 參考型別的警告,請從 ContosoUniversity.csproj 檔案中移除下列這行:
<Nullable>enable</Nullable>
Scaffolding 引擎目前不支援可為 Null 的參考類型,因此 Scaffold 中使用的模型也不支援。
從 Pages/Error.cshtml.cs 的 public string? RequestId { get; set; } 移除 ? 可為 Null 的參考類型註釋,以便專案在沒有編譯器警告的情況下建置。
Scaffold Student 頁面
在本節中,ASP.NET scaffolding 工具會用來產生:
- EF Core
DbContext類別。 內容是協調指定資料模型 Entity Framework 功能的主類別。 它衍生自 Microsoft.EntityFrameworkCore.DbContext 類別。 - 處理
Student實體建立、讀取、更新和刪除 (CRUD) 作業的 Razor 頁面。
- 建立 Pages/Students 資料夾。
- 在 [方案總管] 中,以滑鼠右鍵按一下 Page/Students 資料夾,然後選取 [新增]> [新增 Scaffold 項目]。
- 在 [新增 Scaffold 項目] 對話方塊中:
- 在左側索引標籤中,選取 [已安裝 > 通用 >Razor Pages]
- 選取 [使用 Entity Framework (CRUD) 的 Razor 頁面] > [新增]。>
- 在 [使用 Entity Framework (CRUD) 新增 Razor Pages] 對話方塊中:
- 在 [模型類別] 下拉式清單中,選取 [學生 (ContosoUniversity.Models)]。
- 在 [資料內容類別] 資料列中,選取 + (加號)。
- 將資料內容名稱變更為結束於
SchoolContext,而不是ContosoUniversityContext。 更新的內容名稱:ContosoUniversity.Data.SchoolContext - 選取 [新增] 以完成新增資料內容類別。
- 選取 [新增] 以完成 [新增 Razor 頁面] 對話方塊。
- 將資料內容名稱變更為結束於
會自動安裝下列套件:
Microsoft.EntityFrameworkCore.SqlServerMicrosoft.EntityFrameworkCore.ToolsMicrosoft.VisualStudio.Web.CodeGeneration.Design
若無法執行上述步驟,請建置專案並重試 scaffold 步驟。
Scaffolding 流程:
- 在 Pages/Students 資料夾中建立 Razor 頁面:
Create.cshtml和Create.cshtml.csDelete.cshtml和Delete.cshtml.csDetails.cshtml和Details.cshtml.csEdit.cshtml和Edit.cshtml.csIndex.cshtml和Index.cshtml.cs
- 建立
Data/SchoolContext.cs。 - 將內容新增到
Program.cs中的相依性插入。 - 將資料庫連接字串新增至
appsettings.json。
資料庫連接字串
Scaffolding 工具會在 appsettings.json 檔案中產生連接字串。
連接字串會指定 SQL Server LocalDB:
{
  "Logging": {
    "LogLevel": {
      "Default": "Information",
      "Microsoft.AspNetCore": "Warning"
    }
  },
  "AllowedHosts": "*",
  "ConnectionStrings": {
    "SchoolContext": "Server=(localdb)\\mssqllocaldb;Database=SchoolContext-0e9;Trusted_Connection=True;MultipleActiveResultSets=true"
  }
}
LocalDB 是輕量版的 SQL Server Express Database Engine,旨在用於應用程序開發,而不是生產用途。 根據預設,LocalDB 會在 C:/Users/<user> 目錄中建立 .mdf 檔案。
更新資料庫內容類別
協調指定資料模型 EF Core 功能的主類別是資料庫內容類別。 內容衍生自 Microsoft.EntityFrameworkCore.DbContext。 內容會指定哪些實體會包含在資料模型中。 在此專案中,類別命名為 SchoolContext。
以下列程式碼來更新 Data/SchoolContext.cs:
using Microsoft.EntityFrameworkCore;
using ContosoUniversity.Models;

namespace ContosoUniversity.Data
{
    public class SchoolContext : DbContext
    {
        public SchoolContext (DbContextOptions<SchoolContext> options)
            : base(options)
        {
        }

        public DbSet<Student> Students { get; set; }
        public DbSet<Enrollment> Enrollments { get; set; }
        public DbSet<Course> Courses { get; set; }

        protected override void OnModelCreating(ModelBuilder modelBuilder)
        {
            modelBuilder.Entity<Course>().ToTable("Course");
            modelBuilder.Entity<Enrollment>().ToTable("Enrollment");
            modelBuilder.Entity<Student>().ToTable("Student");
        }
    }
}
上述程式碼會從單數 DbSet<Student> Student 變更為複數 DbSet<Student> Students。 若要讓 Razor Pages 程式碼符合新的 DBSet 名稱,請從下列進行全域變更:_context.Student. 至:_context.Students.
會有 8 次變更。
因為實體集包含多個實體,許多開發人員偏向將 DBSet 屬性名稱設為複數。
醒目提示的程式碼:
- 為每一個實體集建立 DbSet<TEntity> 屬性。 在 EF Core 術語中:
- 實體集通常會對應到資料庫資料表。
- 實體會對應至資料表中的資料列。
- 呼叫 OnModelCreating。
OnModelCreating:- 在
SchoolContext初始化時呼叫,但是在模型已鎖定且用來初始化內容之前。 - 是必要的,因為稍後在本教學課程中,
Student實體將具有其他實體的參考。
- 在
我們希望下一個版本能修正這個問題。
Program.cs
ASP.NET Core 內建相依性插入。 服務 (例如 SchoolContext) 是在應用程式啟動期間使用相依性插入來註冊。 接著,會透過建構函式參數,針對需要這些服務的元件 (例如 Razor 頁面) 來提供服務。 取得資料庫內容執行個體的建構函式程式碼會顯示在本教學課程稍後部分。
Scaffolding 工具會自動對相依性插入容器註冊內容類別。
Scaffolder 會新增下列醒目提示行:
using ContosoUniversity.Data;
using Microsoft.EntityFrameworkCore;
var builder = WebApplication.CreateBuilder(args);

builder.Services.AddRazorPages();

builder.Services.AddDbContext<SchoolContext>(options =>
  options.UseSqlServer(builder.Configuration.GetConnectionString("SchoolContext")));
連接字串的名稱,會透過呼叫 DbContextOptions 物件上的方法來傳遞至內容。 作為本機開發之用,ASP.NET Core 設定系統會從 appsettings.json 或 appsettings.Development.json 檔案讀取連接字串。
新增資料庫例外狀況篩選條件
新增 AddDatabaseDeveloperPageExceptionFilter 和 UseMigrationsEndPoint,如下列程式碼所示:
using ContosoUniversity.Data;
using Microsoft.EntityFrameworkCore;
var builder = WebApplication.CreateBuilder(args);

builder.Services.AddRazorPages();

builder.Services.AddDbContext<SchoolContext>(options =>
  options.UseSqlServer(builder.Configuration.GetConnectionString("SchoolContext")));

builder.Services.AddDatabaseDeveloperPageExceptionFilter();

var app = builder.Build();

if (!app.Environment.IsDevelopment())
{
    app.UseExceptionHandler("/Error");
    app.UseHsts();
}
else
{
    app.UseDeveloperExceptionPage();
    app.UseMigrationsEndPoint();
}
新增 Microsoft.AspNetCore.Diagnostics.EntityFrameworkCore NuGet 封裝。
請在套件管理員主控台中輸入下列以新增 NuGet 封裝:
Install-Package Microsoft.AspNetCore.Diagnostics.EntityFrameworkCore
Microsoft.AspNetCore.Diagnostics.EntityFrameworkCore NuGet 封裝會針對 Entity Framework Core 錯誤頁面提供 ASP.NET Core 中介軟體。 此中介軟體有助於偵測和診斷 Entity Framework Core 移轉的錯誤。
AddDatabaseDeveloperPageExceptionFilter 會針對 EF 移轉錯誤,在開發環境中提供有用的錯誤資訊。
建立資料庫
若未存在資料庫,則請更新 Program.cs 來加以建立:
using ContosoUniversity.Data;
using Microsoft.EntityFrameworkCore;
var builder = WebApplication.CreateBuilder(args);

builder.Services.AddRazorPages();

builder.Services.AddDbContext<SchoolContext>(options =>
  options.UseSqlServer(builder.Configuration.GetConnectionString("SchoolContext")));

builder.Services.AddDatabaseDeveloperPageExceptionFilter();

var app = builder.Build();

if (!app.Environment.IsDevelopment())
{
    app.UseExceptionHandler("/Error");
    app.UseHsts();
}
else
{
    app.UseDeveloperExceptionPage();
    app.UseMigrationsEndPoint();
}

using (var scope = app.Services.CreateScope())
{
    var services = scope.ServiceProvider;

    var context = services.GetRequiredService<SchoolContext>();
    context.Database.EnsureCreated();
    // DbInitializer.Initialize(context);
}

app.UseHttpsRedirection();
app.UseStaticFiles();

app.UseRouting();

app.UseAuthorization();

app.MapRazorPages();

app.Run();
若已存在內容的資料庫,則 EnsureCreated 方法便不會採取任何動作。 若資料庫不存在,則它會建立資料庫和結構描述。 EnsureCreated 會啟用下列工作流程來處理資料模型變更:
- 刪除資料庫。 任何現有的資料都會遺失。
- 變更資料模型。 例如,新增
EmailAddress欄位。 - 執行應用程式。
EnsureCreated會使用新的結構描述來建立資料庫。
只要您不需要保存資料,此工作流程在開發初期結構描述快速變化時的運作效果便會相當良好。 當資料輸入資料庫且需要進行保存時,狀況則會不同。 在這種情況下,請使用移轉。
在教學課程系列的稍後部分,您會刪除 EnsureCreated 建立的資料庫並使用移轉。 EnsureCreated 建立的資料庫無法使用移轉來更新。
測試應用程式
- 執行應用程式。
- 選取 [學生] 連結,然後選取 [新建]。
- 測試 [編輯]、[詳細資料] 和 [刪除] 連結。
植入資料庫
EnsureCreated 方法會建立空白資料庫。 本節會新增程式碼以使用測試資料來填入資料庫。
使用下列程式碼建立 Data/DbInitializer.cs:
using ContosoUniversity.Models;

namespace ContosoUniversity.Data
{
    public static class DbInitializer
    {
        public static void Initialize(SchoolContext context)
        {
            // Look for any students.
            if (context.Students.Any())
            {
                return;   // DB has been seeded
            }

            var students = new Student[]
            {
                new Student{FirstMidName="Carson",LastName="Alexander",EnrollmentDate=DateTime.Parse("2019-09-01")},
                new Student{FirstMidName="Meredith",LastName="Alonso",EnrollmentDate=DateTime.Parse("2017-09-01")},
                new Student{FirstMidName="Arturo",LastName="Anand",EnrollmentDate=DateTime.Parse("2018-09-01")},
                new Student{FirstMidName="Gytis",LastName="Barzdukas",EnrollmentDate=DateTime.Parse("2017-09-01")},
                new Student{FirstMidName="Yan",LastName="Li",EnrollmentDate=DateTime.Parse("2017-09-01")},
                new Student{FirstMidName="Peggy",LastName="Justice",EnrollmentDate=DateTime.Parse("2016-09-01")},
                new Student{FirstMidName="Laura",LastName="Norman",EnrollmentDate=DateTime.Parse("2018-09-01")},
                new Student{FirstMidName="Nino",LastName="Olivetto",EnrollmentDate=DateTime.Parse("2019-09-01")}
            };

            context.Students.AddRange(students);
            context.SaveChanges();

            var courses = new Course[]
            {
                new Course{CourseID=1050,Title="Chemistry",Credits=3},
                new Course{CourseID=4022,Title="Microeconomics",Credits=3},
                new Course{CourseID=4041,Title="Macroeconomics",Credits=3},
                new Course{CourseID=1045,Title="Calculus",Credits=4},
                new Course{CourseID=3141,Title="Trigonometry",Credits=4},
                new Course{CourseID=2021,Title="Composition",Credits=3},
                new Course{CourseID=2042,Title="Literature",Credits=4}
            };

            context.Courses.AddRange(courses);
            context.SaveChanges();

            var enrollments = new Enrollment[]
            {
                new Enrollment{StudentID=1,CourseID=1050,Grade=Grade.A},
                new Enrollment{StudentID=1,CourseID=4022,Grade=Grade.C},
                new Enrollment{StudentID=1,CourseID=4041,Grade=Grade.B},
                new Enrollment{StudentID=2,CourseID=1045,Grade=Grade.B},
                new Enrollment{StudentID=2,CourseID=3141,Grade=Grade.F},
                new Enrollment{StudentID=2,CourseID=2021,Grade=Grade.F},
                new Enrollment{StudentID=3,CourseID=1050},
                new Enrollment{StudentID=4,CourseID=1050},
                new Enrollment{StudentID=4,CourseID=4022,Grade=Grade.F},
                new Enrollment{StudentID=5,CourseID=4041,Grade=Grade.C},
                new Enrollment{StudentID=6,CourseID=1045},
                new Enrollment{StudentID=7,CourseID=3141,Grade=Grade.A},
            };

            context.Enrollments.AddRange(enrollments);
            context.SaveChanges();
        }
    }
}
程式碼會檢查資料庫中是否有任何學生。 若沒有任何學生,它便會將測試資料新增到資料庫。 它會以陣列的方式建立測試資料,而非 List<T> 集合,來最佳化效能。
- 在
Program.cs中,從DbInitializer.Initialize行移除//:
using (var scope = app.Services.CreateScope())
{
    var services = scope.ServiceProvider;

    var context = services.GetRequiredService<SchoolContext>();
    context.Database.EnsureCreated();
    DbInitializer.Initialize(context);
}
停止應用程式 (如果它正在執行),並在套件管理員主控台 (PMC) 中執行下列命令:
Drop-Database -Confirm透過
Y回應以刪除資料庫。
- 重新啟動應用程式。
- 選取 Students 頁面來查看植入的資料。
檢視資料庫
- 從 Visual Studio 中的 View 功能表開啟 SQL Server 物件總管 (SSOX)。
- 在 SSOX 中,選取 [(localdb)\MSSQLLocalDB] > [資料庫] > [SchoolContext-{GUID}]>>。 資料庫名稱是以您稍早所提供的內容名稱加上虛線和 GUID 所產生。
- 展開 [資料表] 節點。
- 以滑鼠右鍵按一下 Students 資料表,並按一下 [檢視資料] 查看建立的資料行、插入資料表中的資料列。
- 以滑鼠右鍵按一下 Student 資料表然後按一下 [檢視程式碼] 來查看
Student模型對應到Student資料表結構描述的方式。
ASP.NET Core Web 應用程式中的非同步 EF 方法
非同步程式設計是預設的 ASP.NET Core 和 EF Core 模式。
網頁伺服器的可用執行緒數量有限,而且在高負載情況下,可能會使用所有可用的執行緒。 發生此情況時,伺服器將無法處理新的要求,直到執行緒空出來。 使用同步程式碼,許多執行緒可能在實際上並未執行任何工作時受到占用,原因是在等候 I/O 完成。 使用非同步程式碼,處理程序在等候 I/O 完成時,其執行緒將會空出來以讓伺服器處理其他要求。 因此,非同步程式碼可以更有效率地使用伺服器資源,且伺服器可處理更多流量而不會造成延遲。
非同步程式碼會在執行階段導致少量的額外負荷。 在低流量情況下,對效能的衝擊非常微小;在高流量情況下,潛在的效能改善則相當大。
在下列程式碼中,async 關鍵字、Task 傳回值、await 關鍵字和 ToListAsync 方法會使程式碼以非同步方式執行。
public async Task OnGetAsync()
{
    Students = await _context.Students.ToListAsync();
}
async關鍵字會指示編譯器:- 為方法主體的組件產生回呼。
- 建立傳回的 Task 物件。
Task傳回型別代表正在進行的工作。await關鍵字會使編譯器將方法分割為兩部分。 第一個部分會與非同步啟動的作業一同結束。 第二個部分則會放入作業完成時呼叫的回呼方法中。ToListAsync是ToList擴充方法的非同步版本。
若要撰寫使用 EF Core 的非同步程式碼,請注意下列事項:
- 只有讓查詢或命令傳送至資料庫的陳述式,會以非同步方式執行。 其中包含
ToListAsync、SingleOrDefaultAsync、FirstOrDefaultAsync和SaveChangesAsync。 不會包含只變更IQueryable的陳述式,例如var students = context.Students.Where(s => s.LastName == "Davolio")。 - EF Core 內容在執行緒中並不安全:不要嘗試執行多個平行作業。
- 若要利用非同步程式碼所帶來的效能利益,請驗證該程式庫套件 (例如用於分頁) 在呼叫傳送查詢到資料庫的 EF Core 方法時使用 async。
如需非同步方法的詳細資訊,請參閱 Async 概觀和使用 Async 和 Await 設計非同步程式。
警告
Microsoft.Data.SqlClient 的非同步實作具有一些已知問題 (#593、#601 等等)。 如果您看到非預期的效能問題,請嘗試改用同步命令執行,尤其是在處理大型文字或二進位值時。
效能考量
一般而言,網頁不應該載入任意數目的資料列。 查詢應該使用分頁或限制方法。 例如,上述查詢可使用 Take 來限制傳回的資料列:
public async Task OnGetAsync()
{
    Student = await _context.Students.Take(10).ToListAsync();
}
如果資料庫例外狀況發生在列舉的一部分,則列舉檢視中的大型資料表可能會傳回部分建構的 HTTP 200 回應。
本教學課程稍後將說明分頁。
如需詳細資訊,請參閱效能考量 (EF)。
下一步
這是一系列教學課程的第一篇,示範如何在 ASP.NET Core Razor Pages 應用程式中使用 Entity Framework (EF) Core。 教學課程會為虛構的 Contoso 大學建置網站。 網站包含學生入學許可、課程建立和講師指派等功能。 本教學課程使用程式碼第一種方法。 如需使用資料庫第一種方法遵循本教學課程的詳細資訊,請參閱此 Github 問題。
必要條件
- 若您是第一次使用 Razor Pages,請先前往開始使用 Razor Pages 教學課程系列,再開始進行本教學課程。
- Visual Studio 2019 16.8 或更新版本,其中包含 ASP.NET 和網頁程式開發工作負載
- .NET 5.0 SDK
資料庫引擎
Visual Studio 說明會使用 SQL Server LocalDB,它是一種只在 Windows 上執行的 SQL Server Express 版本。
疑難排解
若您遇到無法解決的問題,請將您的程式碼與已完成的專案進行比較。 取得協助的其中一種好方法是將問題張貼到 StackOverflow.com,並使用 ASP.NET Core 標籤或 EF Core 標籤。
範例應用程式
在教學課程中建立的應用程式,是一個基本的大學網站。 使用者可以檢視和更新學生、課程和教師資訊。 以下是幾個在教學課程中建立的畫面。
本網站的 UI 風格是以內建的專案範本為基礎。 教學課程的重點在於如何使用 EF Core 搭配 ASP.NET Core,而非如何自訂 UI。
選擇性:建置範例下載
此步驟是選擇性的。 當您有無法解決的問題時,建議您建置已完成的應用程式。 若您遇到無法解決的問題,請將您的程式碼與已完成的專案進行比較。 下載指示。
選取 ContosoUniversity.csproj 以開啟專案。
- 組建專案。
- 在套件管理器主控台 (PMC) 中,執行下列命令:
Update-Database
執行專案來植入資料庫。
建立 Web 應用程式專案
- 啟動 Visual Studio 並選取 [建立新專案]。
- 在 [建立新專案] 對話方塊中,選取 [ASP.NET Core Web 應用程式]>[下一步]。
- 在 [設定新專案] 對話方塊中,輸入
ContosoUniversity作為 [專案名稱]。 使用一模一樣的名稱非常重要 (包括大小寫),用以確保在您複製和貼上程式碼時每個namespace均相符。 - 選取建立。
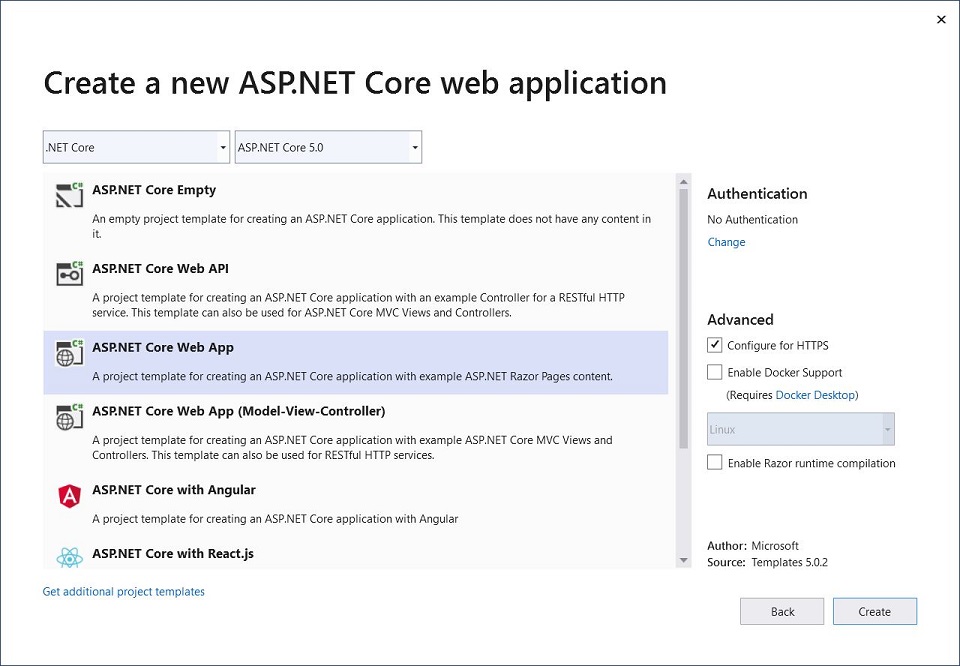
- 在 [建立新的 ASP.NET Core Web 應用程式] 對話方塊中,選取:
- 下拉式清單中的 .NET Core 和 ASP.NET Core 5.0。
- ASP.NET Core Web 應用程式。
- 建立
設定網站樣式
將下列程式碼複製並貼入 Pages/Shared/_Layout.cshtml 檔案中:
<!DOCTYPE html>
<html lang="en">
<head>
<meta charset="utf-8" />
<meta name="viewport" content="width=device-width, initial-scale=1.0" />
<title>@ViewData["Title"] - Contoso University</title>
<link rel="stylesheet" href="~/lib/bootstrap/dist/css/bootstrap.css" />
<link rel="stylesheet" href="~/css/site.css" />
</head>
<body>
<header>
<nav class="navbar navbar-expand-sm navbar-toggleable-sm navbar-light bg-white border-bottom box-shadow mb-3">
<div class="container">
<a class="navbar-brand" asp-area="" asp-page="/Index">Contoso University</a>
<button class="navbar-toggler" type="button" data-toggle="collapse" data-target=".navbar-collapse" aria-controls="navbarSupportedContent"
aria-expanded="false" aria-label="Toggle navigation">
<span class="navbar-toggler-icon"></span>
</button>
<div class="navbar-collapse collapse d-sm-inline-flex flex-sm-row-reverse">
<ul class="navbar-nav flex-grow-1">
<li class="nav-item">
<a class="nav-link text-dark" asp-area="" asp-page="/About">About</a>
</li>
<li class="nav-item">
<a class="nav-link text-dark" asp-area="" asp-page="/Students/Index">Students</a>
</li>
<li class="nav-item">
<a class="nav-link text-dark" asp-area="" asp-page="/Courses/Index">Courses</a>
</li>
<li class="nav-item">
<a class="nav-link text-dark" asp-area="" asp-page="/Instructors/Index">Instructors</a>
</li>
<li class="nav-item">
<a class="nav-link text-dark" asp-area="" asp-page="/Departments/Index">Departments</a>
</li>
</ul>
</div>
</div>
</nav>
</header>
<div class="container">
<main role="main" class="pb-3">
@RenderBody()
</main>
</div>
<footer class="border-top footer text-muted">
<div class="container">
© 2021 - Contoso University - <a asp-area="" asp-page="/Privacy">Privacy</a>
</div>
</footer>
<script src="~/lib/jquery/dist/jquery.js"></script>
<script src="~/lib/bootstrap/dist/js/bootstrap.bundle.js"></script>
<script src="~/js/site.js" asp-append-version="true"></script>
@RenderSection("Scripts", required: false)
</body>
</html>
版面配置檔案會設定網站頁首、頁尾和功能表。 上述程式碼會進行下列變更:
- 將每個出現的「ContosoUniversity」都變更為「Contoso University」。 共有三個發生次數。
- Home 和 Privacy 功能表項目會被刪除。
- [關於]、[學生]、[課程]、[講師] 和 [部門] 會新增項目。
在 Pages/Index.cshtml 中,以下列程式碼來取代檔案的內容:
@page
@model IndexModel
@{
    ViewData["Title"] = "Home page";
}

<div class="row mb-auto">
    <div class="col-md-4">
        <div class="row no-gutters border mb-4">
            <div class="col p-4 mb-4 ">
                <p class="card-text">
                    Contoso University is a sample application that
                    demonstrates how to use Entity Framework Core in an
                    ASP.NET Core Razor Pages web app.
                </p>
            </div>
        </div>
    </div>
    <div class="col-md-4">
        <div class="row no-gutters border mb-4">
            <div class="col p-4 d-flex flex-column position-static">
                <p class="card-text mb-auto">
                    You can build the application by following the steps in a series of tutorials.
                </p>
                <p>
                    <a href="https://docs.microsoft.com/aspnet/core/data/ef-rp/intro" class="stretched-link">See the tutorial</a>
                </p>
            </div>
        </div>
    </div>
    <div class="col-md-4">
        <div class="row no-gutters border mb-4">
            <div class="col p-4 d-flex flex-column">
                <p class="card-text mb-auto">
                    You can download the completed project from GitHub.
                </p>
                <p>
                    <a href="https://github.com/dotnet/AspNetCore.Docs/tree/main/aspnetcore/data/ef-rp/intro/samples" class="stretched-link">See project source code</a>
                </p>
            </div>
        </div>
    </div>
</div>
上述程式碼會將有關 ASP.NET Core 的文字取代為此應用程式的相關文字。
執行應用程式來驗證首頁是否正常顯示。
資料模型
下列各節會建立資料模型:
學生可以註冊任何數量的課程,課程也能讓任意數量的學生註冊。
Student 實體
在專案資料夾中建立 Models 資料夾。
使用下列程式碼建立
Models/Student.cs:using System; using System.Collections.Generic; namespace ContosoUniversity.Models { public class Student { public int ID { get; set; } public string LastName { get; set; } public string FirstMidName { get; set; } public DateTime EnrollmentDate { get; set; } public ICollection<Enrollment> Enrollments { get; set; } } }
ID 屬性會成為對應到此類別資料庫資料表的主索引鍵資料行。 EF Core 預設會將名為 ID 或 classnameID 的屬性解譯為主索引鍵。 因此 Student 類別主索引鍵的替代自動識別名稱為 StudentID。 如需詳細資訊,請參閱 EF Core - 索引鍵。
Enrollments 屬性為導覽屬性。 導覽屬性會保留與此實體相關的其他實體。 在這種情況下,Student 實體的 Enrollments 屬性會保留所有與該 Student 相關的 Enrollment 實體。 例如,若資料庫中的 Student 資料列有兩個相關的 Enrollment 資料列,則 Enrollments 導覽屬性便會包含這兩個 Enrollment 項目。
在資料庫中,若 Enrollment 資料列的 StudentID 資料行包含學生的識別碼值,則該資料列便會與 Student 資料列相關。 例如,假設某 Student 資料列的識別碼為 1。 相關的 Enrollment 資料列將會擁有 StudentID = 1。 StudentID 是 Enrollment 資料表中的「外部索引鍵」。
Enrollments 屬性會定義為 ICollection<Enrollment>,因為可能會有多個相關的 Enrollment 實體。 您可以使用其他集合型別,例如 List<Enrollment> 或 HashSet<Enrollment>。 若使用 ICollection<Enrollment>,EF Core 預設將建立 HashSet<Enrollment> 集合。
Enrollment 實體
使用下列程式碼建立 Models/Enrollment.cs:
using System.ComponentModel.DataAnnotations;

namespace ContosoUniversity.Models
{
    public enum Grade
    {
        A, B, C, D, F
    }

    public class Enrollment
    {
        public int EnrollmentID { get; set; }
        public int CourseID { get; set; }
        public int StudentID { get; set; }
        [DisplayFormat(NullDisplayText = "No grade")]
        public Grade? Grade { get; set; }

        public Course Course { get; set; }
        public Student Student { get; set; }
    }
}
EnrollmentID 屬性是主索引鍵;這個實體會使用 classnameID 模式,而非 ID 本身。 針對生產資料模型,許多開發人員會選擇一個模式並從一而終使用該模式。 本教學課程同時使用兩者的方式只是為了示範兩者都可運作。 在不使用 classname 的情況下使用 ID 可讓實作某些類型的資料模型變更更容易。
Grade 屬性為 enum。 Grade 型別宣告後方的問號表示 Grade 屬性可為 Null。 為 Null 的成績不同於成績為零:Null 表示成績未知或尚未指派。
StudentID 屬性是外部索引鍵,對應的導覽屬性是 Student。 一個 Enrollment 實體與一個 Student 實體建立關聯,因此該屬性包含單一 Student 實體。
CourseID 屬性是外部索引鍵,對應的導覽屬性是 Course。 一個 Enrollment 實體與一個 Course 實體建立關聯。
如果實體名為 <navigation property name><primary key property name>,則 EF Core 會將之解釋為外部索引鍵。 例如,StudentID 是 Student 導覽屬性的外部索引鍵,因為 Student 實體的主索引鍵是 ID。 外部索引鍵屬性也可命名為 <primary key property name>。 例如 CourseID,因為 Course 實體的主索引鍵是 CourseID。
Course 實體
使用下列程式碼建立 Models/Course.cs:
using System.Collections.Generic;
using System.ComponentModel.DataAnnotations.Schema;

namespace ContosoUniversity.Models
{
    public class Course
    {
        [DatabaseGenerated(DatabaseGeneratedOption.None)]
        public int CourseID { get; set; }
        public string Title { get; set; }
        public int Credits { get; set; }

        public ICollection<Enrollment> Enrollments { get; set; }
    }
}
Enrollments 屬性為導覽屬性。 Course 實體可以與任何數量的 Enrollment 實體相關。
DatabaseGenerated 屬性可讓應用程式指定主索引鍵,而非讓資料庫產生它。
建置專案以驗證沒有任何編譯器錯誤。
Scaffold Student 頁面
在本節中,ASP.NET scaffolding 工具會用來產生:
- EF Core
DbContext類別。 內容是協調指定資料模型 Entity Framework 功能的主類別。 它衍生自 Microsoft.EntityFrameworkCore.DbContext 類別。 - 處理
Student實體建立、讀取、更新和刪除 (CRUD) 作業的 Razor 頁面。
- 建立 Pages/Students 資料夾。
- 在 [方案總管] 中,以滑鼠右鍵按一下 Page/Students 資料夾,然後選取 [新增]> [新增 Scaffold 項目]。
- 在 [新增 Scaffold 項目] 對話方塊中:
- 在左側索引標籤中,選取 [已安裝 > 通用 >Razor Pages]
- 選取 [使用 Entity Framework (CRUD) 的 Razor 頁面] > [新增]。>
- 在 [使用 Entity Framework (CRUD) 新增 Razor Pages] 對話方塊中:
- 在 [模型類別] 下拉式清單中,選取 [學生 (ContosoUniversity.Models)]。
- 在 [資料內容類別] 資料列中,選取 + (加號)。
- 將資料內容名稱變更為結束於
SchoolContext,而不是ContosoUniversityContext。 更新的內容名稱:ContosoUniversity.Data.SchoolContext - 選取 [新增] 以完成新增資料內容類別。
- 選取 [新增] 以完成 [新增 Razor 頁面] 對話方塊。
- 將資料內容名稱變更為結束於
如果 Scaffolding 失敗並出現錯誤 'Install the package Microsoft.VisualStudio.Web.CodeGeneration.Design and try again.',請再次執行 Scaffold 工具,或查看此 GitHub 問題。
會自動安裝下列套件:
Microsoft.EntityFrameworkCore.SqlServerMicrosoft.EntityFrameworkCore.ToolsMicrosoft.VisualStudio.Web.CodeGeneration.Design
若無法執行上述步驟,請建置專案並重試 scaffold 步驟。
Scaffolding 流程:
- 在 Pages/Students 資料夾中建立 Razor 頁面:
Create.cshtml和Create.cshtml.csDelete.cshtml和Delete.cshtml.csDetails.cshtml和Details.cshtml.csEdit.cshtml和Edit.cshtml.csIndex.cshtml和Index.cshtml.cs
- 建立
Data/SchoolContext.cs。 - 將內容新增到
Startup.cs中的相依性注入。 - 將資料庫連接字串新增至
appsettings.json。
資料庫連接字串
Scaffolding 工具會在 appsettings.json 檔案中產生連接字串。
連接字串會指定 SQL Server LocalDB:
{
  "Logging": {
    "LogLevel": {
      "Default": "Information",
      "Microsoft": "Warning",
      "Microsoft.Hosting.Lifetime": "Information"
    }
  },
  "AllowedHosts": "*",
  "ConnectionStrings": {
    "SchoolContext": "Server=(localdb)\\mssqllocaldb;Database=CU-1;Trusted_Connection=True;MultipleActiveResultSets=true"
  }
}
LocalDB 是輕量版的 SQL Server Express Database Engine,旨在用於應用程序開發,而不是生產用途。 根據預設,LocalDB 會在 C:/Users/<user> 目錄中建立 .mdf 檔案。
更新資料庫內容類別
協調指定資料模型 EF Core 功能的主類別是資料庫內容類別。 內容衍生自 Microsoft.EntityFrameworkCore.DbContext。 內容會指定哪些實體會包含在資料模型中。 在此專案中,類別命名為 SchoolContext。
以下列程式碼來更新 Data/SchoolContext.cs:
using Microsoft.EntityFrameworkCore;
using ContosoUniversity.Models;

namespace ContosoUniversity.Data
{
    public class SchoolContext : DbContext
    {
        public SchoolContext (DbContextOptions<SchoolContext> options)
            : base(options)
        {
        }

        public DbSet<Student> Students { get; set; }
        public DbSet<Enrollment> Enrollments { get; set; }
        public DbSet<Course> Courses { get; set; }

        protected override void OnModelCreating(ModelBuilder modelBuilder)
        {
            modelBuilder.Entity<Course>().ToTable("Course");
            modelBuilder.Entity<Enrollment>().ToTable("Enrollment");
            modelBuilder.Entity<Student>().ToTable("Student");
        }
    }
}
上述程式碼會從單數 DbSet<Student> Student 變更為複數 DbSet<Student> Students。 若要讓 Razor Pages 程式碼符合新的 DBSet 名稱,請從下列進行全域變更:_context.Student. 至:_context.Students.
會有 8 次變更。
因為實體集包含多個實體,許多開發人員偏向將 DBSet 屬性名稱設為複數。
醒目提示的程式碼:
- 為每一個實體集建立 DbSet<TEntity> 屬性。 在 EF Core 術語中:
- 實體集通常會對應到資料庫資料表。
- 實體會對應至資料表中的資料列。
- 呼叫 OnModelCreating。
OnModelCreating:- 在
SchoolContext初始化時呼叫,但是在模型已鎖定且用來初始化內容之前。 - 是必要的,因為稍後在本教學課程中,
Student實體將具有其他實體的參考。
- 在
建置專案以確認沒有任何編譯器錯誤。
Startup.cs
ASP.NET Core 內建相依性插入。 服務 (例如 SchoolContext) 是在應用程式啟動期間使用相依性插入來註冊。 接著,會透過建構函式參數,針對需要這些服務的元件 (例如 Razor 頁面) 來提供服務。 取得資料庫內容執行個體的建構函式程式碼會顯示在本教學課程稍後部分。
Scaffolding 工具會自動對相依性插入容器註冊內容類別。
Scaffolder 會新增下列醒目提示行:
public void ConfigureServices(IServiceCollection services)
{
    services.AddRazorPages();

    services.AddDbContext<SchoolContext>(options =>
            options.UseSqlServer(Configuration.GetConnectionString("SchoolContext")));
}
連接字串的名稱,會透過呼叫 DbContextOptions 物件上的方法來傳遞至內容。 作為本機開發之用,ASP.NET Core 設定系統會從 appsettings.json 檔案讀取連接字串。
新增資料庫例外狀況篩選條件
新增 AddDatabaseDeveloperPageExceptionFilter 和 UseMigrationsEndPoint,如下列程式碼所示:
public void ConfigureServices(IServiceCollection services)
{
    services.AddRazorPages();

    services.AddDbContext<SchoolContext>(options =>
       options.UseSqlServer(Configuration.GetConnectionString("SchoolContext")));

    services.AddDatabaseDeveloperPageExceptionFilter();
}

public void Configure(IApplicationBuilder app, IWebHostEnvironment env)
{
    if (env.IsDevelopment())
    {
        app.UseDeveloperExceptionPage();
        app.UseMigrationsEndPoint();
    }
    else
    {
        app.UseExceptionHandler("/Error");
        app.UseHsts();
    }

    app.UseHttpsRedirection();
    app.UseStaticFiles();

    app.UseRouting();

    app.UseAuthorization();

    app.UseEndpoints(endpoints =>
    {
        endpoints.MapRazorPages();
    });
}
新增 Microsoft.AspNetCore.Diagnostics.EntityFrameworkCore NuGet 封裝。
請在套件管理員主控台中輸入下列以新增 NuGet 封裝:
Install-Package Microsoft.AspNetCore.Diagnostics.EntityFrameworkCore
Microsoft.AspNetCore.Diagnostics.EntityFrameworkCore NuGet 封裝會針對 Entity Framework Core 錯誤頁面提供 ASP.NET Core 中介軟體。 此中介軟體有助於偵測和診斷 Entity Framework Core 移轉的錯誤。
AddDatabaseDeveloperPageExceptionFilter 會針對 EF 移轉錯誤,在開發環境中提供有用的錯誤資訊。
建立資料庫
若未存在資料庫,則請更新 Program.cs 來加以建立:
using ContosoUniversity.Data;
using Microsoft.Extensions.DependencyInjection;
using Microsoft.AspNetCore.Hosting;
using Microsoft.Extensions.Hosting;
using Microsoft.Extensions.Logging;
using System;

namespace ContosoUniversity
{
    public class Program
    {
        public static void Main(string[] args)
        {
            var host = CreateHostBuilder(args).Build();

            CreateDbIfNotExists(host);

            host.Run();
        }

        private static void CreateDbIfNotExists(IHost host)
        {
            using (var scope = host.Services.CreateScope())
            {
                var services = scope.ServiceProvider;
                try
                {
                    var context = services.GetRequiredService<SchoolContext>();
                    context.Database.EnsureCreated();
                    // DbInitializer.Initialize(context);
                }
                catch (Exception ex)
                {
                    var logger = services.GetRequiredService<ILogger<Program>>();
                    logger.LogError(ex, "An error occurred creating the DB.");
                }
            }
        }

        public static IHostBuilder CreateHostBuilder(string[] args) =>
            Host.CreateDefaultBuilder(args)
                .ConfigureWebHostDefaults(webBuilder =>
                {
                    webBuilder.UseStartup<Startup>();
                });
    }
}
若已存在內容的資料庫,則 EnsureCreated 方法便不會採取任何動作。 若資料庫不存在,則它會建立資料庫和結構描述。 EnsureCreated 會啟用下列工作流程來處理資料模型變更:
- 刪除資料庫。 任何現有的資料都會遺失。
- 變更資料模型。 例如,新增
EmailAddress欄位。 - 執行應用程式。
EnsureCreated會使用新的結構描述來建立資料庫。
只要您不需要保存資料,此工作流程在開發初期結構描述快速變化時的運作效果便會相當良好。 當資料輸入資料庫且需要進行保存時,狀況則會不同。 在這種情況下,請使用移轉。
在教學課程系列的稍後部分,您會刪除 EnsureCreated 建立的資料庫並使用移轉。 EnsureCreated 建立的資料庫無法使用移轉來更新。
測試應用程式
- 執行應用程式。
- 選取 [學生] 連結,然後選取 [新建]。
- 測試 [編輯]、[詳細資料] 和 [刪除] 連結。
植入資料庫
EnsureCreated 方法會建立空白資料庫。 本節會新增程式碼以使用測試資料來填入資料庫。
使用下列程式碼建立 Data/DbInitializer.cs:
using ContosoUniversity.Models;
using System;
using System.Linq;

namespace ContosoUniversity.Data
{
    public static class DbInitializer
    {
        public static void Initialize(SchoolContext context)
        {
            // Look for any students.
            if (context.Students.Any())
            {
                return;   // DB has been seeded
            }

            var students = new Student[]
            {
                new Student{FirstMidName="Carson",LastName="Alexander",EnrollmentDate=DateTime.Parse("2019-09-01")},
                new Student{FirstMidName="Meredith",LastName="Alonso",EnrollmentDate=DateTime.Parse("2017-09-01")},
                new Student{FirstMidName="Arturo",LastName="Anand",EnrollmentDate=DateTime.Parse("2018-09-01")},
                new Student{FirstMidName="Gytis",LastName="Barzdukas",EnrollmentDate=DateTime.Parse("2017-09-01")},
                new Student{FirstMidName="Yan",LastName="Li",EnrollmentDate=DateTime.Parse("2017-09-01")},
                new Student{FirstMidName="Peggy",LastName="Justice",EnrollmentDate=DateTime.Parse("2016-09-01")},
                new Student{FirstMidName="Laura",LastName="Norman",EnrollmentDate=DateTime.Parse("2018-09-01")},
                new Student{FirstMidName="Nino",LastName="Olivetto",EnrollmentDate=DateTime.Parse("2019-09-01")}
            };

            context.Students.AddRange(students);
            context.SaveChanges();

            var courses = new Course[]
            {
                new Course{CourseID=1050,Title="Chemistry",Credits=3},
                new Course{CourseID=4022,Title="Microeconomics",Credits=3},
                new Course{CourseID=4041,Title="Macroeconomics",Credits=3},
                new Course{CourseID=1045,Title="Calculus",Credits=4},
                new Course{CourseID=3141,Title="Trigonometry",Credits=4},
                new Course{CourseID=2021,Title="Composition",Credits=3},
                new Course{CourseID=2042,Title="Literature",Credits=4}
            };

            context.Courses.AddRange(courses);
            context.SaveChanges();

            var enrollments = new Enrollment[]
            {
                new Enrollment{StudentID=1,CourseID=1050,Grade=Grade.A},
                new Enrollment{StudentID=1,CourseID=4022,Grade=Grade.C},
                new Enrollment{StudentID=1,CourseID=4041,Grade=Grade.B},
                new Enrollment{StudentID=2,CourseID=1045,Grade=Grade.B},
                new Enrollment{StudentID=2,CourseID=3141,Grade=Grade.F},
                new Enrollment{StudentID=2,CourseID=2021,Grade=Grade.F},
                new Enrollment{StudentID=3,CourseID=1050},
                new Enrollment{StudentID=4,CourseID=1050},
                new Enrollment{StudentID=4,CourseID=4022,Grade=Grade.F},
                new Enrollment{StudentID=5,CourseID=4041,Grade=Grade.C},
                new Enrollment{StudentID=6,CourseID=1045},
                new Enrollment{StudentID=7,CourseID=3141,Grade=Grade.A},
            };

            context.Enrollments.AddRange(enrollments);
            context.SaveChanges();
        }
    }
}
程式碼會檢查資料庫中是否有任何學生。 若沒有任何學生,它便會將測試資料新增到資料庫。 它會以陣列的方式建立測試資料,而非 List<T> 集合,來最佳化效能。
在
Program.cs中,從DbInitializer.Initialize行移除//:context.Database.EnsureCreated(); DbInitializer.Initialize(context);
停止應用程式 (如果它正在執行),並在套件管理員主控台 (PMC) 中執行下列命令:
Drop-Database -Confirm透過
Y回應以刪除資料庫。
- 重新啟動應用程式。
- 選取 Students 頁面來查看植入的資料。
檢視資料庫
- 從 Visual Studio 中的 View 功能表開啟 SQL Server 物件總管 (SSOX)。
- 在 SSOX 中,選取 [(localdb)\MSSQLLocalDB] > [資料庫] > [SchoolContext-{GUID}]>>。 資料庫名稱是以您稍早所提供的內容名稱加上虛線和 GUID 所產生。
- 展開 [資料表] 節點。
- 以滑鼠右鍵按一下 Students 資料表,並按一下 [檢視資料] 查看建立的資料行、插入資料表中的資料列。
- 以滑鼠右鍵按一下 Student 資料表然後按一下 [檢視程式碼] 來查看
Student模型對應到Student資料表結構描述的方式。
非同步程式碼
非同步程式設計是預設的 ASP.NET Core 和 EF Core 模式。
網頁伺服器的可用執行緒數量有限,而且在高負載情況下,可能會使用所有可用的執行緒。 發生此情況時,伺服器將無法處理新的要求,直到執行緒空出來。 使用同步程式碼,許多執行緒可能在實際上並未執行任何工作時受到占用,原因是在等候 I/O 完成。 使用非同步程式碼,處理程序在等候 I/O 完成時,其執行緒將會空出來以讓伺服器處理其他要求。 因此,非同步程式碼可以更有效率地使用伺服器資源,且伺服器可處理更多流量而不會造成延遲。
非同步程式碼會在執行階段導致少量的額外負荷。 在低流量情況下,對效能的衝擊非常微小;在高流量情況下,潛在的效能改善則相當大。
在下列程式碼中,async 關鍵字、Task 傳回值、await 關鍵字和 ToListAsync 方法會使程式碼以非同步方式執行。
public async Task OnGetAsync()
{
    Students = await _context.Students.ToListAsync();
}
async關鍵字會指示編譯器:- 為方法主體的組件產生回呼。
- 建立傳回的 Task 物件。
Task傳回型別代表正在進行的工作。await關鍵字會使編譯器將方法分割為兩部分。 第一個部分會與非同步啟動的作業一同結束。 第二個部分則會放入作業完成時呼叫的回呼方法中。ToListAsync是ToList擴充方法的非同步版本。
若要撰寫使用 EF Core 的非同步程式碼,請注意下列事項:
- 只有讓查詢或命令傳送至資料庫的陳述式,會以非同步方式執行。 其中包含
ToListAsync、SingleOrDefaultAsync、FirstOrDefaultAsync和SaveChangesAsync。 不會包含只變更IQueryable的陳述式,例如var students = context.Students.Where(s => s.LastName == "Davolio")。 - EF Core 內容在執行緒中並不安全:不要嘗試執行多個平行作業。
- 若要利用非同步程式碼所帶來的效能利益,請驗證該程式庫套件 (例如用於分頁) 在呼叫傳送查詢到資料庫的 EF Core 方法時使用 async。
如需非同步方法的詳細資訊,請參閱 Async 概觀和使用 Async 和 Await 設計非同步程式。
效能考量
一般而言,網頁不應該載入任意數目的資料列。 查詢應該使用分頁或限制方法。 例如,上述查詢可使用 Take 來限制傳回的資料列:
public async Task OnGetAsync()
{
    Student = await _context.Students.Take(10).ToListAsync();
}
如果資料庫例外狀況發生在列舉的一部分,則列舉檢視中的大型資料表可能會傳回部分建構的 HTTP 200 回應。
MaxModelBindingCollectionSize 預設為 1024。 下列程式碼會設定 MaxModelBindingCollectionSize:
public void ConfigureServices(IServiceCollection services)
{
    var myMaxModelBindingCollectionSize = Convert.ToInt32(
                Configuration["MyMaxModelBindingCollectionSize"] ?? "100");

    services.Configure<MvcOptions>(options =>
           options.MaxModelBindingCollectionSize = myMaxModelBindingCollectionSize);

    services.AddRazorPages();

    services.AddDbContext<SchoolContext>(options =>
          options.UseSqlServer(Configuration.GetConnectionString("SchoolContext")));

    services.AddDatabaseDeveloperPageExceptionFilter();
}
如需 MyMaxModelBindingCollectionSize 等組態設定的相關資訊,請參閱組態。
本教學課程稍後將說明分頁。
如需詳細資訊,請參閱效能考量 (EF)。
Entity Framework Core 的 SQL 記錄
記錄組態通常是由 appsettings.{Environment}.json 檔案的 Logging 區段所提供。 若要記錄 SQL 陳述式,請將 "Microsoft.EntityFrameworkCore.Database.Command": "Information" 新增至 appsettings.Development.json 檔案:
{
  "ConnectionStrings": {
    "DefaultConnection": "Server=(localdb)\\mssqllocaldb;Database=MyDB-2;Trusted_Connection=True;MultipleActiveResultSets=true"
  },
  "Logging": {
    "LogLevel": {
      "Default": "Information",
      "Microsoft": "Warning",
      "Microsoft.Hosting.Lifetime": "Information"
     ,"Microsoft.EntityFrameworkCore.Database.Command": "Information"
    }
  },
  "AllowedHosts": "*"
}
使用上述 JSON 時,SQL 陳述式會顯示在命令列和 Visual Studio 輸出視窗中。
如需詳細資訊,請參閱在 .NET Core 和 ASP.NET Core 中記錄和此 GitHub 問題。
下一步
這是一系列教學課程的第一篇,示範如何在 ASP.NET Core Razor Pages 應用程式中使用 Entity Framework (EF) Core。 教學課程會為虛構的 Contoso 大學建置網站。 網站包含學生入學許可、課程建立和講師指派等功能。 本教學課程使用程式碼第一種方法。 如需使用資料庫第一種方法遵循本教學課程的詳細資訊,請參閱此 Github 問題。
必要條件
- 若您是第一次使用 Razor Pages,請先前往開始使用 Razor Pages 教學課程系列,再開始進行本教學課程。
- Visual Studio 2019 和 ASP.NET 與 Web 開發工作負載
- .NET Core 3.0 SDK
資料庫引擎
Visual Studio 說明會使用 SQL Server LocalDB,它是一種只在 Windows 上執行的 SQL Server Express 版本。
Visual Studio Code 說明則會使用 SQLite,它是一種跨平台的資料庫引擎。
若您選擇使用 SQLite,請下載及安裝協力廠商工具來管理和檢視 SQLite 資料庫,例如 DB Browser for SQLite。
疑難排解
若您遇到無法解決的問題,請將您的程式碼與已完成的專案進行比較。 取得協助的其中一種好方法是將問題張貼到 StackOverflow.com,並使用 ASP.NET Core 標籤或 EF Core 標籤。
範例應用程式
在教學課程中建立的應用程式,是一個基本的大學網站。 使用者可以檢視和更新學生、課程和教師資訊。 以下是幾個在教學課程中建立的畫面。
本網站的 UI 風格是以內建的專案範本為基礎。 教學課程的重點在於如何使用 EF Core,而非如何自訂 UI。
請遵循頁面頂端的連結來取得已完成專案的原始程式碼。 cu30 資料夾包含本教學課程 ASP.NET Core 3.0 版本的程式碼。 您可以在 cu30snapshots 資料夾中找到反映教學課程 1 到 7 程式碼狀態的檔案。
在下載已完成的專案後執行應用程式:
組建專案。
在套件管理器主控台 (PMC) 中,執行下列命令:
Update-Database執行專案來植入資料庫。
建立 Web 應用程式專案
- 從 Visual Studio 的 [檔案] 功能表中,選取 [新增]>[專案] 。
- 選取 [ASP.NET Core Web 應用程式]。
- 將專案命名為 ContosoUniversity。 使用與此名稱完全相符的名稱非常重要 (包括大寫),這樣做可以讓命名空間在您複製和貼上程式碼時相符。
- 在下拉式清單中選取 [.NET Core] 及 [ASP.NET Core 3.0],然後選取 [Web 應用程式]。
設定網站樣式
藉由更新 Pages/Shared/_Layout.cshtml 來設定網站頁首、頁尾和功能表:
將每個出現的 "ContosoUniversity" 都變更為 "Contoso University"。 共有三個發生次數。
刪除 [Home] 和 Privacy[] 功能表項目,然後新增 [About]、[Students]、[Courses]、[Instructors] 和 [Departments] 的項目。
所做的變更已醒目提示。
<!DOCTYPE html>
<html lang="en">
<head>
<meta charset="utf-8" />
<meta name="viewport" content="width=device-width, initial-scale=1.0" />
<title>@ViewData["Title"] - Contoso University</title>
<link rel="stylesheet" href="~/lib/bootstrap/dist/css/bootstrap.css" />
<link rel="stylesheet" href="~/css/site.css" />
</head>
<body>
<header>
<nav class="navbar navbar-expand-sm navbar-toggleable-sm navbar-light bg-white border-bottom box-shadow mb-3">
<div class="container">
<a class="navbar-brand" asp-area="" asp-page="/Index">Contoso University</a>
<button class="navbar-toggler" type="button" data-toggle="collapse" data-target=".navbar-collapse" aria-controls="navbarSupportedContent"
aria-expanded="false" aria-label="Toggle navigation">
<span class="navbar-toggler-icon"></span>
</button>
<div class="navbar-collapse collapse d-sm-inline-flex flex-sm-row-reverse">
<ul class="navbar-nav flex-grow-1">
<li class="nav-item">
<a class="nav-link text-dark" asp-area="" asp-page="/About">About</a>
</li>
<li class="nav-item">
<a class="nav-link text-dark" asp-area="" asp-page="/Students/Index">Students</a>
</li>
<li class="nav-item">
<a class="nav-link text-dark" asp-area="" asp-page="/Courses/Index">Courses</a>
</li>
<li class="nav-item">
<a class="nav-link text-dark" asp-area="" asp-page="/Instructors/Index">Instructors</a>
</li>
<li class="nav-item">
<a class="nav-link text-dark" asp-area="" asp-page="/Departments/Index">Departments</a>
</li>
</ul>
</div>
</div>
</nav>
</header>
<div class="container">
<main role="main" class="pb-3">
@RenderBody()
</main>
</div>
<footer class="border-top footer text-muted">
<div class="container">
© 2019 - Contoso University - <a asp-area="" asp-page="/Privacy">Privacy</a>
</div>
</footer>
<script src="~/lib/jquery/dist/jquery.js"></script>
<script src="~/lib/bootstrap/dist/js/bootstrap.bundle.js"></script>
<script src="~/js/site.js" asp-append-version="true"></script>
@RenderSection("Scripts", required: false)
</body>
</html>
在 Pages/Index.cshtml 中,將檔案內容替換成下列程式碼,將 ASP.NET Core 相關文字取代成此應用程式的相關文字:
@page
@model IndexModel
@{
    ViewData["Title"] = "Home page";
}

<div class="row mb-auto">
    <div class="col-md-4">
        <div class="row no-gutters border mb-4">
            <div class="col p-4 mb-4 ">
                <p class="card-text">
                    Contoso University is a sample application that
                    demonstrates how to use Entity Framework Core in an
                    ASP.NET Core Razor Pages web app.
                </p>
            </div>
        </div>
    </div>
    <div class="col-md-4">
        <div class="row no-gutters border mb-4">
            <div class="col p-4 d-flex flex-column position-static">
                <p class="card-text mb-auto">
                    You can build the application by following the steps in a series of tutorials.
                </p>
                <p>
                    <a href="https://docs.microsoft.com/aspnet/core/data/ef-rp/intro" class="stretched-link">See the tutorial</a>
                </p>
            </div>
        </div>
    </div>
    <div class="col-md-4">
        <div class="row no-gutters border mb-4">
            <div class="col p-4 d-flex flex-column">
                <p class="card-text mb-auto">
                    You can download the completed project from GitHub.
                </p>
                <p>
                    <a href="https://github.com/dotnet/AspNetCore.Docs/tree/main/aspnetcore/data/ef-rp/intro/samples" class="stretched-link">See project source code</a>
                </p>
            </div>
        </div>
    </div>
</div>
執行應用程式來驗證首頁是否正常顯示。
資料模型
下列各節會建立資料模型:
學生可以註冊任何數量的課程,課程也能讓任意數量的學生註冊。
Student 實體
在專案資料夾中建立 Models 資料夾。
使用下列程式碼建立
Models/Student.cs:using System; using System.Collections.Generic; namespace ContosoUniversity.Models { public class Student { public int ID { get; set; } public string LastName { get; set; } public string FirstMidName { get; set; } public DateTime EnrollmentDate { get; set; } public ICollection<Enrollment> Enrollments { get; set; } } }
ID 屬性會成為對應到此類別資料庫資料表的主索引鍵資料行。 EF Core 預設會將名為 ID 或 classnameID 的屬性解譯為主索引鍵。 因此 Student 類別主索引鍵的替代自動識別名稱為 StudentID。 如需詳細資訊,請參閱 EF Core - 索引鍵。
Enrollments 屬性為導覽屬性。 導覽屬性會保留與此實體相關的其他實體。 在這種情況下,Student 實體的 Enrollments 屬性會保留所有與該 Student 相關的 Enrollment 實體。 例如,若資料庫中的 Student 資料列有兩個相關的 Enrollment 資料列,則 Enrollments 導覽屬性便會包含這兩個 Enrollment 項目。
在資料庫中,若 Enrollment 資料列的 StudentID 資料行包含學生的識別碼值,則該資料列便會與 Student 資料列相關。 例如,假設某 Student 資料列的識別碼為 1。 相關的 Enrollment 資料列將會擁有 StudentID = 1。 StudentID 是 Enrollment 資料表中的「外部索引鍵」。
Enrollments 屬性會定義為 ICollection<Enrollment>,因為可能會有多個相關的 Enrollment 實體。 您可以使用其他集合型別,例如 List<Enrollment> 或 HashSet<Enrollment>。 若使用 ICollection<Enrollment>,EF Core 預設將建立 HashSet<Enrollment> 集合。
Enrollment 實體
使用下列程式碼建立 Models/Enrollment.cs:
namespace ContosoUniversity.Models
{
    public enum Grade
    {
        A, B, C, D, F
    }

    public class Enrollment
    {
        public int EnrollmentID { get; set; }
        public int CourseID { get; set; }
        public int StudentID { get; set; }
        public Grade? Grade { get; set; }

        public Course Course { get; set; }
        public Student Student { get; set; }
    }
}
EnrollmentID 屬性是主索引鍵;這個實體會使用 classnameID 模式,而非 ID 本身。 針對生產資料模型,請選擇一個模式並一致地使用它。 本教學課程同時使用兩者的方式只是為了示範兩者都可運作。 在不使用 classname 的情況下使用 ID 可讓實作某些類型的資料模型變更更容易。
Grade 屬性為 enum。 Grade 型別宣告後方的問號表示 Grade 屬性可為 Null。 為 Null 的成績不同於成績為零:Null 表示成績未知或尚未指派。
StudentID 屬性是外部索引鍵,對應的導覽屬性是 Student。 一個 Enrollment 實體與一個 Student 實體建立關聯,因此該屬性包含單一 Student 實體。
CourseID 屬性是外部索引鍵,對應的導覽屬性是 Course。 一個 Enrollment 實體與一個 Course 實體建立關聯。
如果實體名為 <navigation property name><primary key property name>,則 EF Core 會將之解釋為外部索引鍵。 例如,StudentID 是 Student 導覽屬性的外部索引鍵,因為 Student 實體的主索引鍵是 ID。 外部索引鍵屬性也可命名為 <primary key property name>。 例如 CourseID,因為 Course 實體的主索引鍵是 CourseID。
Course 實體
使用下列程式碼建立 Models/Course.cs:
using System.Collections.Generic;
using System.ComponentModel.DataAnnotations.Schema;

namespace ContosoUniversity.Models
{
    public class Course
    {
        [DatabaseGenerated(DatabaseGeneratedOption.None)]
        public int CourseID { get; set; }
        public string Title { get; set; }
        public int Credits { get; set; }

        public ICollection<Enrollment> Enrollments { get; set; }
    }
}
Enrollments 屬性為導覽屬性。 Course 實體可以與任何數量的 Enrollment 實體相關。
DatabaseGenerated 屬性可讓應用程式指定主索引鍵,而非讓資料庫產生它。
建置專案以驗證沒有任何編譯器錯誤。
Scaffold Student 頁面
在本節中,您會使用 ASP.NET scaffolding 工具來產生:
- EF Corecontext 類別。 內容是協調指定資料模型 Entity Framework 功能的主類別。 它衍生自
Microsoft.EntityFrameworkCore.DbContext類別。 - 處理
Student實體建立、讀取、更新和刪除 (CRUD) 作業的 Razor 頁面。
- 在 Pages 資料夾中建立 Students 資料夾。
- 在 [方案總管] 中,以滑鼠右鍵按一下 Page/Students 資料夾,然後選取 [新增]> [新增 Scaffold 項目]。
- 在 [新增 Scaffold] 對話方塊中,選取 [使用 Entity Framework (CRUD) 的 Razor Pages]>[新增]。
- 在 [使用 Entity Framework (CRUD) 新增 Razor Pages] 對話方塊中:
- 在 [模型類別] 下拉式清單中,選取 [學生 (ContosoUniversity.Models)]。
- 在 [資料內容類別] 資料列中,選取 + (加號)。
- 將資料內容的名稱從 ContosoUniversity.Models.ContosoUniversityContext 變更為 ContosoUniversity.Data.SchoolContext。
- 選取新增。
會自動安裝下列套件:
Microsoft.VisualStudio.Web.CodeGeneration.DesignMicrosoft.EntityFrameworkCore.SqlServerMicrosoft.Extensions.Logging.DebugMicrosoft.EntityFrameworkCore.Tools
若您在上述步驟中遇到問題,請建置專案並重試 scaffold 步驟。
Scaffolding 流程:
- 在 Pages/Students 資料夾中建立 Razor 頁面:
Create.cshtml和Create.cshtml.csDelete.cshtml和Delete.cshtml.csDetails.cshtml和Details.cshtml.csEdit.cshtml和Edit.cshtml.csIndex.cshtml和Index.cshtml.cs
- 建立
Data/SchoolContext.cs。 - 將內容新增到
Startup.cs中的相依性注入。 - 將資料庫連接字串新增至
appsettings.json。
資料庫連接字串
appsettings.json 檔案會指定連接字串 SQL Server LocalDB。
{
  "Logging": {
    "LogLevel": {
      "Default": "Information",
      "Microsoft": "Warning",
      "Microsoft.Hosting.Lifetime": "Information"
    }
  },
  "AllowedHosts": "*",
  "ConnectionStrings": {
    "SchoolContext": "Server=(localdb)\\mssqllocaldb;Database=SchoolContext6;Trusted_Connection=True;MultipleActiveResultSets=true"
  }
}
LocalDB 是輕量版的 SQL Server Express Database Engine,旨在用於應用程序開發,而不是生產用途。 根據預設,LocalDB 會在 C:/Users/<user> 目錄中建立 .mdf 檔案。
更新資料庫內容類別
協調指定資料模型 EF Core 功能的主類別是資料庫內容類別。 內容衍生自 Microsoft.EntityFrameworkCore.DbContext。 內容會指定哪些實體會包含在資料模型中。 在此專案中,類別命名為 SchoolContext。
以下列程式碼來更新 Data/SchoolContext.cs:
using Microsoft.EntityFrameworkCore;
using ContosoUniversity.Models;

namespace ContosoUniversity.Data
{
    public class SchoolContext : DbContext
    {
        public SchoolContext (DbContextOptions<SchoolContext> options)
            : base(options)
        {
        }

        public DbSet<Student> Students { get; set; }
        public DbSet<Enrollment> Enrollments { get; set; }
        public DbSet<Course> Courses { get; set; }

        protected override void OnModelCreating(ModelBuilder modelBuilder)
        {
            modelBuilder.Entity<Course>().ToTable("Course");
            modelBuilder.Entity<Enrollment>().ToTable("Enrollment");
            modelBuilder.Entity<Student>().ToTable("Student");
        }
    }
}
醒目標示的程式碼會為每一個實體集建立 DbSet<TEntity> 屬性。 在 EF Core 術語中:
- 實體集通常會對應到資料庫資料表。
- 實體會對應至資料表中的資料列。
因為實體集會包含多個實體,所以 DBSet 屬性應為複數名稱。 因為 scaffolding 工具建立了 Student DBSet,所以此步驟會將它變更為複數的 Students。
為了讓 Razor Pages 程式碼與新的 DBSet 名稱相符,請在整個專案中將 _context.Student 全域變更為 _context.Students。 會有 8 次變更。
建置專案以確認沒有任何編譯器錯誤。
Startup.cs
ASP.NET Core 內建相依性插入。 服務 (例如 EF Core 資料庫內容) 是在應用程式啟動期間使用相依性插入來註冊。 接著,會透過建構函式參數,針對需要這些服務的元件 (例如 Razor 頁面) 來提供服務。 取得資料庫內容執行個體的建構函式程式碼會顯示在本教學課程稍後部分。
Scaffolding 工具會自動對相依性插入容器註冊內容類別。
在
ConfigureServices中,Scaffolder 會新增下列醒目提示行:public void ConfigureServices(IServiceCollection services) { services.AddRazorPages(); services.AddDbContext<SchoolContext>(options => options.UseSqlServer(Configuration.GetConnectionString("SchoolContext"))); }
連接字串的名稱,會透過呼叫 DbContextOptions 物件上的方法來傳遞至內容。 作為本機開發之用,ASP.NET Core 設定系統會從 appsettings.json 檔案讀取連接字串。
建立資料庫
若未存在資料庫,則請更新 Program.cs 來加以建立:
using ContosoUniversity.Data;
using Microsoft.Extensions.DependencyInjection;
using Microsoft.AspNetCore.Hosting;
using Microsoft.Extensions.Hosting;
using Microsoft.Extensions.Logging;
using System;

namespace ContosoUniversity
{
    public class Program
    {
        public static void Main(string[] args)
        {
            var host = CreateHostBuilder(args).Build();

            CreateDbIfNotExists(host);

            host.Run();
        }

        private static void CreateDbIfNotExists(IHost host)
        {
            using (var scope = host.Services.CreateScope())
            {
                var services = scope.ServiceProvider;
                try
                {
                    var context = services.GetRequiredService<SchoolContext>();
                    context.Database.EnsureCreated();
                    // DbInitializer.Initialize(context);
                }
                catch (Exception ex)
                {
                    var logger = services.GetRequiredService<ILogger<Program>>();
                    logger.LogError(ex, "An error occurred creating the DB.");
                }
            }
        }

        public static IHostBuilder CreateHostBuilder(string[] args) =>
            Host.CreateDefaultBuilder(args)
                .ConfigureWebHostDefaults(webBuilder =>
                {
                    webBuilder.UseStartup<Startup>();
                });
    }
}
若已存在內容的資料庫,則 EnsureCreated 方法便不會採取任何動作。 若資料庫不存在,則它會建立資料庫和結構描述。 EnsureCreated 會啟用下列工作流程來處理資料模型變更:
- 刪除資料庫。 任何現有的資料都會遺失。
- 變更資料模型。 例如,新增
EmailAddress欄位。 - 執行應用程式。
EnsureCreated會使用新的結構描述來建立資料庫。
只要您不需要保存資料,此工作流程在開發初期結構描述快速變化時的運作效果便會相當良好。 當資料輸入資料庫且需要進行保存時,狀況則會不同。 在這種情況下,請使用移轉。
在教學課程系列的稍後部分,您會刪除 EnsureCreated 建立的資料庫並改為使用移轉。 EnsureCreated 建立的資料庫無法使用移轉來更新。
測試應用程式
- 執行應用程式。
- 選取 [學生] 連結,然後選取 [新建]。
- 測試 [編輯]、[詳細資料] 和 [刪除] 連結。
植入資料庫
EnsureCreated 方法會建立空白資料庫。 本節會新增程式碼以使用測試資料來填入資料庫。
使用下列程式碼建立 Data/DbInitializer.cs:
using ContosoUniversity.Data;
using ContosoUniversity.Models;
using System;
using System.Linq;

namespace ContosoUniversity.Data
{
    public static class DbInitializer
    {
        public static void Initialize(SchoolContext context)
        {
            context.Database.EnsureCreated();

            // Look for any students.
            if (context.Students.Any())
            {
                return;   // DB has been seeded
            }

            var students = new Student[]
            {
                new Student{FirstMidName="Carson",LastName="Alexander",EnrollmentDate=DateTime.Parse("2019-09-01")},
                new Student{FirstMidName="Meredith",LastName="Alonso",EnrollmentDate=DateTime.Parse("2017-09-01")},
                new Student{FirstMidName="Arturo",LastName="Anand",EnrollmentDate=DateTime.Parse("2018-09-01")},
                new Student{FirstMidName="Gytis",LastName="Barzdukas",EnrollmentDate=DateTime.Parse("2017-09-01")},
                new Student{FirstMidName="Yan",LastName="Li",EnrollmentDate=DateTime.Parse("2017-09-01")},
                new Student{FirstMidName="Peggy",LastName="Justice",EnrollmentDate=DateTime.Parse("2016-09-01")},
                new Student{FirstMidName="Laura",LastName="Norman",EnrollmentDate=DateTime.Parse("2018-09-01")},
                new Student{FirstMidName="Nino",LastName="Olivetto",EnrollmentDate=DateTime.Parse("2019-09-01")}
            };

            context.Students.AddRange(students);
            context.SaveChanges();

            var courses = new Course[]
            {
                new Course{CourseID=1050,Title="Chemistry",Credits=3},
                new Course{CourseID=4022,Title="Microeconomics",Credits=3},
                new Course{CourseID=4041,Title="Macroeconomics",Credits=3},
                new Course{CourseID=1045,Title="Calculus",Credits=4},
                new Course{CourseID=3141,Title="Trigonometry",Credits=4},
                new Course{CourseID=2021,Title="Composition",Credits=3},
                new Course{CourseID=2042,Title="Literature",Credits=4}
            };

            context.Courses.AddRange(courses);
            context.SaveChanges();

            var enrollments = new Enrollment[]
            {
                new Enrollment{StudentID=1,CourseID=1050,Grade=Grade.A},
                new Enrollment{StudentID=1,CourseID=4022,Grade=Grade.C},
                new Enrollment{StudentID=1,CourseID=4041,Grade=Grade.B},
                new Enrollment{StudentID=2,CourseID=1045,Grade=Grade.B},
                new Enrollment{StudentID=2,CourseID=3141,Grade=Grade.F},
                new Enrollment{StudentID=2,CourseID=2021,Grade=Grade.F},
                new Enrollment{StudentID=3,CourseID=1050},
                new Enrollment{StudentID=4,CourseID=1050},
                new Enrollment{StudentID=4,CourseID=4022,Grade=Grade.F},
                new Enrollment{StudentID=5,CourseID=4041,Grade=Grade.C},
                new Enrollment{StudentID=6,CourseID=1045},
                new Enrollment{StudentID=7,CourseID=3141,Grade=Grade.A},
            };

            context.Enrollments.AddRange(enrollments);
            context.SaveChanges();
        }
    }
}
程式碼會檢查資料庫中是否有任何學生。 若沒有任何學生,它便會將測試資料新增到資料庫。 它會以陣列的方式建立測試資料,而非 List<T> 集合,來最佳化效能。
在
Program.cs中,將EnsureCreated呼叫取代為DbInitializer.Initialize呼叫:// context.Database.EnsureCreated(); DbInitializer.Initialize(context);
停止應用程式 (如果它正在執行),並在套件管理員主控台 (PMC) 中執行下列命令:
Drop-Database
重新啟動應用程式。
選取 Students 頁面來查看植入的資料。
檢視資料庫
- 從 Visual Studio 中的 View 功能表開啟 SQL Server 物件總管 (SSOX)。
- 在 SSOX 中,選取 [(localdb)\MSSQLLocalDB] > [資料庫] > [SchoolContext-{GUID}]>>。 資料庫名稱是以您稍早所提供的內容名稱加上虛線和 GUID 所產生。
- 展開 [資料表] 節點。
- 以滑鼠右鍵按一下 Students 資料表,並按一下 [檢視資料] 查看建立的資料行、插入資料表中的資料列。
- 以滑鼠右鍵按一下 Student 資料表然後按一下 [檢視程式碼] 來查看
Student模型對應到Student資料表結構描述的方式。
非同步程式碼
非同步程式設計是預設的 ASP.NET Core 和 EF Core 模式。
網頁伺服器的可用執行緒數量有限,而且在高負載情況下,可能會使用所有可用的執行緒。 發生此情況時,伺服器將無法處理新的要求,直到執行緒空出來。 使用同步程式碼,許多執行緒可能在實際上並未執行任何工作時受到占用,原因是在等候 I/O 完成。 使用非同步程式碼,處理程序在等候 I/O 完成時,其執行緒將會空出來以讓伺服器處理其他要求。 因此,非同步程式碼可以更有效率地使用伺服器資源,且伺服器可處理更多流量而不會造成延遲。
非同步程式碼會在執行階段導致少量的額外負荷。 在低流量情況下,對效能的衝擊非常微小;在高流量情況下,潛在的效能改善則相當大。
在下列程式碼中,async 關鍵字、Task<T> 傳回值、await 關鍵字和 ToListAsync 方法會使程式碼以非同步方式執行。
public async Task OnGetAsync()
{
    Students = await _context.Students.ToListAsync();
}
async關鍵字會指示編譯器:- 為方法主體的組件產生回呼。
- 建立傳回的 Task 物件。
Task<T>傳回型別代表正在進行的工作。await關鍵字會使編譯器將方法分割為兩部分。 第一個部分會與非同步啟動的作業一同結束。 第二個部分則會放入作業完成時呼叫的回呼方法中。ToListAsync是ToList擴充方法的非同步版本。
若要撰寫使用 EF Core 的非同步程式碼,請注意下列事項:
- 只有讓查詢或命令傳送至資料庫的陳述式,會以非同步方式執行。 其中包含
ToListAsync、SingleOrDefaultAsync、FirstOrDefaultAsync和SaveChangesAsync。 不會包含只變更IQueryable的陳述式,例如var students = context.Students.Where(s => s.LastName == "Davolio")。 - EF Core 內容在執行緒中並不安全:不要嘗試執行多個平行作業。
- 若要利用非同步程式碼所帶來的效能利益,請驗證該程式庫套件 (例如用於分頁) 在呼叫傳送查詢到資料庫的 EF Core 方法時使用 async。
如需非同步方法的詳細資訊,請參閱 Async 概觀和使用 Async 和 Await 設計非同步程式。
下一步
意見反應
即將登場:在 2024 年,我們將逐步淘汰 GitHub 問題作為內容的意見反應機制,並將它取代為新的意見反應系統。 如需詳細資訊,請參閱:https://aka.ms/ContentUserFeedback。
提交並檢視相關的意見反應