在 Azure 中部署 Node.js Web 應用程式
在本快速入門中,您將了解如何建立第一個 Node.js (Express) Web 應用程式,並將其部署至 Azure App Service。 App Service 支援 Linux 和 Windows 上的各種 Node.js 版本。
本快速入門會在免費層中設定 App Service 應用程式,您的 Azure 訂用帳戶不會產生任何費用。
這段影片示範如何在 Azure 中部署 Node.js Web 應用程式。
下列章節也會說明影片中的步驟。
設定初始環境
- 具有有效訂用帳戶的 Azure 帳戶。 免費建立帳戶。
- 安裝 Node.js 和 npm。 執行命令
node --version,確認已安裝 Node.js。 - 安裝 Visual Studio Code。
- 適用於 Visual Studio Code 的 Azure App Service 擴充功能。
- 具有有效訂用帳戶的 Azure 帳戶。 免費建立帳戶。
- 安裝 Node.js LTS 和 npm。 執行命令
node --version,確認已安裝 Node.js。 - 安裝 Azure CLI,您可以在任何殼層中執行命令以建立和設定 Azure 資源。
- 具有有效訂用帳戶的 Azure 帳戶。 免費建立帳戶。
- 安裝 Node.js LTS 和 npm。 執行命令
node --version,確認已安裝 Node.js。 - 讓 FTP 用戶端 (例如 FileZilla) 連線到您的應用程式。
建立您的 Node.js 應用程式
在此步驟中,您會建立基礎 Node.js 應用程式,並確保其在您的電腦上執行。
提示
如果您已完成 ode.js 教學課程,您可以直接跳到部署至 Azure。
使用 Express 產生器建立 Node.js 應用程式,該產生器預設會隨著 Node.js 和 NPM 一起安裝。
npx express-generator myExpressApp --view ejs變更為應用程式的目錄,並安裝 NPM 套件。
cd myExpressApp && npm install使用偵錯資訊啟動開發伺服器。
DEBUG=myexpressapp:* npm start在瀏覽器中,巡覽至
http://localhost:3000。 您應該會看到類似這樣的畫面︰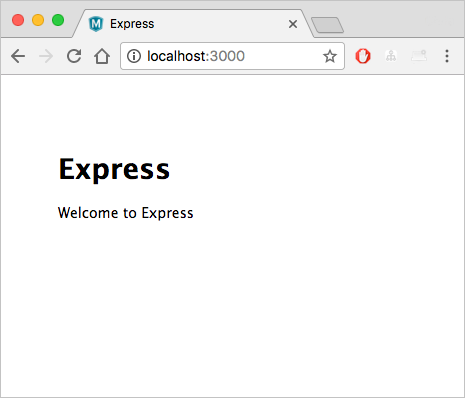
部署至 Azure
在繼續之前,請確定您已安裝並設定所有必要條件。
注意
若要讓 Node.js 應用程式在 Azure 中執行,應用程式必須接聽 PORT 環境變數所提供的連接埠。 在您產生的 Express 應用程式中,此環境變數已用於啟動指令碼 bin/www (搜尋 process.env.PORT)。
登入 Azure
在終端機中,確定您位於 myExpressApp 資料夾中,然後使用下列命令啟動 Visual Studio Code:
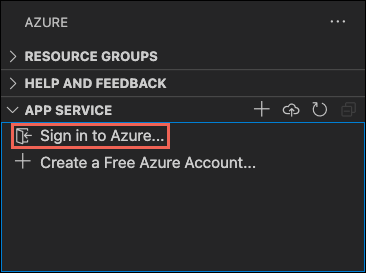
code .在 Visual Studio Code 的活動列上,選取 Azure 標誌。
在 [App Service] 總管中,選取 [登入 Azure...],然後遵循指示進行。
在 Visual Studio Code 中,您應該會在狀態列中看到您的 Azure 電子郵件地址,並在 [AZURE APP SERVICE] 總管畫面中看到您的訂用帳戶。
設定 App Service 應用程式和部署程式碼
- 選擇 myExpressApp 資料夾。
以滑鼠右鍵按一下 App Service,並選取 [建立新的 Web 應用程式]。 預設會使用 Linux 容器。
輸入 Web 應用程式的全域唯一名稱,然後按 Enter。 該名稱在所有 Azure 中必須是唯一的,而且只能使用英數位元 ('A-z'、'a-z' 和 '0-9') 和連字號 ('-')。
在 [選取執行階段堆疊] 中,選取您想要的 Node.js 版本。 建議使用 LTS 版本。
在 [選取定價層] 中,選取 [免費 (F1)],並等候在 Azure 中建立資源。
在快顯 [一律將工作區 "myExpressApp" 部署至 <app-name>]中,選取 [是]。 如此一來,只要您位於相同的工作區,Visual Studio Code 就能每次都部署至相同的 App Service 應用程式。
Visual Studio Code 建立 Azure 資源並部署程式碼時,會顯示進度通知。
部署完成之後,請在通知快顯中選取 [瀏覽網站]。 瀏覽器應該會顯示 Express 預設頁面。
在終端機中,確定您位於 myExpressApp 目錄中,並使用 az webapp up 命令將程式碼部署在本機資料夾中 (myExpressApp):
az webapp up --sku F1 --name <app-name>
- 如果無法辨識
az命令,請確定您已安裝 Azure CLI,如設定初始環境所說明。 - 以 Azure 中的唯一名稱 (有效字元為
a-z、0-9和-) 取代<app_name>。 良好的模式是使用您的公司名稱和應用程式識別碼的組合。 --sku F1引數會在免費定價層上建立 Web 應用程式,不會產生費用。- 您可以選擇性地加入引數
--location <location-name>,其中<location_name>是可用的 Azure 區域。 您可以執行az account list-locations命令,擷取 Azure 帳戶的允許區域清單。 - 此命令預設會建立適用於 Node.js 的 Linux 應用程式。 若要改為建立 Windows 應用程式,請使用
--os-type引數。 - 如果您看到錯誤:「無法自動偵測應用程式的執行階段堆疊」,請確定您是在 myExpressApp 目錄中執行命令 (請參閱使用 az webapp up 針對自動偵測問題進行疑難排解)。
此命令可能需要數分鐘才能完成。 此命令執行時會提供相關訊息,包括建立資源群組、App Service 方案和應用程式資源、設定記錄,以及執行 ZIP 部署。 接著會提供「您可以在 http://<app-name>.azurewebsites.net 啟動應用程式」的訊息,這是 Azure 上應用程式的 URL。
The webapp '<app-name>' doesn't exist
Creating Resource group '<group-name>' ...
Resource group creation complete
Creating AppServicePlan '<app-service-plan-name>' ...
Creating webapp '<app-name>' ...
Configuring default logging for the app, if not already enabled
Creating zip with contents of dir /home/cephas/myExpressApp ...
Getting scm site credentials for zip deployment
Starting zip deployment. This operation can take a while to complete ...
Deployment endpoint responded with status code 202
You can launch the app at http://<app-name>.azurewebsites.net
{
  "URL": "http://<app-name>.azurewebsites.net",
  "appserviceplan": "<app-service-plan-name>",
  "location": "centralus",
  "name": "<app-name>",
  "os": "<os-type>",
  "resourcegroup": "<group-name>",
  "runtime_version": "node|10.14",
  "runtime_version_detected": "0.0",
  "sku": "FREE",
  "src_path": "//home//cephas//myExpressApp"
}
注意
az webapp up 命令會執行下列動作:
建立預設資源群組。
建立預設 App Service 方案。
使用所指定的名稱建立應用程式。
在 .azure/config 檔案中本機快取參數,這樣您就不需要在稍後使用
az webapp up或其他來自專案資料夾的az webapp命令進行部署時再次加以指定。 預設會自動使用快取的值。
登入 Azure 入口網站
登入 Azure 入口網站。
建立 Azure 資源
若要開始建立 Node.js 應用程式,請瀏覽至 https://portal.azure.com/#create/Microsoft.WebSite。
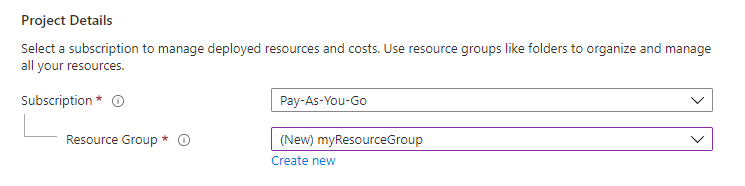
在 [基本知識] 索引標籤的 [專案詳細資料] 下,確保已選取正確的訂用帳戶,然後選取 [新建] 資源群組。 輸入 myResourceGroup 作為名稱。
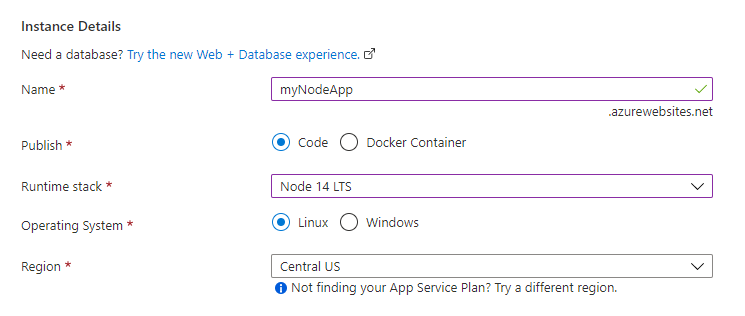
在 [執行個體詳細資料] 下,輸入 Web 應用程式的全域唯一名稱,然後選取 [程式碼]。 選取 [Node 18 LTS] 執行階段堆疊、[作業系統] 和您想要提供應用程式的 [區域]。
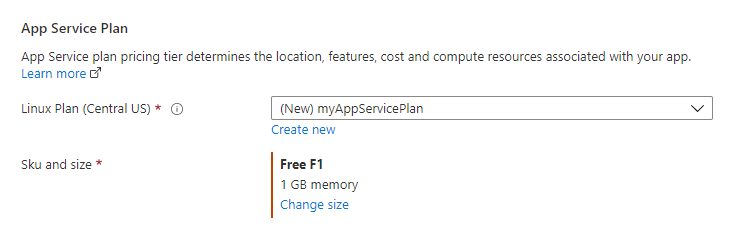
在 [App Service 方案] 下,選取 [新建] App Service 方案。 輸入 myAppServicePlan 作為名稱。 若要變更為免費層,請選取 [變更大小],選取 [開發/測試] 索引標籤,並選取 [F1],然後選取頁面底部的 [套用] 按鈕。
選取頁面底部的 [檢閱 + 建立] 按鈕。

驗證執行之後,請選取頁面底部的 [建立] 按鈕。
當部署完成時,選取 [前往資源]。

取得 FTPS 認證
Azure App Service 針對 FTP/S 部署支援兩種認證類型。 這些認證與您的 Azure 訂用帳戶認證不同。 在本節中,您會取得要搭配 FileZilla 使用的應用程式範圍認證。
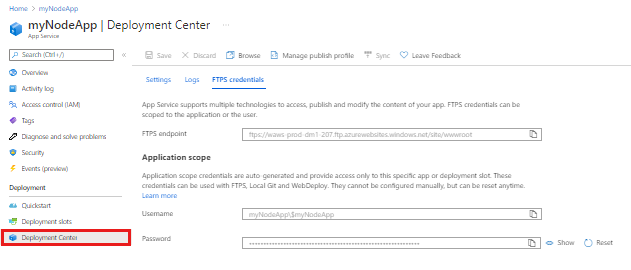
從 [App Service 應用程式] 頁面中,選取左側功能表中的 [部署中心],然後選取 [FTPS 認證] 索引標籤。
開啟 FileZilla 並建立新的網站。
從 [FTPS 認證] 索引標籤的 [應用程式範圍] 下,將 [FTPS 端點]、[FTPS 使用者名稱] 和 [密碼] 複製到 FileZilla。
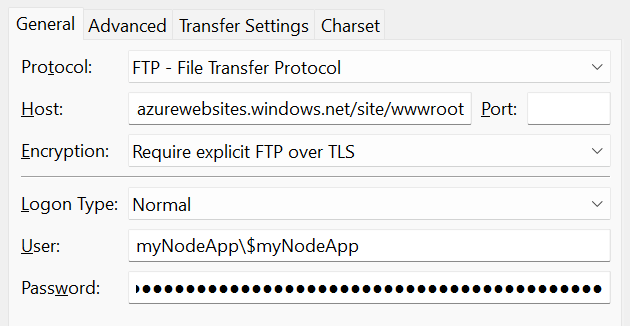
選擇 FileZilla 中的 [連線]。
使用 FTPS 部署檔案
將所有檔案和目錄檔案複製到 Azure 中的 /site/wwwroot 目錄。
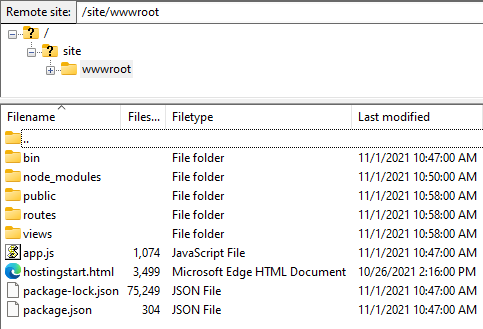
瀏覽至您的應用程式 URL,以確認應用程式運作正常。
重新部署更新
您可以在 Visual Studio Code 中進行編輯、儲存檔案,然後重新部署至 Azure 應用程式,以部署此應用程式的變更。 例如:
從範例專案中開啟 views/index.ejs 並變更
<p>Welcome to <%= title %></p>打給
<p>Welcome to Azure</p>
在 [App Service] 總管中,再次選取 [部署至 Web 應用程式] 圖示,然後再次按一下 [部署] 加以確認。
等候部署完成,然後在通知快顯中選取 [瀏覽網站]。 您應該會看到
Welcome to Express訊息已變更為Welcome to Azure!。
儲存您的變更,然後再次使用 az webapp up 命令 (不使用 Linux 的引數) 重新部署應用程式。 為 Windows 新增
--os-type Windows:az webapp up此命令會使用在 .azure/config 檔案中本機快取的值,例如應用程式名稱、資源群組和 App Service 方案。
完成部署之後,重新整理網頁
http://<app-name>.azurewebsites.net。 您應該會看到Welcome to Express訊息已變更為Welcome to Azure!。
儲存您的變更,然後使用 FTP 用戶端重新部署應用程式。
完成部署之後,重新整理網頁
http://<app-name>.azurewebsites.net。 您應該會看到Welcome to Express訊息已變更為Welcome to Azure!。
資料流記錄
您可以直接在 Visual Studio Code 輸出視窗中,從 Azure 應用程式中串流記錄輸出 (console.log() 的呼叫)。
在 App Service 總管中,以滑鼠右鍵按一下應用程式,然後選擇 [開始串流記錄]。
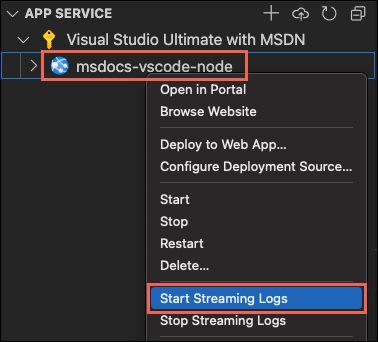
如果系統要求您重新啟動應用程式,請選擇 [是]。 重新啟動應用程式之後,Visual Studio Code 的輸出視窗會隨即開啟,並且連線至記錄串流。
幾秒鐘之後,輸出視窗中會顯示您已連線至記錄串流服務的訊息。 您可以在瀏覽器中重新整理頁面,以產生更多的輸出活動。
 Connecting to log stream...
 2020-03-04T19:29:44  Welcome, you are now connected to log-streaming service. The default timeout is 2 hours.
 Change the timeout with the App Setting SCM_LOGSTREAM_TIMEOUT (in seconds).
您可以存取從應用程式及其執行所在的容器產生的主控台記錄。 記錄包含呼叫 console.log() 所產生的任何輸出。
若要串流記錄,請執行 az webapp log tail 命令:
az webapp log tail
此命令會使用 .azure/config 檔案中快取的資源群組名稱。
您也可以加入 --logs 參數,然後使用 az webapp up 命令在部署時自動開啟記錄資料流。
在瀏覽器中重新整理應用程式以產生主控台記錄,其中應包含描述應用程式 HTTP 要求的訊息。 如果沒有立即看到輸出,請在 30 秒後再試一次。
您可以隨時在終端機中按 Ctrl+C,以停止記錄串流。
您可以存取從應用程式及其執行所在的容器產生的主控台記錄。 您可以直接在 Azure 入口網站中,從 Node.js 應用程式串流記錄輸出 (console.log() 的呼叫)。
在應用程式的相同 [App Service] 頁面中,使用左側功能表捲動至 [監視] 區段,然後選擇 [記錄串流]。
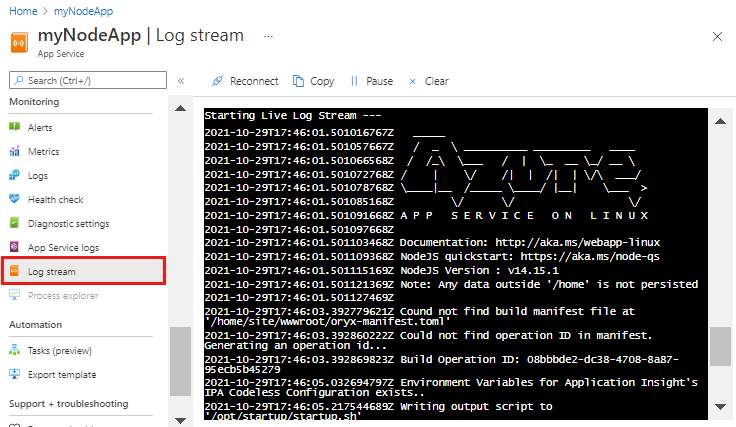
幾秒鐘之後,輸出視窗中會顯示您已連線至記錄串流服務的訊息。 您可以在瀏覽器中重新整理頁面,以產生更多的輸出活動。
 Connecting...
 2021-10-26T21:04:14  Welcome, you are now connected to log-streaming service.
 Starting Log Tail -n 10 of existing logs ----
 /appsvctmp/volatile/logs/runtime/81b1b83b27ea1c3d598a1cdec28c71c4074ce66c735d0be57f15a8d07cb3178e.log
 2021-10-26T21:04:08.614384810Z: [INFO]
 2021-10-26T21:04:08.614393710Z: [INFO]  # Enter the source directory to make sure the script runs where the user expects
 2021-10-26T21:04:08.614399010Z: [INFO]  cd "/home/site/wwwroot"
 2021-10-26T21:04:08.614403210Z: [INFO]
 2021-10-26T21:04:08.614407110Z: [INFO]  export NODE_PATH=/usr/local/lib/node_modules:$NODE_PATH
 2021-10-26T21:04:08.614411210Z: [INFO]  if [ -z "$PORT" ]; then
 2021-10-26T21:04:08.614415310Z: [INFO]          export PORT=8080
 2021-10-26T21:04:08.614419610Z: [INFO]  fi
 2021-10-26T21:04:08.614423411Z: [INFO]
 2021-10-26T21:04:08.614427211Z: [INFO]  node /opt/startup/default-static-site.js
 Ending Log Tail of existing logs ---
清除資源
在上述步驟中,您已建立資源群組中的 Azure 資源。 本快速入門中的建立步驟會將所有資源放在此資源群組中。 若要清除,您只需要移除資源群組。
在 Visual Studio 的 Azure 延伸模組中,展開 [資源群組] 總管。
展開訂用帳戶,以滑鼠右鍵按一下您稍早建立的資源群組,然後選取 [刪除]。
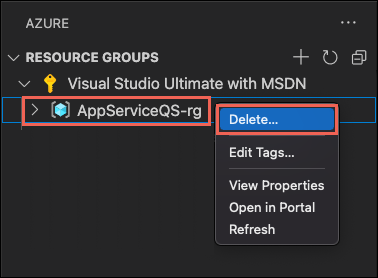
出現提示時,輸入您要刪除的資源群組名稱來確認刪除。 確認之後,資源群組就會遭到刪除,您會在完成時看到通知。
在上述步驟中,您已建立資源群組中的 Azure 資源。 視您的位置而定,資源群組的名稱類似於 "appsvc_rg_Linux_CentralUS"。
如果您在未來不需使用這些資源,請執行下列命令來刪除資源群組:
az group delete --no-wait
此命令會使用 .azure/config 檔案中快取的資源群組名稱。
--no-wait 引數可讓命令在作業完成之前傳回。
若不再需要,您可以刪除資源群組、App Service 及所有相關資源。
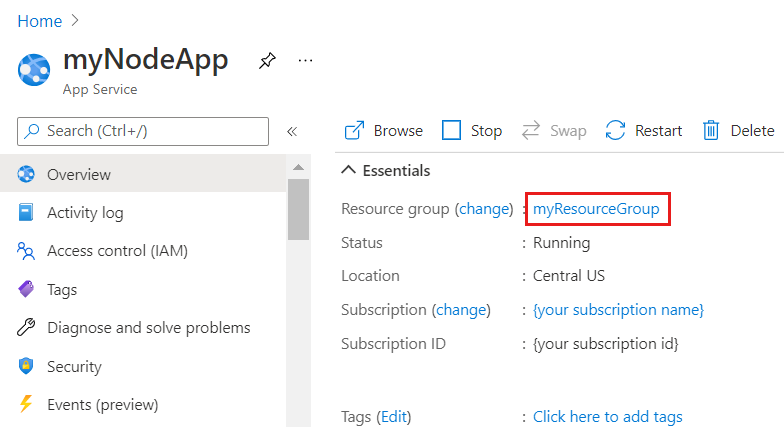
從您的 App Service [概觀] 頁面,選取您在建立 Azure 資源步驟中建立的 [資源群組]。
在資源群組頁面中,選取 [刪除資源群組]。 確認要完成資源刪除作業的資源群組名稱。

下一步
恭喜,您已成功完成本快速入門!
查看其他 Azure 擴充功能。
或藉由安裝適用於 Azure 的 Node Pack 擴充功能來取得這所有項目。