教學課程:在 Azure Notebook 中使用個人化工具
重要
從 2023 年 9 月 20 日起,您將無法建立新的個人化工具資源。 個人化工具服務將于 2026 年 10 月 1 日淘汰。
本教學課程會在 Azure Notebook 中執行個人化工具迴圈,示範個人化工具迴圈的端對端生命週期。
迴圈會建議客戶應訂購的咖啡類型。 使用者及其喜好設定會儲存在使用者資料集中。 咖啡的相關資訊會儲存在咖啡資料集中。
使用者和咖啡
筆記本會模擬使用者與網站的互動,從資料集選取隨機使用者、一天中的時間和天氣類型。 使用者資訊的摘要如下:
| 客戶 - 內容功能 | 一天中的時間 | 天氣類型 |
|---|---|---|
| Alice Bob 凱茜 Dave |
上午 下午 晚上 |
陽光 下雨 下雪 |
為了協助個人化工具學習,隨著時間推移, 系統 也會知道每個人咖啡選擇的詳細資料。
| 咖啡 - 動作功能 | 溫度類型 | 原點位置 | 烤肉類型 | 有機 |
|---|---|---|---|---|
| Cappacino | 經常性 | 肯亞 | 深色 | 有機 |
| 冷釀造 | 沒有興趣 | 巴西 | 淺色 | 有機 |
| Iced mocha | 沒有興趣 | 衣索比亞 | 淺色 | 非有機 |
| Latte (拿鐵) | 經常性 | 巴西 | 深色 | 非有機 |
個人化工具迴圈的目的是 要盡可能多地尋找使用者與咖啡之間的最佳比對。
本教學課程的程式碼可在個人化工具範例 GitHub 存放庫中 取得 。
模擬的運作方式
在執行系統開始時,個人化工具的建議只會在 20% 到 30% 之間成功。 此成功會以回報給個人化工具獎勵 API 的獎勵來表示,分數為 1。 在一些排名和獎勵呼叫之後,系統會改善。
初始要求之後,請執行離線評估。 這可讓個人化工具檢閱資料,並建議更好的學習原則。 套用新的學習原則,並使用先前要求計數的 20% 再次執行筆記本。 迴圈將會使用新的學習原則來執行得更好。
排名和獎勵通話
針對對個人化工具服務的每個數千個呼叫,Azure Notebook 會將排名 要求傳送 至 REST API:
- 排名/要求事件的唯一識別碼
- 內容功能 - 隨機播放使用者、天氣和一天中的時間 - 模擬網站或行動裝置上的使用者
- 具有功能的動作 - 所有 咖啡資料 - 個人化工具會從中提出建議
系統會接收要求,然後比較該預測與使用者當天和天氣的已知選擇。 如果已知選擇與預測的選擇相同, 則會將獎勵 1 傳回給個人化工具。 否則傳回的獎勵為 0。
注意
這是模擬,因此獎勵的演算法很簡單。 在真實世界的案例中,演算法應該使用商務邏輯,可能具有客戶體驗各個層面的權數,以判斷獎勵分數。
必要條件
- Azure Notebook 帳戶。
- Azure AI 個人化工具資源。
- 如果您已經使用個人化工具資源,請務必 清除 資源Azure 入口網站中的資料。
- 將此範例 的所有檔案 上傳至 Azure Notebook 專案。
檔案描述:
- Personalizer.ipynb 是本教學課程的 Jupyter 筆記本。
- 使用者資料集 會儲存在 JSON 物件中。
- 咖啡資料集 會儲存在 JSON 物件中。
- 範例要求 JSON 是排名 API POST 要求的預期格式。
設定個人化工具資源
在Azure 入口網站中, 將個人化工具資源 設定為更新模型頻率 設定為 15 秒,獎勵 等候時間為 10 分鐘。 這些值位於 [ 組態 ] 頁面上。
| 設定 | 值 |
|---|---|
| 更新模型頻率 | 15 秒 |
| 獎勵等候時間 | 10 分鐘 |
這些值有非常短的持續時間,以便顯示本教學課程中的變更。 這些值不應該在生產案例中使用,而不需要驗證它們以您的個人化工具迴圈達成您的目標。
設定 Azure Notebook
- 將核心變更為
Python 3.6。 - 開啟
Personalizer.ipynb檔案。
執行筆記本資料格
執行每個可執行檔資料格,並等候它傳回。 您知道當儲存格旁的方括弧顯示數位而非 * 時,就會完成。 下列各節說明每個資料格以程式設計方式執行哪些動作,以及輸出的預期。
包含 Python 模組
包含必要的 Python 模組。 儲存格沒有輸出。
import json
import matplotlib.pyplot as plt
import random
import requests
import time
import uuid
設定個人化工具資源金鑰和名稱
從Azure 入口網站,在 個人化工具資源的 [快速入門] 頁面上尋找您的金鑰和端點。 將 的值 <your-resource-name> 變更為個人化工具資源的名稱。 將 的值 <your-resource-key> 變更為個人化工具金鑰。
# Replace 'personalization_base_url' and 'resource_key' with your valid endpoint values.
personalization_base_url = "https://<your-resource-name>.cognitiveservices.azure.com/"
resource_key = "<your-resource-key>"
列印目前的日期和時間
使用此函式來記下反復函式反復專案的開始和結束時間。
這些儲存格沒有輸出。 函式會輸出呼叫時的目前日期和時間。
# Print out current datetime
def currentDateTime():
    currentDT = datetime.datetime.now()
    print (str(currentDT))
取得上次模型更新時間
呼叫 函式 get_last_updated 時,函式會列印模型更新的最後一個修改日期和時間。
這些儲存格沒有輸出。 函式會在呼叫時輸出最後一個模型定型日期。
函式會使用 GET REST API 來 取得模型屬性 。
# ititialize variable for model's last modified date
modelLastModified = ""
def get_last_updated(currentModifiedDate):

    print('-----checking model')

    # get model properties
    response = requests.get(personalization_model_properties_url, headers = headers, params = None)

    print(response)
    print(response.json())

    # get lastModifiedTime
    lastModifiedTime = json.dumps(response.json()["lastModifiedTime"])

    if (currentModifiedDate != lastModifiedTime):
        currentModifiedDate = lastModifiedTime
        print(f'-----model updated: {lastModifiedTime}')
取得原則和服務設定
使用這兩個 REST 呼叫來驗證服務的狀態。
這些儲存格沒有輸出。 函式會在呼叫時輸出服務值。
def get_service_settings():

    print('-----checking service settings')

    # get learning policy
    response = requests.get(personalization_model_policy_url, headers = headers, params = None)

    print(response)
    print(response.json())

    # get service settings
    response = requests.get(personalization_service_configuration_url, headers = headers, params = None)

    print(response)
    print(response.json())
建構 URL 並讀取 JSON 資料檔案
此儲存格
- 建置 REST 呼叫中使用的 URL
- 使用個人化工具資源金鑰設定安全性標頭
- 設定 Rank 事件識別碼的隨機種子
- 讀取 JSON 資料檔案
- calls
get_last_updated方法 - 範例輸出中已移除學習原則 - calls
get_service_settings方法
儲存格具有 對 和 get_service_settings 函式呼叫 get_last_updated 的輸出。
# build URLs
personalization_rank_url = personalization_base_url + "personalizer/v1.0/rank"
personalization_reward_url = personalization_base_url + "personalizer/v1.0/events/" #add "{eventId}/reward"
personalization_model_properties_url = personalization_base_url + "personalizer/v1.0/model/properties"
personalization_model_policy_url = personalization_base_url + "personalizer/v1.0/configurations/policy"
personalization_service_configuration_url = personalization_base_url + "personalizer/v1.0/configurations/service"

headers = {'Ocp-Apim-Subscription-Key' : resource_key, 'Content-Type': 'application/json'}

# context
users = "users.json"

# action features
coffee = "coffee.json"

# empty JSON for Rank request
requestpath = "example-rankrequest.json"

# initialize random
random.seed(time.time())

userpref = None
rankactionsjsonobj = None
actionfeaturesobj = None

with open(users) as handle:
    userpref = json.loads(handle.read())

with open(coffee) as handle:
    actionfeaturesobj = json.loads(handle.read())

with open(requestpath) as handle:
    rankactionsjsonobj = json.loads(handle.read())

get_last_updated(modelLastModified)
get_service_settings()

print(f'User count {len(userpref)}')
print(f'Coffee count {len(actionfeaturesobj)}')
確認輸出的 rewardWaitTime 設定為 10 分鐘,且 modelExportFrequency 設定為 15 秒。
-----checking model
<Response [200]>
{'creationTime': '0001-01-01T00:00:00+00:00', 'lastModifiedTime': '0001-01-01T00:00:00+00:00'}
-----model updated: "0001-01-01T00:00:00+00:00"
-----checking service settings
<Response [200]>
{...learning policy...}
<Response [200]>
{'rewardWaitTime': '00:10:00', 'defaultReward': 0.0, 'rewardAggregation': 'earliest', 'explorationPercentage': 0.2, 'modelExportFrequency': '00:00:15', 'logRetentionDays': -1}
User count 4
Coffee count 4
針對第一個 REST 呼叫進行疑難排解
上一個儲存格是呼叫個人化工具的第一個儲存格。 請確定輸出中的 REST 狀態碼為 <Response [200]> 。 如果您收到錯誤,例如 404,但您確定您的資源金鑰和名稱正確,請重載筆記本。
請確定咖啡計數和使用者都是 4。 如果您收到錯誤,請檢查您是否已上傳所有 3 個 JSON 檔案。
在 Azure 入口網站 中設定計量圖表
在本教學課程稍後,瀏覽器會顯示 10,000 個要求的長時間執行程式,其中包含更新文字方塊。 當長時間執行的進程結束時,在圖表中或總和中可能會比較容易看到。 若要檢視這項資訊,請使用資源所提供的計量。 您現在可以建立圖表,現在您已經完成對服務的要求,然後在長時間執行的程式進行時定期重新整理圖表。
在Azure 入口網站中,選取您的個人化工具資源。
在資源導覽中,選取 [監視] 下方的 [計量]。
在圖表中,選取 [ 新增計量 ]。
已設定資源和計量命名空間。 您只需要選取成功呼叫的 計量和總 和匯總 。
將時間篩選準則變更為過去 4 小時。
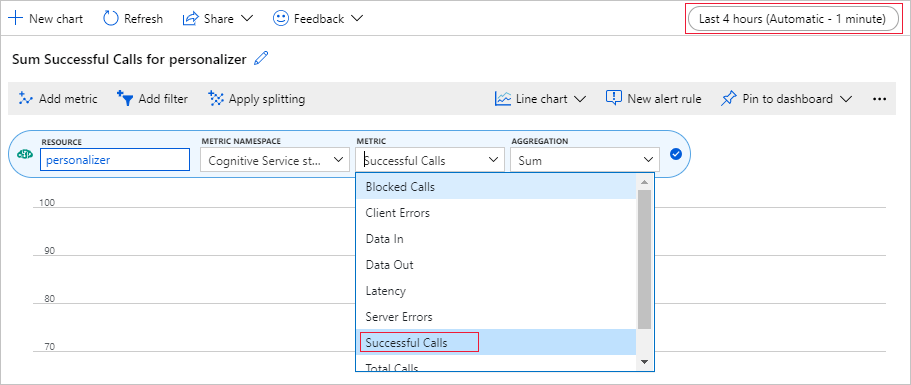
您應該會在圖表中看到三個成功的呼叫。
產生唯一的事件識別碼
此函式會為每個排名呼叫產生唯一識別碼。 識別碼可用來識別排名和獎勵通話資訊。 此值可能來自商務程式,例如 Web 檢視識別碼或交易識別碼。
儲存格沒有輸出。 呼叫 時,函式會輸出唯一識別碼。
def add_event_id(rankjsonobj):
    eventid = uuid.uuid4().hex
    rankjsonobj["eventId"] = eventid
    return eventid
取得隨機使用者、天氣和一天中的時間
此函式會選取唯一的使用者、天氣和一天中的時間,然後將這些專案新增至 JSON 物件,以傳送至 Rank 要求。
儲存格沒有輸出。 呼叫 函式時,它會傳回隨機使用者的名稱、隨機天氣和一天中的隨機時間。
4 個使用者及其喜好設定的清單 - 僅顯示一些喜好設定,以求簡潔:
{
  "Alice": {
    "Sunny": {
      "Morning": "Cold brew",
      "Afternoon": "Iced mocha",
      "Evening": "Cold brew"
    }...
  },
  "Bob": {
    "Sunny": {
      "Morning": "Cappucino",
      "Afternoon": "Iced mocha",
      "Evening": "Cold brew"
    }...
  },
  "Cathy": {
    "Sunny": {
      "Morning": "Latte",
      "Afternoon": "Cold brew",
      "Evening": "Cappucino"
    }...
  },
  "Dave": {
    "Sunny": {
      "Morning": "Iced mocha",
      "Afternoon": "Iced mocha",
      "Evening": "Iced mocha"
    }...
  }
}
def add_random_user_and_contextfeatures(namesoption, weatheropt, timeofdayopt, rankjsonobj):
    name = namesoption[random.randint(0,3)]
    weather = weatheropt[random.randint(0,2)]
    timeofday = timeofdayopt[random.randint(0,2)]
    rankjsonobj['contextFeatures'] = [{'timeofday': timeofday, 'weather': weather, 'name': name}]
    return [name, weather, timeofday]
新增所有咖啡資料
此函式會將整個咖啡清單新增至 JSON 物件,以傳送至 Rank 要求。
儲存格沒有輸出。 函式會在呼叫 時變更 rankjsonobj 。
單一咖啡功能的範例如下:
{
    "id": "Cappucino",
    "features": [
    {
        "type": "hot",
        "origin": "kenya",
        "organic": "yes",
        "roast": "dark"

    }
}
def add_action_features(rankjsonobj):
    rankjsonobj["actions"] = actionfeaturesobj
比較預測與已知的使用者喜好設定
呼叫排名 API 之後,會針對每個反復專案呼叫此函式。
此函式會根據天氣和一天中的時間,比較使用者的咖啡喜好設定,以及個人化工具針對這些篩選使用者的建議。 如果建議相符,則會傳回 1 的分數,否則分數為 0。 儲存格沒有輸出。 函式會在呼叫時輸出分數。
def get_reward_from_simulated_data(name, weather, timeofday, prediction):
    if(userpref[name][weather][timeofday] == str(prediction)):
        return 1
    return 0
迴圈呼叫排名和獎勵
下一個資料格是 Notebook 的主要 工作,取得隨機使用者、取得咖啡清單、將兩者傳送至排名 API。 比較預測與使用者的已知喜好設定,然後將獎勵傳回個人化工具服務。
迴圈會執行一段時間 num_requests 。 個人化工具需要數千個呼叫來排名和獎勵,才能建立模型。
傳送至排名 API 的 JSON 範例如下。 為了簡潔起見,咖啡清單不完整。 您可以在 中看到 coffee.json 用於咖啡的完整 JSON。
傳送至排名 API 的 JSON:
{
   'contextFeatures':[
      {
         'timeofday':'Evening',
         'weather':'Snowy',
         'name':'Alice'
      }
   ],
   'actions':[
      {
         'id':'Cappucino',
         'features':[
            {
               'type':'hot',
               'origin':'kenya',
               'organic':'yes',
               'roast':'dark'
            }
         ]
      }
        ...rest of coffee list
   ],
   'excludedActions':[

   ],
   'eventId':'b5c4ef3e8c434f358382b04be8963f62',
   'deferActivation':False
}
排名 API 的 JSON 回應:
{
    'ranking': [
        {'id': 'Latte', 'probability': 0.85 },
        {'id': 'Iced mocha', 'probability': 0.05 },
        {'id': 'Cappucino', 'probability': 0.05 },
        {'id': 'Cold brew', 'probability': 0.05 }
    ],
    'eventId': '5001bcfe3bb542a1a238e6d18d57f2d2',
    'rewardActionId': 'Latte'
}
最後,每個迴圈都會顯示隨機選取使用者、天氣、一天中的時間,以及決定獎勵。 獎勵 1 表示個人化工具資源為指定的使用者、天氣和一天中的時間選取了正確的咖啡類型。
1 Alice Rainy Morning Latte 1
函式使用:
def iterations(n, modelCheck, jsonFormat):

    i = 1

    # default reward value - assumes failed prediction
    reward = 0

    # Print out dateTime
    currentDateTime()

    # collect results to aggregate in graph
    total = 0
    rewards = []
    count = []

    # default list of user, weather, time of day
    namesopt = ['Alice', 'Bob', 'Cathy', 'Dave']
    weatheropt = ['Sunny', 'Rainy', 'Snowy']
    timeofdayopt = ['Morning', 'Afternoon', 'Evening']


    while(i <= n):

        # create unique id to associate with an event
        eventid = add_event_id(jsonFormat)

        # generate a random sample
        [name, weather, timeofday] = add_random_user_and_contextfeatures(namesopt, weatheropt, timeofdayopt, jsonFormat)

        # add action features to rank
        add_action_features(jsonFormat)

        # show JSON to send to Rank
        print('To: ', jsonFormat)

        # choose an action - get prediction from Personalizer
        response = requests.post(personalization_rank_url, headers = headers, params = None, json = jsonFormat)

        # show Rank prediction
        print ('From: ',response.json())

        # compare personalization service recommendation with the simulated data to generate a reward value
        prediction = json.dumps(response.json()["rewardActionId"]).replace('"','')
        reward = get_reward_from_simulated_data(name, weather, timeofday, prediction)

        # show result for iteration
        print(f'   {i} {currentDateTime()} {name} {weather} {timeofday} {prediction} {reward}')

        # send the reward to the service
        response = requests.post(personalization_reward_url + eventid + "/reward", headers = headers, params= None, json = { "value" : reward })

        # for every N rank requests, compute total correct  total
         total =  total + reward

        # every N iteration, get last updated model date and time
        if(i % modelCheck == 0):

            print("**** 10% of loop found")

            get_last_updated(modelLastModified)

        # aggregate so chart is easier to read
        if(i % 10 == 0):
            rewards.append( total)
            count.append(i)
             total = 0

        i = i + 1

    # Print out dateTime
    currentDateTime()

    return [count, rewards]
執行 10,000 個反復專案
針對 10,000 個反復專案執行個人化工具迴圈。 這是長時間執行的事件。 請勿關閉執行筆記本的瀏覽器。 定期重新整理Azure 入口網站中的計量圖表,以查看服務的總呼叫數。 當您有大約 20,000 個呼叫時,迴圈的每個反復專案的排名和獎勵呼叫都會完成反復專案。
# max iterations
num_requests = 200

# check last mod date N% of time - currently 10%
lastModCheck = int(num_requests * .10)

jsonTemplate = rankactionsjsonobj

# main iterations
[count, rewards] = iterations(num_requests, lastModCheck, jsonTemplate)
查看改善的圖表結果
從 count 和 rewards 建立圖表。
def createChart(x, y):
    plt.plot(x, y)
    plt.xlabel("Batch of rank events")
    plt.ylabel("Correct recommendations per batch")
    plt.show()
10,000 個排名要求的執行圖表
執行 函 createChart 式。
createChart(count,rewards)
讀取圖表
此圖表顯示目前預設學習原則的模型成功。
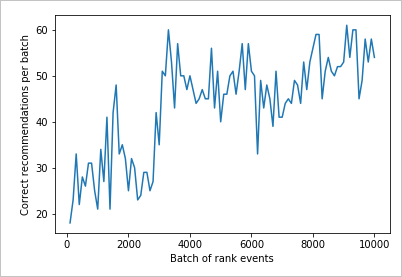
在測試結束時的理想目標,迴圈平均成功率接近 100%, 減去探索。 探索的預設值為 20%。
100-20=80
此探索值位於 [組態 ] 頁面上的個人化工具資源 Azure 入口網站。
若要根據資料到排名 API 尋找更好的學習原則,請在入口網站中針對個人化工具迴圈執行 離線評估 。
執行離線評估
在Azure 入口網站中,開啟個人化工具資源的 [評估 ] 頁面。
選取 [ 建立評估 ]。
輸入評估名稱的必要資料,以及迴圈評估的日期範圍。 日期範圍應該只包含您專注于評估的天數。
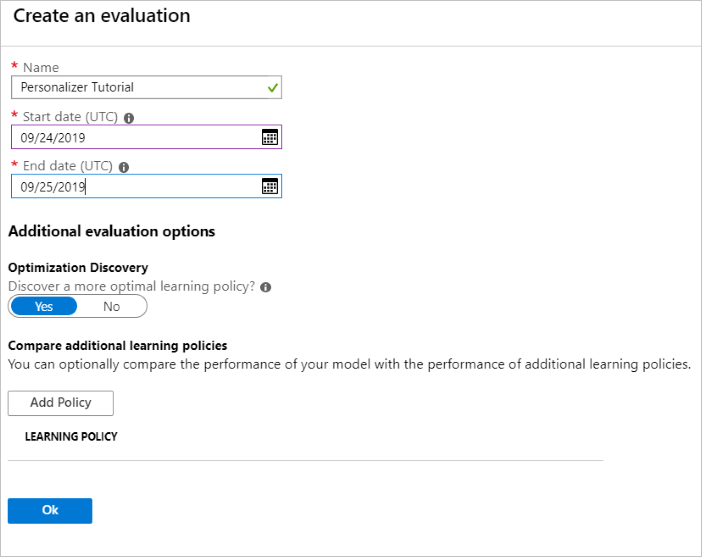
執行此離線評估的目的是要判斷此迴圈中所使用的功能和動作是否有更好的學習原則。 若要尋找更好的學習原則,請確定 優化探索 已開啟。
選取 [ 確定 ] 開始評估。
此 評估 頁面會列出新的評估及其目前狀態。 視您擁有的資料量而定,此評估可能需要一些時間。 您可以在幾分鐘後返回此頁面,以查看結果。
評估完成時,請選取評估,然後選取 [比較不同的學習原則 ]。 這會顯示可用的學習原則,以及它們與資料的行為方式。
選取資料表中最上層的學習原則,然後選取 [ 套用 ]。 這會將 最佳 學習原則套用至您的模型和重新定型。
將更新模型頻率變更為 5 分鐘
- 在Azure 入口網站中,仍在個人化工具資源上,選取 [ 設定 ] 頁面。
- 將 模型更新頻率 和 獎勵等候時間 變更為 5 分鐘,然後選取 [ 儲存 ]。
#Verify new learning policy and times
get_service_settings()
確認輸出的 rewardWaitTime 和 modelExportFrequency 都設定為 5 分鐘。
-----checking model
<Response [200]>
{'creationTime': '0001-01-01T00:00:00+00:00', 'lastModifiedTime': '0001-01-01T00:00:00+00:00'}
-----model updated: "0001-01-01T00:00:00+00:00"
-----checking service settings
<Response [200]>
{...learning policy...}
<Response [200]>
{'rewardWaitTime': '00:05:00', 'defaultReward': 0.0, 'rewardAggregation': 'earliest', 'explorationPercentage': 0.2, 'modelExportFrequency': '00:05:00', 'logRetentionDays': -1}
User count 4
Coffee count 4
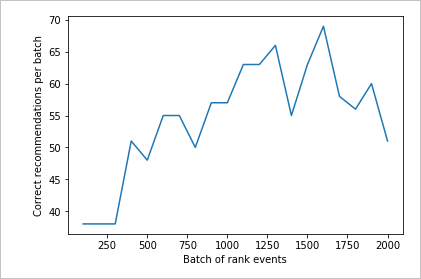
驗證新的學習原則
返回 Azure Notebooks 檔案並繼續執行相同的迴圈,但只執行 2,000 個反復專案。 定期重新整理Azure 入口網站中的計量圖表,以查看服務的總呼叫數。 當您有大約 4,000 個呼叫時,迴圈的每個反復專案的排名和獎勵呼叫都會完成反復專案。
# max iterations
num_requests = 2000

# check last mod date N% of time - currently 10%
lastModCheck2 = int(num_requests * .10)

jsonTemplate2 = rankactionsjsonobj

# main iterations
[count2, rewards2] = iterations(num_requests, lastModCheck2, jsonTemplate)
2,000 個排名要求的執行圖表
執行 函 createChart 式。
createChart(count2,rewards2)
檢閱第二張圖表
第二個圖表應該會顯示與使用者喜好設定一致的排名預測可見增加。
清除資源
如果您不打算繼續進行教學課程系列,請清除下列資源:
- 刪除您的 Azure Notebook 專案。
- 刪除個人化工具資源。
下一步
此範例中使用的 Jupyter Notebook 和資料檔案 可在個人化工具的 GitHub 存放庫上取得。