快速入門:建立自訂語音助理
在本快速入門中,您將使用語音 SDK 建立自訂語音助理應用程式,以連線至您已撰寫並設定的 Bot。 如果您需要建立 Bot,請參閱相關的教學課程,以取得更完整的指南。
符合幾項必要條件後,只需執行幾個步驟即可連線至您的自訂語音助理:
- 從您的訂用帳戶金鑰和區域建立
BotFrameworkConfig物件。 - 使用上面的
BotFrameworkConfig物件來建立DialogServiceConnector物件。 - 使用
DialogServiceConnector物件,開始對單一語句進行聽取程序。 - 檢查所傳回的
ActivityReceivedEventArgs。
注意
適用於 C++、JavaScript、Objective-C、Python 和 Swift 的語音 SDK 支援自訂語音助理,但我們尚未在此包含指南。
您可以在 GitHub 上檢視或下載所有語音 SDK C# 範例。
必要條件
開始之前,請務必:
- 建立語音資源
- 設定您的開發環境並建立空白專案
- 建立連線至 Direct Line Speech 通道的 Bot
- 確定您可以存取麥克風以擷取音訊
注意
請參閱語音助理支援的區域清單,並確定您的資源已部署於其中一個區域。
在 Visual Studio 中開啟您的專案
第一個步驟是確定您已在 Visual Studio 中開啟專案。
從重複使用程式碼開始著手
我們將新增程式碼,作為專案的基本架構。
在 [方案總管] 中開啟
MainPage.xaml。在設計工具的 XAML 檢視中,以定義基本使用者介面的下列程式碼片段取代整個內容:
<Page
    x:Class="helloworld.MainPage"
    xmlns="http://schemas.microsoft.com/winfx/2006/xaml/presentation"
    xmlns:x="http://schemas.microsoft.com/winfx/2006/xaml"
    xmlns:local="using:helloworld"
    xmlns:d="http://schemas.microsoft.com/expression/blend/2008"
    xmlns:mc="http://schemas.openxmlformats.org/markup-compatibility/2006"
    mc:Ignorable="d"
    Background="{ThemeResource ApplicationPageBackgroundThemeBrush}">

    <Grid>
        <StackPanel Orientation="Vertical" HorizontalAlignment="Center"
                    Margin="20,50,0,0" VerticalAlignment="Center" Width="800">
            <Button x:Name="EnableMicrophoneButton" Content="Enable Microphone"
                    Margin="0,0,10,0" Click="EnableMicrophone_ButtonClicked"
                    Height="35"/>
            <Button x:Name="ListenButton" Content="Talk to your bot"
                    Margin="0,10,10,0" Click="ListenButton_ButtonClicked"
                    Height="35"/>
            <StackPanel x:Name="StatusPanel" Orientation="Vertical"
                        RelativePanel.AlignBottomWithPanel="True"
                        RelativePanel.AlignRightWithPanel="True"
                        RelativePanel.AlignLeftWithPanel="True">
                <TextBlock x:Name="StatusLabel" Margin="0,10,10,0"
                           TextWrapping="Wrap" Text="Status:" FontSize="20"/>
                <Border x:Name="StatusBorder" Margin="0,0,0,0">
                    <ScrollViewer VerticalScrollMode="Auto"
                                  VerticalScrollBarVisibility="Auto" MaxHeight="200">
                        <!-- Use LiveSetting to enable screen readers to announce
                             the status update. -->
                        <TextBlock
                            x:Name="StatusBlock" FontWeight="Bold"
                            AutomationProperties.LiveSetting="Assertive"
                            MaxWidth="{Binding ElementName=Splitter, Path=ActualWidth}"
                            Margin="10,10,10,20" TextWrapping="Wrap"  />
                    </ScrollViewer>
                </Border>
            </StackPanel>
        </StackPanel>
        <MediaElement x:Name="mediaElement"/>
    </Grid>
</Page>
設計檢視更新為顯示應用程式的使用者介面。
- 在 [方案總管] 中,開啟程式碼後置原始檔
MainPage.xaml.cs。 (它分組在MainPage.xaml底下。)將此檔案的內容取代為下列內容,其中包括:
Speech和Speech.Dialog命名空間的using陳述式進行簡單的實作,確認麥克風存取正常並連線至按鈕處理常式
應用程式中的基本 UI 協助程式會顯示訊息及錯誤
初始程式碼路徑登陸點,稍後會填入資訊
在沒有串流支援的情況下播放文字轉換語音 (的協助程式)
稍後會填入即將開始接聽的空白按鈕處理常式
using Microsoft.CognitiveServices.Speech;
using Microsoft.CognitiveServices.Speech.Audio;
using Microsoft.CognitiveServices.Speech.Dialog;
using System;
using System.Diagnostics;
using System.IO;
using System.Text;
using Windows.Foundation;
using Windows.Storage.Streams;
using Windows.UI.Xaml;
using Windows.UI.Xaml.Controls;
using Windows.UI.Xaml.Media;

namespace helloworld
{
    public sealed partial class MainPage : Page
    {
        private DialogServiceConnector connector;

        private enum NotifyType
        {
            StatusMessage,
            ErrorMessage
        };

        public MainPage()
        {
            this.InitializeComponent();
        }

        private async void EnableMicrophone_ButtonClicked(
            object sender, RoutedEventArgs e)
        {
            bool isMicAvailable = true;
            try
            {
                var mediaCapture = new Windows.Media.Capture.MediaCapture();
                var settings =
                    new Windows.Media.Capture.MediaCaptureInitializationSettings();
                settings.StreamingCaptureMode =
                    Windows.Media.Capture.StreamingCaptureMode.Audio;
                await mediaCapture.InitializeAsync(settings);
            }
            catch (Exception)
            {
                isMicAvailable = false;
            }
            if (!isMicAvailable)
            {
                await Windows.System.Launcher.LaunchUriAsync(
                    new Uri("ms-settings:privacy-microphone"));
            }
            else
            {
                NotifyUser("Microphone was enabled", NotifyType.StatusMessage);
            }
        }

        private void NotifyUser(
            string strMessage, NotifyType type = NotifyType.StatusMessage)
        {
            // If called from the UI thread, then update immediately.
            // Otherwise, schedule a task on the UI thread to perform the update.
            if (Dispatcher.HasThreadAccess)
            {
                UpdateStatus(strMessage, type);
            }
            else
            {
                var task = Dispatcher.RunAsync(
                    Windows.UI.Core.CoreDispatcherPriority.Normal,
                    () => UpdateStatus(strMessage, type));
            }
        }

        private void UpdateStatus(string strMessage, NotifyType type)
        {
            switch (type)
            {
                case NotifyType.StatusMessage:
                    StatusBorder.Background = new SolidColorBrush(
                        Windows.UI.Colors.Green);
                    break;
                case NotifyType.ErrorMessage:
                    StatusBorder.Background = new SolidColorBrush(
                        Windows.UI.Colors.Red);
                    break;
            }
            StatusBlock.Text += string.IsNullOrEmpty(StatusBlock.Text)
                ? strMessage : "\n" + strMessage;

            if (!string.IsNullOrEmpty(StatusBlock.Text))
            {
                StatusBorder.Visibility = Visibility.Visible;
                StatusPanel.Visibility = Visibility.Visible;
            }
            else
            {
                StatusBorder.Visibility = Visibility.Collapsed;
                StatusPanel.Visibility = Visibility.Collapsed;
            }
            // Raise an event if necessary to enable a screen reader
            // to announce the status update.
            var peer = Windows.UI.Xaml.Automation.Peers.FrameworkElementAutomationPeer.FromElement(StatusBlock);
            if (peer != null)
            {
                peer.RaiseAutomationEvent(
                    Windows.UI.Xaml.Automation.Peers.AutomationEvents.LiveRegionChanged);
            }
        }

        // Waits for and accumulates all audio associated with a given
        // PullAudioOutputStream and then plays it to the MediaElement. Long spoken
        // audio will create extra latency and a streaming playback solution
        // (that plays audio while it continues to be received) should be used --
        // see the samples for examples of this.
        private void SynchronouslyPlayActivityAudio(
            PullAudioOutputStream activityAudio)
        {
            var playbackStreamWithHeader = new MemoryStream();
            playbackStreamWithHeader.Write(Encoding.ASCII.GetBytes("RIFF"), 0, 4); // ChunkID
            playbackStreamWithHeader.Write(BitConverter.GetBytes(UInt32.MaxValue), 0, 4); // ChunkSize: max
            playbackStreamWithHeader.Write(Encoding.ASCII.GetBytes("WAVE"), 0, 4); // Format
            playbackStreamWithHeader.Write(Encoding.ASCII.GetBytes("fmt "), 0, 4); // Subchunk1ID
            playbackStreamWithHeader.Write(BitConverter.GetBytes(16), 0, 4); // Subchunk1Size: PCM
            playbackStreamWithHeader.Write(BitConverter.GetBytes(1), 0, 2); // AudioFormat: PCM
            playbackStreamWithHeader.Write(BitConverter.GetBytes(1), 0, 2); // NumChannels: mono
            playbackStreamWithHeader.Write(BitConverter.GetBytes(16000), 0, 4); // SampleRate: 16kHz
            playbackStreamWithHeader.Write(BitConverter.GetBytes(32000), 0, 4); // ByteRate
            playbackStreamWithHeader.Write(BitConverter.GetBytes(2), 0, 2); // BlockAlign
            playbackStreamWithHeader.Write(BitConverter.GetBytes(16), 0, 2); // BitsPerSample: 16-bit
            playbackStreamWithHeader.Write(Encoding.ASCII.GetBytes("data"), 0, 4); // Subchunk2ID
            playbackStreamWithHeader.Write(BitConverter.GetBytes(UInt32.MaxValue), 0, 4); // Subchunk2Size

            byte[] pullBuffer = new byte[2056];

            uint lastRead = 0;
            do
            {
                lastRead = activityAudio.Read(pullBuffer);
                playbackStreamWithHeader.Write(pullBuffer, 0, (int)lastRead);
            }
            while (lastRead == pullBuffer.Length);

            var task = Dispatcher.RunAsync(
                Windows.UI.Core.CoreDispatcherPriority.Normal, () =>
            {
                mediaElement.SetSource(
                    playbackStreamWithHeader.AsRandomAccessStream(), "audio/wav");
                mediaElement.Play();
            });
        }

        private void InitializeDialogServiceConnector()
        {
            // New code will go here
        }

        private async void ListenButton_ButtonClicked(
            object sender, RoutedEventArgs e)
        {
            // New code will go here
        }
    }
}
將下列程式碼片段新增至
InitializeDialogServiceConnector的方法主體。 此程式碼會使用您的訂用帳戶資訊建立DialogServiceConnector。// Create a BotFrameworkConfig by providing a Speech service subscription key // the botConfig.Language property is optional (default en-US) const string speechSubscriptionKey = "YourSpeechSubscriptionKey"; // Your subscription key const string region = "YourServiceRegion"; // Your subscription service region. var botConfig = BotFrameworkConfig.FromSubscription(speechSubscriptionKey, region); botConfig.Language = "en-US"; connector = new DialogServiceConnector(botConfig);注意
請參閱語音助理支援的區域清單,並確定您的資源已部署於其中一個區域。
注意
如需設定 Bot 的詳細資訊,請參閱 Direct Line Speech 通道的 Bot Framework 文件。
針對您的語音訂用帳戶和區域,以您自己的值取代字串
YourSpeechSubscriptionKey和YourServiceRegion。將下列程式碼片段附加至
InitializeDialogServiceConnector的方法主體結尾。 此程式碼為依賴DialogServiceConnector的事件設定處理常式,以傳達其 Bot 活動、語音辨識結果及其他資訊。// ActivityReceived is the main way your bot will communicate with the client // and uses bot framework activities connector.ActivityReceived += (sender, activityReceivedEventArgs) => { NotifyUser( $"Activity received, hasAudio={activityReceivedEventArgs.HasAudio} activity={activityReceivedEventArgs.Activity}"); if (activityReceivedEventArgs.HasAudio) { SynchronouslyPlayActivityAudio(activityReceivedEventArgs.Audio); } }; // Canceled will be signaled when a turn is aborted or experiences an error condition connector.Canceled += (sender, canceledEventArgs) => { NotifyUser($"Canceled, reason={canceledEventArgs.Reason}"); if (canceledEventArgs.Reason == CancellationReason.Error) { NotifyUser( $"Error: code={canceledEventArgs.ErrorCode}, details={canceledEventArgs.ErrorDetails}"); } }; // Recognizing (not 'Recognized') will provide the intermediate recognized text // while an audio stream is being processed connector.Recognizing += (sender, recognitionEventArgs) => { NotifyUser($"Recognizing! in-progress text={recognitionEventArgs.Result.Text}"); }; // Recognized (not 'Recognizing') will provide the final recognized text // once audio capture is completed connector.Recognized += (sender, recognitionEventArgs) => { NotifyUser($"Final speech to text result: '{recognitionEventArgs.Result.Text}'"); }; // SessionStarted will notify when audio begins flowing to the service for a turn connector.SessionStarted += (sender, sessionEventArgs) => { NotifyUser($"Now Listening! Session started, id={sessionEventArgs.SessionId}"); }; // SessionStopped will notify when a turn is complete and // it's safe to begin listening again connector.SessionStopped += (sender, sessionEventArgs) => { NotifyUser($"Listening complete. Session ended, id={sessionEventArgs.SessionId}"); };將下列程式碼片段新增至
MainPage類別中的ListenButton_ButtonClicked方法。 此程式碼設定DialogServiceConnector來接聽,因為您已經建立組態並註冊事件處理常式。if (connector == null) { InitializeDialogServiceConnector(); // Optional step to speed up first interaction: if not called, // connection happens automatically on first use var connectTask = connector.ConnectAsync(); } try { // Start sending audio to your speech-enabled bot var listenTask = connector.ListenOnceAsync(); // You can also send activities to your bot as JSON strings -- // Microsoft.Bot.Schema can simplify this string speakActivity = @"{""type"":""message"",""text"":""Greeting Message"", ""speak"":""Hello there!""}"; await connector.SendActivityAsync(speakActivity); } catch (Exception ex) { NotifyUser($"Exception: {ex.ToString()}", NotifyType.ErrorMessage); }
建置並執行您的應用程式
現在您已準備好使用語音服務來建置應用程式,並測試您的自訂語音助理。
從功能表列中,選擇 [建置] >[建置方案] 來建置應用程式。 程式碼現在應該可以編譯,而且不會出現任何錯誤。
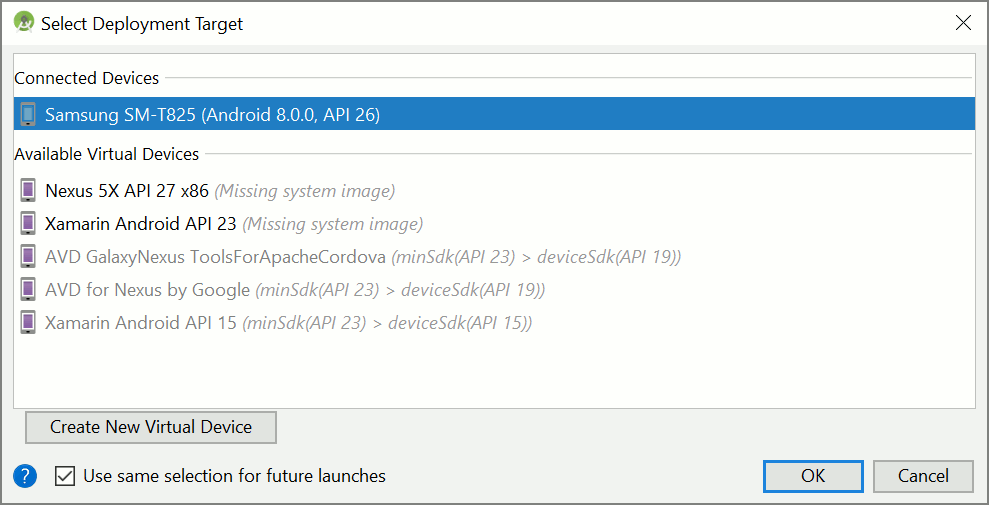
選擇 [偵錯] >[開始偵錯] (或按 F5) 以啟動應用程式。 helloworld 視窗會出現。
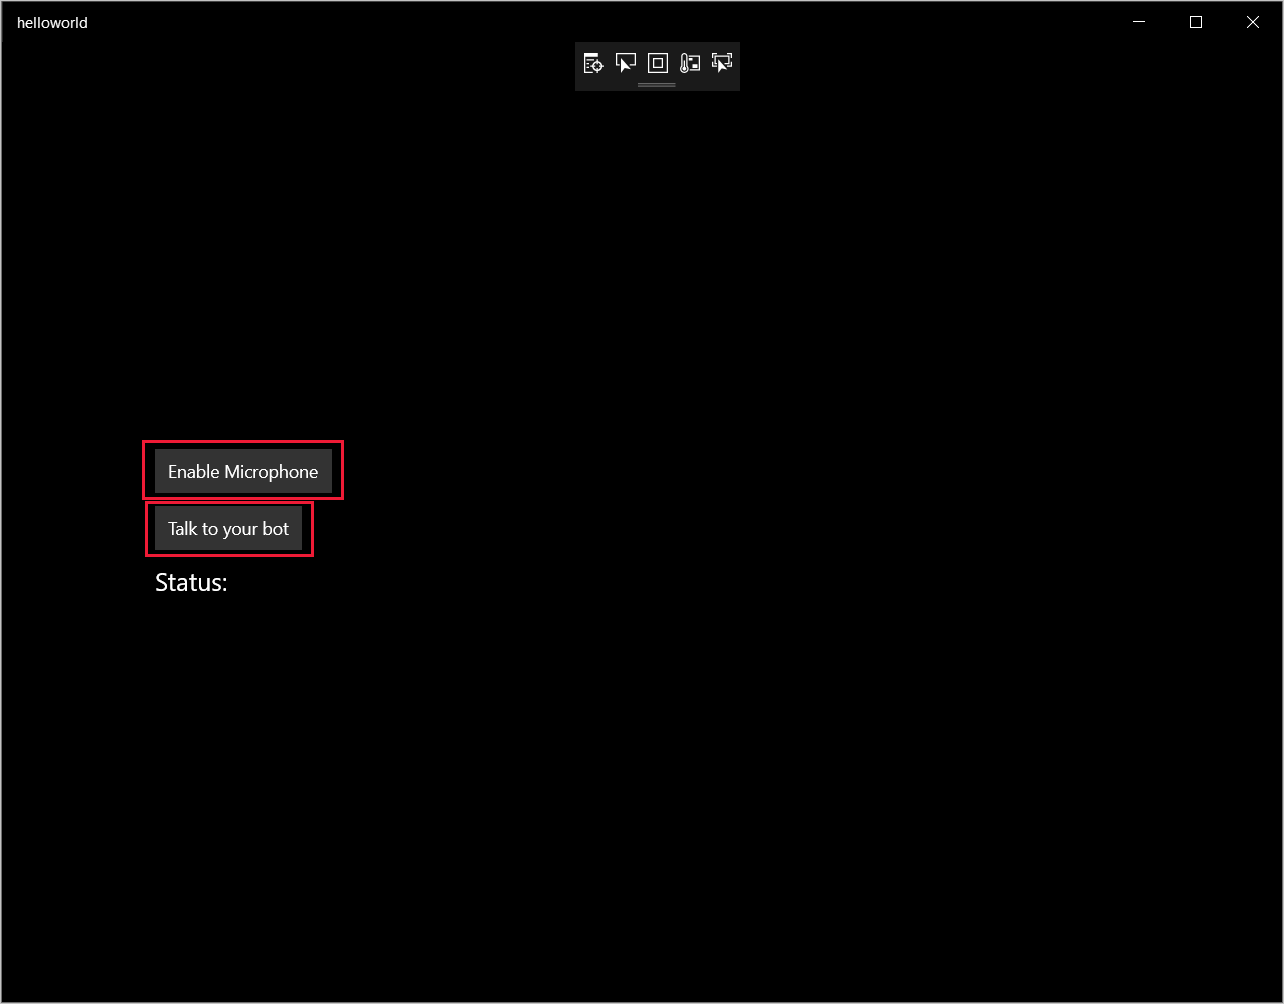
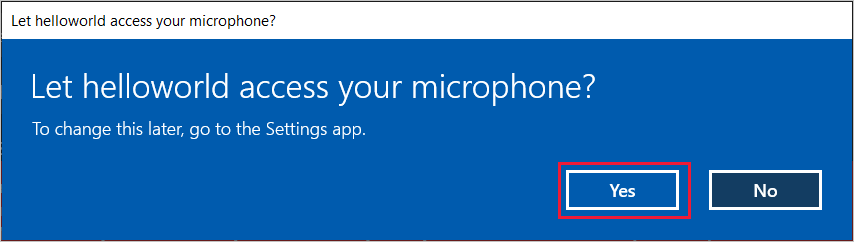
選取 [啟用麥克風] ,當存取權限要求出現時,選取 [是] 。
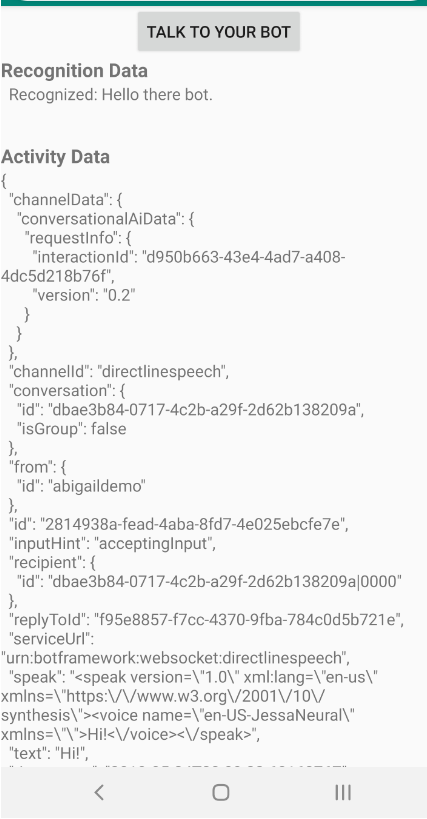
選取 [與您的 Bot 交談] ,然後對裝置的麥克風說出英文片語或句子。 您的語音會傳送到 Direct Line Speech 頻道並轉譯為文字,該文字會出現在視窗中。
後續步驟
探索 GitHub 上的 C# 範例 \(英文\)
您可以在 GitHub 上檢視或下載所有語音 SDK Java 範例。
選擇您的目標環境
必要條件
開始之前,請務必:
- 建立語音資源
- 設定您的開發環境並建立空白專案
- 建立連線至 Direct Line Speech 通道的 Bot
- 確定您可以存取麥克風以擷取音訊
注意
請參閱語音助理支援的區域清單,並確定您的資源已部署於其中一個區域。
建立及設定專案
建立 Eclipse 專案並安裝語音 SDK。
此外,若要啟用記錄功能,請更新 pom.xml 檔案以包含下列相依性:
 <dependency>
     <groupId>org.slf4j</groupId>
     <artifactId>slf4j-simple</artifactId>
     <version>1.7.5</version>
 </dependency>
新增範例程式碼
若要將新的空白類別新增到您的 Java 專案,請選取 [檔案]>[新增]>[類別]。
在 [新增 Java 類別] 視窗中,於 [套件] 欄位中輸入 speechsdk.quickstart,並在 [名稱] 欄位中輸入 Main。
![[新增 Java 類別] 視窗的螢幕擷取畫面](../media/sdk/qs-java-jre-06-create-main-java.png)
開啟新建立的
Main類別,並以下列起始程式碼取代Main.java檔案的內容:package speechsdk.quickstart; import com.microsoft.cognitiveservices.speech.audio.AudioConfig; import com.microsoft.cognitiveservices.speech.audio.PullAudioOutputStream; import com.microsoft.cognitiveservices.speech.dialog.BotFrameworkConfig; import com.microsoft.cognitiveservices.speech.dialog.DialogServiceConnector; import org.slf4j.Logger; import org.slf4j.LoggerFactory; import javax.sound.sampled.AudioFormat; import javax.sound.sampled.AudioSystem; import javax.sound.sampled.DataLine; import javax.sound.sampled.SourceDataLine; import java.io.InputStream; public class Main { final Logger log = LoggerFactory.getLogger(Main.class); public static void main(String[] args) { // New code will go here } private void playAudioStream(PullAudioOutputStream audio) { ActivityAudioStream stream = new ActivityAudioStream(audio); final ActivityAudioStream.ActivityAudioFormat audioFormat = stream.getActivityAudioFormat(); final AudioFormat format = new AudioFormat( AudioFormat.Encoding.PCM_SIGNED, audioFormat.getSamplesPerSecond(), audioFormat.getBitsPerSample(), audioFormat.getChannels(), audioFormat.getFrameSize(), audioFormat.getSamplesPerSecond(), false); try { int bufferSize = format.getFrameSize(); final byte[] data = new byte[bufferSize]; SourceDataLine.Info info = new DataLine.Info(SourceDataLine.class, format); SourceDataLine line = (SourceDataLine) AudioSystem.getLine(info); line.open(format); if (line != null) { line.start(); int nBytesRead = 0; while (nBytesRead != -1) { nBytesRead = stream.read(data); if (nBytesRead != -1) { line.write(data, 0, nBytesRead); } } line.drain(); line.stop(); line.close(); } stream.close(); } catch (Exception e) { e.printStackTrace(); } } }在
main方法中,您會先設定DialogServiceConfig並用其建立DialogServiceConnector執行個體。 此執行個體會連線至 Direct Line Speech 頻道來與您的 Bot 互動。AudioConfig執行個體也用來指定音訊輸入來源。 在此範例中,預設麥克風會搭配AudioConfig.fromDefaultMicrophoneInput()使用。- 將字串
YourSubscriptionKey取代為您的語音資源金鑰,您可從 Azure 入口網站取得該金鑰。 - 將字串
YourServiceRegion取代為與您的語音資源相關聯的區域。
注意
請參閱語音助理支援的區域清單,並確定您的資源已部署於其中一個區域。
final String subscriptionKey = "YourSubscriptionKey"; // Your subscription key final String region = "YourServiceRegion"; // Your speech subscription service region final BotFrameworkConfig botConfig = BotFrameworkConfig.fromSubscription(subscriptionKey, region); // Configure audio input from a microphone. final AudioConfig audioConfig = AudioConfig.fromDefaultMicrophoneInput(); // Create a DialogServiceConnector instance. final DialogServiceConnector connector = new DialogServiceConnector(botConfig, audioConfig);- 將字串
DialogServiceConnector連接器依賴多個事件來傳達其 Bot 活動、語音辨識結果及其他資訊。 接下來新增這些事件接聽程式。// Recognizing will provide the intermediate recognized text while an audio stream is being processed. connector.recognizing.addEventListener((o, speechRecognitionResultEventArgs) -> { log.info("Recognizing speech event text: {}", speechRecognitionResultEventArgs.getResult().getText()); }); // Recognized will provide the final recognized text once audio capture is completed. connector.recognized.addEventListener((o, speechRecognitionResultEventArgs) -> { log.info("Recognized speech event reason text: {}", speechRecognitionResultEventArgs.getResult().getText()); }); // SessionStarted will notify when audio begins flowing to the service for a turn. connector.sessionStarted.addEventListener((o, sessionEventArgs) -> { log.info("Session Started event id: {} ", sessionEventArgs.getSessionId()); }); // SessionStopped will notify when a turn is complete and it's safe to begin listening again. connector.sessionStopped.addEventListener((o, sessionEventArgs) -> { log.info("Session stopped event id: {}", sessionEventArgs.getSessionId()); }); // Canceled will be signaled when a turn is aborted or experiences an error condition. connector.canceled.addEventListener((o, canceledEventArgs) -> { log.info("Canceled event details: {}", canceledEventArgs.getErrorDetails()); connector.disconnectAsync(); }); // ActivityReceived is the main way your bot will communicate with the client and uses Bot Framework activities. connector.activityReceived.addEventListener((o, activityEventArgs) -> { final String act = activityEventArgs.getActivity().serialize(); log.info("Received activity {} audio", activityEventArgs.hasAudio() ? "with" : "without"); if (activityEventArgs.hasAudio()) { playAudioStream(activityEventArgs.getAudio()); } });叫用
connectAsync()方法,以將DialogServiceConnector連線到 Direct Line Speech。 若要測試您的 Bot,您可以叫用listenOnceAsync方法,以傳送來自麥克風的音訊輸入。 此外,您也可以使用sendActivityAsync方法,以序列化字串的形式傳送自訂活動。 這些自訂活動可以提供您 Bot 在交談中使用的其他資料。connector.connectAsync(); // Start listening. System.out.println("Say something ..."); connector.listenOnceAsync(); // connector.sendActivityAsync(...)將變更儲存到
Main檔案。若要支援回應播放,請在 Java inputStream 中新增額外的類別以轉換從 getAudio() API 傳回的 PullAudioOutputStream 物件,以便輕鬆處理。 此
ActivityAudioStream是特殊的類別,可處理來自 Direct Line Speech 頻道的語音回應。 也會提供處理播放所需的存取子,以擷取音訊格式資訊。 如需此功能,請選取 [檔案]> [新建]> [類別]。在 [新建 Java 類別] 視窗中,將 speechsdk.quickstart 輸入 [套件] 欄位,並將 ActivityAudioStream 輸入 [名稱] 欄位。
開啟新建的
ActivityAudioStream類別,並將內容取代為下列程式碼:package com.speechsdk.quickstart; import com.microsoft.cognitiveservices.speech.audio.PullAudioOutputStream; import java.io.IOException; import java.io.InputStream; public final class ActivityAudioStream extends InputStream { /** * The number of samples played per second (16 kHz). */ public static final long SAMPLE_RATE = 16000; /** * The number of bits in each sample of a sound that has this format (16 bits). */ public static final int BITS_PER_SECOND = 16; /** * The number of audio channels in this format (1 for mono). */ public static final int CHANNELS = 1; /** * The number of bytes in each frame of a sound that has this format (2). */ public static final int FRAME_SIZE = 2; /** * Reads up to a specified maximum number of bytes of data from the audio * stream, putting them into the given byte array. * * @param b the buffer into which the data is read * @param off the offset, from the beginning of array <code>b</code>, at which * the data will be written * @param len the maximum number of bytes to read * @return the total number of bytes read into the buffer, or -1 if there * is no more data because the end of the stream has been reached */ @Override public int read(byte[] b, int off, int len) { byte[] tempBuffer = new byte[len]; int n = (int) this.pullStreamImpl.read(tempBuffer); for (int i = 0; i < n; i++) { if (off + i > b.length) { throw new ArrayIndexOutOfBoundsException(b.length); } b[off + i] = tempBuffer[i]; } if (n == 0) { return -1; } return n; } /** * Reads the next byte of data from the activity audio stream if available. * * @return the next byte of data, or -1 if the end of the stream is reached * @see #read(byte[], int, int) * @see #read(byte[]) * @see #available * <p> */ @Override public int read() { byte[] data = new byte[1]; int temp = read(data); if (temp <= 0) { // we have a weird situation if read(byte[]) returns 0! return -1; } return data[0] & 0xFF; } /** * Reads up to a specified maximum number of bytes of data from the activity audio stream, * putting them into the given byte array. * * @param b the buffer into which the data is read * @return the total number of bytes read into the buffer, or -1 if there * is no more data because the end of the stream has been reached */ @Override public int read(byte[] b) { int n = (int) pullStreamImpl.read(b); if (n == 0) { return -1; } return n; } /** * Skips over and discards a specified number of bytes from this * audio input stream. * * @param n the requested number of bytes to be skipped * @return the actual number of bytes skipped * @throws IOException if an input or output error occurs * @see #read * @see #available */ @Override public long skip(long n) { if (n <= 0) { return 0; } if (n <= Integer.MAX_VALUE) { byte[] tempBuffer = new byte[(int) n]; return read(tempBuffer); } long count = 0; for (long i = n; i > 0; i -= Integer.MAX_VALUE) { int size = (int) Math.min(Integer.MAX_VALUE, i); byte[] tempBuffer = new byte[size]; count += read(tempBuffer); } return count; } /** * Closes this audio input stream and releases any system resources associated * with the stream. */ @Override public void close() { this.pullStreamImpl.close(); } /** * Fetch the audio format for the ActivityAudioStream. The ActivityAudioFormat defines the sample rate, bits per sample, and the # channels. * * @return instance of the ActivityAudioFormat associated with the stream */ public ActivityAudioStream.ActivityAudioFormat getActivityAudioFormat() { return activityAudioFormat; } /** * Returns the maximum number of bytes that can be read (or skipped over) from this * audio input stream without blocking. * * @return the number of bytes that can be read from this audio input stream without blocking. * As this implementation does not buffer, this will be defaulted to 0 */ @Override public int available() { return 0; } public ActivityAudioStream(final PullAudioOutputStream stream) { pullStreamImpl = stream; this.activityAudioFormat = new ActivityAudioStream.ActivityAudioFormat(SAMPLE_RATE, BITS_PER_SECOND, CHANNELS, FRAME_SIZE, AudioEncoding.PCM_SIGNED); } private PullAudioOutputStream pullStreamImpl; private ActivityAudioFormat activityAudioFormat; /** * ActivityAudioFormat is an internal format which contains metadata regarding the type of arrangement of * audio bits in this activity audio stream. */ static class ActivityAudioFormat { private long samplesPerSecond; private int bitsPerSample; private int channels; private int frameSize; private AudioEncoding encoding; public ActivityAudioFormat(long samplesPerSecond, int bitsPerSample, int channels, int frameSize, AudioEncoding encoding) { this.samplesPerSecond = samplesPerSecond; this.bitsPerSample = bitsPerSample; this.channels = channels; this.encoding = encoding; this.frameSize = frameSize; } /** * Fetch the number of samples played per second for the associated audio stream format. * * @return the number of samples played per second */ public long getSamplesPerSecond() { return samplesPerSecond; } /** * Fetch the number of bits in each sample of a sound that has this audio stream format. * * @return the number of bits per sample */ public int getBitsPerSample() { return bitsPerSample; } /** * Fetch the number of audio channels used by this audio stream format. * * @return the number of channels */ public int getChannels() { return channels; } /** * Fetch the default number of bytes in a frame required by this audio stream format. * * @return the number of bytes */ public int getFrameSize() { return frameSize; } /** * Fetch the audio encoding type associated with this audio stream format. * * @return the encoding associated */ public AudioEncoding getEncoding() { return encoding; } } /** * Enum defining the types of audio encoding supported by this stream. */ public enum AudioEncoding { PCM_SIGNED("PCM_SIGNED"); String value; AudioEncoding(String value) { this.value = value; } } }將變更儲存到
ActivityAudioStream檔案。
建置並執行應用程式
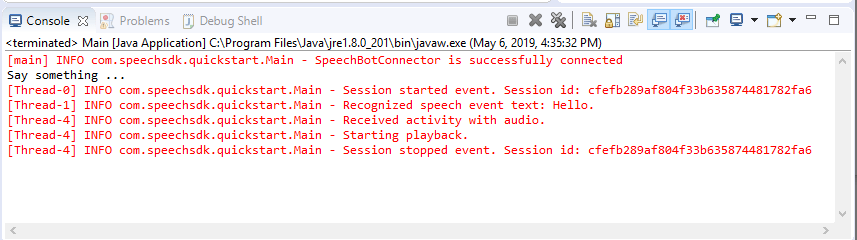
選取 F11 鍵,或選取 [執行]>[偵錯]。
主控台會顯示「說一些話」訊息。此時,請說您 Bot 可理解的英文片語或句子。 您的語音會透過您 Bot 可辨識及處理的 Direct Line 語音頻道來傳輸至您的 Bot。 回應會以活動形式傳回。 如果您的 Bot 傳回語音作為回應,則會使用 AudioPlayer 類別播放音訊。
下一步
探索 GitHub 上的 Java 範例 \(英文\)
您可以在 GitHub 上檢視或下載所有語音 SDK Go 範例。
必要條件
開始之前:
- 建立語音資源
- 設定您的開發環境並建立空白專案
- 建立連線至 Direct Line Speech 通道的 Bot
- 確定您可以存取麥克風以擷取音訊
注意
請參閱語音助理支援的區域清單,並確定您的資源已部署於其中一個區域。
設定您的環境
藉由新增以下這一行,以最新的 SDK 版本更新 go.mod 檔案
require (
    github.com/Microsoft/cognitive-services-speech-sdk-go v1.15.0
)
從重複使用程式碼開始著手
將來源檔案 (例如 quickstart.go) 的內容取代為下列內容,其中包括:
- 「主要」套件定義
- 從語音 SDK 匯入必要的模組
- 用來儲存 Bot 資訊的變數,稍後將在本快速入門中加以取代
- 使用音訊輸入麥克風的簡單實作
- 在語音互動期間發生的各種事件適用的事件處理常式
package main

import (
    "fmt"
    "time"

    "github.com/Microsoft/cognitive-services-speech-sdk-go/audio"
    "github.com/Microsoft/cognitive-services-speech-sdk-go/dialog"
    "github.com/Microsoft/cognitive-services-speech-sdk-go/speech"
)

func main() {
    subscription :=  "YOUR_SUBSCRIPTION_KEY"
    region := "YOUR_BOT_REGION"

    audioConfig, err := audio.NewAudioConfigFromDefaultMicrophoneInput()
    if err != nil {
        fmt.Println("Got an error: ", err)
        return
    }
    defer audioConfig.Close()
    config, err := dialog.NewBotFrameworkConfigFromSubscription(subscription, region)
    if err != nil {
        fmt.Println("Got an error: ", err)
        return
    }
    defer config.Close()
    connector, err := dialog.NewDialogServiceConnectorFromConfig(config, audioConfig)
    if err != nil {
        fmt.Println("Got an error: ", err)
        return
    }
    defer connector.Close()
    activityReceivedHandler := func(event dialog.ActivityReceivedEventArgs) {
        defer event.Close()
        fmt.Println("Received an activity.")
    }
    connector.ActivityReceived(activityReceivedHandler)
    recognizedHandle := func(event speech.SpeechRecognitionEventArgs) {
        defer event.Close()
        fmt.Println("Recognized ", event.Result.Text)
    }
    connector.Recognized(recognizedHandle)
    recognizingHandler := func(event speech.SpeechRecognitionEventArgs) {
        defer event.Close()
        fmt.Println("Recognizing ", event.Result.Text)
    }
    connector.Recognizing(recognizingHandler)
    connector.ListenOnceAsync()
    <-time.After(10 * time.Second)
}
以語音資源中的實際值取代 YOUR_SUBSCRIPTION_KEY 和 YOUR_BOT_REGION 值。
瀏覽至 Azure 入口網站,然後開啟語音資源
在左側的 [金鑰和端點] 底下,有兩個可用的訂用帳戶金鑰
- 使用其中一個作為
YOUR_SUBSCRIPTION_KEY值取代
- 使用其中一個作為
在左側的 [概觀] 底下記下區域,並將其對應至區域識別碼
- 使用區域識別碼來取代
YOUR_BOT_REGION值,例如:"westus"代表 [美國西部]
注意
請參閱語音助理支援的區域清單,並確定您的資源已部署於其中一個區域。
注意
如需設定 Bot 的詳細資訊,請參閱 Direct Line Speech 通道的 Bot Framework 文件。
- 使用區域識別碼來取代
程式碼說明
需要語音訂用帳戶金鑰和區域,才能建立語音設定物件。 需要設定物件,才能具現化語音辨識器物件。
辨識器執行個體會公開多種辨識語音的方式。 在此範例中,會持續辨識語音。 此功能可讓語音服務知道您要傳送多個片語以進行辨識,以及程式何時會終止而停止辨識語音。 產生結果後,程式碼會將其寫入至主控台。
建置和執行
現在您已完成設定,可使用語音服務建置專案及測試自訂語音助理。
- 建置您的專案,例如 "go build"
- 執行模組,並對裝置的麥克風說出片語或句子。 您的語音會傳送到 Direct Line Speech 通道並轉譯為文字,出現在輸出中。
注意
語音 SDK 會預設為使用 en-us 來辨識語言,如需選擇來源語言的詳細資訊,請參閱如何辨識語音。
後續步驟
其他語言和平台支援
按下此索引標籤,表示您可能未找到慣用程式設計語言的快速入門。 別擔心,我們在 GitHub 上有其他的快速入門資料和程式碼範例可供使用。 您可以使用資料表來尋找您程式設計語言和平台/作業系統組合的合適範例。
| Language | 程式碼範例 |
|---|---|
| C# | .NET Framework、.NET Core、UWP、Unity、Xamarin |
| C++ | Windows、Linux、macOS |
| Java | Android、JRE |
| JavaScript | 瀏覽器、Node.js |
| Objective-C | iOS、macOS |
| Python | Windows、Linux、macOS |
| Swift | iOS、macOS |