使用 Key Vault 開發 Azure AI 服務應用程式
了解如何使用 Azure Key Vault 安全地開發 Azure AI 服務應用程式。
Key Vault 可降低秘密可能會意外洩漏的風險,因為您可避免將安全性資訊儲存在應用程式中。
必要條件
- 有效的 Azure 訂用帳戶 - 免費建立帳戶
- Visual Studio IDE
- Azure Key Vault
- 多服務資源或特定服務的資源
- 有效的 Azure 訂用帳戶 - 建立免費帳戶。
- Python 3.7 或更新版本
- Azure CLI 或 Azure PowerShell
- Azure Key Vault
- 多服務資源或特定服務的資源
- 有效的 Azure 訂用帳戶 - 建立免費帳戶。
- Java Development Kit (JDK) 第 8 版或更新版本
- Azure CLI 或 Azure PowerShell
- Azure Key Vault
- 多服務資源或特定服務的資源
- 有效的 Azure 訂用帳戶 - 建立免費帳戶。
- 目前的 Node.js v14 LTS 或更新版本
- Azure CLI 或 Azure PowerShell
- Azure Key Vault
- 多服務資源或特定服務的資源
注意
請檢閱您用來了解 Azure AI 服務的文件和快速入門文章:
- 您傳送 API 呼叫所需的認證和其他資訊。
- 您執行應用程式所需的套件和程式碼。
從 Azure AI 服務資源取得您的認證
將認證資訊新增至 Azure 金鑰保存庫之前,您必須從 Azure AI 服務資源中擷取資訊。 例如,如果您的服務需要金鑰和端點,則可以使用下列步驟找到:
在 Azure 入口網站中瀏覽至您的 Azure 資源。
從左側的可摺疊功能表中,選取 [金鑰和端點]。


某些 Azure AI 服務需要不同的資訊來驗證 API 呼叫,例如金鑰和區域。 在繼續之前,請務必先擷取此資訊。
將您的認證新增至金鑰保存庫
若要讓應用程式擷取並使用認證來驗證 API 呼叫,您必須將其新增至金鑰保存庫秘密。
重複這些步驟來產生每個必要資源認證的秘密。 例如,金鑰和端點。 這些秘密名稱稍後會用來驗證您的應用程式。
開啟新的瀏覽器索引標籤或視窗。 在 Azure 入口網站中瀏覽至您的金鑰保存庫。
從左側的可摺疊功能表中,選取 [物件]>[祕密]。
選取產生/匯入。
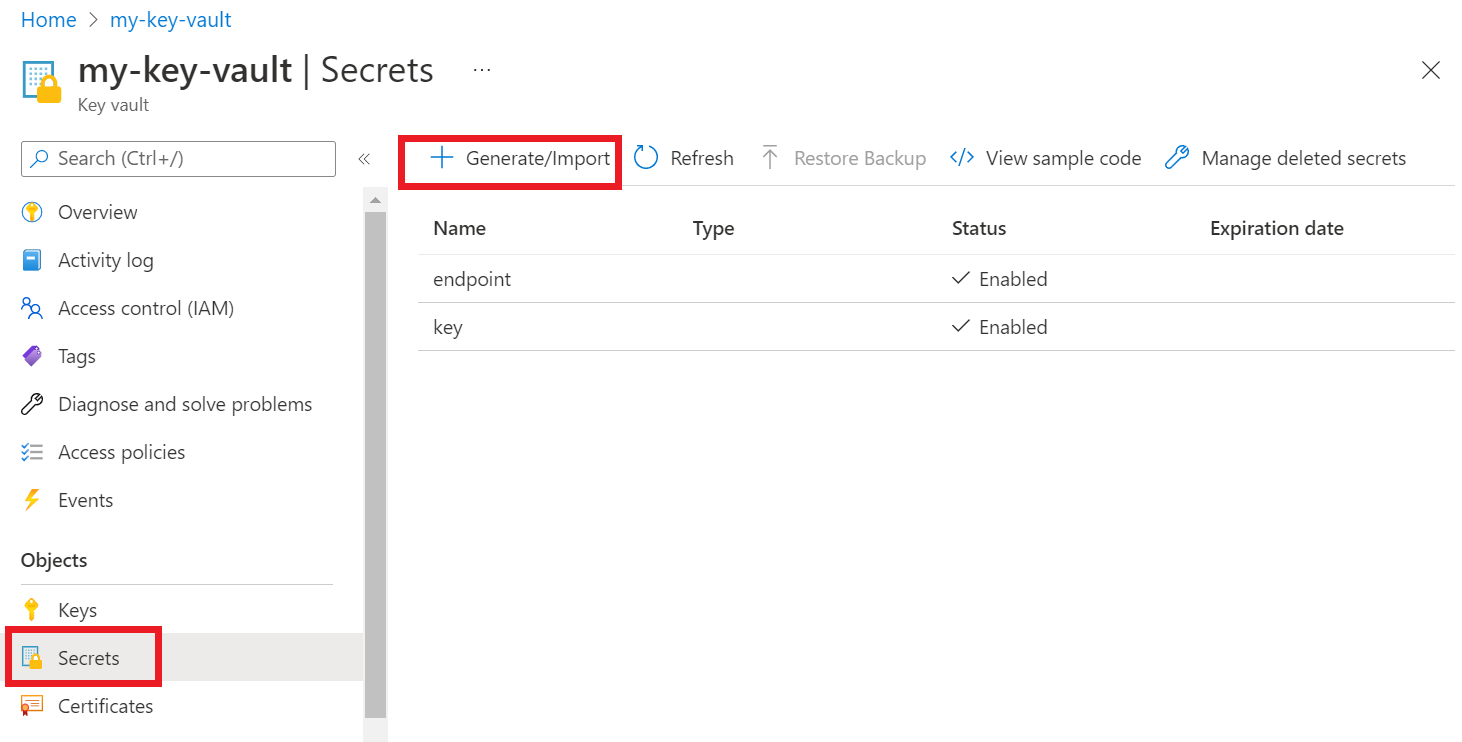
在 [建立祕密] 畫面上,輸入下列值:
名稱 值 上傳選項 手動 名稱 金鑰或端點的秘密名稱。 例如:「CognitiveServicesKey」或「CognitiveServicesEndpoint」 值 您的 Azure AI 服務資源金鑰或端點。 稍後,您的應用程式會使用秘密「名稱」安全地存取「值」。
將其他的值保留預設值。 選取 建立。
提示
請務必記住您為秘密設定的名稱,因為您稍後會在應用程式中用到這些名稱。

您現在應該會有資源資訊的具名秘密。
為您金鑰保存庫的名稱建立環境變數
建議您為 Azure 金鑰保存庫的名稱建立環境變數。 您的應用程式會在執行階段讀取此環境變數,以擷取金鑰和端點資訊。
若要設定環境變數,請使用下列其中一個命令。 KEY_VAULT_NAME 以環境變數的名稱取代,並將 Your-Key-Vault-Name 取代為金鑰保存庫的名稱,這會儲存在環境變數中。
建立並指派已保存的環境變數 (給定值)。
setx KEY_VAULT_NAME "Your-Key-Vault-Name"
在新的 [命令提示字元] 執行個體中,讀取環境變數。
echo %KEY_VAULT_NAME%
使用 Visual Studio 向 Azure 進行驗證
使用 Visual Studio 2017 或更新版本的開發人員可以透過 Visual Studio 來驗證 Microsoft Entra 帳戶。 這可讓您從 IDE 內登入 Azure 訂用帳戶,藉此存取金鑰保存庫中的秘密。
若要在 Visual Studio 中進行驗證,請從頂端導覽功能表中選取 [工具],然後選取 [選項]。 瀏覽至 [Azure 服務驗證] 選項,以使用您的使用者名稱和密碼進行登入。
使用命令列進行驗證
您必須先使用 Microsoft Entra 使用者名稱和密碼進行驗證,才能授與金鑰保存庫的存取權。
若要利用 Azure CLI 進行驗證,請執行 az login 命令。
az login
在使用預設網路瀏覽器的系統上,Azure CLI 會啟動瀏覽器來進行驗證。 針對沒有預設網頁瀏覽器的系統,az login 命令會採用裝置程式碼驗證流程。 您也可以強制 Azure CLI 採用裝置程式碼流程,而不是指定 --use-device-code 引數來啟動瀏覽器。
如果您有多個訂用帳戶,請務必選取包含金鑰保存庫的 Azure 訂用帳戶。
授與對金鑰保存庫的存取權
建立金鑰保存庫的存取原則,將祕密權限授與使用者帳戶。
若要設定存取原則,請執行 az keyvault set-policy 命令。 將 Your-Key-Vault-Name 取代為金鑰保存庫的名稱。 以您的 Microsoft Entra 使用者名稱取代 user@domain.com。
az keyvault set-policy --name Your-Key-Vault-Name --upn user@domain.com --secret-permissions delete get list set purge
建立新的 C# 應用程式
使用 Visual Studio IDE,建立新的 .NET Core 主控台應用程式。 這會建立 "Hello World" 專案,內含單一 C# 原始程式檔:program.cs。
以滑鼠右鍵按一下 [方案總管] 中的解決方案,然後選取 [管理 NuGet 套件],以安裝下列用戶端程式庫。 在開啟的套件管理員中,選取 [瀏覽] 並搜尋下列程式庫,然後針對每個程式庫選取 [安裝]:
Azure.Security.KeyVault.SecretsAzure.Identity
匯入範例程式碼
將下列範例程式碼複製到您的 program.cs 檔案中。 將 Your-Key-Secret-Name 和 Your-Endpoint-Secret-Name 取代為您在金鑰保存庫中設定的秘密名稱。
using System;
using System.Threading.Tasks;
using Azure;
using Azure.Identity;
using Azure.Security.KeyVault.Secrets;
using System.Net;

namespace key_vault_console_app
{
    class Program
    {
        static async Task Main(string[] args)
        {
            //Name of your key vault
            var keyVaultName = Environment.GetEnvironmentVariable("KEY_VAULT_NAME");

            //variables for retrieving the key and endpoint from your key vault.
            //Set these variables to the names you created for your secrets
            const string keySecretName = "Your-Key-Secret-Name";
            const string endpointSecretName = "Your-Endpoint-Secret-Name";

            //Endpoint for accessing your key vault
            var kvUri = $"https://{keyVaultName}.vault.azure.net";

            var keyVaultClient = new SecretClient(new Uri(kvUri), new DefaultAzureCredential());

            Console.WriteLine($"Retrieving your secrets from {keyVaultName}.");

            //Key and endpoint secrets retrieved from your key vault
            var keySecret = await keyVaultClient.GetSecretAsync(keySecretName);
            var endpointSecret = await keyVaultClient.GetSecretAsync(endpointSecretName);
            Console.WriteLine($"Your key secret value is: {keySecret.Value.Value}");
            Console.WriteLine($"Your endpoint secret value is: {endpointSecret.Value.Value}");
            Console.WriteLine("Secrets retrieved successfully");

        }
    }
}
執行應用程式
選取 Visual Studio 頂端的 [偵錯] 按鈕,以執行應用程式。 將會從您的金鑰保存庫擷取您的金鑰和端點秘密。
傳送測試語言服務呼叫 (選擇性)
如果您使用多服務資源或語言資源,則可以遵循下列步驟,從金鑰保存庫擷取金鑰和端點來傳送範例具名實體辨識呼叫,藉此更新您的應用程式。
以滑鼠右鍵按一下 [方案總管] 中的解決方案,然後選取 [管理 NuGet 套件],以安裝
Azure.AI.TextAnalytics程式庫。 在開啟的套件管理員中,選取 [瀏覽] 並搜尋下列程式庫,然後針對每個程式庫選取 [安裝]:將下列指示詞新增至
program.cs檔案的頂端。using Azure.AI.TextAnalytics;將下列程式碼範例新增至應用程式。
// Example method for extracting named entities from text
private static void EntityRecognitionExample(string keySecret, string endpointSecret)
{
    //String to be sent for Named Entity Recognition
    var exampleString = "I had a wonderful trip to Seattle last week.";

    AzureKeyCredential azureKeyCredential = new AzureKeyCredential(keySecret);
    Uri endpoint = new Uri(endpointSecret);
    var languageServiceClient = new TextAnalyticsClient(endpoint, azureKeyCredential);

    Console.WriteLine($"Sending a Named Entity Recognition (NER) request");
    var response = languageServiceClient.RecognizeEntities(exampleString);
    Console.WriteLine("Named Entities:");
    foreach (var entity in response.Value)
    {
        Console.WriteLine($"\tText: {entity.Text},\tCategory: {entity.Category},\tSub-Category: {entity.SubCategory}");
        Console.WriteLine($"\t\tScore: {entity.ConfidenceScore:F2},\tLength: {entity.Length},\tOffset: {entity.Offset}\n");
    }
}
使用您的金鑰和端點值來新增下列程式碼,以從您的 main 方法呼叫
EntityRecognitionExample()。EntityRecognitionExample(keySecret.Value.Value, endpointSecret.Value.Value);執行應用程式。
驗證您的應用程式
您必須先使用 Microsoft Entra 使用者名稱和密碼進行驗證,才能授與金鑰保存庫的存取權。
若要利用 Azure CLI 進行驗證,請執行 az login 命令。
az login
在使用預設網路瀏覽器的系統上,Azure CLI 會啟動瀏覽器來進行驗證。 針對沒有預設網頁瀏覽器的系統,az login 命令會採用裝置程式碼驗證流程。 您也可以強制 Azure CLI 採用裝置程式碼流程,而不是指定 --use-device-code 引數來啟動瀏覽器。
如果您有多個訂用帳戶,請務必選取包含金鑰保存庫的 Azure 訂用帳戶。
授與對金鑰保存庫的存取權
建立金鑰保存庫的存取原則,將祕密權限授與使用者帳戶。
若要設定存取原則,請執行 az keyvault set-policy 命令。 將 Your-Key-Vault-Name 取代為金鑰保存庫的名稱。 以您的 Microsoft Entra 使用者名稱取代 user@domain.com。
az keyvault set-policy --name Your-Key-Vault-Name --upn user@domain.com --secret-permissions delete get list set purge
建立 Python 應用程式
建立名為 keyVaultExample 的新資料夾。 然後使用您慣用的程式碼編輯器,在新建立的資料夾內建立名為 program.py 的檔案。
安裝 Key Vault 和語言服務套件
在終端或命令提示字元中,瀏覽至您的專案資料夾並安裝 Microsoft Entra 身分識別程式庫:
pip install azure-identity安裝 Key Vault 祕密程式庫:
pip install azure-keyvault-secrets
匯入範例程式碼
將下列範例程式碼新增至名為 program.py 的檔案。 將 Your-Key-Secret-Name 和 Your-Endpoint-Secret-Name 取代為您在金鑰保存庫中設定的秘密名稱。
import os
from azure.keyvault.secrets import SecretClient
from azure.identity import DefaultAzureCredential
from azure.core.credentials import AzureKeyCredential

keyVaultName = os.environ["KEY_VAULT_NAME"]

# Set these variables to the names you created for your secrets
keySecretName = "Your-Key-Secret-Name"
endpointSecretName = "Your-Endpoint-Secret-Name"

# URI for accessing key vault
KVUri = f"https://{keyVaultName}.vault.azure.net"

# Instantiate the client and retrieve secrets
credential = DefaultAzureCredential()
kv_client = SecretClient(vault_url=KVUri, credential=credential)

print(f"Retrieving your secrets from {keyVaultName}.")

retrieved_key = kv_client.get_secret(keySecretName).value
retrieved_endpoint = kv_client.get_secret(endpointSecretName).value

print(f"Your secret key value is {retrieved_key}.");
print(f"Your secret endpoint value is {retrieved_endpoint}.");
執行應用程式
使用下列命令執行應用程式。 將會從您的金鑰保存庫擷取您的金鑰和端點秘密。
python ./program.py
傳送測試語言服務呼叫 (選擇性)
如果您使用多服務資源或語言資源,則可以遵循下列步驟,從金鑰保存庫擷取金鑰和端點來傳送範例具名實體辨識呼叫,藉此更新您的應用程式。
安裝語言服務程式庫:
pip install azure-ai-textanalytics==5.1.0將下列程式碼新增至應用程式
from azure.ai.textanalytics import TextAnalyticsClient
# Authenticate the key vault secrets client using your key and endpoint
azure_key_credential = AzureKeyCredential(retrieved_key)
# Now you can use key vault credentials with the Language service
language_service_client = TextAnalyticsClient(
    endpoint=retrieved_endpoint,
    credential=azure_key_credential)

# Example of recognizing entities from text

print("Sending NER request")

try:
    documents = ["I had a wonderful trip to Seattle last week."]
    result = language_service_client.recognize_entities(documents = documents)[0]
    print("Named Entities:\n")
    for entity in result.entities:
        print("\tText: \t", entity.text, "\tCategory: \t", entity.category, "\tSubCategory: \t", entity.subcategory,
                "\n\tConfidence Score: \t", round(entity.confidence_score, 2), "\tLength: \t", entity.length, "\tOffset: \t", entity.offset, "\n")

except Exception as err:
    print("Encountered exception. {}".format(err))
執行應用程式。
驗證您的應用程式
您必須先使用 Microsoft Entra 使用者名稱和密碼進行驗證,才能授與金鑰保存庫的存取權。
若要利用 Azure CLI 進行驗證,請執行 az login 命令。
az login
在使用預設網路瀏覽器的系統上,Azure CLI 會啟動瀏覽器來進行驗證。 針對沒有預設網頁瀏覽器的系統,az login 命令會採用裝置程式碼驗證流程。 您也可以強制 Azure CLI 採用裝置程式碼流程,而不是指定 --use-device-code 引數來啟動瀏覽器。
如果您有多個訂用帳戶,請務必選取包含金鑰保存庫的 Azure 訂用帳戶。
授與對金鑰保存庫的存取權
建立金鑰保存庫的存取原則,將祕密權限授與使用者帳戶。
若要設定存取原則,請執行 az keyvault set-policy 命令。 將 Your-Key-Vault-Name 取代為金鑰保存庫的名稱。 以您的 Microsoft Entra 使用者名稱取代 user@domain.com。
az keyvault set-policy --name Your-Key-Vault-Name --upn user@domain.com --secret-permissions delete get list set purge
建立 Java 應用程式
在慣用的 IDE 中,建立新的 JAVA 主控台應用程式專案,並建立名為 Example 的類別。
新增相依性
在您的專案中,將下列相依性新增至您的 pom.xml 檔案。
<dependencies>

        <dependency>
            <groupId>com.azure</groupId>
            <artifactId>azure-security-keyvault-secrets</artifactId>
            <version>4.2.3</version>
        </dependency>
        <dependency>
            <groupId>com.azure</groupId>
            <artifactId>azure-identity</artifactId>
            <version>1.2.0</version>
        </dependency>
    </dependencies>
匯入範例程式碼
將下列程式碼複製到名為 Example.java 的檔案中。 將 Your-Key-Secret-Name 和 Your-Endpoint-Secret-Name 取代為您在金鑰保存庫中設定的秘密名稱。
import com.azure.identity.DefaultAzureCredentialBuilder;
import com.azure.security.keyvault.secrets.SecretClient;
import com.azure.security.keyvault.secrets.SecretClientBuilder;
import com.azure.core.credential.AzureKeyCredential;

public class Example {

    public static void main(String[] args) {

        String keyVaultName = System.getenv("KEY_VAULT_NAME");
        String keyVaultUri = "https://" + keyVaultName + ".vault.azure.net";

        //variables for retrieving the key and endpoint from your key vault.
        //Set these variables to the names you created for your secrets
        String keySecretName = "Your-Key-Secret-Name";
        String endpointSecretName = "Your-Endpoint-Secret-Name";

        //Create key vault secrets client
        SecretClient secretClient = new SecretClientBuilder()
                .vaultUrl(keyVaultUri)
                .credential(new DefaultAzureCredentialBuilder().build())
                .buildClient();

        //retrieve key and endpoint from key vault
        String keyValue = secretClient.getSecret(keySecretName).getValue();
        String endpointValue = secretClient.getSecret(endpointSecretName).getValue();
        System.out.printf("Your secret key value is: %s", keyValue)
        System.out.printf("Your secret endpoint value is: %s", endpointValue)
    }
}
傳送測試語言服務呼叫 (選擇性)
如果您使用多服務資源或語言資源,則可以遵循下列步驟,從金鑰保存庫擷取金鑰和端點來傳送範例具名實體辨識呼叫,藉此更新您的應用程式。
在您的應用程式中,新增下列相依性:
<dependency>
    <groupId>com.azure</groupId>
    <artifactId>azure-ai-textanalytics</artifactId>
    <version>5.1.12</version>
</dependency>
在您的檔案中新增下列 import 陳述式。
import com.azure.ai.textanalytics.models.*;
import com.azure.ai.textanalytics.TextAnalyticsClientBuilder;
import com.azure.ai.textanalytics.TextAnalyticsClient;
將下列程式碼新增到您應用程式中的
main()方法:TextAnalyticsClient languageClient = new TextAnalyticsClientBuilder() .credential(new AzureKeyCredential(keyValue)) .endpoint(endpointValue) .buildClient(); // Example for recognizing entities in text String text = "I had a wonderful trip to Seattle last week."; for (CategorizedEntity entity : languageClient.recognizeEntities(text)) { System.out.printf( "Recognized entity: %s, entity category: %s, entity sub-category: %s, score: %s, offset: %s, length: %s.%n", entity.getText(), entity.getCategory(), entity.getSubcategory(), entity.getConfidenceScore(), entity.getOffset(), entity.getLength()); }執行您的應用程式
驗證您的應用程式
您必須先使用 Microsoft Entra 使用者名稱和密碼進行驗證,才能授與金鑰保存庫的存取權。
若要利用 Azure CLI 進行驗證,請執行 az login 命令。
az login
在使用預設網路瀏覽器的系統上,Azure CLI 會啟動瀏覽器來進行驗證。 針對沒有預設網頁瀏覽器的系統,az login 命令會採用裝置程式碼驗證流程。 您也可以強制 Azure CLI 採用裝置程式碼流程,而不是指定 --use-device-code 引數來啟動瀏覽器。
如果您有多個訂用帳戶,請務必選取包含金鑰保存庫的 Azure 訂用帳戶。
授與對金鑰保存庫的存取權
建立金鑰保存庫的存取原則,將祕密權限授與使用者帳戶。
若要設定存取原則,請執行 az keyvault set-policy 命令。 將 Your-Key-Vault-Name 取代為金鑰保存庫的名稱。 以您的 Microsoft Entra 使用者名稱取代 user@domain.com。
az keyvault set-policy --name Your-Key-Vault-Name --upn user@domain.com --secret-permissions delete get list set purge
建立新的 Node.js 應用程式
建立一個使用金鑰保存庫的 Node.js 應用程式。
在終端機建立名為 key-vault-js-example 的資料夾,並切換至該資料夾:
mkdir key-vault-js-example && cd key-vault-js-example
初始化 Node.js 專案:
npm init -y
安裝 Key Vault 和語言服務套件
使用終端機,針對 Node.js 安裝 Azure Key Vault 祕密程式庫 @azure/keyvault-secrets。
npm install @azure/keyvault-secrets安裝 Azure 身分識別程式庫 @azure/identity 封裝,以向 Key Vault 進行驗證。
npm install @azure/identity
匯入程式碼範例
將下列範例程式碼新增至名為 index.js 的檔案。 將 Your-Key-Secret-Name 和 Your-Endpoint-Secret-Name 取代為您在金鑰保存庫中設定的秘密名稱。
const { SecretClient } = require("@azure/keyvault-secrets");
const { DefaultAzureCredential } = require("@azure/identity");
// Load the .env file if it exists
const dotenv = require("dotenv");
dotenv.config();

async function main() {
    const credential = new DefaultAzureCredential();

    const keyVaultName = process.env["KEY_VAULT_NAME"];
    const url = "https://" + keyVaultName + ".vault.azure.net";

    const kvClient = new SecretClient(url, credential);

    // Set these variables to the names you created for your secrets
    const keySecretName = "Your-Key-Secret-Name";
    const endpointSecretName = "Your-Endpoint-Secret-Name";

    console.log("Retrieving secrets from ", keyVaultName);
    const retrievedKey = await (await kvClient.getSecret(keySecretName)).value;
    const retrievedEndpoint = await (await kvClient.getSecret(endpointSecretName)).value;
    console.log("Your secret key value is: ", retrievedKey);
    console.log("Your secret endpoint value is: ", retrievedEndpoint);
}

main().catch((error) => {
  console.error("An error occurred:", error);
  process.exit(1);
});
執行範例應用程式
使用下列命令執行應用程式。 將會從您的金鑰保存庫擷取您的金鑰和端點秘密。
node index.js
傳送測試語言服務呼叫 (選擇性)
如果您使用多服務資源或語言資源,則可以遵循下列步驟,從金鑰保存庫擷取金鑰和端點來傳送範例具名實體辨識呼叫,藉此更新您的應用程式。
安裝適用於語言的 Azure AI 服務程式庫 (@azure/ai-text-analytics),以將 API 要求傳送至語言服務。
npm install @azure/ai-text-analytics@5.1.0將下列程式碼新增到您的應用程式:
const { TextAnalyticsClient, AzureKeyCredential } = require("@azure/ai-text-analytics");
// Authenticate the language client with your key and endpoint
const languageClient = new TextAnalyticsClient(retrievedEndpoint,  new AzureKeyCredential(retrievedKey));

// Example for recognizing entities in text
console.log("Sending NER request")
const entityInputs = [
    "I had a wonderful trip to Seattle last week."
];
const entityResults = await languageClient.recognizeEntities(entityInputs);
entityResults.forEach(document => {
    console.log(`Document ID: ${document.id}`);
    document.entities.forEach(entity => {
        console.log(`\tName: ${entity.text} \tCategory: ${entity.category} \tSubcategory: ${entity.subCategory ? entity.subCategory : "N/A"}`);
        console.log(`\tScore: ${entity.confidenceScore}`);
    });
});
執行應用程式。
下一步
- 如需可與 Azure Key Vault 一起開發的功能,請參閱什麼是 Azure AI 服務。
- 如需安全應用程式開發的其他資訊,請參閱: