在 Azure Machine Learning 中使用 Apache Spark 進行互動式資料整頓
資料整頓將成為機器學習專案中最重要的步驟之一。 Azure Machine Learning 整合,搭配 Azure Synapse Analytics,可讓您存取 Apache Spark 集區 (由 Azure Synapse 支援),以使用 Azure Machine Learning Notebooks 進行互動式資料整頓。
在本文中,您將了解如何使用以下資源執行資料整頓
- 無伺服器 Spark 計算
- 連結的 Synapse Spark 集區
必要條件
- Azure 訂用帳戶;如果您沒有 Azure 訂用帳戶,請在開始前建立免費帳戶。
- Azure Machine Learning 工作區。 請參閱建立工作區資源。
- Azure Data Lake Storage (ADLS) Gen 2 儲存體帳戶。 請參閱建立 Azure Data Lake Storage (ADLS) Gen 2 儲存體帳戶。
- (選擇性):Azure Key Vault。 請參閱建立 Azure Key Vault。
- (選擇性):服務主體。 請參閱建立服務主體。
- (選擇性):Azure Machine Learning 工作區中連結的 Synapse Spark 集區。
開始資料整頓工作之前,請先了解儲存秘密的流程
- Azure Blob 儲存體帳戶存取金鑰
- 共用存取簽章 (SAS) 權杖
- Azure Data Lake Storage (ADLS) Gen 2 服務主體資訊
才能開始處理資料整頓工作。 您也必須知道如何處理 Azure 儲存體帳戶中的角色指派。 下列各節將複習這些概念。 然後,我們將使用 Azure Machine Learning Notebooks 中的 Spark 集區來探索互動式資料整頓的細節。
提示
若要了解 Azure 儲存體帳戶角色指派設定,或如果您使用使用者身分識別傳遞來存取您的儲存體帳戶中的資料,請參閱在 Azure 儲存體帳戶中新增角色指派。
使用 Apache Spark 進行互動式資料整頓
Azure Machine Learning 提供無伺服器 Spark 計算,以及連結的 Synapse Spark 集區,讓您在 Azure Machine Learning Notebooks 中使用 Apache Spark 進行互動式資料整頓。 無伺服器 Spark 計算不需要在 Azure Synapse 工作區中建立資源。 相反地,完全受控的無伺服器 Spark 計算可直接在 Azure Machine Learning Notebooks 中取得。 使用無伺服器 Spark 計算是存取 Azure Machine Learning 中 Spark 叢集的最簡單方法。
Azure Machine Learning Notebooks 中的無伺服器 Spark 計算
依預設,會在 Azure Machine Learning Notebooks 中提供無伺服器 Spark 計算。 若要在 Notebook 中存取它,請從 [計算] 選取功能表中的 [Azure Machine Learning 無伺服器 Spark] 下選取 [無伺服器 Spark 計算]。
Notebooks UI 也提供 Spark 工作階段設定的選項,適用於無伺服器 Spark 計算。 若要設定 Spark 工作階段:
- 選取畫面頂部的 [設定工作階段]。
- 從下拉式功能表中選取 [Apache Spark 版本]。
重要
適用於 Apache Spark 的 Azure Synapse Runtime:公告
- 適用於 Apache Spark 3.2 的 Azure Synapse Runtime:
- EOLA 公告日期:2023 年 7 月 8 日
- 支援結束日期:2024 年 7 月 8 日。 在此日期之後,將會停用執行階段。
- 為了獲得持續的支援和最佳效能,我們建議您移轉到 Apache Spark 3.3。
- 適用於 Apache Spark 3.2 的 Azure Synapse Runtime:
- 從下拉式功能表中選取 [執行個體類型]。 目前支援下列執行個體類型:
Standard_E4s_v3Standard_E8s_v3Standard_E16s_v3Standard_E32s_v3Standard_E64s_v3
- 輸入 Spark [工作階段逾時] 值 (以分鐘為單位)。
- 選取是否要動態配置執行程式
- 選取 Spark 工作階段的 [執行程式] 數目。
- 從下拉式功能表中選取 [執行程式大小]。
- 從下拉式功能表中選取 [驅動程式大小]。
- 若要使用 Conda 檔案來設定 Spark 工作階段,請核取 [上傳 Conda 檔案] 核取方塊。 然後選取 [瀏覽],並選擇具有您想要之 Spark 工作階段組態的 Conda 檔案。
- 新增 [組態設定] 屬性,在 [屬性] 和 [值] 文字方塊中輸入值,然後選取 [新增]。
- 選取套用。
- 在 [設定新工作階段?] 快顯視窗中選取 [停止工作階段]。
工作階段組態變更會保存,並可供使用無伺服器 Spark 計算啟動的另一個 Notebook 工作階段使用。
提示
如果您使用工作階段層級 Conda 套件,則可在將組態變數 spark.hadoop.aml.enable_cache 設為 true 時改善 Spark 工作階段的冷啟動時間。 工作階段第一次啟動時,使用工作階段層級 Conda 套件的工作階段冷啟動通常需要 10 到 15 分鐘。 不過,將組態變數設為 true 的後續工作階段冷啟動通常需要三到五分鐘。
從 Azure Data Lake Storage (ADLS) Gen 2 匯入和整頓資料
您可以從以下兩種資料存取機制中擇一使用,透過 abfss:// 資料 URI 存取並整頓 Azure Data Lake Storage (ADLS) Gen 2 儲存體帳戶中儲存的資料:
- 使用者身分識別傳遞
- 服務主體型資料存取
提示
使用無伺服器 Spark 計算的資料整頓,搭配以使用者身分識別傳遞來存取 Azure Data Lake Storage (ADLS) Gen 2 儲存體帳戶中的資料,需要最少的設定步驟。
若要透過使用者身分識別傳遞啟動互動式資料整頓:
確認使用者身分識別在 Azure Data Lake Storage (ADLS) Gen 2 儲存體帳戶中具有參與者和儲存體 Blob 資料參與者角色指派。
若要使用無伺服器 Spark 計算,請從 [計算] 選取功能表中的 [Azure Machine Learning 無伺服器 Spark] 底下選取 [無伺服器 Spark 計算]。
若要使用連結的 Synapse Spark 集區,請從 [計算] 選取功能表中的 [Synapse Spark 集區] 底下選取連結的 Synapse Spark 集區。
此 Titanic 資料整頓程式碼範例示範如何使用格式為
abfss://<FILE_SYSTEM_NAME>@<STORAGE_ACCOUNT_NAME>.dfs.core.windows.net/<PATH_TO_DATA>的資料 URI 以及pyspark.pandas和pyspark.ml.feature.Imputer。import pyspark.pandas as pd from pyspark.ml.feature import Imputer df = pd.read_csv( "abfss://<FILE_SYSTEM_NAME>@<STORAGE_ACCOUNT_NAME>.dfs.core.windows.net/data/titanic.csv", index_col="PassengerId", ) imputer = Imputer(inputCols=["Age"], outputCol="Age").setStrategy( "mean" ) # Replace missing values in Age column with the mean value df.fillna( value={"Cabin": "None"}, inplace=True ) # Fill Cabin column with value "None" if missing df.dropna(inplace=True) # Drop the rows which still have any missing value df.to_csv( "abfss://<FILE_SYSTEM_NAME>@<STORAGE_ACCOUNT_NAME>.dfs.core.windows.net/data/wrangled", index_col="PassengerId", )注意
此 Python 程式碼範例會使用
pyspark.pandas。 只有 Spark 執行階段 3.2 版或更新版本才支援此功能。
若要以透過服務主體存取的方式整頓資料:
確認服務主體在 Azure Data Lake Storage (ADLS) Gen 2 儲存體帳戶中具有參與者和儲存體 Blob 資料參與者角色指派。
為服務主體租用戶識別碼、用戶端識別碼和用戶端密碼值建立 Azure Key Vault 秘密。
從 [計算] 選取功能表中的 [Azure Machine Learning 無伺服器 Spark] 底下選取 [無伺服器 Spark 計算],或是從 [計算] 選取功能表中的 [Synapse Spark 集區] 底下選取連結的 Synapse Spark 集區。
在組態中設定服務主體租用戶識別碼、用戶端識別碼和用戶端密碼,然後執行下列程式碼範例。
程式碼中的
get_secret()呼叫取決於 Azure Key Vault 的名稱,以及為服務主體租用戶識別碼、用戶端識別碼和用戶端密碼建立的 Azure Key Vault 秘密的名稱。 在組態中設定這些對應的屬性名稱/值:- 用戶端識別碼屬性:
fs.azure.account.oauth2.client.id.<STORAGE_ACCOUNT_NAME>.dfs.core.windows.net - 用戶端密碼屬性:
fs.azure.account.oauth2.client.secret.<STORAGE_ACCOUNT_NAME>.dfs.core.windows.net - 租用戶識別碼屬性:
fs.azure.account.oauth2.client.endpoint.<STORAGE_ACCOUNT_NAME>.dfs.core.windows.net - 租用戶識別碼值:
https://login.microsoftonline.com/<TENANT_ID>/oauth2/token
from pyspark.sql import SparkSession sc = SparkSession.builder.getOrCreate() token_library = sc._jvm.com.microsoft.azure.synapse.tokenlibrary.TokenLibrary # Set up service principal tenant ID, client ID and secret from Azure Key Vault client_id = token_library.getSecret("<KEY_VAULT_NAME>", "<CLIENT_ID_SECRET_NAME>") tenant_id = token_library.getSecret("<KEY_VAULT_NAME>", "<TENANT_ID_SECRET_NAME>") client_secret = token_library.getSecret("<KEY_VAULT_NAME>", "<CLIENT_SECRET_NAME>") # Set up service principal which has access of the data sc._jsc.hadoopConfiguration().set( "fs.azure.account.auth.type.<STORAGE_ACCOUNT_NAME>.dfs.core.windows.net", "OAuth" ) sc._jsc.hadoopConfiguration().set( "fs.azure.account.oauth.provider.type.<STORAGE_ACCOUNT_NAME>.dfs.core.windows.net", "org.apache.hadoop.fs.azurebfs.oauth2.ClientCredsTokenProvider", ) sc._jsc.hadoopConfiguration().set( "fs.azure.account.oauth2.client.id.<STORAGE_ACCOUNT_NAME>.dfs.core.windows.net", client_id, ) sc._jsc.hadoopConfiguration().set( "fs.azure.account.oauth2.client.secret.<STORAGE_ACCOUNT_NAME>.dfs.core.windows.net", client_secret, ) sc._jsc.hadoopConfiguration().set( "fs.azure.account.oauth2.client.endpoint.<STORAGE_ACCOUNT_NAME>.dfs.core.windows.net", "https://login.microsoftonline.com/" + tenant_id + "/oauth2/token", )- 用戶端識別碼屬性:
使用格式為
abfss://<FILE_SYSTEM_NAME>@<STORAGE_ACCOUNT_NAME>.dfs.core.windows.net/<PATH_TO_DATA>的資料 URI 匯入和整頓資料,如使用 Titanic 資料的程式碼範例所示。
從 Azure Blob 儲存體匯入和整頓資料
您可以使用儲存體帳戶存取金鑰或共用存取簽章 (SAS) 權杖來存取 Azure Blob 儲存體資料。 您應該將這些認證儲存為 Azure Key Vault 中的秘密,並設定為工作階段組態中的屬性。
若要啟動互動式資料整頓:
在 Azure Machine Learning 工作室左側面板選取 [Notebooks]。
從 [計算] 選取功能表中的 [Azure Machine Learning 無伺服器 Spark] 底下選取 [無伺服器 Spark 計算],或是從 [計算] 選取功能表中的 [Synapse Spark 集區] 底下選取連結的 Synapse Spark 集區。
若要在 Azure Machine Learning Notebooks 中設定用於資料存取的儲存體帳戶存取金鑰或共用存取簽章 (SAS) 權杖:
針對存取金鑰,請設定屬性
fs.azure.account.key.<STORAGE_ACCOUNT_NAME>.blob.core.windows.net,如下列程式碼片段所示:from pyspark.sql import SparkSession sc = SparkSession.builder.getOrCreate() token_library = sc._jvm.com.microsoft.azure.synapse.tokenlibrary.TokenLibrary access_key = token_library.getSecret("<KEY_VAULT_NAME>", "<ACCESS_KEY_SECRET_NAME>") sc._jsc.hadoopConfiguration().set( "fs.azure.account.key.<STORAGE_ACCOUNT_NAME>.blob.core.windows.net", access_key )針對 SAS 權杖,請設定屬性
fs.azure.sas.<BLOB_CONTAINER_NAME>.<STORAGE_ACCOUNT_NAME>.blob.core.windows.net,如下列程式碼片段所示:from pyspark.sql import SparkSession sc = SparkSession.builder.getOrCreate() token_library = sc._jvm.com.microsoft.azure.synapse.tokenlibrary.TokenLibrary sas_token = token_library.getSecret("<KEY_VAULT_NAME>", "<SAS_TOKEN_SECRET_NAME>") sc._jsc.hadoopConfiguration().set( "fs.azure.sas.<BLOB_CONTAINER_NAME>.<STORAGE_ACCOUNT_NAME>.blob.core.windows.net", sas_token, )注意
上述程式碼片段中的
get_secret()呼叫需要 Azure Key Vault 的名稱,以及為 Azure Blob 儲存體帳戶存取金鑰或 SAS 權杖建立的秘密名稱
在相同的筆記本中執行資料整頓程式碼。 將資料 URI 格式化為
wasbs://<BLOB_CONTAINER_NAME>@<STORAGE_ACCOUNT_NAME>.blob.core.windows.net/<PATH_TO_DATA>,類似此程式碼片段所示:import pyspark.pandas as pd from pyspark.ml.feature import Imputer df = pd.read_csv( "wasbs://<BLOB_CONTAINER_NAME>@<STORAGE_ACCOUNT_NAME>.blob.core.windows.net/data/titanic.csv", index_col="PassengerId", ) imputer = Imputer(inputCols=["Age"], outputCol="Age").setStrategy( "mean" ) # Replace missing values in Age column with the mean value df.fillna( value={"Cabin": "None"}, inplace=True ) # Fill Cabin column with value "None" if missing df.dropna(inplace=True) # Drop the rows which still have any missing value df.to_csv( "wasbs://<BLOB_CONTAINER_NAME>@<STORAGE_ACCOUNT_NAME>.blob.core.windows.net/data/wrangled", index_col="PassengerId", )注意
此 Python 程式碼範例會使用
pyspark.pandas。 只有 Spark 執行階段 3.2 版或更新版本才支援此功能。
從 Azure Machine Learning 資料存放區匯入和整頓資料
若要從 Azure Machine Learning 資料存放區存取資料,請使用 URI 格式azureml://datastores/<DATASTORE_NAME>/paths/<PATH_TO_DATA> 來定義資料存放區上資料的路徑。 若要在 Notebooks 工作階段中以互動方式整頓 Azure Machine Learning 資料存放區中的資料:
從 [計算] 選取功能表中的 [Azure Machine Learning 無伺服器 Spark] 底下選取 [無伺服器 Spark 計算],或是從 [計算] 選取功能表中的 [Synapse Spark 集區] 底下選取連結的 Synapse Spark 集區。
此程式碼範例示範如何使用資料
azureml://存放區 URIpyspark.pandas和pyspark.ml.feature.Imputer,從 Azure Machine Learning 資料存放區讀取和整頓 Titanic 資料。import pyspark.pandas as pd from pyspark.ml.feature import Imputer df = pd.read_csv( "azureml://datastores/workspaceblobstore/paths/data/titanic.csv", index_col="PassengerId", ) imputer = Imputer(inputCols=["Age"], outputCol="Age").setStrategy( "mean" ) # Replace missing values in Age column with the mean value df.fillna( value={"Cabin": "None"}, inplace=True ) # Fill Cabin column with value "None" if missing df.dropna(inplace=True) # Drop the rows which still have any missing value df.to_csv( "azureml://datastores/workspaceblobstore/paths/data/wrangled", index_col="PassengerId", )注意
此 Python 程式碼範例會使用
pyspark.pandas。 只有 Spark 執行階段 3.2 版或更新版本才支援此功能。
Azure Machine Learning 資料存放區可以使用 Azure 儲存體帳戶認證來存取資料
- 存取金鑰
- SAS 權杖
- 服務主體
或提供無認證資料存取。 視資料存放區類型和基礎 Azure 儲存體帳戶類型而定,選取適當的驗證機制以確保順利存取資料。 下表摘述了存取 Azure Machine Learning 資料存放區中資料的驗證機制:
| Storage account type | 無認證資料存取 | 資料存取機制 | 角色指派 |
|---|---|---|---|
| Azure Blob | No | 存取金鑰或 SAS 權杖 | 不需要角色指派 |
| Azure Blob | Yes | 使用者身分識別傳遞* | 在 Azure Blob 儲存體帳戶中,使用者身分識別應有適當的角色指派 |
| Azure Data Lake Storage (ADLS) Gen 2 | No | 服務主體 | 在 Azure Data Lake Storage (ADLS) Gen 2 儲存體帳戶中,服務主體應有適當的角色指派 |
| Azure Data Lake Storage (ADLS) Gen 2 | Yes | 使用者身分識別傳遞 | 在 Azure Data Lake Storage (ADLS) Gen 2 儲存體帳戶中,使用者身分識別應有適當的角色指派 |
* 只有在未啟用虛刪除時,使用者身分識別傳遞才適用於指向 Azure Blob 儲存體帳戶的無認證資料存放區。
存取預設檔案共用上的資料
預設檔案共用會裝載至無伺服器 Spark 計算和連結的 Synapse Spark 集區。
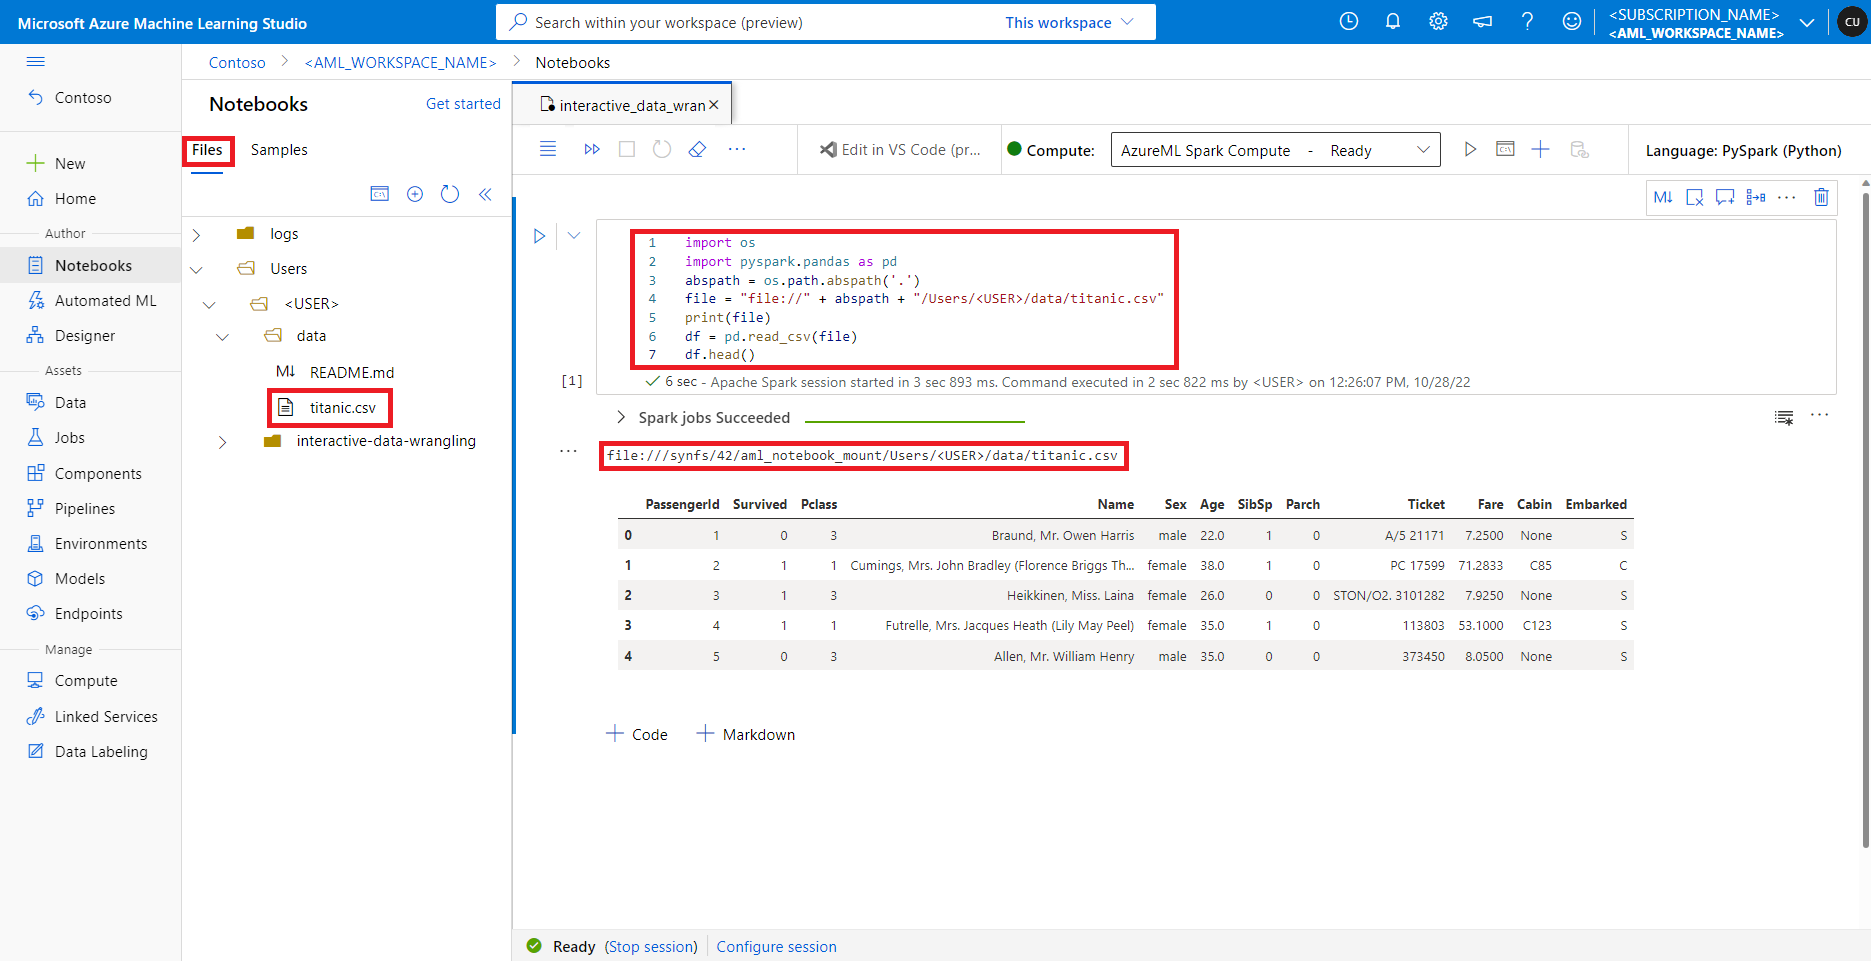
在 Azure Machine Learning Studio 中,預設檔案共用中的檔案會顯示在 [檔案] 索引標籤下的目錄樹狀結構中。Notebook 程式碼可以透過 file:// 通訊協定直接存取儲存在此檔案共用中的檔案 (以及檔案的絕對路徑),而無需進行更多的設定。 此程式碼片段示範如何存取儲存在預設檔案共用上的檔案:
import os
import pyspark.pandas as pd
from pyspark.ml.feature import Imputer

abspath = os.path.abspath(".")
file = "file://" + abspath + "/Users/<USER>/data/titanic.csv"
print(file)
df = pd.read_csv(file, index_col="PassengerId")
imputer = Imputer(
    inputCols=["Age"],
    outputCol="Age").setStrategy("mean") # Replace missing values in Age column with the mean value
df.fillna(value={"Cabin" : "None"}, inplace=True) # Fill Cabin column with value "None" if missing
df.dropna(inplace=True) # Drop the rows which still have any missing value
output_path = "file://" + abspath + "/Users/<USER>/data/wrangled"
df.to_csv(output_path, index_col="PassengerId")
注意
此 Python 程式碼範例會使用 pyspark.pandas。 只有 Spark 執行階段 3.2 版或更新版本才支援此功能。