使用 Azure Resource Manager 樣本指派 Azure 角色
Azure 角色型存取控制 (Azure RBAC) 是您用來管理 Azure 資源的存取權的授權系統。 若要授與存取權,您可以將角色指派給特定範圍的使用者、群組、服務主體或受控識別。 除了使用 Azure PowerShell 或 Azure CLI 之外,您還可以使用 Azure Resource Manager 範本來指派角色。 如果您需要一致且重複地部署資源,範本會很有説明。 本文說明如何使用範本指派角色。
注意
Bicep 是可定義 Azure 資源的一種新語言。 其撰寫體驗比 JSON 更簡單,還有其他功能可協助改善基礎結構即程式碼的品質。 對於 Azure 上不熟悉基礎結構即程式碼的任何人,建議使用 Bicep,而不是 JSON。
若要瞭解如何使用 Bicep 定義角色指派,請參閱 使用 Bicep 建立 Azure RBAC 資源。 如需快速入門範例,請參閱 快速入門:使用 Bicep 指派 Azure 角色。
必要條件
若要指派 Azure 角色,您必須具備:
Microsoft.Authorization/roleAssignments/write許可權,例如角色型 存取控制 管理員 istrator 或 User Access 管理員 istrator
您必須使用下列版本:
2018-09-01-preview或更新版本將 Azure 角色指派給新的服務主體2020-04-01-preview或更新版本在資源範圍指派 Azure 角色2022-04-01是第一個穩定版本
如需詳細資訊,請參閱 Azure RBAC REST API 的 API 版本。
取得物件識別碼
若要指派角色,您必須指定您要指派角色的使用者、群組或應用程式識別碼。 標識碼的格式為: 11111111-1111-1111-1111-111111111111。 您可以使用 Azure 入口網站、Azure PowerShell 或 Azure CLI 來取得識別符。
User
若要取得使用者的標識碼,您可以使用 Get-AzADUser 或 az ad user show 命令。
$objectid = (Get-AzADUser -DisplayName "{name}").id
objectid=$(az ad user show --id "{email}" --query id --output tsv)
群組
若要取得群組的標識符,您可以使用 Get-AzADGroup 或 az ad group show 命令。
$objectid = (Get-AzADGroup -DisplayName "{name}").id
objectid=$(az ad group show --group "{name}" --query id --output tsv)
受控識別
若要取得受控識別的標識符,您可以使用 Get-AzAdServiceprincipal 或 az ad sp 命令。
$objectid = (Get-AzADServicePrincipal -DisplayName <Azure resource name>).id
objectid=$(az ad sp list --display-name <Azure resource name> --query [].id --output tsv)
應用程式
若要取得服務主體的標識碼(應用程式所使用的身分識別),您可以使用 Get-AzADServicePrincipal 或 az ad sp list 命令。 針對服務主體,請使用物件標識碼, 而不是 應用程式識別碼。
$objectid = (Get-AzADServicePrincipal -DisplayName "{name}").id
objectid=$(az ad sp list --display-name "{name}" --query [].id --output tsv)
指派 Azure 角色
在 Azure RBAC 中,若要授與存取權,您可以指派角色。
資源群組範圍 (不含參數)
下列範本顯示指派角色的基本方式。 範本內會指定某些值。 下列範本示範:
若要使用範本,您必須執行下列動作:
- 建立新的 JSON 檔案並複製範本
- 將取代
<your-principal-id>為要指派角色的使用者、群組、受控識別或應用程式識別碼
{
    "$schema": "https://schema.management.azure.com/schemas/2015-01-01/deploymentTemplate.json#",
    "contentVersion": "1.0.0.0",
    "resources": [
        {
            "type": "Microsoft.Authorization/roleAssignments",
            "apiVersion": "2022-04-01",
            "name": "[guid(resourceGroup().id)]",
            "properties": {
                "roleDefinitionId": "[concat('/subscriptions/', subscription().subscriptionId, '/providers/Microsoft.Authorization/roleDefinitions/', 'acdd72a7-3385-48ef-bd42-f606fba81ae7')]",
                "principalId": "<your-principal-id>"
            }
        }
    ]
}
以下是 New-AzResourceGroupDeployment 和 az deployment group create 命令範例,說明如何在名為 ExampleGroup 的資源群組中啟動部署。
New-AzResourceGroupDeployment -ResourceGroupName ExampleGroup -TemplateFile rbac-test.json
az deployment group create --resource-group ExampleGroup --template-file rbac-test.json
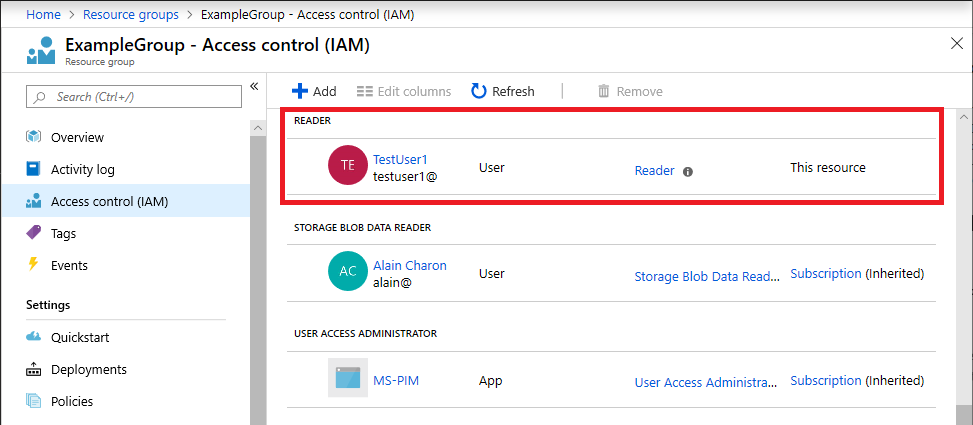
以下顯示部署範本之後,針對資源群組的使用者指派讀者角色指派的範例。
資源群組或訂用帳戶範圍
上一個範本沒有彈性。 下列範本使用參數,而且可用於不同的範圍。 下列範本示範:
- 如何將角色指派給資源群組或訂用帳戶範圍的使用者、群組或應用程式
- 如何將擁有者、參與者和讀者角色指定為參數
若要使用範本,您必須指定下列輸入:
- 要指派角色的使用者、群組、受控識別或應用程式標識碼
- 將用於角色指派的唯一標識碼,或者您可以使用預設標識碼
{
    "$schema": "https://schema.management.azure.com/schemas/2015-01-01/deploymentTemplate.json#",
    "contentVersion": "1.0.0.0",
    "parameters": {
        "principalId": {
            "type": "string",
            "metadata": {
                "description": "The principal to assign the role to"
            }
        },
        "builtInRoleType": {
            "type": "string",
            "allowedValues": [
                "Owner",
                "Contributor",
                "Reader"
            ],
            "metadata": {
                "description": "Built-in role to assign"
            }
        },
        "roleNameGuid": {
            "type": "string",
            "defaultValue": "[newGuid()]",
            "metadata": {
                "description": "A new GUID used to identify the role assignment"
            }
        }
    },
    "variables": {
        "Owner": "[concat('/subscriptions/', subscription().subscriptionId, '/providers/Microsoft.Authorization/roleDefinitions/', '8e3af657-a8ff-443c-a75c-2fe8c4bcb635')]",
        "Contributor": "[concat('/subscriptions/', subscription().subscriptionId, '/providers/Microsoft.Authorization/roleDefinitions/', 'b24988ac-6180-42a0-ab88-20f7382dd24c')]",
        "Reader": "[concat('/subscriptions/', subscription().subscriptionId, '/providers/Microsoft.Authorization/roleDefinitions/', 'acdd72a7-3385-48ef-bd42-f606fba81ae7')]"
    },
    "resources": [
        {
            "type": "Microsoft.Authorization/roleAssignments",
            "apiVersion": "2022-04-01",
            "name": "[parameters('roleNameGuid')]",
            "properties": {
                "roleDefinitionId": "[variables(parameters('builtInRoleType'))]",
                "principalId": "[parameters('principalId')]"
            }
        }
    ]
}
注意
除非為範本的每個部署提供相同的值做為參數,否則此範本不具 roleNameGuid 等冪性。 roleNameGuid如果未提供 ,則預設會在每個部署上產生新的 GUID,後續部署將會失敗併產生Conflict: RoleAssignmentExists錯誤。
角色指派的範圍取決於部署層級。 以下是 New-AzResourceGroupDeployment 和 az deployment group create 命令範例,說明如何在資源群組範圍啟動部署。
New-AzResourceGroupDeployment -ResourceGroupName ExampleGroup -TemplateFile rbac-test.json -principalId $objectid -builtInRoleType Reader
az deployment group create --resource-group ExampleGroup --template-file rbac-test.json --parameters principalId=$objectid builtInRoleType=Reader
以下是 New-AzDeployment 和 az deployment sub create 命令範例,說明如何在訂用帳戶範圍啟動部署並指定位置。
New-AzDeployment -Location centralus -TemplateFile rbac-test.json -principalId $objectid -builtInRoleType Reader
az deployment sub create --location centralus --template-file rbac-test.json --parameters principalId=$objectid builtInRoleType=Reader
資源範圍
如果您需要在資源層級指派角色,請將角色指派上的 屬性設定 scope 為資源的名稱。
下列範本示範:
- 如何建立新的記憶體帳戶
- 如何將角色指派給記憶體帳戶範圍中的使用者、群組或應用程式
- 如何將擁有者、參與者和讀者角色指定為參數
若要使用範本,您必須指定下列輸入:
- 要指派角色的使用者、群組、受控識別或應用程式標識碼
{
    "$schema": "https://schema.management.azure.com/schemas/2019-04-01/deploymentTemplate.json#",
    "contentVersion": "1.0.0.0",
    "parameters": {
        "principalId": {
            "type": "string",
            "metadata": {
                "description": "The principal to assign the role to"
            }
        },
        "builtInRoleType": {
            "type": "string",
            "allowedValues": [
                "Owner",
                "Contributor",
                "Reader"
            ],
            "metadata": {
                "description": "Built-in role to assign"
            }
        },
        "roleNameGuid": {
            "type": "string",
            "defaultValue": "[newGuid()]",
            "metadata": {
                "description": "A new GUID used to identify the role assignment"
            }
        },
        "location": {
            "type": "string",
            "defaultValue": "[resourceGroup().location]"
        }
    },
    "variables": {
        "Owner": "[concat('/subscriptions/', subscription().subscriptionId, '/providers/Microsoft.Authorization/roleDefinitions/', '8e3af657-a8ff-443c-a75c-2fe8c4bcb635')]",
        "Contributor": "[concat('/subscriptions/', subscription().subscriptionId, '/providers/Microsoft.Authorization/roleDefinitions/', 'b24988ac-6180-42a0-ab88-20f7382dd24c')]",
        "Reader": "[concat('/subscriptions/', subscription().subscriptionId, '/providers/Microsoft.Authorization/roleDefinitions/', 'acdd72a7-3385-48ef-bd42-f606fba81ae7')]",
        "storageName": "[concat('storage', uniqueString(resourceGroup().id))]"
    },
    "resources": [
        {
            "apiVersion": "2019-04-01",
            "type": "Microsoft.Storage/storageAccounts",
            "name": "[variables('storageName')]",
            "location": "[parameters('location')]",
            "sku": {
                "name": "Standard_LRS"
            },
            "kind": "Storage",
            "properties": {}
        },
        {
            "type": "Microsoft.Authorization/roleAssignments",
            "apiVersion": "2022-04-01",
            "name": "[parameters('roleNameGuid')]",
            "scope": "[concat('Microsoft.Storage/storageAccounts', '/', variables('storageName'))]",
            "dependsOn": [
                "[variables('storageName')]"
            ],
            "properties": {
                "roleDefinitionId": "[variables(parameters('builtInRoleType'))]",
                "principalId": "[parameters('principalId')]"
            }
        }
    ]
}
若要部署先前的範本,您可以使用資源群組命令。 以下是 New-AzResourceGroupDeployment 和 az deployment group create 命令範例,說明如何在資源範圍啟動部署。
New-AzResourceGroupDeployment -ResourceGroupName ExampleGroup -TemplateFile rbac-test.json -principalId $objectid -builtInRoleType Contributor
az deployment group create --resource-group ExampleGroup --template-file rbac-test.json --parameters principalId=$objectid builtInRoleType=Contributor
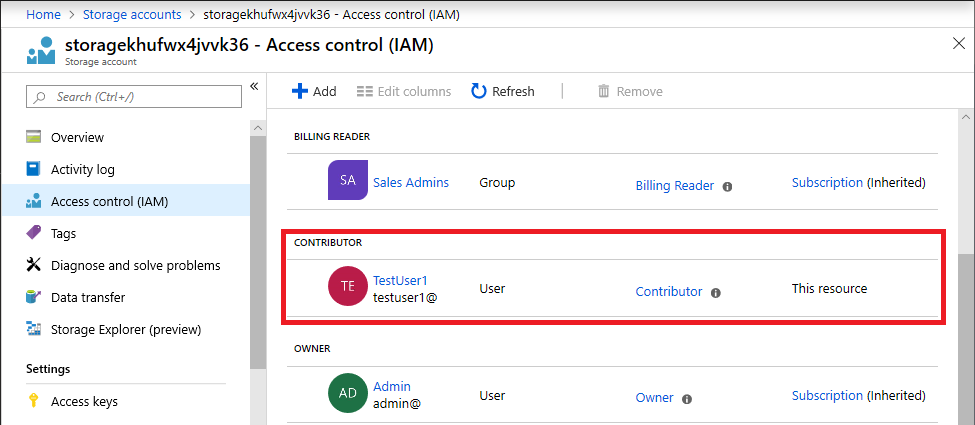
以下顯示部署範本之後,為記憶體帳戶指派用戶參與者角色指派的範例。
新的服務主體
如果您建立新的服務主體,並立即嘗試將角色指派給該服務主體,在某些情況下,該角色指派可能會失敗。 例如,如果您建立新的受控識別,然後嘗試在相同的 Azure Resource Manager 範本中將角色指派給該服務主體,角色指派可能會失敗。 此失敗的原因可能是復寫延遲。 服務主體會在一個區域中建立;不過,角色指派可能會發生在尚未復寫服務主體的不同區域中。
若要解決此案例,您應該在建立角色指派時,將屬性設定 principalType 為 ServicePrincipal 。 您也必須將角色指派的 設定 apiVersion 為 2018-09-01-preview 或更新版本。 2022-04-01 是第一個穩定版本。
下列範本示範:
- 如何建立新的受控識別服務主體
- 如何指定
principalType - 如何將參與者角色指派給資源群組範圍的該服務主體
若要使用範本,您必須指定下列輸入:
- 受控識別的基底名稱,或者您可以使用預設字串
{
    "$schema": "http://schema.management.azure.com/schemas/2015-01-01/deploymentTemplate.json#",
    "contentVersion": "1.0.0.0",
    "parameters": {
        "baseName": {
            "type": "string",
            "defaultValue": "msi-test"
        }
    },
    "variables": {
        "identityName": "[concat(parameters('baseName'), '-bootstrap')]",
        "bootstrapRoleAssignmentId": "[guid(concat(resourceGroup().id, 'contributor'))]",
        "contributorRoleDefinitionId": "[concat('/subscriptions/', subscription().subscriptionId, '/providers/Microsoft.Authorization/roleDefinitions/', 'b24988ac-6180-42a0-ab88-20f7382dd24c')]"
    },
    "resources": [
        {
            "type": "Microsoft.ManagedIdentity/userAssignedIdentities",
            "name": "[variables('identityName')]",
            "apiVersion": "2018-11-30",
            "location": "[resourceGroup().location]"
        },
        {
            "type": "Microsoft.Authorization/roleAssignments",
            "apiVersion": "2022-04-01",
            "name": "[variables('bootstrapRoleAssignmentId')]",
            "dependsOn": [
                "[resourceId('Microsoft.ManagedIdentity/userAssignedIdentities', variables('identityName'))]"
            ],
            "properties": {
                "roleDefinitionId": "[variables('contributorRoleDefinitionId')]",
                "principalId": "[reference(resourceId('Microsoft.ManagedIdentity/userAssignedIdentities', variables('identityName')), '2018-11-30').principalId]",
                "principalType": "ServicePrincipal"
            }
        }
    ]
}
以下是 New-AzResourceGroupDeployment 和 az deployment group create 命令範例,說明如何在資源群組範圍啟動部署。
New-AzResourceGroupDeployment -ResourceGroupName ExampleGroup2 -TemplateFile rbac-test.json
az deployment group create --resource-group ExampleGroup2 --template-file rbac-test.json
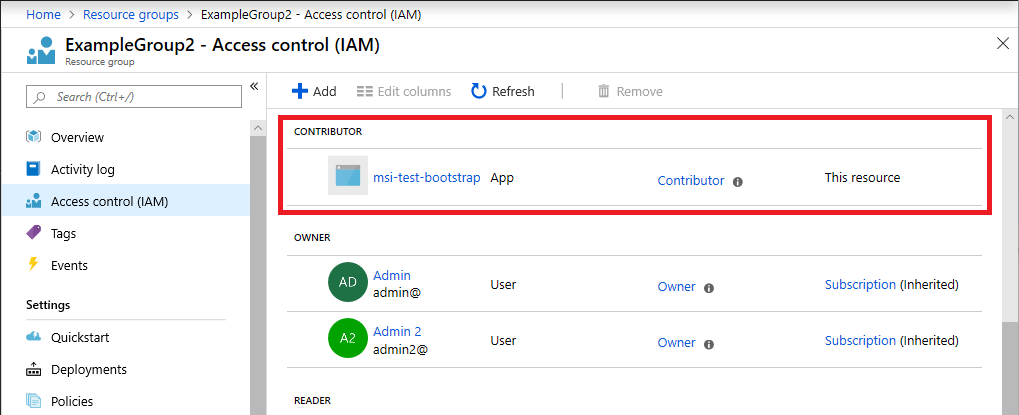
以下顯示部署範本之後,將參與者角色指派給新受控識別服務主體的範例。