執行緒模型
Windows Presentation Foundation (WPF) 的設計目的是為了協助開發人員擺脫執行緒處理的困難。 因此大多數 WPF 開發人員不需要撰寫介面來使用超過一個的執行緒。 由於多執行緒的程式非常複雜且很難偵錯,因此,若有單一執行緒解決方案,就應避免使用多執行緒程式。
但是不論架構設計多麼完善,沒有任何使用者介面架構能夠為每種問題提供單一執行緒的解決方案。 WPF 已經幾乎都能做到,但在某些情況下,多執行緒仍然可以改善使用者介面 (UI) 的回應性或應用程式效能。 討論一些背景資料之後,本文將探討其中一些情況,接著再討論一些較低層次的細節來做為結尾。
注意
本主題將討論使用 InvokeAsync 方法進行非同步呼叫來處理執行緒。 InvokeAsync 方法採用 Action 或 Func<TResult> 作為參數,並傳回具有 Task 屬性的 DispatcherOperation 或 DispatcherOperation<TResult>。 您可以將 await 關鍵字與 DispatcherOperation 或關聯的 Task 一起使用。 若需要同步等候 DispatcherOperation 或 DispatcherOperation<TResult> 返回的 Task,請呼叫 DispatcherOperationWait 擴充方法。 呼叫 Task.Wait 將導致鎖死。 有關使用 Task 執行非同步操作的更多資訊,請參閱工作型非同步程式設計。
若要進行同步呼叫,請使用 Invoke 方法,該方法也有接受委派、Action 或 Func<TResult> 參數的多載。
概觀和發送器
一般而言,WPF 應用程式一開始會使用兩個執行緒:一個用來處理轉譯,另一個用來管理 UI。 轉譯執行緒會有效地在背景中隱藏執行,而 UI 執行緒會接收輸入、處理事件、繪製畫面,以及執行應用程式程式碼。 大部分的應用程式會使用單一執行緒,但在某些情況下最好使用多執行緒。 我們稍後將以範例討論這件事。
UI 執行緒會在名為 Dispatcher 的物件中排序工作項目。 Dispatcher 會依優先權選取工作項目,並逐一執行以完成每個工作項目。 每個 UI 執行緒必須至少有一個 Dispatcher,而每個 Dispatcher 只能執行一個執行緒中的工作項目。
想打造回應靈敏而方便使用的應用程式,訣竅在於維持較小的工作項目,讓 Dispatcher 的輸送量達到最大。 透過此方式,位於 Dispatcher 中的等候處理項目就永遠不會過期。 輸入與回應之間任何可察覺到的延遲都能讓使用者感到挫折。
那麼 WPF 應用程式該如何處理大型作業? 如果您的程式碼牽涉到大型計算,或需要查詢某些遠端伺服器上的資料庫,又該怎麼做? 答案通常是在個別執行緒中處理大型作業,讓 UI 執行緒有空處理 Dispatcher 佇列中的項目。 完成大型作業後,它可以向 UI 執行緒回報其結果以供顯示。
Windows 過去只允許建立 UI 元素的執行緒存取它們。 這表示負責某些長時間執行工作的背景執行緒無法在完成時更新文字方塊。 Windows 這麼做是為了確保 UI 元件的完整性。 如果背景執行緒已在繪製期間更新了清單方塊的內容,則該清單方塊看起來可能很奇怪。
WPF 有個內建的互斥機制,會強制執行這項協調。 WPF 中的大多數類別都是衍生自 DispatcherObject。 在建構時,DispatcherObject 會儲存對 Dispatcher 的參考,後者已連結至目前執行的執行緒。 實際上,DispatcherObject 會與建立它的執行緒產生關聯。 在程式執行期間,DispatcherObject 可以呼叫其公開的 VerifyAccess 方法。 VerifyAccess 會檢查與目前執行緒相關聯的 Dispatcher,並將它與建構期間儲存的 Dispatcher 參考進行比較。 如果不相符,VerifyAccess 會傳回例外狀況。 VerifyAccess 應該在屬於 DispatcherObject 的每個方法的開頭呼叫。
如果只有一個執行緒可以修改 UI,那麼背景執行緒如何與使用者互動? 背景執行緒可以要求 UI 執行緒代替它執行作業。 其做法是向 UI 執行緒的 Dispatcher 註冊工作項目。 Dispatcher 類別提供下列方法來註冊工作項目:Dispatcher.InvokeAsync、Dispatcher.BeginInvoke 和 Dispatcher.Invoke。 這些方法都會排程要執行的委派。 Invoke 是同步呼叫 – 也就是說,它不會在 UI 執行緒實際完成執行委派之前回傳。 InvokeAsync 和 BeginInvoke 是非同步的,會立即回傳。
Dispatcher 會依優先順序排序其佇列中的項目。 將元素加入 Dispatcher 佇列時可以指定十個層級。 這些優先順序會保存在 DispatcherPriority 列舉中。
單一執行緒應用程式與長時間運行的計算
大多數的圖形化使用者介面 (GUI) 會在大部分時間中處於閒置狀態,等待產生回應使用者互動的事件。 透過嚴謹的程式設計,就能以建設性的方式來使用這個閒置時間,而不會影響 UI 的回應性。 WPF 執行緒模式不允許輸入中斷發生在 UI 執行緒中的操作。 這表示您必須確保會定期返回 Dispatcher,在擱置的輸入事件過期之前進行處理。
GitHub 上有 C# 或 Visual Basic 的範例應用程式可供下載,展示本章節所述的概念。
請考慮下列範例:
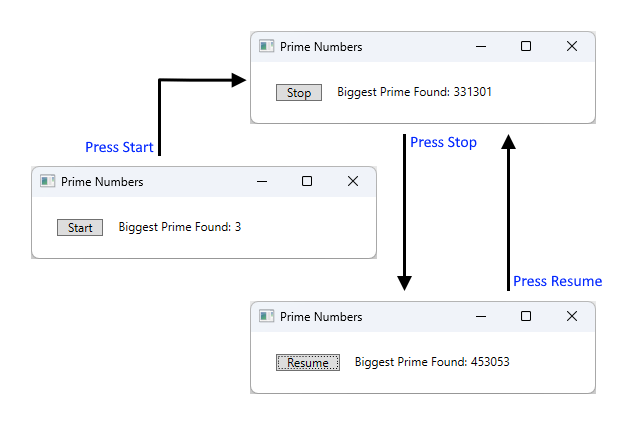
這個簡單的應用程式會從三開始向上計算,以搜尋質數。 當使用者按一下 [Start (開始)] 按鈕時,開始搜尋。 當程式找到質數時,會使用它的發現來更新使用者介面。 使用者隨時都能停止搜尋。
雖然夠簡單,但質數搜尋會永無止盡的繼續執行,其中會遇到一些難題。 如果我們已在按鈕的 click 事件處理常式內處理整個搜尋,就永遠不會讓 UI 執行緒有機會處理其他事件。 UI 將無法回應輸入或處理訊息。 它永遠不會重新繪製,而且永遠不會回應按鈕 Click。
我們可以在個別執行緒中管理質數搜尋,但接著需要處理同步問題。 使用單一執行緒的方法,我們可以直接更新標籤,以列出所找到的最大質數。
如果我們將計算工作分解成數個可管理的區塊,則可定期返回 Dispatcher 並處理事件。 我們讓 WPF 有機會重繪並處理輸入。
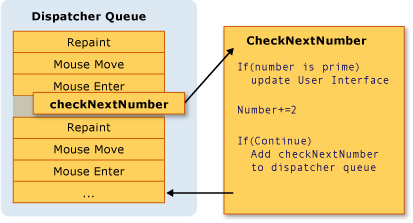
在計算和事件處理之間分割處理時間的最佳方式是從 Dispatcher 管理計算。 藉由使用 InvokeAsync 方法,我們可以在繪製 UI 事件的相同佇列中排程質數檢查。 在範例中,我們一次只會排程單一質數檢查。 質數檢查完成之後,我們會立即排程下次檢查。 這項檢查只有在處理完擱置的 UI 事件之後才會繼續。
Microsoft Word 會使用這項機制來完成拼字檢查。 拼字檢查是在背景中使用 UI 執行緒的閒置時間來完成。 讓我們看看程式碼。
下列範例顯示建立使用者介面的 XAML。
重要
本文中顯示的 XAML 來自一項 C# 專案。 Visual Basic XAML 在宣告 XAML 的支援類別時會稍有不同。
<Window x:Class="SDKSamples.PrimeNumber"
        xmlns="http://schemas.microsoft.com/winfx/2006/xaml/presentation"
        xmlns:x="http://schemas.microsoft.com/winfx/2006/xaml"
        Title="Prime Numbers" Width="360" Height="100">
    <StackPanel Orientation="Horizontal" VerticalAlignment="Center" Margin="20" >
        <Button Content="Start"
                Click="StartStopButton_Click"
                Name="StartStopButton"
                Margin="5,0,5,0" Padding="10,0" />

        <TextBlock Margin="10,0,0,0">Biggest Prime Found:</TextBlock>
        <TextBlock Name="bigPrime" Margin="4,0,0,0">3</TextBlock>
    </StackPanel>
</Window>
下列範例顯示程式碼後置。
using System;
using System.Windows;
using System.Windows.Threading;

namespace SDKSamples
{
    public partial class PrimeNumber : Window
    {
        // Current number to check
        private long _num = 3;
        private bool _runCalculation = false;

        public PrimeNumber() =>
            InitializeComponent();

        private void StartStopButton_Click(object sender, RoutedEventArgs e)
        {
            _runCalculation = !_runCalculation;

            if (_runCalculation)
            {
                StartStopButton.Content = "Stop";
                StartStopButton.Dispatcher.InvokeAsync(CheckNextNumber, DispatcherPriority.SystemIdle);
            }
            else
                StartStopButton.Content = "Resume";
        }

        public void CheckNextNumber()
        {
            // Reset flag.
            _isPrime = true;

            for (long i = 3; i <= Math.Sqrt(_num); i++)
            {
                if (_num % i == 0)
                {
                    // Set not a prime flag to true.
                    _isPrime = false;
                    break;
                }
            }

            // If a prime number, update the UI text
            if (_isPrime)
                bigPrime.Text = _num.ToString();

            _num += 2;

            // Requeue this method on the dispatcher
            if (_runCalculation)
                StartStopButton.Dispatcher.InvokeAsync(CheckNextNumber, DispatcherPriority.SystemIdle);
        }

        private bool _isPrime = false;
    }
}
Imports System.Windows.Threading

Public Class PrimeNumber
    ' Current number to check
    Private _num As Long = 3
    Private _runCalculation As Boolean = False

    Private Sub StartStopButton_Click(sender As Object, e As RoutedEventArgs)
        _runCalculation = Not _runCalculation

        If _runCalculation Then
            StartStopButton.Content = "Stop"
            StartStopButton.Dispatcher.InvokeAsync(AddressOf CheckNextNumber, DispatcherPriority.SystemIdle)
        Else
            StartStopButton.Content = "Resume"
        End If

    End Sub

    Public Sub CheckNextNumber()
        ' Reset flag.
        _isPrime = True

        For i As Long = 3 To Math.Sqrt(_num)
            If (_num Mod i = 0) Then

                ' Set Not a prime flag to true.
                _isPrime = False
                Exit For
            End If
        Next

        ' If a prime number, update the UI text
        If _isPrime Then
            bigPrime.Text = _num.ToString()
        End If

        _num += 2

        ' Requeue this method on the dispatcher
        If (_runCalculation) Then
            StartStopButton.Dispatcher.InvokeAsync(AddressOf CheckNextNumber, DispatcherPriority.SystemIdle)
        End If
    End Sub

    Private _isPrime As Boolean
End Class
除了更新 Button 上的文字,StartStopButton_Click 處理常式也負責排程第一個質數檢查,方法是將委派加入至 Dispatcher 佇列。 在此事件處理常式完成其工作後的某個時間,Dispatcher 會選擇要執行的委派。
如前所述,InvokeAsync 是用來排程執行委派的 Dispatcher 成員。 在此情況下,我們選擇 SystemIdle 優先級。 Dispatcher 只有在不需處理任何重要事件時才會執行此委派。 UI 回應性比數字檢查更為重要。 我們也會傳遞新的委派來代表數字檢查常式。
public void CheckNextNumber()
{
    // Reset flag.
    _isPrime = true;

    for (long i = 3; i <= Math.Sqrt(_num); i++)
    {
        if (_num % i == 0)
        {
            // Set not a prime flag to true.
            _isPrime = false;
            break;
        }
    }

    // If a prime number, update the UI text
    if (_isPrime)
        bigPrime.Text = _num.ToString();

    _num += 2;

    // Requeue this method on the dispatcher
    if (_runCalculation)
        StartStopButton.Dispatcher.InvokeAsync(CheckNextNumber, DispatcherPriority.SystemIdle);
}

private bool _isPrime = false;
Public Sub CheckNextNumber()
    ' Reset flag.
    _isPrime = True

    For i As Long = 3 To Math.Sqrt(_num)
        If (_num Mod i = 0) Then

            ' Set Not a prime flag to true.
            _isPrime = False
            Exit For
        End If
    Next

    ' If a prime number, update the UI text
    If _isPrime Then
        bigPrime.Text = _num.ToString()
    End If

    _num += 2

    ' Requeue this method on the dispatcher
    If (_runCalculation) Then
        StartStopButton.Dispatcher.InvokeAsync(AddressOf CheckNextNumber, DispatcherPriority.SystemIdle)
    End If
End Sub

Private _isPrime As Boolean
這個方法會檢查下一個奇數是否為質數。 如果是質數,此方法就會直接更新 bigPrime TextBlock 來反映它的發現。 由於計算會發生在用來建立控制項的相同執行緒中,因此我們可以執行這項操作。 如果我們選擇使用個別執行緒來進行計算,就必須使用更複雜的同步處理機制,並在 UI 執行緒中執行更新。 接下來我們將展示這種情況。
多個視窗,多個執行緒
某些 WPF 應用程式需要多個最上層視窗。 由一個執行緒/發送器組合管理多個視窗是完全可以接受的,但有時多個執行緒可以做得更好。 如果有可能發生某一視窗將獨佔執行緒的情況,這特別適用。
Windows 檔案總管會以這種方式運作。 每個新的檔案總管視窗都屬於原始的程序,但會在獨立執行緒的控制下建立。 當檔案總管在尋找網路資源時等情況下變得沒有回應時,其他檔案總管視窗會繼續回應並可供使用。
我們可以用下面的範例來說明這個概念。
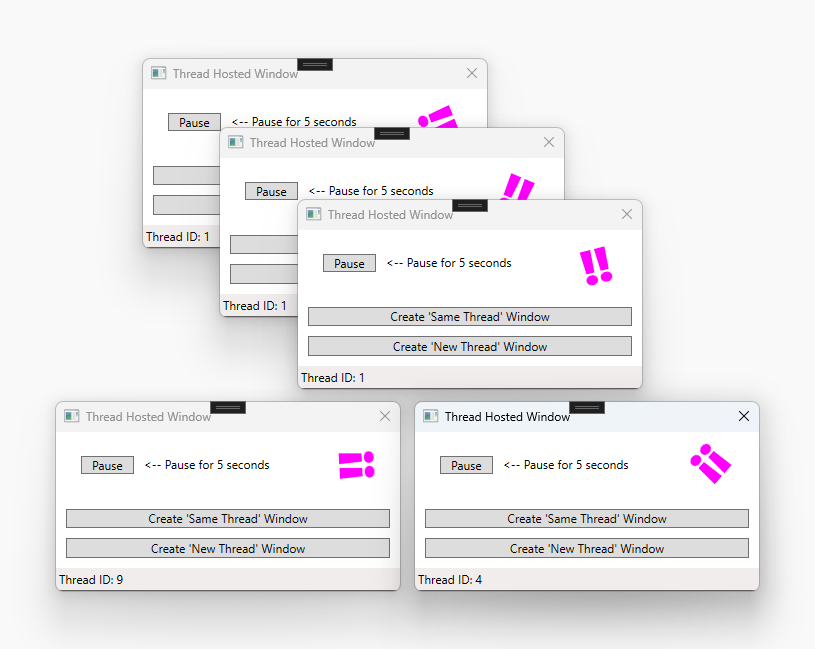
圖片最上方的三個視窗共用相同的執行緒識別碼:1。 另外兩個視窗具有不同的執行緒識別碼:9 和 4。 每個視窗的右上角都有一個洋紅色的旋轉 ‼ 字符。
此範例包含一個有旋轉 ‼️ 字符的視窗、一個暫停按鈕,以及兩個在目前執行緒或新執行緒中建立新視窗的其他按鈕。 ‼️ 字符會持續旋轉,直到按下暫停按鈕,這會讓執行緒暫停五秒鐘。 視窗底部會顯示執行緒識別碼。
按下暫停按鈕後,同一執行緒下的所有視窗都會變得沒有回應。 位於不同執行緒下的其他視窗都會繼續正常工作。
以下範例是視窗的 XAML:
<Window x:Class="SDKSamples.MultiWindow"
        xmlns="http://schemas.microsoft.com/winfx/2006/xaml/presentation"
        xmlns:x="http://schemas.microsoft.com/winfx/2006/xaml"
        Title="Thread Hosted Window" Width="360" Height="180" SizeToContent="Height" ResizeMode="NoResize" Loaded="Window_Loaded">
    <Grid>
        <Grid.RowDefinitions>
            <RowDefinition Height="*" />
            <RowDefinition Height="Auto" />
            <RowDefinition Height="Auto" />
        </Grid.RowDefinitions>

        <TextBlock HorizontalAlignment="Right" Margin="30,0" Text="‼️" FontSize="50" FontWeight="ExtraBold"
                   Foreground="Magenta" RenderTransformOrigin="0.5,0.5" Name="RotatedTextBlock">
            <TextBlock.RenderTransform>
                <RotateTransform Angle="0" />
            </TextBlock.RenderTransform>
            <TextBlock.Triggers>
                <EventTrigger RoutedEvent="Loaded">
                    <BeginStoryboard>
                        <Storyboard>
                            <DoubleAnimation Storyboard.TargetName="RotatedTextBlock"
                                Storyboard.TargetProperty="(UIElement.RenderTransform).(RotateTransform.Angle)"
                                From="0" To="360" Duration="0:0:5" RepeatBehavior="Forever" />
                        </Storyboard>
                    </BeginStoryboard>
                </EventTrigger>
            </TextBlock.Triggers>
        </TextBlock>

        <StackPanel Orientation="Horizontal" VerticalAlignment="Center" Margin="20" >
            <Button Content="Pause" Click="PauseButton_Click" Margin="5,0" Padding="10,0" />
            <TextBlock Margin="5,0,0,0" Text="<-- Pause for 5 seconds" />
        </StackPanel>

        <StackPanel Grid.Row="1" Margin="10">
            <Button Content="Create 'Same Thread' Window" Click="SameThreadWindow_Click" />
            <Button Content="Create 'New Thread' Window" Click="NewThreadWindow_Click" Margin="0,10,0,0" />
        </StackPanel>

        <StatusBar Grid.Row="2" VerticalAlignment="Bottom">
            <StatusBarItem Content="Thread ID" Name="ThreadStatusItem" />
        </StatusBar>

    </Grid>
</Window>
下列範例顯示程式碼後置。
using System;
using System.Threading;
using System.Threading.Tasks;
using System.Windows;

namespace SDKSamples
{
    public partial class MultiWindow : Window
    {
        public MultiWindow() =>
            InitializeComponent();

        private void Window_Loaded(object sender, RoutedEventArgs e) =>
            ThreadStatusItem.Content = $"Thread ID: {Thread.CurrentThread.ManagedThreadId}";

        private void PauseButton_Click(object sender, RoutedEventArgs e) =>
            Task.Delay(TimeSpan.FromSeconds(5)).Wait();

        private void SameThreadWindow_Click(object sender, RoutedEventArgs e) =>
            new MultiWindow().Show();

        private void NewThreadWindow_Click(object sender, RoutedEventArgs e)
        {
            Thread newWindowThread = new Thread(ThreadStartingPoint);
            newWindowThread.SetApartmentState(ApartmentState.STA);
            newWindowThread.IsBackground = true;
            newWindowThread.Start();
        }

        private void ThreadStartingPoint()
        {
            new MultiWindow().Show();

            System.Windows.Threading.Dispatcher.Run();
        }
    }
}
Imports System.Threading

Public Class MultiWindow
    Private Sub Window_Loaded(sender As Object, e As RoutedEventArgs)
        ThreadStatusItem.Content = $"Thread ID: {Thread.CurrentThread.ManagedThreadId}"
    End Sub

    Private Sub PauseButton_Click(sender As Object, e As RoutedEventArgs)
        Task.Delay(TimeSpan.FromSeconds(5)).Wait()
    End Sub

    Private Sub SameThreadWindow_Click(sender As Object, e As RoutedEventArgs)
        Dim window As New MultiWindow()
        window.Show()
    End Sub

    Private Sub NewThreadWindow_Click(sender As Object, e As RoutedEventArgs)
        Dim newWindowThread = New Thread(AddressOf ThreadStartingPoint)
        newWindowThread.SetApartmentState(ApartmentState.STA)
        newWindowThread.IsBackground = True
        newWindowThread.Start()
    End Sub

    Private Sub ThreadStartingPoint()
        Dim window As New MultiWindow()
        window.Show()

        System.Windows.Threading.Dispatcher.Run()
    End Sub
End Class
以下是一些需要注意的細節:
Task.Delay(TimeSpan) 工作用於在按下暫停按鈕時,使目前的執行緒暫停五秒。
private void PauseButton_Click(object sender, RoutedEventArgs e) =>
    Task.Delay(TimeSpan.FromSeconds(5)).Wait();
Private Sub PauseButton_Click(sender As Object, e As RoutedEventArgs) Task.Delay(TimeSpan.FromSeconds(5)).Wait() End SubSameThreadWindow_Click事件處理常式會立即在目前的執行緒下顯示一個新視窗。NewThreadWindow_Click事件處理常式會建立一個新的執行緒,開始執行ThreadStartingPoint方法,依序顯示一個新視窗,如下一點所述。private void SameThreadWindow_Click(object sender, RoutedEventArgs e) => new MultiWindow().Show(); private void NewThreadWindow_Click(object sender, RoutedEventArgs e) { Thread newWindowThread = new Thread(ThreadStartingPoint); newWindowThread.SetApartmentState(ApartmentState.STA); newWindowThread.IsBackground = true; newWindowThread.Start(); }Private Sub SameThreadWindow_Click(sender As Object, e As RoutedEventArgs) Dim window As New MultiWindow() window.Show() End Sub Private Sub NewThreadWindow_Click(sender As Object, e As RoutedEventArgs) Dim newWindowThread = New Thread(AddressOf ThreadStartingPoint) newWindowThread.SetApartmentState(ApartmentState.STA) newWindowThread.IsBackground = True newWindowThread.Start() End SubThreadStartingPoint方法是新執行緒的起點。 新視窗是在此執行緒的控制下建立的。 WPF 會自動建立一個新的 System.Windows.Threading.Dispatcher 來管理新執行緒。 我們要做的就是啟動 System.Windows.Threading.Dispatcher,讓視窗發揮功能。private void ThreadStartingPoint() { new MultiWindow().Show(); System.Windows.Threading.Dispatcher.Run(); }Private Sub ThreadStartingPoint() Dim window As New MultiWindow() window.Show() System.Windows.Threading.Dispatcher.Run() End Sub
GitHub 上有 C# 或 Visual Basic 的範例應用程式可供下載,展示本章節所述的概念。
使用 Task.Run 處理封鎖作業
處理圖形應用程式中的封鎖作業可能很困難。 我們不想從事件處理常式中呼叫封鎖方法,因為應用程式會呈現凍結狀態。 上一個範例在自己的執行緒中建立新窗口,讓每個視窗獨立運行。 雖然我們可以用 System.Windows.Threading.Dispatcher 建立新的執行緒,但在工作完成後很難將新執行緒與主 UI 執行緒同步。 由於新執行緒無法直接修改 UI,因此我們必須使用 Dispatcher.InvokeAsync、Dispatcher.BeginInvoke 或 Dispatcher.Invoke,將委派插入 UI 執行緒的 Dispatcher 中。 最後,這些委派將被授權修改 UI 元素。
有一種更簡單的方法可以在新執行緒上運行程式碼並同步處理結果,也就是工作架構非同步模式 (TAP)。 這是以 System.Threading.Tasks 命名空間中的 Task 和 Task<TResult> 類型為基礎,這兩種類別用於表示非同步作業。 TAP 使用單一方法表示非同步作業的啟始和完成。 這種模式有一些好處:
Task的呼叫者可以選擇非同步或同步運行程式碼。- 可以從
Task報告進展。 - 呼叫程式碼可以暫停執行並等待運算結果。
Task.Run 範例
在此範例中,我們模仿遠端程序呼叫來擷取氣象預報。 按下按鈕後,UI 會更新以顯示資料擷取正在進行中,同時會啟動一項工作來模擬擷取天氣預報。 工作啟動後,按鈕事件處理常式程式碼會暫停,直到工作完成。 工作完成後,事件處理常式程式碼會繼續運行。 程式碼會暫停,而不會阻塞 UI 執行緒的其他部分。 WPF 的同步處理內容會暫停程式碼,讓 WPF 繼續執行。
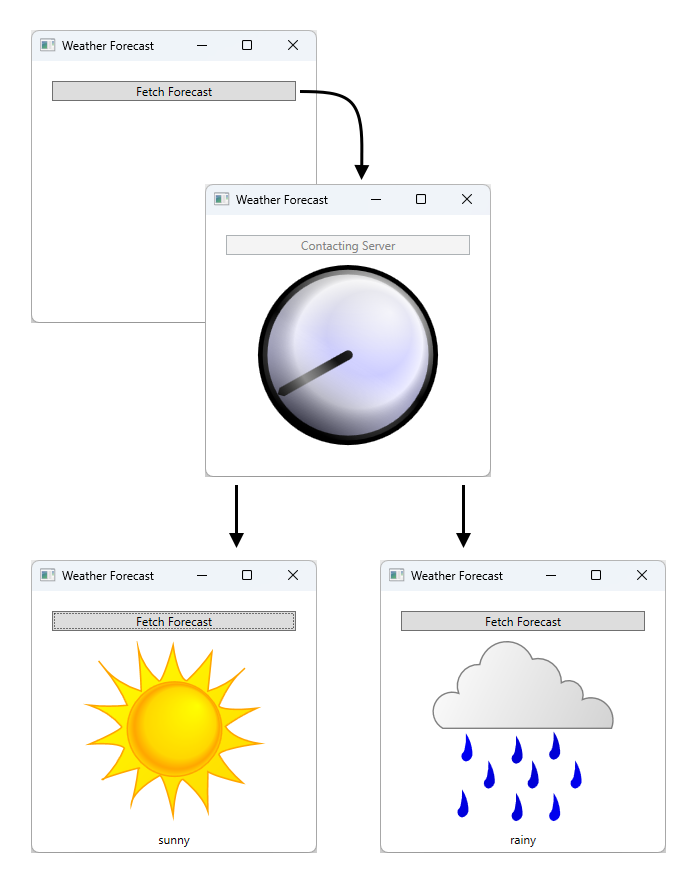
展示範例應用程式工作流程的圖表。 本應用程式只有一個按鈕,寫著「取得預報」。 按下按鈕後,會有一個箭頭指向應用程式的下一階段,這是一個位於應用程式中央的時鐘圖像,表示應用程式正忙著擷取資料。 經過一段時間後,應用程式會根據資料結果傳回太陽或雨雲的圖像。
GitHub 上有 C# 或 Visual Basic 的範例應用程式可供下載,展示本章節所述的概念。 此範例使用的 XAML 相當龐大,本文中未提供。 請使用前面的 GitHub 連結來瀏覽 XAML。 本 XAML 使用一個按鈕來取得天氣資訊。
思考 XAML 背後的程式碼:
using System;
using System.Windows;
using System.Windows.Media;
using System.Windows.Media.Animation;
using System.Threading.Tasks;

namespace SDKSamples
{
    public partial class Weather : Window
    {
        public Weather() =>
            InitializeComponent();

        private async void FetchButton_Click(object sender, RoutedEventArgs e)
        {
            // Change the status image and start the rotation animation.
            fetchButton.IsEnabled = false;
            fetchButton.Content = "Contacting Server";
            weatherText.Text = "";
            ((Storyboard)Resources["HideWeatherImageStoryboard"]).Begin(this);

            // Asynchronously fetch the weather forecast on a different thread and pause this code.
            string weather = await Task.Run(FetchWeatherFromServerAsync);

            // After async data returns, process it...
            // Set the weather image
            if (weather == "sunny")
                weatherIndicatorImage.Source = (ImageSource)Resources["SunnyImageSource"];

            else if (weather == "rainy")
                weatherIndicatorImage.Source = (ImageSource)Resources["RainingImageSource"];

            //Stop clock animation
            ((Storyboard)Resources["ShowClockFaceStoryboard"]).Stop(ClockImage);
            ((Storyboard)Resources["HideClockFaceStoryboard"]).Begin(ClockImage);

            //Update UI text
            fetchButton.IsEnabled = true;
            fetchButton.Content = "Fetch Forecast";
            weatherText.Text = weather;
        }

        private async Task<string> FetchWeatherFromServerAsync()
        {
            // Simulate the delay from network access
            await Task.Delay(TimeSpan.FromSeconds(4));

            // Tried and true method for weather forecasting - random numbers
            Random rand = new Random();

            if (rand.Next(2) == 0)
                return "rainy";

            else
                return "sunny";
        }

        private void HideClockFaceStoryboard_Completed(object sender, EventArgs args) =>
            ((Storyboard)Resources["ShowWeatherImageStoryboard"]).Begin(ClockImage);

        private void HideWeatherImageStoryboard_Completed(object sender, EventArgs args) =>
            ((Storyboard)Resources["ShowClockFaceStoryboard"]).Begin(ClockImage, true);
    }
}
Imports System.Windows.Media.Animation

Public Class Weather

    Private Async Sub FetchButton_Click(sender As Object, e As RoutedEventArgs)

        ' Change the status image and start the rotation animation.
        fetchButton.IsEnabled = False
        fetchButton.Content = "Contacting Server"
        weatherText.Text = ""
        DirectCast(Resources("HideWeatherImageStoryboard"), Storyboard).Begin(Me)

        ' Asynchronously fetch the weather forecast on a different thread and pause this code.
        Dim weatherType As String = Await Task.Run(AddressOf FetchWeatherFromServerAsync)

        ' After async data returns, process it...
        ' Set the weather image
        If weatherType = "sunny" Then
            weatherIndicatorImage.Source = DirectCast(Resources("SunnyImageSource"), ImageSource)

        ElseIf weatherType = "rainy" Then
            weatherIndicatorImage.Source = DirectCast(Resources("RainingImageSource"), ImageSource)

        End If

        ' Stop clock animation
        DirectCast(Resources("ShowClockFaceStoryboard"), Storyboard).Stop(ClockImage)
        DirectCast(Resources("HideClockFaceStoryboard"), Storyboard).Begin(ClockImage)

        ' Update UI text
        fetchButton.IsEnabled = True
        fetchButton.Content = "Fetch Forecast"
        weatherText.Text = weatherType
    End Sub

    Private Async Function FetchWeatherFromServerAsync() As Task(Of String)

        ' Simulate the delay from network access
        Await Task.Delay(TimeSpan.FromSeconds(4))

        ' Tried and true method for weather forecasting - random numbers
        Dim rand As New Random()

        If rand.Next(2) = 0 Then
            Return "rainy"
        Else
            Return "sunny"
        End If

    End Function

    Private Sub HideClockFaceStoryboard_Completed(sender As Object, e As EventArgs)
        DirectCast(Resources("ShowWeatherImageStoryboard"), Storyboard).Begin(ClockImage)
    End Sub

    Private Sub HideWeatherImageStoryboard_Completed(sender As Object, e As EventArgs)
        DirectCast(Resources("ShowClockFaceStoryboard"), Storyboard).Begin(ClockImage, True)
    End Sub
End Class
以下是一些要注意的詳細資料。
按鈕事件處理常式
private async void FetchButton_Click(object sender, RoutedEventArgs e)
{
    // Change the status image and start the rotation animation.
    fetchButton.IsEnabled = false;
    fetchButton.Content = "Contacting Server";
    weatherText.Text = "";
    ((Storyboard)Resources["HideWeatherImageStoryboard"]).Begin(this);

    // Asynchronously fetch the weather forecast on a different thread and pause this code.
    string weather = await Task.Run(FetchWeatherFromServerAsync);

    // After async data returns, process it...
    // Set the weather image
    if (weather == "sunny")
        weatherIndicatorImage.Source = (ImageSource)Resources["SunnyImageSource"];

    else if (weather == "rainy")
        weatherIndicatorImage.Source = (ImageSource)Resources["RainingImageSource"];

    //Stop clock animation
    ((Storyboard)Resources["ShowClockFaceStoryboard"]).Stop(ClockImage);
    ((Storyboard)Resources["HideClockFaceStoryboard"]).Begin(ClockImage);

    //Update UI text
    fetchButton.IsEnabled = true;
    fetchButton.Content = "Fetch Forecast";
    weatherText.Text = weather;
}
Private Async Sub FetchButton_Click(sender As Object, e As RoutedEventArgs) ' Change the status image and start the rotation animation. fetchButton.IsEnabled = False fetchButton.Content = "Contacting Server" weatherText.Text = "" DirectCast(Resources("HideWeatherImageStoryboard"), Storyboard).Begin(Me) ' Asynchronously fetch the weather forecast on a different thread and pause this code. Dim weatherType As String = Await Task.Run(AddressOf FetchWeatherFromServerAsync) ' After async data returns, process it... ' Set the weather image If weatherType = "sunny" Then weatherIndicatorImage.Source = DirectCast(Resources("SunnyImageSource"), ImageSource) ElseIf weatherType = "rainy" Then weatherIndicatorImage.Source = DirectCast(Resources("RainingImageSource"), ImageSource) End If ' Stop clock animation DirectCast(Resources("ShowClockFaceStoryboard"), Storyboard).Stop(ClockImage) DirectCast(Resources("HideClockFaceStoryboard"), Storyboard).Begin(ClockImage) ' Update UI text fetchButton.IsEnabled = True fetchButton.Content = "Fetch Forecast" weatherText.Text = weatherType End Sub請注意,事件處理常式是以
async(或 Visual Basic 的Async) 宣告的。 當等待中的方法 (例如FetchWeatherFromServerAsync) 被呼叫時,「async」方法可暫停程式碼。 這是由await(或 Visual Basic 中的Await) 關鍵字指定的。 在FetchWeatherFromServerAsync完成之前,按鈕的處理常式程式碼將暫停,並將控制權還給呼叫者。 這與同步方法類似,只不過同步方法會等待方法中的每個操作完成,然後將控制權還給呼叫者。Awaited 方法會利用目前方法的執行緒內容,其中包含按鈕處理常式,即 UI 執行緒。 這表示呼叫
await FetchWeatherFromServerAsync();(或 Visual Basic 中的Await FetchWeatherFromServerAsync()) 會導致FetchWeatherFromServerAsync中的程式碼在 UI 執行緒上執行,但在發送器有時間運行它之前不會執行,類似 Single Threaded Application With Long Running Calculation Sample 範例的運作方式。 但請注意使用了await Task.Run。 這會在執行緒集區中為指定的工作建立新的執行緒,而不是目前的執行緒。 所以FetchWeatherFromServerAsync會在自己的執行緒上運行。擷取氣象
private async Task<string> FetchWeatherFromServerAsync()
{
    // Simulate the delay from network access
    await Task.Delay(TimeSpan.FromSeconds(4));

    // Tried and true method for weather forecasting - random numbers
    Random rand = new Random();

    if (rand.Next(2) == 0)
        return "rainy";

    else
        return "sunny";
}
Private Async Function FetchWeatherFromServerAsync() As Task(Of String) ' Simulate the delay from network access Await Task.Delay(TimeSpan.FromSeconds(4)) ' Tried and true method for weather forecasting - random numbers Dim rand As New Random() If rand.Next(2) = 0 Then Return "rainy" Else Return "sunny" End If End Function為了簡單起見,我們在這個範例中實際上並未使用任何網路程式碼。 相反地,我們讓新的執行緒進入睡眠狀態 4 秒,藉以模擬網路存取延遲。 此時,原始的 UI 執行緒仍在運行並回應 UI 事件,而按鈕的事件處理常式則暫停,直到新執行緒完成。 為了展示這件事,我們讓動畫繼續運行,您可以調整視窗大小。 如果 UI 執行緒暫停或延遲,則不會顯示動畫,而且您將無法與視窗互動。
當
Task.Delay完成,我們隨機選擇了天氣預報,天氣狀態將回傳給呼叫者。更新 UI
private async void FetchButton_Click(object sender, RoutedEventArgs e)
{
    // Change the status image and start the rotation animation.
    fetchButton.IsEnabled = false;
    fetchButton.Content = "Contacting Server";
    weatherText.Text = "";
    ((Storyboard)Resources["HideWeatherImageStoryboard"]).Begin(this);

    // Asynchronously fetch the weather forecast on a different thread and pause this code.
    string weather = await Task.Run(FetchWeatherFromServerAsync);

    // After async data returns, process it...
    // Set the weather image
    if (weather == "sunny")
        weatherIndicatorImage.Source = (ImageSource)Resources["SunnyImageSource"];

    else if (weather == "rainy")
        weatherIndicatorImage.Source = (ImageSource)Resources["RainingImageSource"];

    //Stop clock animation
    ((Storyboard)Resources["ShowClockFaceStoryboard"]).Stop(ClockImage);
    ((Storyboard)Resources["HideClockFaceStoryboard"]).Begin(ClockImage);

    //Update UI text
    fetchButton.IsEnabled = true;
    fetchButton.Content = "Fetch Forecast";
    weatherText.Text = weather;
}
Private Async Sub FetchButton_Click(sender As Object, e As RoutedEventArgs) ' Change the status image and start the rotation animation. fetchButton.IsEnabled = False fetchButton.Content = "Contacting Server" weatherText.Text = "" DirectCast(Resources("HideWeatherImageStoryboard"), Storyboard).Begin(Me) ' Asynchronously fetch the weather forecast on a different thread and pause this code. Dim weatherType As String = Await Task.Run(AddressOf FetchWeatherFromServerAsync) ' After async data returns, process it... ' Set the weather image If weatherType = "sunny" Then weatherIndicatorImage.Source = DirectCast(Resources("SunnyImageSource"), ImageSource) ElseIf weatherType = "rainy" Then weatherIndicatorImage.Source = DirectCast(Resources("RainingImageSource"), ImageSource) End If ' Stop clock animation DirectCast(Resources("ShowClockFaceStoryboard"), Storyboard).Stop(ClockImage) DirectCast(Resources("HideClockFaceStoryboard"), Storyboard).Begin(ClockImage) ' Update UI text fetchButton.IsEnabled = True fetchButton.Content = "Fetch Forecast" weatherText.Text = weatherType End Sub當工作完成且 UI 執行緒有空時,
Task.Run的呼叫者、按鈕的事件處理常式將會繼續運行。 方法中的其餘部分會將時鐘動畫停止,並選擇一個圖像來描述天氣。 將顯示此圖像,且啟用「取得預報」按鈕。
GitHub 上有 C# 或 Visual Basic 的範例應用程式可供下載,展示本章節所述的概念。
技術詳細資訊與困難點
以下章節說明多執行緒處理中的一些細節和可能遇到的困難點。
巢狀提取
有時無法完全鎖住 UI 執行緒。 讓我們思考一下 MessageBox 類的 Show 方法。 在使用者按下 [確定] 按鈕之前,Show 不會回傳。 不過,它會建立必須有訊息迴圈才能互動的視窗。 雖然我們正在等待使用者按下 [OK (確定)],但原始的應用程式視窗並不會回應使用者輸入。 不過,它會繼續處理繪製訊息。 原始視窗會在涵蓋並顯示時自行重新繪製。
![顯示帶有 [確定] 按鈕的 MessageBox 的螢幕擷取畫面](media/threading-model/threading-message-loop.png?view=netframeworkdesktop-4.8)
有些執行緒必須負責訊息方塊視窗。 WPF 能夠只針對訊息框視窗建立新的執行緒,但這個執行緒無法在原始視窗中繪製停用的元素 (記得先前討論過的互斥)。 反之,WPF 會使用巢狀訊息處理系統。 Dispatcher 類別包含名為 PushFrame 的特殊方法,此方法會儲存應用程式目前的執行點,然後開啟新的訊息迴圈。 當巢狀訊息迴圈完成時,會在原始的 PushFrame 呼叫之後繼續執行。
在這種情況下,PushFrame 在呼叫 MessageBox.Show 時會維護程式內容,並啟動一個新的訊息迴圈來重新繪製背景視窗和處理訊息框視窗的輸入。 當使用者按下 [確定] 並清除快顯視窗時,巢狀迴圈即會結束,且控制會在呼叫 Show 之後繼續。
過期的路由事件
WPF 中的路由事件系統會在引發事件時通知整個樹狀結構。
<Canvas MouseLeftButtonDown="handler1"
        Width="100"
        Height="100"
        >
  <Ellipse Width="50"
            Height="50"
            Fill="Blue"
            Canvas.Left="30"
            Canvas.Top="50"
            MouseLeftButtonDown="handler2"
            />
</Canvas>
在橢圓形上按下滑鼠左鍵時,即會執行 handler2。 當 handler2 完成之後,即會將事件傳遞到 Canvas 物件,此物件會使用 handler1 來處理它。 只有當 handler2 未明確地將事件物件標示為已處理時,才會發生此情況。
handler2 可能需要花費很長的時間來處理這個事件。 handler2 可能會使用 PushFrame 開始一個巢狀訊息迴圈,數小時之內都不會回傳。 如果 handler2 沒在此訊息迴圈完成時將事件標示為已處理,則會在樹狀結構中將事件往上傳遞,即便它已經很舊了。
可重入性和鎖定
通用語言執行平台 (CLR) 鎖定機制的運作方式並不完全如人們所想像;人們可能預期執行緒在要求鎖定時會完全停止運作。 實際上,執行緒會繼續接收和處理高優先順序的訊息。 這有助於防止發生鎖死,並讓介面進行最低限度的回應,但它也會造成發生輕微 Bug 的可能性。 大多數時候您不需要知道關於此情況的所有詳情,但在極少數的情況 (通常涉及 Win32 視窗訊息或 COM STA 元件) 下值得花時間了解。
大多數介面在建置時並未考慮到執行緒安全,因為開發人員的工作假設是 UI 永遠不會被多個執行緒存取。 在這種情況下,該單一執行緒可能會在意外的時間發生環境變化,造成 DispatcherObject 互斥機制應該解決的不良影響。 請考慮下列虛擬程式碼:
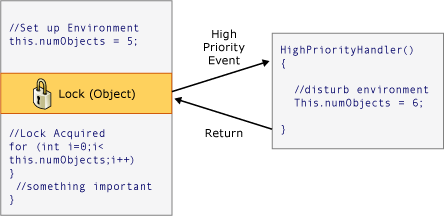
大多數時候這是正確的做法,但在 WPF 中,有時這種意外的重入性確實會造成問題。 因此在某些關鍵時刻,WPF 會呼叫 DisableProcessing,這會更改該執行緒的鎖定指令以使用 WPF 無重入鎖定,而非通常的 CLR 鎖定。
那麼,為什麼 CLR 團隊會選擇這種行為? 它必須使用 STA COM 物件和完成項執行緒來執行。 回收物件的記憶體時,其 Finalize 方法是在專屬的完成項執行緒上執行,而非 UI 執行緒。 這就是問題所在,因為在 UI 執行緒上建立的 COM STA 物件只能在 UI 執行緒上釋放。 CLR 執行相當於 BeginInvoke 的操作 (在本例中使用 Win32 的 SendMessage)。 但如果 UI 執行緒忙碌中,完成項執行緒就會過舊且無法釋放 COM STA 物件,這會造成嚴重的記憶體流失。 因此 CLR 團隊做出了艱難的決定,讓鎖定按照它們的方式運作。
WPF 的工作是避免在未重新引入記憶體流失的情況下發生未預期的重新進入,這就是為什麼我們並未在所有位置上封鎖重新進入的原因。