Respond to a compromised connector
Tip
Did you know you can try the features in Microsoft Defender XDR for Office 365 Plan 2 for free? Use the 90-day Defender for Office 365 trial at the Microsoft Defender portal trials hub. Learn about who can sign up and trial terms here.
Connectors are used for enabling mail flow between Microsoft 365 and email servers that you have in your on-premises environment. For more information, see Configure mail flow using connectors in Exchange Online.
An inbound connector with the Type value OnPremises is considered compromised when an attacker creates a new connector or modifies and existing connector to send spam or phishing email.
This article explains the symptoms of a compromised connector and how to regain control of it.
Symptoms of a compromised connector
A compromised connector exhibits one or more of the following characteristics:
- A sudden spike in outbound mail volume.
- A mismatch between the
5321.MailFromaddress (also known as the MAIL FROM address, P1 sender, or envelope sender) and the5322.Fromaddress (also known as the From address or P2 sender) in outbound email. For more information about these senders, see How EOP validates the From address to prevent phishing. - Outbound mail sent from a domain that isn't provisioned or registered.
- The connector is blocked from sending or relaying mail.
- The presence of an inbound connector that wasn't created by an admin.
- Unauthorized changes in the configuration of an existing connector (for example, the name, domain name, and IP address).
- A recently compromised admin account. Creating or editing connectors requires admin access.
If you see these symptoms or other unusual symptoms, you should investigate.
Secure and restore email function to a suspected compromised connector
Do all of the following steps to regain control of the connector. Go through the steps as soon as you suspect a problem and as quickly as possible to make sure that the attacker doesn't resume control of the connector. These steps also help you remove any back-door entries that the attacker might have added to the connector.
Step 1: Identify if an inbound connector has been compromised
Review recent suspicious connector traffic or related messages
In Microsoft Defender for Office 365 Plan 2, open the Microsoft Defender portal at https://security.microsoft.com and go to Explorer. Or, to go directly to the Explorer page, use https://security.microsoft.com/threatexplorer.
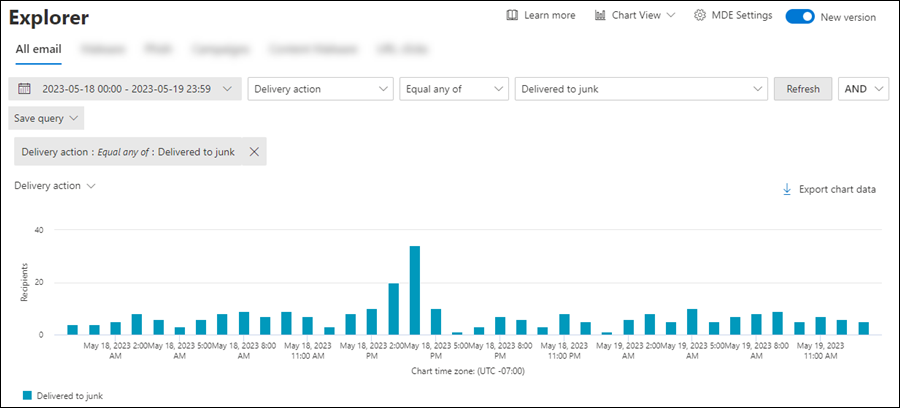
On the Explorer page, verify that the All email tab is selected and then configure the following options:
- Select the date/time range.
- Select Connector.
- Enter the connector name in the
 Search box.
 - Select Refresh.

Look for abnormal spikes or dips in email traffic.
Answer the following questions:
- Does the Sender IP match your organization's on-premises IP address?
- Were a significant number of recent messages sent to the Junk Email folder? This result clearly indicates that a compromised connector was used to send spam.
- Is it reasonable for the message recipients to receive email from senders in your organization?


In Microsoft Defender for Office 365 or Exchange Online Protection, use Alerts and Message trace to look for the symptoms of connector compromise:
Open the Defender portal at https://security.microsoft.com and go to Incidents & alerts > Alerts. Or, to go directly to the Alerts page, useOpen Suspicious connector activity alert in https://security.microsoft.com/alerts.
On the Alerts page, use the
 Filter > Policy > Suspicious connector activity to find any alerts related to suspicious connector activity.
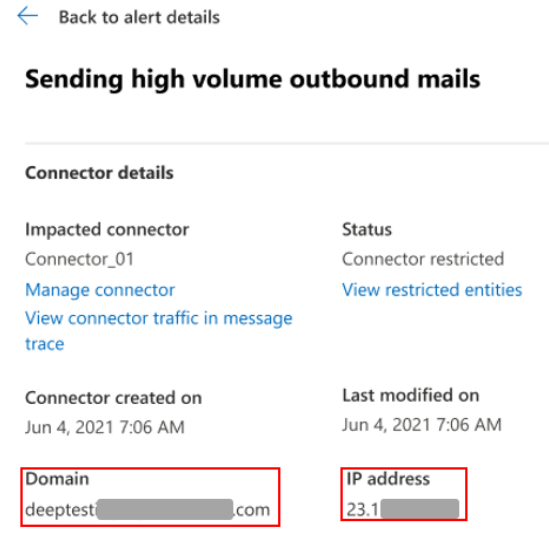
Select a suspicious connector activity alert by clicking anywhere in the row other than the check box next to the name. On the details page that opens, select an activity under Activity list, and copy the Connector domain and IP address values from the alert.
Open the Exchange admin center at https://admin.exchange.microsoft.com and go to Mail flow > Message trace. Or, to go directly to the Message trace page, use https://admin.exchange.microsoft.com/#/messagetrace.
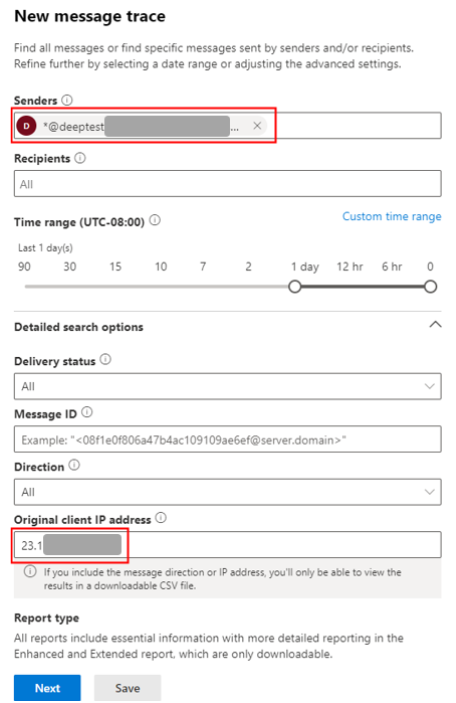
On the Message trace page, select the Custom queries tab, select
 Start a trace, and use the Connector domain and IP address values from the previous step.
For more information about message trace, see Message trace in the modern Exchange admin center in Exchange Online.
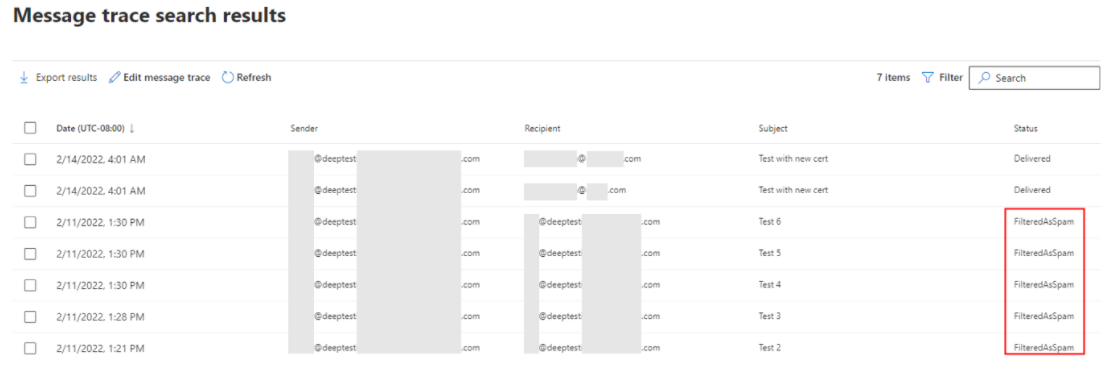
In the message trace results, look for the following information:
- A significant number of messages were recently marked as FilteredAsSpam. This result clearly indicates that a compromised connector was used to send spam.
- Whether it's reasonable for the message recipients to receive email from senders in your organization


Investigate and validate connector-related activity
In Exchange Online PowerShell, replace <StartDate> and <EndDate> with your values, and then run the following command to find and validate admin-related connector activity in the audit log. For more information, see Use a PowerShell script to search the audit log.
Search-UnifiedAuditLog -StartDate "<ExDateTime>" -EndDate "<ExDateTime>" -Operations "New-InboundConnector","Set-InboundConnector","Remove-InboundConnector
For detailed syntax and parameter information, see Search-UnifiedAuditLog.
Step 2: Review and revert unauthorized change(s) in a connector
Open the Exchange admin center at https://admin.exchange.microsoft.com and go to Mail flow > Connectors. Or, to go directly to the Connectors page, use https://admin.exchange.microsoft.com/#/connectors.
On the Connectors page, review the list of connectors. Remove or turn off any unknown connectors, and check each connector for unauthorized configuration changes.
Step 3: Unblock the connector to re-enable mail flow
After you've regained control of the compromised connector, unblock the connector on the Restricted entities page in the Defender portal. For instructions, see Remove blocked connectors from the Restricted entities page.
Step 4: Investigate and remediate potentially compromised admin accounts
After you identify the admin account that was responsible for the unauthorized connector configuration activity, investigate the admin account for compromise. For instructions, see Responding to a Compromised Email Account.
More information
意見反應
即將登場:在 2024 年,我們將逐步淘汰 GitHub 問題作為內容的意見反應機制,並將它取代為新的意見反應系統。 如需詳細資訊,請參閱:https://aka.ms/ContentUserFeedback。
提交並檢視相關的意見反應