第 5 章:在 Azure 中建立和發佈 Web API
建立技術人員的應用程式資料時,應透過 Web API 從現有的系統取得資料,Maria 和文心會共同判斷出所需的資訊,以及所需使用的格式。 Kiana 接著將會建立一個Web API,揭露適合的 Web API,並讓它託管於 Azure 中。 在有無線連線的地方,應用程式可以從任何地方連線至 Azure。
定義 Web API 作業:欄位庫存管理
應用程式的欄位庫存管理區段的瀏覽畫面會顯示鍋爐和空調系統 (簡稱鍋爐部件) 的部件清單。 詳細資料畫面能讓技術人員查看所選部件的詳細資訊。
在現有的庫存資料庫 (名為 InventoryDB) 中,各部件的相關資訊會保留在單一資料表中,名為 BoilerParts。 Kiana 會判斷 Web API 是否應支援下列要求:
- 取得所有鍋爐部件。
- 在特定部件 ID 中,取得部件的詳細資料。
定義 Web API 作業:欄位知識庫
在現有的系統中,知識庫資料庫 (名為 KnowledgeDB) 包含三個資料表,可讓您在秘訣、工程師和部件之間進行記錄和管理關聯:
- 秘訣,其中包含秘訣的詳細資料。 每個秘訣都包含用於識別特定問題 (主旨) 的單行摘要,以及描述如何解決問題的詳細解釋 (本文)。 各秘訣也會參照錄製秘訣的部件和工程師。
- BoilerParts,其中包含秘訣參考的部件清單。 各部件的詳細資料會儲存在 InventoryDB 資料庫的 BoilerParts 資料表中。
- 工程師,其中會列出已授權各秘訣的技術人員。
應用程式的知識庫部分目前只包含一個預留位置瀏覽器畫面。 文心想要實施下列功能:
技術人員會在瀏覽畫面指定搜尋字詞,以尋找所有相符的秘訣。 相符可能是秘訣所參照的部件名稱、秘訣主旨或本文中的文字,或是特定裝置專家的技術人員名稱。
當您發現了所有相符的提示後,技術人員可以選取秘訣來查看其詳細資料。
技術人員也可以新增知識庫的新秘訣,並且新增已有提示的注釋與評論。
知識庫的規模相當大,而且仍在持續成長,跨多個資料表和資料欄進行查詢可能涉及複雜的邏輯,需要強大的計算能力。 為了減少 Web API 的負載,Kiana 決定使用 Azure 認知搜尋來提供搜尋功能,如前文所述。 為了支援應用程式,Kiana 決定從 Web API 執行下列作業:
從秘訣資料表中尋找指定知識庫提示的詳細資料。
在提示資料表中更新現有的知識庫提示。
將新的知識庫秘訣新增至秘訣資料表中,如果指定的部件或工程師目前並未錄製任何秘訣,也可能包括將這些列新增至 BoilerParts 和工程師資料表。 在新增新秘訣前實際執行邏輯的常式,會以調用邏輯應用程式的方式來實現 Power Apps。
定義 Web API 作業:欄位排程
排程技術人員約會不僅需要查詢、新增及移除約會,也需要記錄客戶的相關資訊。 現有的約會系統會將此資料記錄在 SchedulesDB 資料庫的三個資料表中:
- 約會:包含每個約會的詳細資料,包括指派工作的日期、時間、問題、註釋和技術人員。
- 客戶:包含每位客戶的詳細資料,包括名稱、地址和連絡人詳細資料。
- 工程師:列出每位參與約會的技術人員。
注意
資料庫實際上包含名為 AppointmentsStatus 的第四個資料表。 此資料表包含約會狀態的有效值清單,而且僅為現有約會系統之其他部件所使用的查詢。
Kiana 判斷下列作業在應用程式的欄位排程部分中將非常有用:
- 尋找指定技術人員的所有約會。
- 尋找指定技術人員目前的所有約會。
- 尋找指定技術人員下一次排定的約會。
- 更新約會的詳細資料,例如新增註釋或照片。
- 尋找客戶的相關詳細資料。
建立 Web API 作業:欄位庫存管理
現有的系統會使用 Azure SQL 資料庫儲存資料。 Kiana 決定使用 Entity Framework Core 建立 Web API,因為這種方式可能會生成大量查詢、插入及更新資料的程式碼。 Microsoft 所提供的 Web API 範本也可以建立在 API 中描述每個作業的 Swagger 描述。 這些描述在測試 API 作業時非常有用。 許多工具都可以使用此資訊,將 API 與其他服務整合,例如 Azure API 管理。
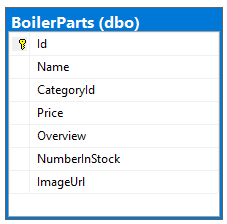
Kiana 開始使用現場庫存功能,因為這是最直接的部件。 Web API 中的欄位庫存作業在 InventoryDB 資料庫中查詢單一資料表 BoilerParts。 此資料表包含下列影像中所顯示的資料欄。
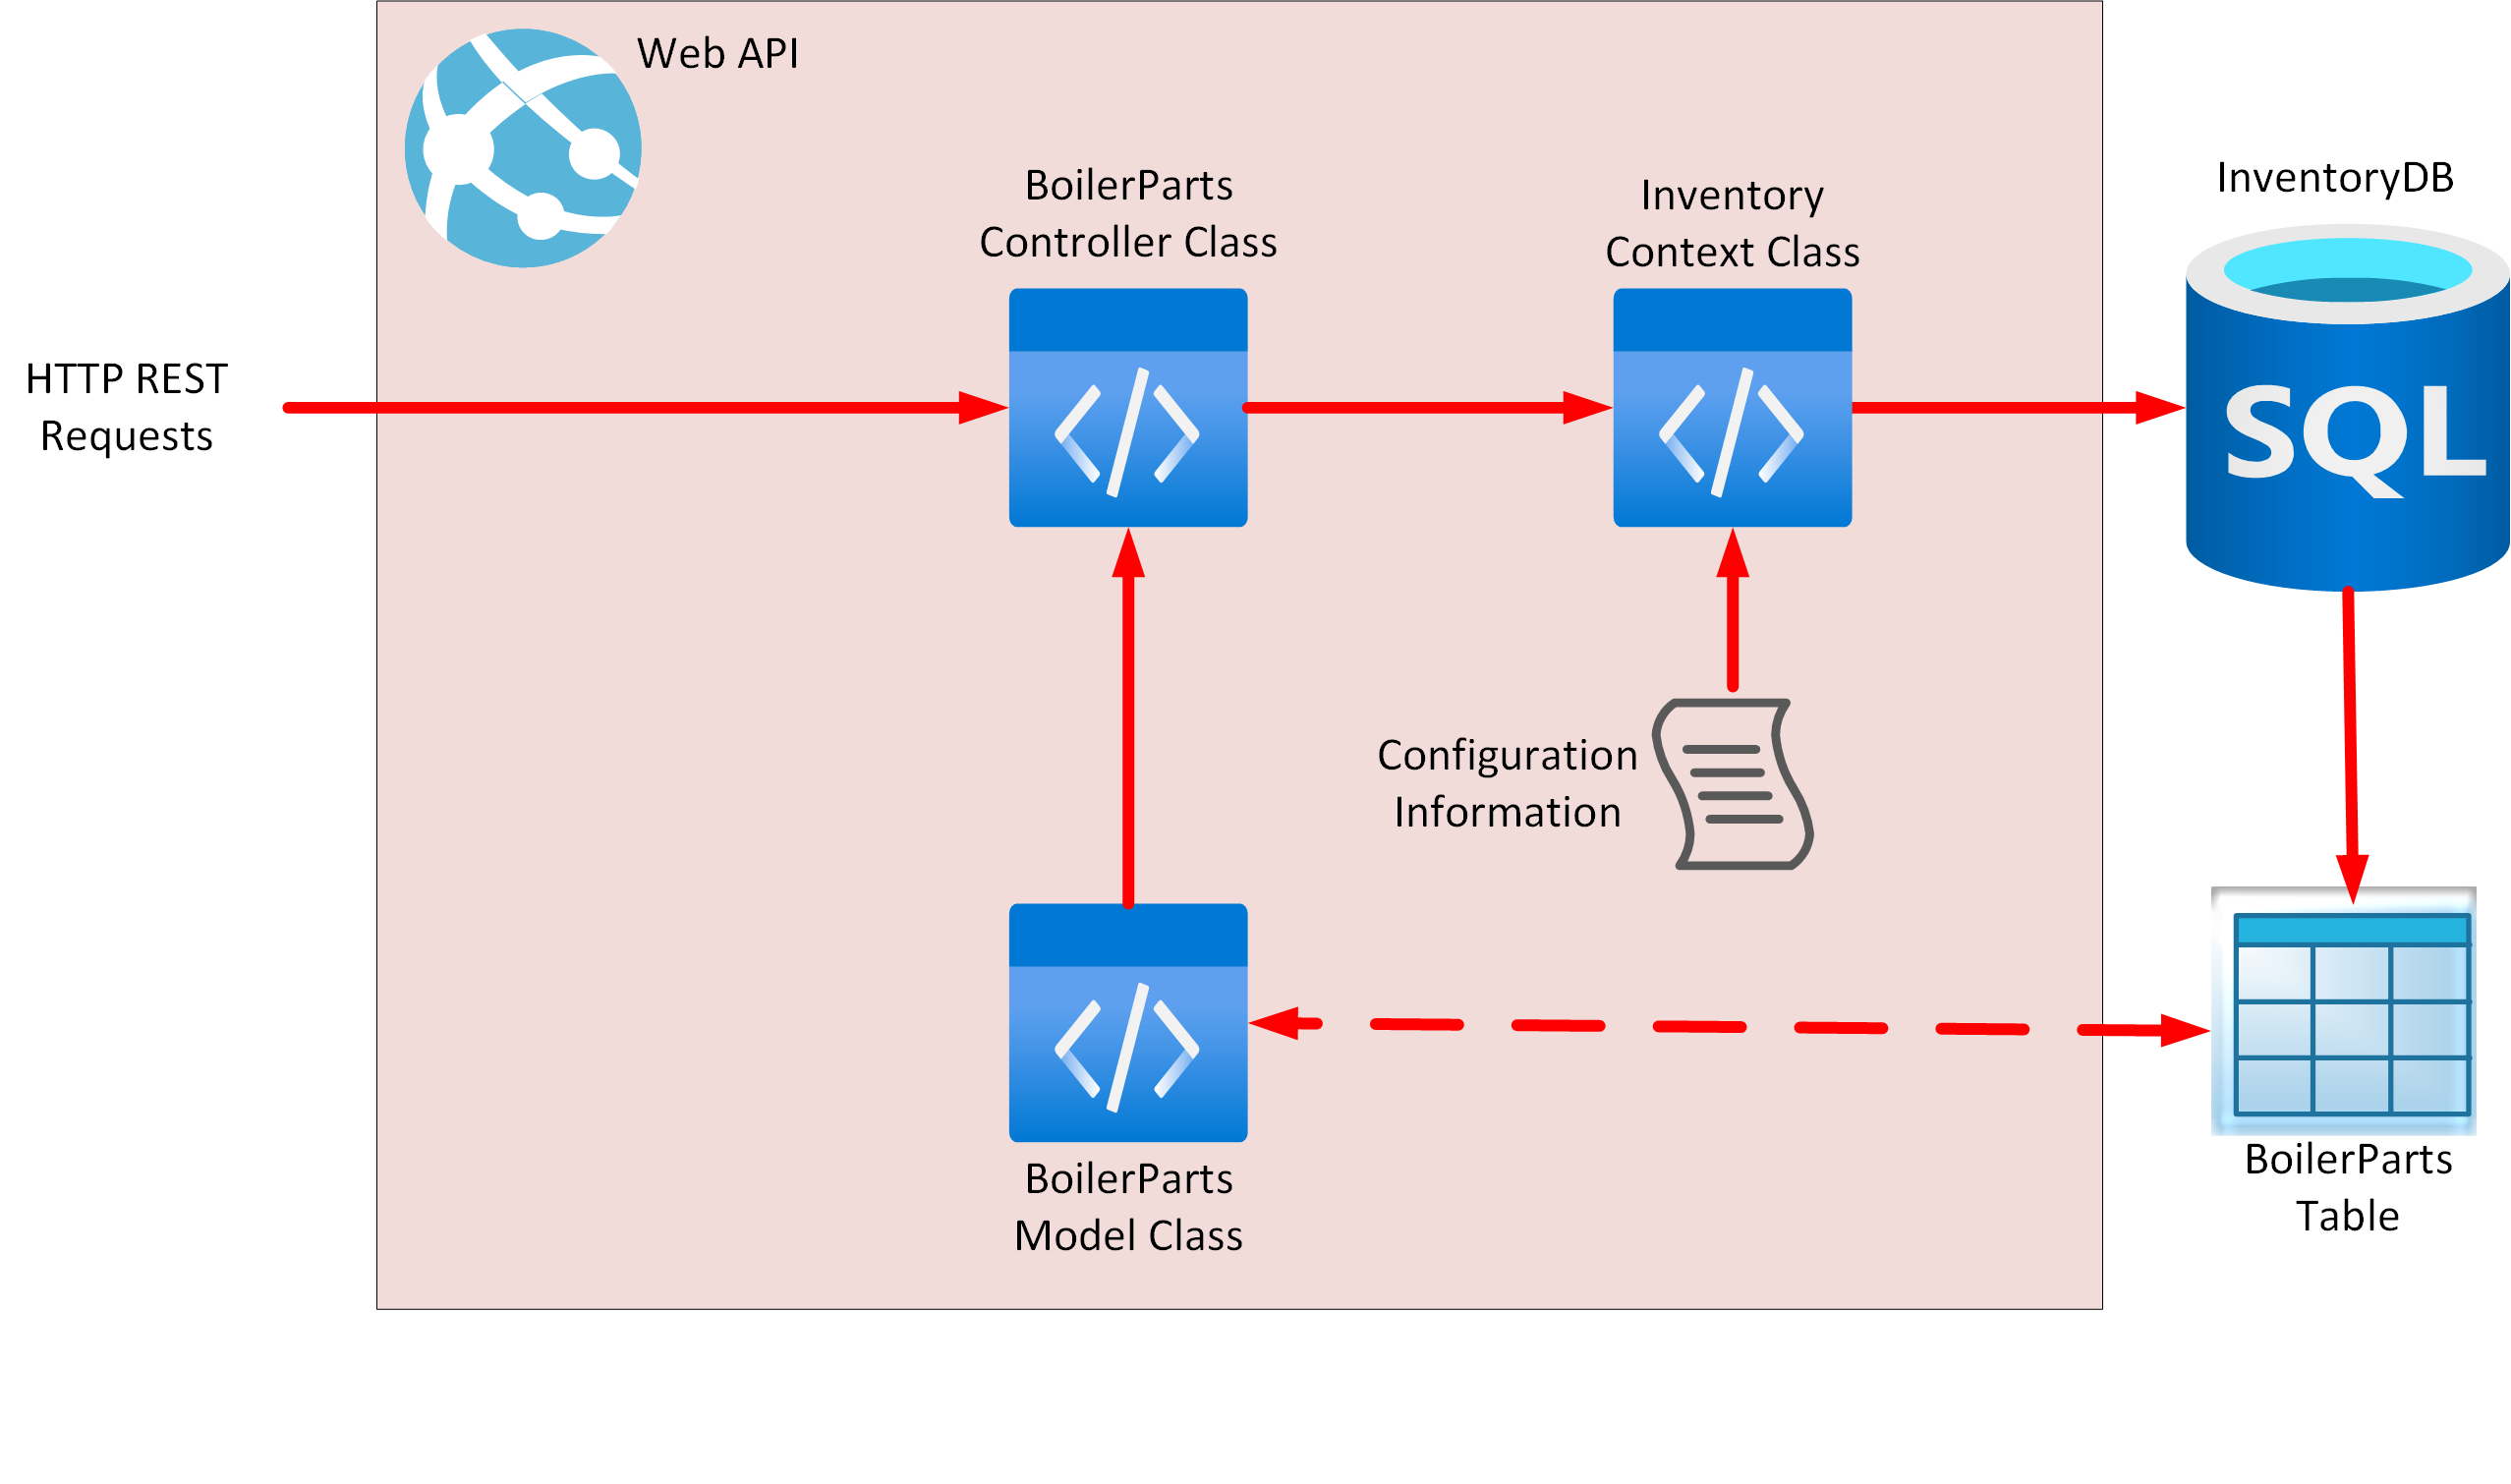
Kiana 採用「程式碼優先」方法以建置 Web API,並已執行下列工作:
定義其本身的 C# 模型類別,在 InventoryDB 資料庫中建立 BoilerParts 資料表結構的鏡像。
建立一個實體框架內文模型,讓 Web API 用其連接資料庫,以執行查詢。
已設定上下文模型,以連線至 Azure 中的 InventoryDB 資料庫。
使用實體框架命令列工具,生成可針對 BoilerParts 資料表執行之各作業的 HTTP REST 要求的 Web API 控制器模型 。
已使用 Swagger API 來測試 Web API。
下圖顯示的是 Web API 的上層結構。
Kiana 會使用下列程序,透過 NET 6.0 命令列工具和 Visual Studio Code 來建立 Web API:
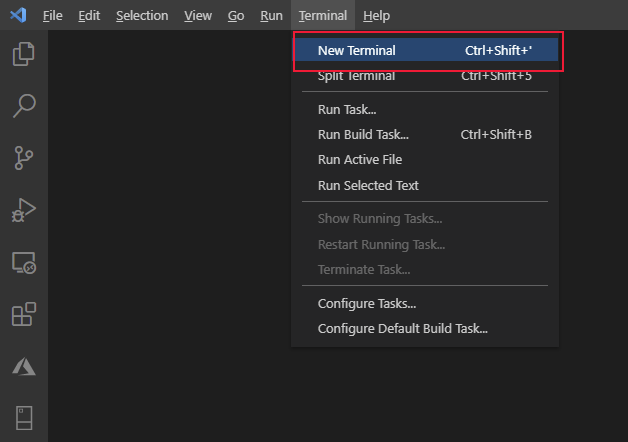
在 Visual Studio Code 中開啟終端視窗。
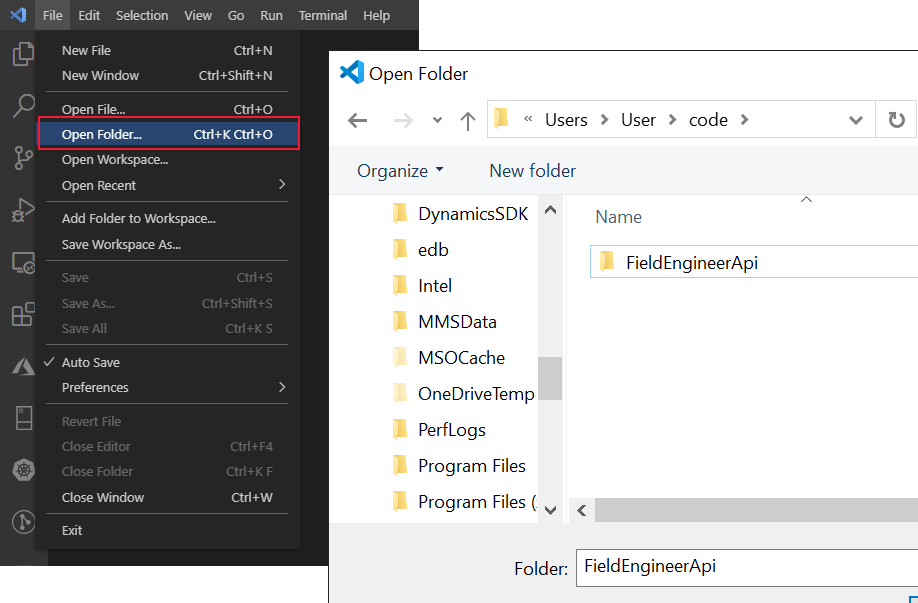
執行下列命令,建立名為 FieldEngineerApi 的新 Web API 專案 。
dotnet new webapi -o FieldEngineerApi打開 FieldEngineerApi 資料夾。
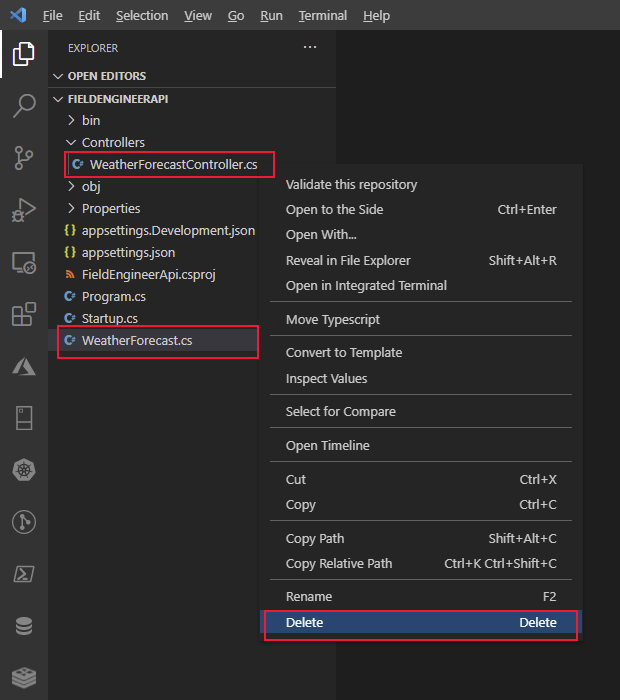
移除範例 WeatherForecastController.cs 控制器和由 Web API 範本建立的 WeatherForecast.cs 類別檔案。
在終端視窗中,新增下列實體框架套件及工具,並結合使用 SQL Server 來支援專案。
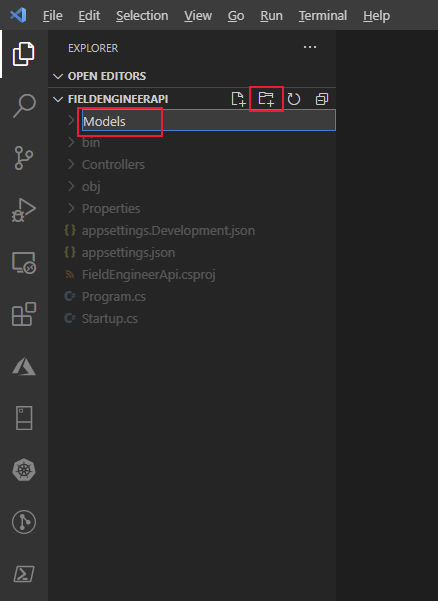
dotnet add package Microsoft.EntityFrameworkCore.SqlServer

dotnet add package Microsoft.VisualStudio.Web.CodeGeneration.Design

dotnet add package Microsoft.EntityFrameworkCore.Design

dotnet add package Microsoft.AspNetCore.Mvc.NewtonsoftJson

dotnet tool install --global dotnet-ef

dotnet tool install --global dotnet-aspnet-codegenerator
在 FieldEngineerApi 資料夾中,建立名為模型的新資料夾。
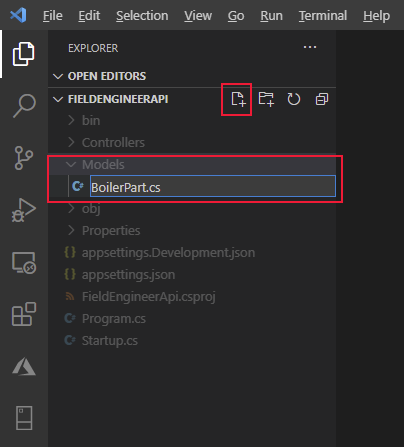
在模型資料夾中,建立名為 BoilerPart.cs 的 C# 程式碼檔案。
在此檔案中,新增下列屬性和欄位。 這些屬性和欄位會鏡像 InventoryDB 資料庫中 BoilerParts 資料表的結構 。
using System.Collections.Generic; using System.ComponentModel.DataAnnotations; using System.ComponentModel.DataAnnotations.Schema; namespace FieldEngineerApi.Models { public class BoilerPart { [Key] public long Id { get; set; } public string Name { get; set; } public string CategoryId { get; set; } [Column(TypeName = "money")] public decimal Price { get; set; } public string Overview { get; set; } public int NumberInStock { get; set; } public string ImageUrl { get; set; } } }在模型資料夾中,建立名為 InventoryContext.cs 的 C# 程式碼檔案。 將下列代碼新增至此類別。 此類別會提供控制器 (下一個要建立的) 和資料庫之間的連線。
using Microsoft.EntityFrameworkCore;

namespace FieldEngineerApi.Models
{
    public class InventoryContext : DbContext
    {
        public InventoryContext(DbContextOptions<InventoryContext> options)
            : base(options)
        {

        }

        public DbSet\<BoilerPart\> BoilerParts { get; set; }
    }
}
編輯 appsettings.Development.json 檔案,並使用下列 InventoryDB 連接字串新增 ConnectionStrings 區段 。 用您建立的 SQL Database 伺服器取代 <server name>,存放 InventoryDB 資料庫。
{
    "ConnectionStrings": {
        "InventoryDB": "Server=tcp*:<server name>*.database.windows.net,1433;Initial Catalog=InventoryDB;Persist Security Info=False;User ID=sqladmin;Password=Pa55w.rd;MultipleActiveResultSets=False;Encrypt=True;TrustServerCertificate=False;Connection Timeout=30;"
    },
    "Logging": {
        "LogLevel": {
            "Default": "Information",
            "Microsoft": "Warning",
            "Microsoft.Hosting.Lifetime": "Information"
        }
    }
}
重要
僅出於本指南的目的,連接字串包含資料庫的使用者 ID 與密碼。 在生產系統中,您永遠不應該在設定檔中以純文字儲存這些專案。
編輯 Startup.cs 檔案,並新增下列使用指令至檔案開頭的清單中 。
using FieldEngineerApi.Models; using Microsoft.EntityFrameworkCore;在啟動類別中,尋找 ConfigureServices方法。 將下列陳述式新增至此方法。
public void ConfigureServices(IServiceCollection services) { services.AddDbContext<InventoryContext>(options => options.UseSqlServer(Configuration.GetConnectionString("InventoryDB"))); services.AddControllers(); ... }當應用程式在生產模式中執行時,修改設定方法並啟用 Swagger UI,如下所示 (這項變更涉及重新置放兩個 app.UseSwagger 方法,在 if 語句之外進行調用)。
public void Configure(IApplicationBuilder app, IWebHostEnvironment env)
{
    if (env.IsDevelopment())
    {
        app.UseDeveloperExceptionPage();
    }
    app.UseSwagger();
    app.UseSwaggerUI(c => c.SwaggerEndpoint("/swagger/v1/swagger.json", "FieldEngineerApi v1"));

    ...
}
重要
這種變更可讓 Swagger 端點暴露,以進行 API 管理整合。 設定 API 管理之後,您應該將此代碼移回if 陳述式中,然後重新部署 Web API。 千萬不要在生產系統中打開 Swagger 端點。
在終端視窗中執行下列命令,從 BoilerPart 模型類別和 InventoryCoNtext 內文類別生成 BoilerParts 控制器。
dotnet aspnet-codegenerator controller ^
    -name BoilerPartsController -async -api ^
     -m BoilerPart -dc InventoryContext -outDir Controllers
BoilerParts 控制器應建立在控制器資料夾中。
[!NOTE] 只有 Windows 才能識別行終止字元 ^。 如果您正在 Linux 系統上執行 Visual Studio Code,請使用 \ 字元。
在控制器資料夾中打開 BoilerParts.cs 檔案,然後查看內容。 BoilerPartsController 類別公開下列 REST 方法:
- GetBoilerParts():從資料庫中返回所有 BoilerPart 物件的清單。
- GetBoilerPart(long id):會擷取指定鍋爐部件的詳細資料。
- PutBoilerPart(long id, BoilerPart boilerPart):透過指定為參數的 BoilerPart 物件中的詳細資料,更新資料庫中的鍋爐部件。
- PostBoilerPart(BoilerPart boilerPart):建立新的鍋爐部件。
- DeleteBoilerPart(long id):從資料庫移除指定鍋爐部件。
注意
技術人員的應用程式只需要兩個 Get 方法,而其他適用於桌面庫存管理應用程式 (本指南並未涵蓋)。
編譯並建立 Web API。
dotnet build
Web API 建立時應該不會報告任何錯誤或警告。
部署 Web API 至Azure:欄位庫存管理
Kiana 部署並測試了 Web API,方法是執行下列工作:
在 Visual Studio Code 中使用 Azure 帳戶擴充功能,登入您的 Azure 訂閱。
從 Visual Studio Code 的終端視窗中,在您的 Azure 訂閱中建立名為 webapi_rg 的新資源群組。 在下列命令中,以您最近的 Azure 區域取代 <location>。
az group create ^
    --name webapi_rg ^
    --location <location>
建立 Azure 應用服務方案,提供用來託管 Web API 的資源。
az appservice plan create ^
    --name webapi_plan ^
    --resource-group webapi_rg ^
    --sku F1
注意
F1 是適用於應用程式服務方案的免費 SKU。 它能提供有限的輸送量和容量,而且僅適用於開發目的。
使用應用程式服務方案建立 Azure Web 應用程式。 用 Web 應用程式的唯一名稱取代為 <webapp name>。
az webapp create ^
    --name <webapp name> ^
    --resource-group webapi_rg ^
    --plan webapi_plan
在程式 Visual Studio Code 中,編輯 appSettings 檔案,並新增先前寫入 appSettings 的相同連接字串 appSettings.Development.json 檔案。 記得用您建立的 SQL Database 伺服器取代 <server name>,存放 InventoryDB 資料庫。
{
    "ConnectionStrings": {
        "InventoryDB": "Server=tcp:<server name>.database.windows.net,1433;Initial Catalog=InventoryDB;Persist Security Info=False;User ID=sqladmin;Password=Pa55w.rd;MultipleActiveResultSets=False;Encrypt=True;TrustServerCertificate=False;Connection Timeout=30;"**
    },
    "Logging": {
        "LogLevel": {
            "Default\: "Information",
            "Microsoft": "Warning",
            "Microsoft.Hosting.Lifetime": "Information"
        }
    },
    "AllowedHosts": "*"
}
在終端視窗中,將 Web API 打包,準備部署至 Azure。
dotnet publish -c Release -o ./publish此命令會將打包的檔案儲存至名為發佈的資料夾。
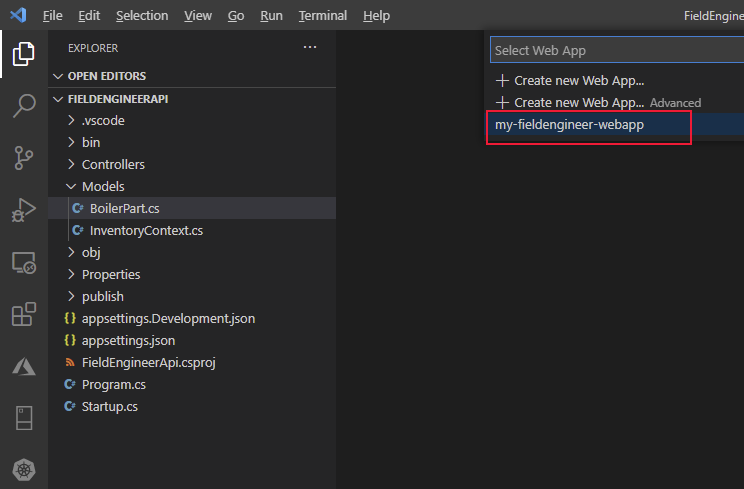
在 Visual Studio Code 中,右鍵點擊發佈資料夾,然後選取部署至 Web 應用程式。

選取先前在步驟 4 中所建立的 web 應用程式名稱 (<webapp name>)。 在下列範例中,web 應用程式的名稱為 my-fieldengineer-webapp。
在 Visual Studio Code 對話方塊的提示字元中,選取部署以接受警告並部署 Web 應用程式。
確認 Web 應用程式已順利部署,然後瀏覽至網站。
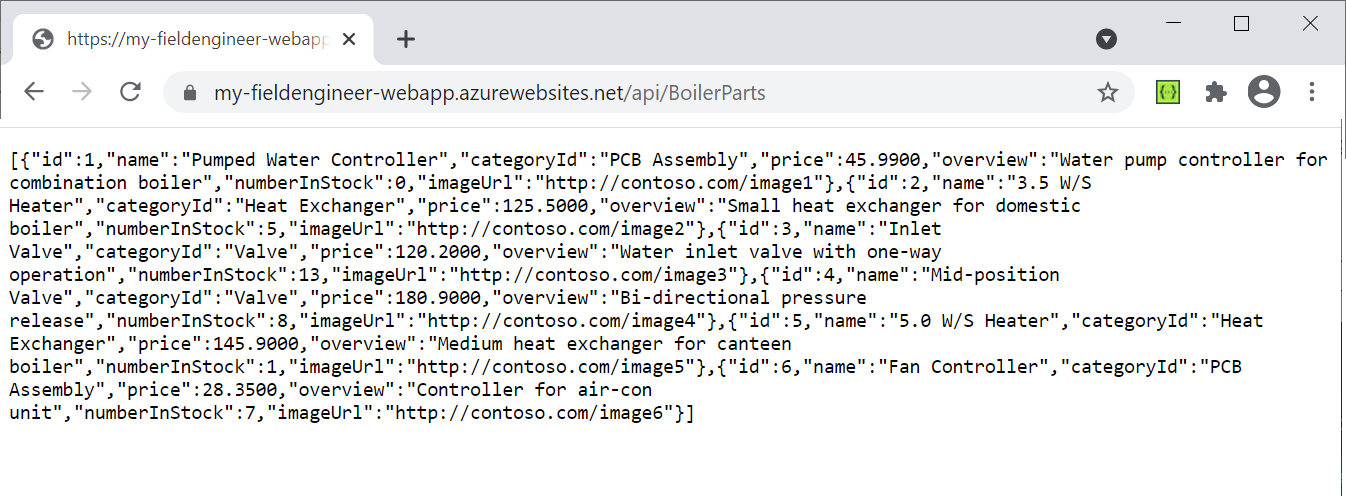
網站將會在新的瀏覽器視窗中打開,但會顯示 HTTP 404 錯誤 (找不到)。 這是因為 Web API 作業可以透過 API 端點而非網站根目錄來使用。 將 URL 變更為 https://<webapp name>.azurewebsites.net/api/BoilerParts。 此 URI 會在 BoilerParts 控制器中調用 GetBoilerParts 方法。 Web API 必須以 JSON 檔回應,其中列出 InventoryDB 資料庫中的所有鍋爐部件。
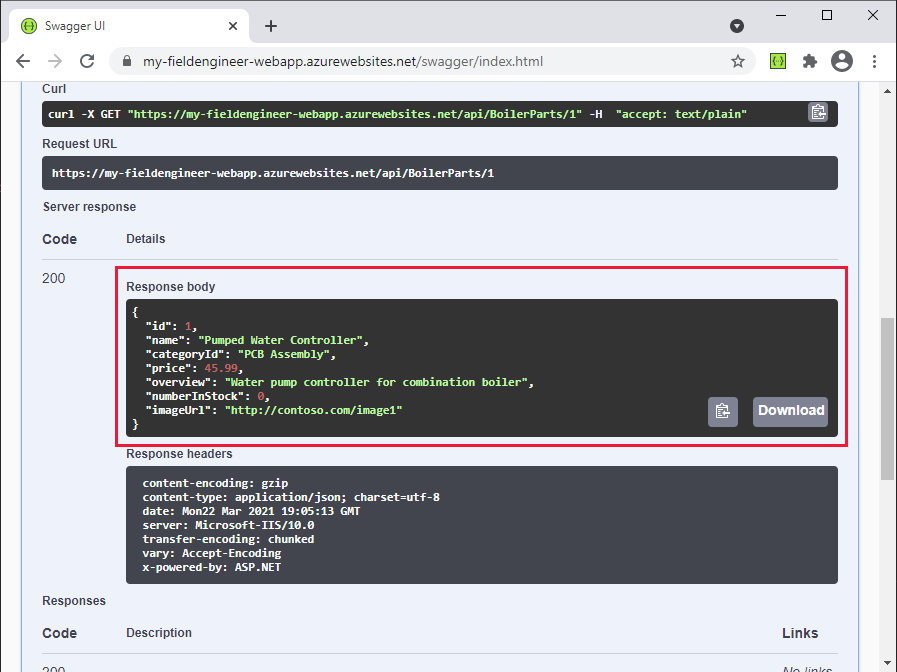
將瀏覽器中的 URL 變更為 https://<webapp name>.azurewebsites.net/swagger。 將會顯示 Swagger API。 這是一種圖形使用者介面,可讓開發人員驗證和測試 Web API 中的各種作業。 它也可以作為一種實用的文件工具。

選取 /api/BoilerParts/{id} 端點旁邊的 GET,然後選取試用。
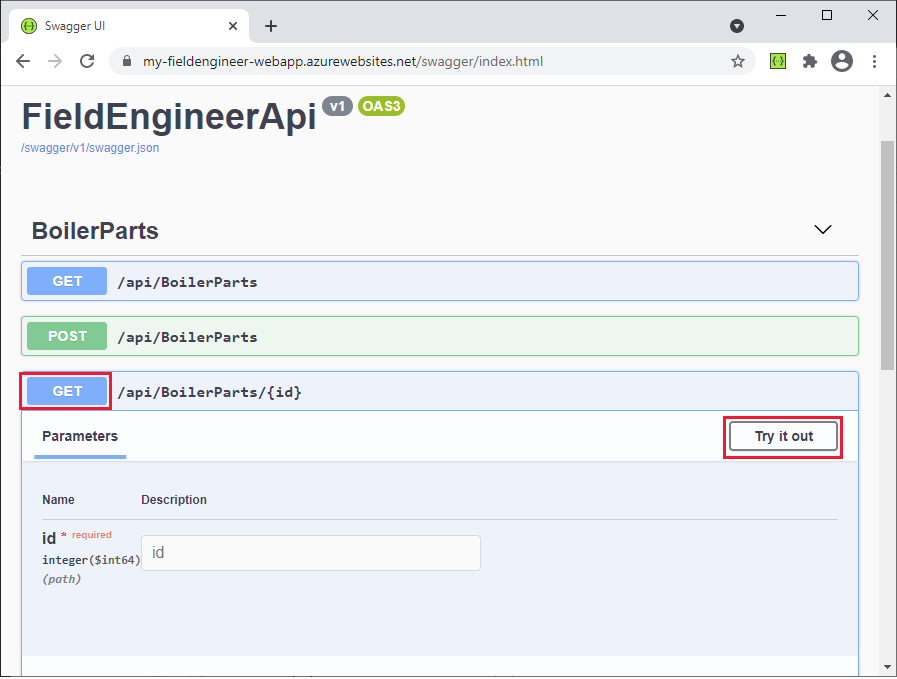
在 id 欄位中輸入部件的 ID,然後選取執行。 此動作會在 BoilerParts 控制器中調用 GetBoilerPart(long id) 方法。 如果在資料庫中找不到符合的部件,它會返回包含部件詳細資料的 JSON 檔,或 HTTP 404 錯誤。
關閉網頁瀏覽器並返回 Visual Studio Code。
建立和部署 Web API:欄位知識庫
Web API 中的欄位知識庫作業可在 KnowledgeDB 資料庫中使用三個資料表:KnowledgeDB 知識庫、秘訣、BoilerParts 和工程師。 下圖顯示這些資料表與其中包含的資料欄關聯。

Kiana 對用於現場庫存管理資料庫的現場知識庫資料庫採用類似的方法,並已執行下列工作:
建立鏡像 KnowledgeDB 資料庫中的秘訣、BoilerParts 和工程師資料表結構的 C# 模型類別。 下列各類的程式碼如下所示。
注意
KnowledgeDB 資料庫中的 BoilerParts 資料表與 InventoryDB 資料庫中的 BoilerParts 資料表不同。 若要避免名稱衝突,KnowledgeDB 資料庫中資料表的模型類別擁有 KnowledgeBase 首碼。
// KnowledgeBaseTips.cs

using System.ComponentModel.DataAnnotations;

namespace FieldEngineerApi.Models
{
    public class KnowledgeBaseTip
    {
        [Key]
        public long Id { get; set; }

        public long KnowledgeBaseBoilerPartId { get; set; }

        public virtual KnowledgeBaseBoilerPart KnowledgeBaseBoilerPart { get; set; }

        public string KnowledgeBaseEngineerId { get; set; }

        public virtual KnowledgeBaseEngineer KnowledgeBaseEngineer { get; set; }

        public string Subject { get; set; }

        public string Body { get; set; }
    }
}
注意
工程師 Id 是字串,而不是數字。 這是因為現有的系統會使用 Guid 來識別技術人員和其他使用者。
// KnowledgeBaseBoilerPart.cs

using System.Collections.Generic;
using System.ComponentModel.DataAnnotations;

namespace FieldEngineerApi.Models
{
    public class KnowledgeBaseBoilerPart
    {
        [Key]
        public long Id { get; set; }

        public string Name { get; set; }

        public string Overview { get; set; }

        public virtual ICollection<KnowledgeBaseTip> KnowledgeBaseTips { get; set; }
    }
}
// KnowledgeBaseEngineer.cs using System.Collections.Generic; using System.ComponentModel.DataAnnotations; namespace FieldEngineerApi.Models { public class KnowledgeBaseEngineer { [Key] public string Id { get; set; } [Required] public string Name { get; set; } public string ContactNumber { get; set; } public virtual ICollection<KnowledgeBaseTip> KnowledgeBaseTips { get; set; } } }建立另一個實體框架內文類別,讓 Web API 用其連接 KnowledgeDB 資料庫。
// KnowledgeBaseContext.cs

using Microsoft.EntityFrameworkCore;

namespace FieldEngineerApi.Models
{
    public class KnowledgeBaseContext : DbContext
    {
        public KnowledgeBaseContext(DbContextOptions<KnowledgeBaseContext> options)
            : base(options)
        {

        }

        public DbSet<KnowledgeBaseBoilerPart> BoilerParts { get; set; }

        public DbSet<KnowledgeBaseEngineer> Engineers { get; set; }

        public DbSet<KnowledgeBaseTip> Tips { get; set; }
    }
}
編輯 appsettings.Development.json 檔案,並使用下列 InventoryDB 連接字串新增 ConnectionStrings 區段 。 用您建立的 SQL Database 伺服器取代 <server name>,存放 KnowledgeDB 資料庫。
{
    "ConnectionStrings": {
        "InventoryDB": "Server=tcp:...",
        "KnowledgeDB": "Server=tcp:<server name>.database.windows.net,1433;Initial Catalog=KnowledgeDB;Persist Security Info=False;User ID=sqladmin;Password=Pa55w.rd;MultipleActiveResultSets=False;Encrypt=True;TrustServerCertificate=False;Connection Timeout=30;"
    },
    "Logging": {
        ...
        }
    }
}
重要
僅出於本指南的目的,連接字串包含資料庫的使用者 ID 與密碼。 在生產系統中,您永遠不應該在設定檔中以純文字儲存這些專案。
編輯 Startup.cs 檔案,然後在 ConfigureServices 方法中新增下列陳述式。
public void ConfigureServices(IServiceCollection services)
{
    services.AddDbContext<InventoryContext>...;

    services.AddDbContext<KnowledgeBaseContext>(options =>
        options.UseSqlServer(Configuration.GetConnectionString("KnowledgeD")));

    services.AddControllers().AddNewtonsoftJson(
        options => options.SerializerSettings.ReferenceLoopHandling = Newtonsoft.Json.ReferenceLoopHandling.Ignore**
    );

    services.AddControllers();
    ...
}
第二個陳述式控制檢索資料時序列化資料的方式。 某些模型類別會參考其他模型類別,而這些模型類別又可以參照進一步的模型類別。 其中一些參照會導致遞迴迴圈 (實體 A 參考實體 B,該實體會再次參考實體 B,依此類推)。 ReferenceLoopHandling 選項會讓序列化程式忽略資料中的此類迴圈,而且只會返回實體及其立即參考的物件,而不需要其他實體和物件。
在終端視窗中執行下列命令,從 KnowledgeBaseBoilerTip、KnowledgeBaseBoilerPart 以及 KnowledgeBaseEngineer 模型類別和 KnowledgeBaseCoNtext 內文類別組建控制器。
dotnet aspnet-codegenerator controller ^ -name KnowledgeBaseTipController -async -api ^ -m KnowledgeBaseTip ^ -dc KnowledgeBaseContext -outDir Controllers dotnet aspnet-codegenerator controller ^ -name KnowledgeBaseBoilerPartController -async -api ^ -m KnowledgeBaseBoilerPart ^ -dc KnowledgeBaseContext -outDir Controllers dotnet aspnet-codegenerator controller ^ -name KnowledgeBaseEngineerController -async -api ^ -m KnowledgeBaseEngineer ^ -dc KnowledgeBaseContext -outDir Controllers全部三種控制器應建立在控制器資料夾中。
編輯 KnowledgeBaseBoilerPartController.cs 檔案。 此檔案包含 KnowledgeBaseBoilerPart 控制器的程式碼。 它應遵循與先前建立的 BoilerPartsController 類別相同的模式 ,公開可客戶端列出、查詢、插入、更新和刪除實體的 REST 方法。 將下列 GetTipsForPart 方法新增至控制器。
[Route("api/[controller]")]
[ApiController]

public class KnowledgeBaseBoilerPartController : ControllerBase
{
    private readonly KnowledgeBaseContext _context;

    public KnowledgeBaseBoilerPartController(KnowledgeBaseContext context)
    {
        _context = context;
    }

    // GET: api/KnowledgeBaseBoilerPart/5/Tips
    [HttpGet("{id}/Tips")]
    public async Task<ActionResult<IEnumerable<KnowledgeBaseTip>>>GetTipsForPart(long id)
    {
        return await _context.Tips.Where(
            t => t.KnowledgeBaseBoilerPartId == id).ToListAsync();
    }
    ...
}
此方法會返回參考指定部件的所有知識庫提示。 它會透過 KnowledgeBaseContext 物件查詢資料庫中的秘訣表格,尋找此資訊。
編輯 KnowledgeBaseEngineerController.cs 檔案並新增下列 KnowledgeBaseEngineerController 類別中的方法,如下所示。
[Route("api/[controller]")]
[ApiController]
public class KnowledgeBaseEngineerController : ControllerBase
{
    private readonly KnowledgeBaseContext _context;

    public KnowledgeBaseEngineerController(KnowledgeBaseContext context)
    {
        _context = context;
    }

    // GET: api/KnowledgeBaseEngineer/5/Tips
    [HttpGet("{id}/Tips")]
    public async Task\<ActionResult<IEnumerable<KnowledgeBaseTip>>> GetTipsForEngineer(string id)
    {
        return await _context.Tips.Where(t =>
            t.KnowledgeBaseEngineerId == id).ToListAsync();
    }

    ...
}
GetTipsForEngineer 方法會尋找由指定的工程師張貼的所有知識庫提示。
在終端視窗中,編譯並建立 Web API。
dotnet buildWeb API 建立時應該不會報告任何錯誤或警告。
編輯 appSettings.json 檔案,並新增 KnowledgeDB 資料庫的連接字串。 此字串應與您先前寫入 appSettings.Development.json 檔案的字串相同。
{ "ConnectionStrings": { "InventoryDB": ..., "KnowledgeDB": "Server=tcp:<server name>.database.windows.net,1433;Initial Catalog=KnowledgeDB;Persist Security Info=False;User ID=sqladmin;Password=Pa55w.rd;MultipleActiveResultSets=False;Encrypt=True;TrustServerCertificate=False;Connection Timeout=30;" }, "Logging": { ... }, "AllowedHosts": "*" }在終端視窗中,將 Web API 打包,準備部署至 Azure。
dotnet publish -c Release -o ./publish在 Visual Studio Code 中,右鍵點擊發佈資料夾,然後選取部署至 Web 應用程式。 部署先前建立的 Azure web 應用程式。 允許此安裝精靈使用新的程式碼覆寫現有的 Web 應用程式。
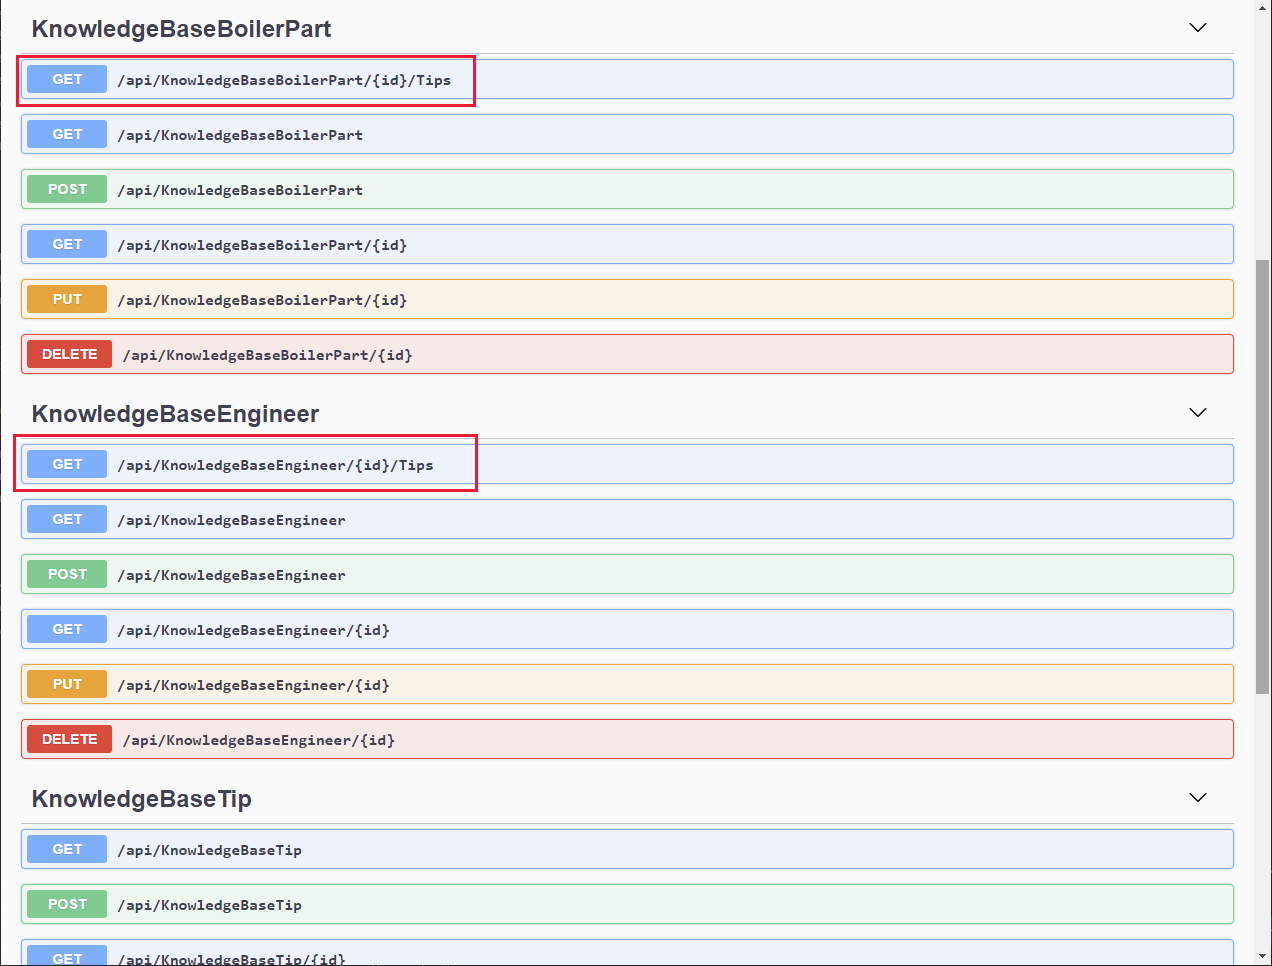
部署完成後,請瀏覽網站,但是將瀏覽器中的 URL 變更為 https://<webapp name>.azurewebsites.net/swagger。 除了現有的 BoilerParts 作業之外,也應列出 KnowledgeBaseBoilerPart、KnowledgeBaseEngineer 和 KnowldgeBaseTip 控制器的作業。 確認 KnowledgeBaseBoilerPart 作業包括 URI /api/KnowledgeBaseBoilerPart/{id}/Tips 的 GET 作業,且 KnowledgeBaseEngineer 作業包括 /api/KnowledgeBaseEngineer/{id}/Tips 的 GET 作業。
建立和部署 Web API:欄位排程
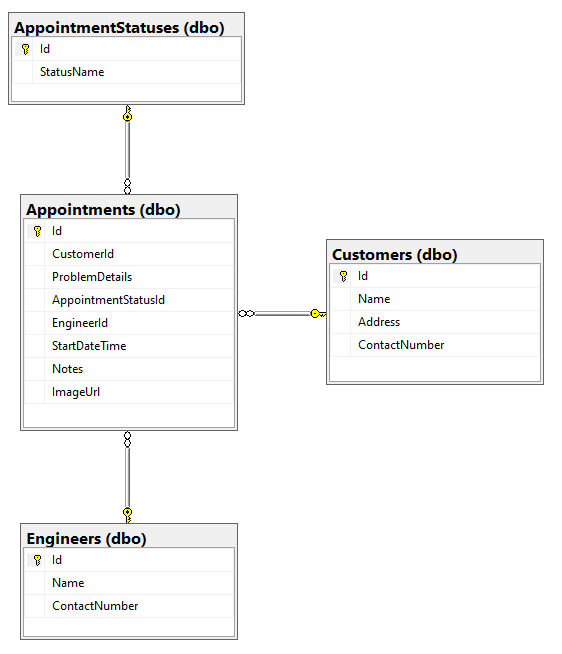
欄位排程作業使用資料表約會、AppointmentStatuses (這是一個簡單的查詢表格,其中列出有效的約會狀態值)、客戶和工程師,如下圖所示。 這些表格會儲存在 SchedulesDB 資料庫中。
為了建立系統的欄位排程部分的 Web API 作業,Kiana 執行下列工作:
建立鏡像 SchedulesDB 資料庫中的 AppointmentStatus、約會、客戶和工程師資料表結構的 C# 模型類別。 下列程式碼顯示了各種類別。
注意
工程師表格的模型類別會命名為 ScheduleEngineer,與 InventoryDB 資料庫中的工程師資料表模型相區分。
// AppointmentStatus.cs

using Newtonsoft.Json;
using System.Collections.Generic;
using System.ComponentModel.DataAnnotations;

namespace FieldEngineerApi.Models
{
    public class AppointmentStatus {
        [Key]
        public long Id { get; set; }

        public string StatusName { get; set; }
        [JsonIgnore]
        public virtual ICollection<Appointment> Appointments { get; set; }
    }
}
// Appointment.cs using System; using System.ComponentModel.DataAnnotations; namespace FieldEngineerApi.Models { public class Appointment { [Key] public long Id { get; set; } [Required] public long CustomerId { get; set; } public virtual Customer Customer { get; set; } public string ProblemDetails { get; set; } [Required] public long AppointmentStatusId { get; set; } public virtual AppointmentStatus AppointmentStatus { get; set; } public string EngineerId { get; set; } public virtual ScheduleEngineer Engineer { get ; set; } [Display(Name = "StartTime")] [DataType(DataType.DateTime)] [DisplayFormat(DataFormatString = "{0:MM/dd/yyyy H:mm:ss}")] public DateTime StartDateTime { get; set; } public string Notes { get; set; } public string ImageUrl { get; set; } } }// Customer.cs using System.Collections.Generic; using System.ComponentModel.DataAnnotations; namespace FieldEngineerApi.Models { public class Customer { [Key] public long Id { get; set; } [Required] public string Name { get; set; } public string Address { get; set; } public string ContactNumber { get; set; } public virtual ICollection<Appointment> Appointments { get; set; } } }// ScheduleEngineer.cs using Newtonsoft.Json; using System.ComponentModel.DataAnnotations; using System.Collections.Generic; namespace FieldEngineerApi.Models { public class ScheduleEngineer { [Key] public string Id { get; set; } [Required] public string Name { get; set; } public string ContactNumber { get; set; } [JsonIgnore] public virtual ICollection<Appointment> Appointments { get; set; } } }建立實體框架內文類別,讓 Web API 用其連接 SchedulesDB 資料庫。
// ScheduleContext.cs

using System;
using Microsoft.EntityFrameworkCore;

namespace FieldEngineerApi.Models
{
    public class ScheduleContext : DbContext
    {
        public ScheduleContext(DbContextOptions<ScheduleContext> options)
            : base(options)
        {

        }

        public DbSet<Appointment> Appointments { get; set; }

        public DbSet<AppointmentStatus> AppointmentStatuses { get; set; }

        public DbSet<Customer> Customers { get; set; }

        public DbSet<ScheduleEngineer> Engineers { get; set; }
    }
}
編輯 appsettings.Development.json 檔案,並使用下列 SchedulesDB 連接字串新增 ConnectionStrings 區段 。 用您建立的 SQL Database 伺服器取代 <server name>,存放 KnowledgeDB 資料庫。
{
    "ConnectionStrings": {
        "InventoryDB": "Server=tcp*: ...",
        "KnowledgeDB": "Server=tcp; ... ",
        "SchedulesDB": "Server=tcp:<server name>.database.windows.net,1433;Initial Catalog=SchedulesDB;Persist Security Info=False;User ID=sqladmin;Password=Pa55w.rd;MultipleActiveResultSets=False;Encrypt=True;TrustServerCertificate=False;Connection Timeout=30;"
    },
    "Logging": {
        ...
        }
    }
}
編輯 Startup.cs 檔案,然後在 ConfigureServices 方法中新增下列陳述式。
public void ConfigureServices(IServiceCollection services) { services.AddDbContext<InventoryContext>...; services.AddDbContex\<KnowledgeBaseContext>...; services.AddDbContext<ScheduleContext>(options => options.UseSqlServer(Configuration.GetConnectionString("SchedulesDB"))); services.AddControllers().AddNewtonsoftJson(...); ... }在終端視窗中執行下列命令,從 約會、客戶 以及 ScheduleEngineer 模型類別和 ScheduleContext 內文類別組建控制器。
注意
請勿為 AppointmentStatus 模型建立不同的控制器。
dotnet aspnet-codegenerator controller ^
    -name AppointmentsController -async -api ^
    -m Appointment ^
    -dc ScheduleContext -outDir Controllers

dotnet aspnet-codegenerator controller ^
    -name CustomerController -async -api ^
    -m Customer ^
    -dc ScheduleContext -outDir Controllers

dotnet aspnet-codegenerator controller ^
    -name ScheduleEngineerController -async -api ^
    -m ScheduleEngineer ^
    -dc ScheduleContext -outDir Controllers
編輯 AppointmentsController.cs 檔案。 在 AppointmentsController 類別中,尋找 GetAppointments 方法。 修改返回陳述式,如圖所示。 此變更可確保在 GET 作業過程中檢索客戶、工程師及 AppointmentStatus 資訊;這些欄位參照實體框架的惰性載入機制而可能會保留 null 值的其他實體。
public class AppointmentsController : ControllerBase
{
    private readonly ScheduleContext _context;

    public AppointmentsController(ScheduleContext context)
    {
        _context = context;
    }

    // GET: api/Appointments

    [HttpGet]
    public async Task<ActionResult<IEnumerable<Appointment>>> GetAppointments()
    {
        return await _context.Appointments
            .Include(c => c.Customer)
            .Include(e => e.Engineer)
            .Include(s => s.AppointmentStatus)
            .ToListAsync();
    }

    ...
}
在相同的檔案中,修改 GetAppointment(long id) 方法,如圖所示。
// GET: api/Appointments/5 [HttpGet("{id}")] public async Task<ActionResult<Appointment>> GetAppointment(long id) { var appointment = _context.Appointments .Where(a => a.Id == id) .Include(c => c.Customer) .Include(e => e.Engineer) .Include(s => s.AppointmentStatus); var appData = await appointment.FirstOrDefaultAsync(); if (appData == null) { return NotFound(); } return appData; }這個版本的方法會在檢索約會時填入約會的客戶、工程師及 AppointmentStatus 欄位 (否則,惰性載入可能會將這些欄位保留空白)。
尋找 PutAppointment 方法,並將它替換為下列程式碼。 這個版本的 PutAppointment 方法採用約會中的欄位,使用者可以在應用程式中修改而不是完整的約會物件。
[HttpPut("{id}")]
public async Task<IActionResult> PutAppointment(long id,
    string problemDetails, string statusName,
    string notes, string imageUrl)
{

    var statusId = _context.AppointmentStatuses.First(s =>
        s.StatusName == statusName).Id;

    var appointment = _context.Appointments.First(e =>
        e.Id == id);

    if (appointment == null)
    {
        return BadRequest();
    }

    appointment.ProblemDetails = problemDetails;
    appointment.AppointmentStatusId = statusId;
    appointment.Notes = notes;
    appointment.ImageUrl = imageUrl;
    _context.Entry(appointment).State = EntityState.Modified;

    try
    {
        await _context.SaveChangesAsync();
    }
    catch (DbUpdateConcurrencyException)
    {
        if (!AppointmentExists(id))
        {
            return NotFound();
        }
        else
        {
            throw;
        }
    }

    return NoContent();
}
注意
一般規則是,PUT 作業應該只會修改使用者應允許更新的資料,而不一定是實體中的每個欄位。
開啟 ScheduleEngineerController.cs 檔案並新增下列 GetScheduleEngineerAppointments 方法至 ScheduleEngineerController 類別。
[Route("api/[controller]")]
[ApiController]
public class ScheduleEngineerController : ControllerBase
{
    private readonly ScheduleContext _context;

    public ScheduleEngineerController(ScheduleContext context)
    {
        _context = context;
    }

    // GET: api/ScheduleEngineer/5/Appointments
    [HttpGet("{id}/Appointments")]

    public async Task<ActionResult<IEnumerable<Appointment>>> GetScheduleEngineerAppointments(string id)
    {
        return await _context.Appointments
            .Where(a => a.EngineerId == id)
            .OrderByDescending(a => a.StartDateTime)
            .Include(c => c.Customer)
            .Include(e => e.Engineer)
            .Include(s => s.AppointmentStatus)
            .ToListAsync();
    }

    ...
}

These methods retrieve the appointments for the specified technician.
Edit the CustomerController.cs file and add the GetAppointments and GetNotes methods, as shown, to the CustomerController class.
[Route("api/[controller]")]
[ApiController]
public class CustomerController : ControllerBase
{
    private readonly ScheduleContext _context;

    public CustomerController(ScheduleContext context)
    {
        _context = context;
    }

    //GET: api/Customers/5/Appointments
    [HttpGet("{id}/Appointments")]
    public async Task<ActionResult<IEnumerable<Appointment>>> GetAppointments(long id)
    {
        return await _context.Appointments
            .Where(a => a.CustomerId == id)
            .OrderByDescending(a => a.StartDateTime)
            .ToListAsync();
    }

    //GET: api/Customers/5/Notes
    [HttpGet("{id}/Notes")]
    public async Task<ActionResult<IEnumerable<object>>> GetNotes(long id)
    {
        return await _context.Appointments
            .Where(a => a.CustomerId == id)
            .OrderByDescending(a => a.StartDateTime)
            .Select(a =>
                new {a.StartDateTime, a.ProblemDetails, a.Notes})
            .ToListAsync();
    }

    ...
}
GetAppointments 方法會尋找指定客戶的所有約會。 GetNotes 方法會檢索在先前對客戶進行的拜訪中所建立的所有注釋。
編輯 appSettings.json 檔案,並新增 KnowledgeDB 資料庫的連接字串。 此字串應與您先前寫入 appSettings.Development.json 檔案的字串相同。
{ "ConnectionStrings": { "InventoryDB": ..., "KnowledgeDB": ..., "SchedulesDB": "Server=tcp:<server name>.database.windows.net,1433;Initial Catalog=SchedulesDB;Persist Security Info=False;User ID=sqladmin;Password=Pa55w.rd;MultipleActiveResultSets=False;Encrypt=True;TrustServerCertificate=False;Connection Timeout=30;" }, "Logging": { ... }, "AllowedHosts": "*" }在終端視窗中,編譯並建立 Web API。
dotnet buildWeb API 建立時應該不會報告任何錯誤或警告。
在終端視窗中,將 Web API 打包,準備部署至 Azure。
dotnet publish -c Release -o ./publish在 Visual Studio Code 中,右鍵點擊發佈資料夾,然後選取部署至 Web 應用程式。 部署先前建立的 Azure web 應用程式。 允許此安裝精靈使用新的程式碼覆寫現有的 Web 應用程式。
部署完成後,請瀏覽網站,但是將瀏覽器中的 URL 變更為 https://<webapp name>.azurewebsites.net/swagger。 確認約會、客戶及 ScheduleEngineer 控制器的作業現已可進行。
Web API 現在已準備好整合至應用程式中。
意見反應
即將登場:在 2024 年,我們將逐步淘汰 GitHub 問題作為內容的意見反應機制,並將它取代為新的意見反應系統。 如需詳細資訊,請參閱:https://aka.ms/ContentUserFeedback。
提交並檢視相關的意見反應