練習 - 部署 ARM 範本
注意
當您第一次啟動沙箱並接受條款時,您的 Microsoft 帳戶會與名為「Microsoft Learn 沙箱」的新 Azure 目錄建立關聯。 系統會將您新增至名為 Concierge Subscription 的特殊訂用帳戶。
在這裡,您會藉由指定 URI,以從電腦及 GitHub 存放庫部署 Azure Resource Manager (ARM) 範本。
重要
此練習會使用適用於 Visual Studio Code 的 Azure Resource Manager 工具。 請務必在 Visual Studio Code 中安裝此延伸模組。
使用 Microsoft Learn 沙箱訂用帳戶來設定環境
您必須從 Visual Studio Code 終端機登入 Azure 帳戶,才能執行本單元中的每個部署。
確定您登入的是已啟用沙箱的相同帳戶。
登入 Azure
從 Visual Studio Code 中的終端機,執行下列命令以登入 Azure。 執行此命令會開啟瀏覽器,讓您能夠登入帳戶。
Connect-AzAccount登入之後,即會在終端機中看到與此帳戶建立關聯的訂用帳戶清單。 如已啟用沙箱,則此清單中應會顯示指引訂用帳戶。
驗證訂用帳戶名稱。 下列命令會使用易於讀取的資料表格式列出訂用帳戶、名稱及其識別碼。 尋找
Concierge Subscription。Get-AzSubscription將作用中訂用帳戶變更為指引訂用帳戶。
$context = Get-AzSubscription -SubscriptionName "Concierge Subscription" | Set-AzContext
設定預設資源群組
您現在必須將在沙箱中建立的資源群組設定為預設資源群組。 若要執行此作業,您必須先執行下列命令來取得資源群組名稱。
Get-AzResourceGroup | where-object ResourceGroupName -match "learn" | Set-AzDefault
在此命令中,使用從上一個命令中獲得的資源名稱。 (其看起來很像 learn-a73131a1-b618-48b8-af70-21af7ca420c4。) 此命令允許在本練習的其餘 Azure PowerShell 命令中忽略該參數。
注意
一般而言,當執行 PowerShell 或 Azure CLI 命令來部署範本時,您必須指定目標資源群組名稱。 執行上述命令時,我們已設定部署的內容。 我們已執行 Set-AzDefault PowerShell 命令來指定沙箱資源群組名稱:
Set-AzDefault -ResourceGroupName {Resource Group Name}
部署本機範本
在接下來的練習中,您會從本機電腦部署範本。 因為上一節中已定義預設的資源群組,所以此處不需要您在自有環境中部署時常用的資源群組名稱。
請複製下列範本程式碼的內容,並貼到下列本機目錄中的檔案,以開始練習。 例如,使用
C:\JSON\maintemplate.json。{ "$schema": "https://schema.management.azure.com/schemas/2019-04-01/deploymentTemplate.json#", "contentVersion": "1.0.0.0", "parameters": { "VnetName": { "type": "string", "defaultValue": "VNet-001", "metadata": { "description": "Virtual Network Name" } }, "CostCenterIO": { "type": "string", "defaultValue": "12345", "metadata": { "description": "Cost Center IO number for cross billing" } }, "OwnerName": { "type": "string", "defaultValue": "John Smith", "metadata": { "description": "Name of the stakeholder responsible for this resource" } } }, "variables": {}, "resources": [ { "apiVersion": "2018-10-01", "type": "Microsoft.Network/virtualNetworks", "name": "[parameters('VnetName')]", "location": "[resourceGroup().location]", "tags": { "CostCenter": "[parameters('CostCenterIO')]", "Owner": "[parameters('OwnerName')]" }, "properties": { "addressSpace": { "addressPrefixes": [ "10.0.0.0/16" ] }, "enableVmProtection": false, "enableDdosProtection": false, "subnets": [ { "name": "subnet001", "properties": { "addressPrefix": "10.0.0.0/24" } }, { "name": "subnet002", "properties": { "addressPrefix": "10.0.1.0/24" } } ] } } ] }將該檔案儲存到本機之後,您即可在上個單元中提到的資源群組層級使用 PowerShell 命令進行部署。 換句話說,使用 New-AzResourceGroupDeployment 命令。
$templateFile="C:\JSON\maintemplate.json"
$today=Get-Date -Format "MM-dd-yyyy"
$DeploymentName="DeployLocalTemplate-"+"$today"

New-AzResourceGroupDeployment `
-Name $DeploymentName `
-TemplateFile $templateFile
完成後,結果應該類似此範例。
DeploymentName          : DeployLocalTemplate-08-24-2020
ResourceGroupName       : learn-03f041a7-cd17-4f50-9c81-5f6678feb217
ProvisioningState       : Succeeded
Timestamp               : 2020-08-24 5:50:04 p.m.
Mode                    : Incremental
TemplateLink            :
Parameters              :
                          Name             Type                       Value
                          ===============  =========================  ==========
                          vnetName         String                     VNet-001
                          costCenterIO     String                     12345
                          ownerName        String                     John Smith

Outputs                 :
DeploymentDebugLogLevel :
使用參數值部署相同的本機範本
在上一個練習中,您使用了參數的預設值來部署範本。 當正在部署本機 ARM 範本時,可能需要傳遞這些參數值。 您可使用內嵌參數或參數檔案。
若要將內嵌參數傳遞至部署,您必須使用 New-AzResourceGroupDeployment Cmdlet 來提供參數的名稱。 在下一個練習中,您將使用內嵌參數及參數檔案的形式來傳遞參數。
使用和上個練習相同的範本,建構包含必要範本參數值的雜湊表。
$parameters = @{vnetName = "VNet-001"; costCenterIO = "12345"; ownerName = "John Smith"}
$templateFile="C:\JSON\maintemplate.json"
$today=Get-Date -Format "MM-dd-yyyy"
$DeploymentName="DeployLocalTemplate-2-"+"$today"

New-AzResourceGroupDeployment `
    -Name $DeploymentName `
    -TemplateFile $templateFile `
    -TemplateParameterObject $parameters
完成後,結果應該類似這樣:
DeploymentName          : DeployLocalTemplate-2-08-24-2020
ResourceGroupName       : learn-03f041a7-cd17-4f50-9c81-5f6678feb217
ProvisioningState       : Succeeded
Timestamp               : 2020-08-24 5:51:55 p.m.
Mode                    : Incremental
TemplateLink            :
Parameters              :
                          Name             Type                       Value
                          ===============  =========================  ==========
                          vnetName         String                     VNet-001
                          costCenterIO     String                     12345
                          ownerName        String                     John Smith

Outputs                 :
DeploymentDebugLogLevel :
您可能會發現,使用包含參數值的 JSON 檔案,比利用指令碼將參數當作內嵌值傳遞更容易。 參數檔案可以是本機檔案或具有可存取 URI 的外部/遠端檔案。 如需參數檔案的詳細資訊,請參閱建立 Resource Manager 參數檔案。
我們會在持續使用的相同命令中,以
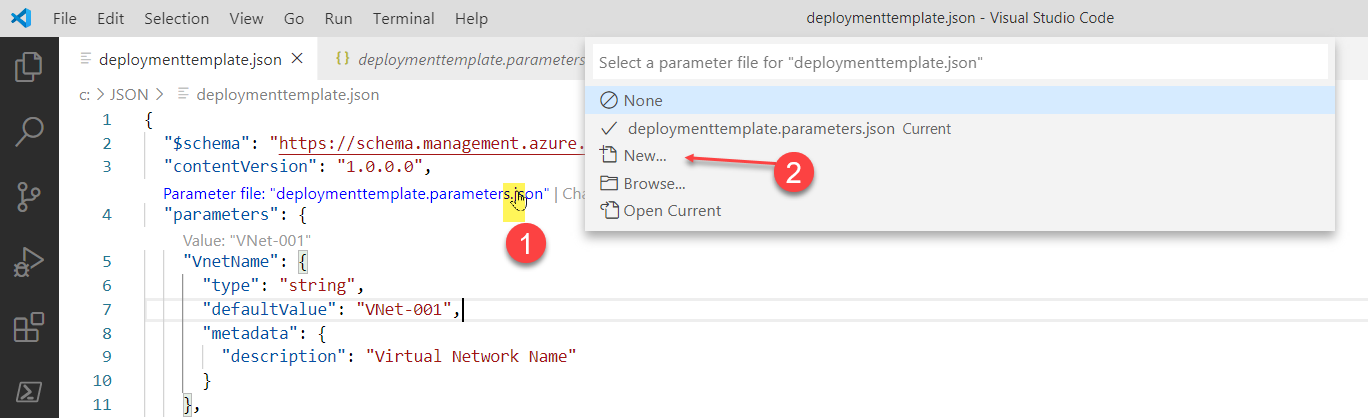
TemplateParameterFile參數來傳遞本機參數檔案。 但首先,您必須建立並儲存參數檔案。因為我們使用 Visual Studio Code 並搭配 Azure Resource Manager 工具延伸模組,所以您可開啟儲存在本機的 ARM 範本,然後選取 [選取/建立參數檔案...] 連結。
選取功能表上的 [新增],然後選取 [僅限必要參數]。 該延伸模組會根據目前開啟的範本建立參數檔案。
使用下列具有
TemplateParameterFile參數的 PowerShell 命令。$parameters = @{vnetName = "VNet-001"; costCenterIO = "12345"; ownerName = "John Smith"} $templateFile="C:\JSON\maintemplate.json" $TemplateParameterFile= "C:\JSON\maintemplate.parameters.json" $today=Get-Date -Format "MM-dd-yyyy" $DeploymentName="DeployLocalTemplate-3-"+"$today" New-AzResourceGroupDeployment ` -Name $DeploymentName ` -TemplateFile $templateFile ` -TemplateParameterFile $TemplateParameterFile部署之後,結果應該看起來如下列範例所示。
DeploymentName          : DeployLocalTemplate-3-08-24-2020
ResourceGroupName       : learn-03f041a7-cd17-4f50-9c81-5f6678feb217
ProvisioningState       : Succeeded
Timestamp               : 2020-08-24 5:54:40 p.m.
Mode                    : Incremental
TemplateLink            :
Parameters              :
                          Name             Type                       Value
                          ===============  =========================  ==========
                          vnetName         String                     VNet-001
                          costCenterIO     String                     12345
                          ownerName        String                     John Smith

Outputs                 :
DeploymentDebugLogLevel :
部署外部或遠端範本
在某些情況下,您必須從外部或遠端位置,而不是從本機電腦的範本進行部署。 您可以在原始檔控制存放庫 (例如 GitHub) 中儲存範本。 或者,您可以將其儲存在 Azure 儲存體帳戶中,以在組織中進行共用存取。
使用
TemplateUri參數部署外部範本。在下一個練習中,您要從 GitHub 存放庫部署 ARM 範本。 因為存放庫是公用的,所以無需擔心部署範本需要共用存取簽章 (SAS) 權杖。 如需使用私人或安全遠端位置的詳細資料,請參閱 使用 SAS 權杖部署私人範本 (機器翻譯)。
本練習的範本 URI 為 https://raw.githubusercontent.com/Azure/azure-quickstart-templates/master/quickstarts/microsoft.storage/storage-account-create/azuredeploy.json。 這是一個簡短的範本,會在沙箱環境中部署基本的儲存體帳戶。
PowerShell 命令與用於本機範本的命令完全相同。 唯一的差別在於
-TemplateUri參數會取代-TemplateFile參數。請使用下列程式碼在提供的沙箱中部署:
$parameters = @{vnetName = "VNet-001"; costCenterIO = "12345"; ownerName = "John Smith"}
$today=Get-Date -Format "MM-dd-yyyy"
$DeploymentName="DeployLocalTemplate-4-"+"$today"

New-AzResourceGroupDeployment `
    -Name $DeploymentName `
    -TemplateUri https://raw.githubusercontent.com/Azure/azure-quickstart-templates/master/quickstarts/microsoft.storage/storage-account-create/azuredeploy.json
結果會類似下列螢幕擷取畫面。 結果會概述範本位置的詳細資料。
DeploymentName          : DeployLocalTemplate-4-08-24-2020
ResourceGroupName       : learn-03f041a7-cd17-4f50-9c81-5f6678feb217
ProvisioningState       : Succeeded
Timestamp               : 2020-08-24 5:56:55 p.m.
Mode                    : Incremental
TemplateLink            :
                          Uri            :
                          https://raw.githubusercontent.com/Azure/azure-quickstart-templates/master/quickstarts/microsoft.storage/storage-account-create/azuredeploy.json
                          ContentVersion : 1.0.0.0

Parameters              :
                          Name                  Type                       Value
                          ====================  =========================  ==========
                          storageAccountType    String                     Standard_LRS
                          location              String                     westus

Outputs                 :
                          Name                  Type                       Value
                          ====================  =========================  ==========
                          storageAccountName    String                     storepgxosadmbq77e

DeploymentDebugLogLevel :
注意
本節是在 Windows 10 上,使用 Windows Linux 子系統 (WSL2) 的 Azure CLI 命令所撰寫。 無論是在 PowerShell、CMD 或 Bash 殼層中使用 Azure CLI,這些命令皆相同。 不過,處理變數的方式有所不同。
登入 Azure
從 Visual Studio Code 中的終端機,執行下列命令以登入 Azure。 執行此命令會開啟瀏覽器,讓您能夠登入帳戶。
az login登入之後,即會在終端機中看到與此帳戶建立關聯的 JSON 訂用帳戶清單。 如已啟用沙箱,則此清單中應會顯示指引訂用帳戶。
取得訂用帳戶識別碼。 下列命令會列出您的訂用帳戶與其識別碼。 訂用帳戶識別碼在第三個資料行。 尋找
Concierge Subscription,並複製第三個資料行。 您應該會看到類似於cf49fbbc-217c-4eb6-9eb5-a6a6c68295a0的內容。az account list -o table將作用中訂用帳戶變更為指引訂用帳戶。 請務必將
{Your subscription ID}替換為在上一個命令中取得的指引訂用帳戶識別碼。az account set -s {Your subscription ID}
設定預設資源群組
您現在必須將在沙箱中建立的資源群組設定為預設資源群組。 您必須先使用下列命令取得資源群組名稱,才能執行此作業:
az group list -o table
在此命令中,使用從上一個命令中獲得的資源名稱。 (其看起來很像 learn-a73131a1-b618-48b8-af70-21af7ca420c4。) 此命令允許在本練習的其餘 Azure CLI 命令中忽略該參數。
注意
一般而言,當您使用 Azure CLI 命令來部署範本時,需要指定目標資源群組名稱。 在本課程模組的練習中,我們會藉由設定部署內容以略過這項需求。 我們會在下一個步驟中,藉由 az configure Azure CLI 命令以指定沙箱資源群組名稱。
az configure --defaults group={Resource Group Name}
部署本機範本
在接下來的練習中,您會從本機電腦部署範本。 因為上一節中已定義預設的資源群組,所以此處不需要您在自有環境中部署時常用的資源群組名稱。
請複製下列範本程式碼的內容,並貼到下列本機目錄中的檔案,以開始練習。 例如,使用
C:\JSON\maintemplate.json或/mnt/c/Users/you/json/maintemplate.json。{ "$schema": "https://schema.management.azure.com/schemas/2019-04-01/deploymentTemplate.json#", "contentVersion": "1.0.0.0", "parameters": { "VnetName": { "type": "string", "defaultValue": "VNet-001", "metadata": { "description": "Virtual Network Name" } }, "CostCenterIO": { "type": "string", "defaultValue": "12345", "metadata": { "description": "Cost Center IO number for cross billing" } }, "OwnerName": { "type": "string", "defaultValue": "John Smith", "metadata": { "description": "Name of the stakeholder responsible for this resource" } } }, "variables": {}, "resources": [ { "apiVersion": "2018-10-01", "type": "Microsoft.Network/virtualNetworks", "name": "[parameters('VnetName')]", "location": "[resourceGroup().location]", "tags": { "CostCenter": "[parameters('CostCenterIO')]", "Owner": "[parameters('OwnerName')]" }, "properties": { "addressSpace": { "addressPrefixes": [ "10.0.0.0/16" ] }, "enableVmProtection": false, "enableDdosProtection": false, "subnets": [ { "name": "subnet001", "properties": { "addressPrefix": "10.0.0.0/24" } }, { "name": "subnet002", "properties": { "addressPrefix": "10.0.1.0/24" } } ] } } ] }將該檔案儲存到本機之後,您即可在上個單元中提到的資源群組層級使用 Azure CLI 命令進行部署。 亦即,使用 az deployment group create。
注意
在下列範例中,範本檔案位於 Windows Linux 子系統 (WSL2) 主目錄磁碟機的 json 資料夾。 根據所選殼層調整命令。
templateFile=/mnt/c/Users/<UserName>/json/maintemplate.json
today=$(date +"%Y-%m-%d")
deploymentname="DeployLocalTemplate-"$today

az deployment group create \
  --name $deploymentname \
  --template-file $templateFile
完成之後,產生的輸出應該看起來如下列範例所示。 請尋找
"provisioningState": "Succeeded"程式碼行,以確保部署成功。{ "id": "/subscriptions/082d0d73-f197-45c5-9884-581c8f0ce102/resourceGroups/learn-e692001a-b605-48d4-97bd-7c05669db9dd/providers/Microsoft.Resources/deployments/DeployLocalTemplate-2020-08-19", "location": null, "name": "DeployLocalTemplate-2020-08-19", "properties": { "correlationId": "6ad759d5-cda5-4a71-a772-05a03d983c6f", "debugSetting": null, "dependencies": [], "duration": "PT8.9060761S", "error": null, "mode": "Incremental", "onErrorDeployment": null, "outputResources": [ { "id": "/subscriptions/082d0d73-f197-45c5-9884-581c8f0ce102/resourceGroups/ learn-e692001a-b605-48d4-97bd-7c05669db9dd/providers/Microsoft.Network/virtualNetworks/VNet-001", "resourceGroup": "learn-e692001a-b605-48d4-97bd-7c05669db9dd" } ], "outputs": null, "parameters": { "costCenterIO": { "type": "String", "value": "12345" }, "ownerName": { "type": "String", "value": "John Smith" }, "vnetName": { "type": "String", "value": "VNet-001" } }, "parametersLink": null, "providers": [ { "id": null, "namespace": "Microsoft.Network", "registrationPolicy": null, "registrationState": null, "resourceTypes": [ { "aliases": null, "apiVersions": null, "capabilities": null, "locations": [ "westus" ], "properties": null, "resourceType": "virtualNetworks" } ] } ], "provisioningState": "Succeeded", "templateHash": "11553431046699679955", "templateLink": null, "timestamp": "2020-08-19T14:47:06.403362+00:00", "validatedResources": null }, "resourceGroup": "learn-e692001a-b605-48d4-97bd-7c05669db9dd", "tags": null, "type": "Microsoft.Resources/deployments" }
使用參數值部署相同的本機範本
在上一個練習中,您使用了參數的預設值來部署範本。 當正在部署本機 ARM 範本時,可能需要傳遞這些參數值。 您可使用內嵌參數或參數檔案。
在下一個練習中,您要將內嵌參數傳遞至部署。 不論您使用內嵌參數或是參數檔案,都需要使用 az deployment group create 命令來提供參數的名稱。
使用和上個練習相同的範本建構變數,此變數會包含必要範本參數的 JSON 字串格式參數。
注意
在下列範例中,範本檔案位於 Windows Linux 子系統 (WSL2) 的 json 資料夾。 根據所選殼層和作業系統調整命令。
parameters="{\"vnetName\":{\"value\":\"VNet-001\"},\"costCenterIO\":{\"value\":\"12345\"},\"ownerName\":{\"value\":\"John Smith\"}}"
templateFile=/mnt/c/Users/<UserName>/json/maintemplate.json
today=$(date +"%Y-%m-%d")
deploymentname="DeployLocalTemplate-2-"$today

az deployment group create \
--name $deploymentname \
--template-file $templateFile \
--parameters "$parameters"
完成之後,應該會有如下列範例一樣的結果。 若要確保命令成功,請參閱
"parameters"區段和"provisioningState"值。{- Finished .. "id": "/subscriptions/082d0d73-f197-45c5-9884-581c8f0ce102/resourceGroups/learn-e692001a-b605-48d4-97bd-7c05669db9dd/providers/Microsoft.Resources/deployments/DeployLocalTemplate-2-2020-08-19", "location": null, "name": "DeployLocalTemplate-2-2020-08-19", "properties": { "correlationId": "edb2992e-08be-4ec2-940e-df23b1c09453", "debugSetting": null, "dependencies": [], "duration": "PT4.6990388S", "error": null, "mode": "Incremental", "onErrorDeployment": null, "outputResources": [ { "id": "/subscriptions/082d0d73-f197-45c5-9884-581c8f0ce102/resourceGroups/learn-e692001a-b605-48d4-97bd-7c05669db9dd/providers/Microsoft.Network/virtualNetworks/VNet-001", "resourceGroup": "learn-e692001a-b605-48d4-97bd-7c05669db9dd" } ], "outputs": null, "parameters": { "costCenterIO": { "type": "String", "value": "12345" }, "ownerName": { "type": "String", "value": "John Smith" }, "vnetName": { "type": "String", "value": "VNet-001" } }, "parametersLink": null, "providers": [ { "id": null, "namespace": "Microsoft.Network", "registrationPolicy": null, "registrationState": null, "resourceTypes": [ { "aliases": null, "apiVersions": null, "capabilities": null, "locations": [ "westus" ], "properties": null, "resourceType": "virtualNetworks" } ] } ], "provisioningState": "Succeeded", "templateHash": "11553431046699679955", "templateLink": null, "timestamp": "2020-08-19T16:40:20.249786+00:00", "validatedResources": null }, "resourceGroup": "learn-e692001a-b605-48d4-97bd-7c05669db9dd", "tags": null, "type": "Microsoft.Resources/deployments" }您可能會發現,使用包含參數值的 JSON 檔案,比利用指令碼將參數當作內嵌值傳遞更容易。 參數檔案可以是本機檔案或具有可存取 URI 的外部/遠端檔案。 如需參數檔案的詳細資訊,請參閱建立 Resource Manager 參數檔案。
我們會在持續使用的相同命令中,以
--parameters參數來傳遞本機參數檔案。 但首先,您必須建立並儲存參數檔案。因為我們使用 Visual Studio Code 並搭配 Azure Resource Manager 工具延伸模組,所以您可開啟儲存在本機的 ARM 範本,然後選取 [選取或建立參數檔案以啟用完整驗證] 連結。
在功能表上選取 [新增]。 該延伸模組會根據目前開啟的範本建立參數檔案。
使用下列 Azure CLI 命令搭配
--parameters參數。注意
在下列範例中,範本檔案位於 Windows Linux 子系統 (WSL2) 的 json 資料夾。 根據所選殼層和作業系統調整命令。
templateFile=/mnt/c/Users/<UserName>/json/maintemplate.json
templateparameterfile=/mnt/c/Users/<UserName>/json/maintemplate.parameters.json
today=$(date +"%Y-%m-%d")
deploymentname="DeployLocalTemplate-3-"$today

az deployment group create \
--name $deploymentname \
--template-file $templateFile \
--parameters $templateparameterfile
部署之後,結果應該看起來如下列範例所示。
  {- Finished ..
    "id": "/subscriptions/00000000-0000-0000-0000-000000000000/resourceGroups/learn-159e2742-d3a1-4e71-84a3-16e19830242b/providers/Microsoft.Resources/deployments/DeployLocalTemplate-3-2020-08-19",
    "location": null,
    "name": "DeployLocalTemplate-3-2020-08-19",
    "properties": {
      "correlationId": "2a668f55-d8d0-48ac-862f-7170b48c02b6",
      "debugSetting": null,
      "dependencies": [],
      "duration": "PT4.2058912S",
      "error": null,
      "mode": "Incremental",
      "onErrorDeployment": null,
      "outputResources": [
        {
          "id": "/subscriptions/00000000-0000-0000-0000-000000000000/resourceGroups/learn-159e2742-d3a1-4e71-84a3-16e19830242b/providers/Microsoft.Network/virtualNetworks/VNet-001",
          "resourceGroup": "learn-159e2742-d3a1-4e71-84a3-16e19830242b"
        }
      ],
      "outputs": null,
      "parameters": {
        "costCenterIO": {
          "type": "String",
          "value": "12345"
        },
        "ownerName": {
          "type": "String",
          "value": "John Smith"
        },
        "vnetName": {
          "type": "String",
          "value": "VNet-001"
        }
      },
      "parametersLink": null,
      "providers": [
        {
          "id": null,
          "namespace": "Microsoft.Network",
          "registrationPolicy": null,
          "registrationState": null,
          "resourceTypes": [
            {
              "aliases": null,
              "apiVersions": null,
              "capabilities": null,
              "locations": [
                "westus"
              ],
              "properties": null,
              "resourceType": "virtualNetworks"
            }
          ]
        }
      ],
      "provisioningState": "Succeeded",
      "templateHash": "11553431046699679955",
      "templateLink": null,
      "timestamp": "2020-08-19T20:42:44.069215+00:00",
      "validatedResources": null
    },
    "resourceGroup": "learn-159e2742-d3a1-4e71-84a3-16e19830242b",
    "tags": null,
    "type": "Microsoft.Resources/deployments"
  }
部署外部或遠端範本
在某些情況下,您必須從外部或遠端位置,而不是從本機電腦的範本進行部署。 您可以在原始檔控制存放庫 (例如 GitHub) 中儲存範本。 或者,您可以將其儲存在 Azure 儲存體帳戶中,以在組織中進行共用存取。
- 使用
--template-uri參數部署外部範本。
在本練習中,您會從 GitHub 存放庫部署 ARM 範本。 因為存放庫是公用的,所以無需擔心部署範本需要共用存取簽章 (SAS) 權杖。 如需使用私人或安全遠端位置的詳細資料,請參閱 使用 SAS 權杖部署私人範本 (機器翻譯)。
本練習的範本 URI 為 https://raw.githubusercontent.com/Azure/azure-quickstart-templates/master/quickstarts/microsoft.storage/storage-account-create/azuredeploy.json。 這是一個簡短的範本,會在沙箱環境中部署基本的儲存體帳戶。
Azure CLI 命令與用於本機範本的命令完全相同。 唯一的差別在於
--template-uri參數會取代--template-file參數。請使用下列程式碼在提供的沙箱中部署:
parameters="{\"vnetName\":{\"value\":\"VNet-001\"},\"costCenterIO\":{\"value\":\"12345\"},\"ownerName\":{\"value\":\"John Smith\"}}"
today=$(date +"%Y-%m-%d")
deploymentname="DeployLocalTemplate-4-"$today

az deployment group create \
--name $deploymentname \
--template-uri https://raw.githubusercontent.com/Azure/azure-quickstart-templates/master/quickstarts/microsoft.storage/storage-account-create/azuredeploy.json
結果會類似下列程式碼區塊。 結果會在
"templateLink"區段概述範本位置的詳細資料。 部署成功與否也會顯示在"provisioningState"區段中。{- Finished .. "id": "/subscriptions/00000000-0000-0000-0000-000000000000/resourceGroups/learn-159e2742-d3a1-4e71-84a3-16e19830242b/providers/Microsoft.Resources/deployments/DeployLocalTemplate-4-2020-08-19", "location": null, "name": "DeployLocalTemplate-4-2020-08-19", "properties": { "correlationId": "2ccc49de-9d46-4375-a25d-19ec10daf88b", "debugSetting": null, "dependencies": [], "duration": "PT24.3286124S", "error": null, "mode": "Incremental", "onErrorDeployment": null, "outputResources": [ { "id": "/subscriptions/00000000-0000-0000-0000-000000000000/resourceGroups/learn-159e2742-d3a1-4e71-84a3-16e19830242b/providers/Microsoft.Storage/storageAccounts/store7zk7eyqew54l4", "resourceGroup": "learn-159e2742-d3a1-4e71-84a3-16e19830242b" } ], "outputs": { "storageAccountName": { "type": "String", "value": "store7zk7eyqew54l4" } }, "parameters": { "location": { "type": "String", "value": "westus" }, "storageAccountType": { "type": "String", "value": "Standard_LRS" } }, "parametersLink": null, "providers": [ { "id": null, "namespace": "Microsoft.Storage", "registrationPolicy": null, "registrationState": null, "resourceTypes": [ { "aliases": null, "apiVersions": null, "capabilities": null, "locations": [ "westus" ], "properties": null, "resourceType": "storageAccounts" } ] } ], "provisioningState": "Succeeded", "templateHash": "12600309984865991765", "templateLink": { "contentVersion": "1.0.0.0", "id": null, "relativePath": null, "uri": "https://raw.githubusercontent.com/Azure/azure-quickstart-templates/master/quickstarts/microsoft.storage/storage-account-create/azuredeploy.json" }, "timestamp": "2020-08-19T20:53:36.759312+00:00", "validatedResources": null }, "resourceGroup": "learn-159e2742-d3a1-4e71-84a3-16e19830242b", "tags": null, "type": "Microsoft.Resources/deployments" }