特製的片段類別
Fragments API 提供其他子類別,這些子類別會封裝應用程式中找到的一些較常見的功能。 這些子類別包括:
ListFragment – 此片段可用來顯示系結至數據源的項目清單,例如數位或數據指標。
DialogFragment – 此片段會當做對話框的包裝函式使用。 片段會顯示其活動頂端的對話框。
PreferenceFragment – 此片段用來將喜好設定對象顯示為清單。
The ListFragment
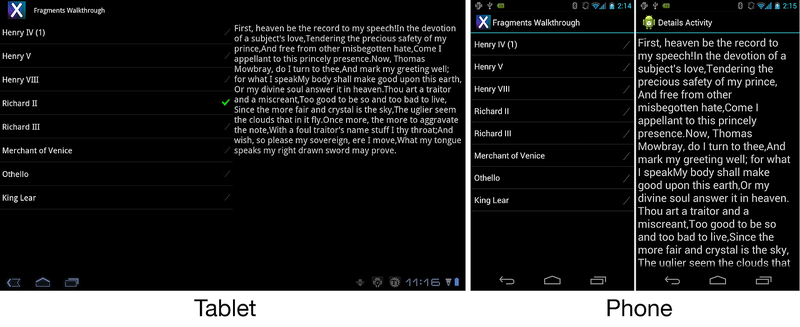
ListFragment的概念和功能ListActivity非常類似 ,它是在 Fragment 中裝載 ListView 的包裝函式。 下圖顯示 ListFragment 平板電腦與手機上執行的 :
使用 ListAdapter 系結數據
類別 ListFragment 已經提供預設配置,因此不需要覆寫 OnCreateView 以顯示 的內容 ListFragment。 ListView使用 實作ListAdapter系結至數據。 下列範例示範如何使用簡單的字串數位完成這項作業:
public override void OnActivityCreated(Bundle savedInstanceState)
{
    base.OnActivityCreated(savedInstanceState);
    string[] values = new[] { "Android", "iPhone", "WindowsMobile",
                "Blackberry", "WebOS", "Ubuntu", "Windows7", "Max OS X",
                "Linux", "OS/2" };
    this.ListAdapter = new ArrayAdapter<string>(Activity, Android.Resource.Layout.SimpleExpandableListItem1, values);
}
設定 ListAdapter時,請務必使用 ListFragment.ListAdapter 屬性,而不是 ListView.ListAdapter 屬性。 使用 ListView.ListAdapter 會導致略過重要的初始化程序代碼。
回應用戶選取
若要回應使用者選取專案,應用程式必須覆寫 OnListItemClick 方法。 下列範例顯示其中一種可能性:
public override void OnListItemClick(ListView l, View v, int index, long id)
{
    // We can display everything in place with fragments.
    // Have the list highlight this item and show the data.
    ListView.SetItemChecked(index, true);

    // Check what fragment is shown, replace if needed.
    var details = FragmentManager.FindFragmentById<DetailsFragment>(Resource.Id.details);
    if (details == null || details.ShownIndex != index)
    {
        // Make new fragment to show this selection.
        details = DetailsFragment.NewInstance(index);

        // Execute a transaction, replacing any existing
        // fragment with this one inside the frame.
        var ft = FragmentManager.BeginTransaction();
        ft.Replace(Resource.Id.details, details);
        ft.SetTransition(FragmentTransit.FragmentFade);
        ft.Commit();
    }
}
在上述程式代碼中,當用戶選取 中的 ListFragment專案時,主控活動中會顯示新的片段,其中顯示已選取專案的詳細數據。
DialogFragment
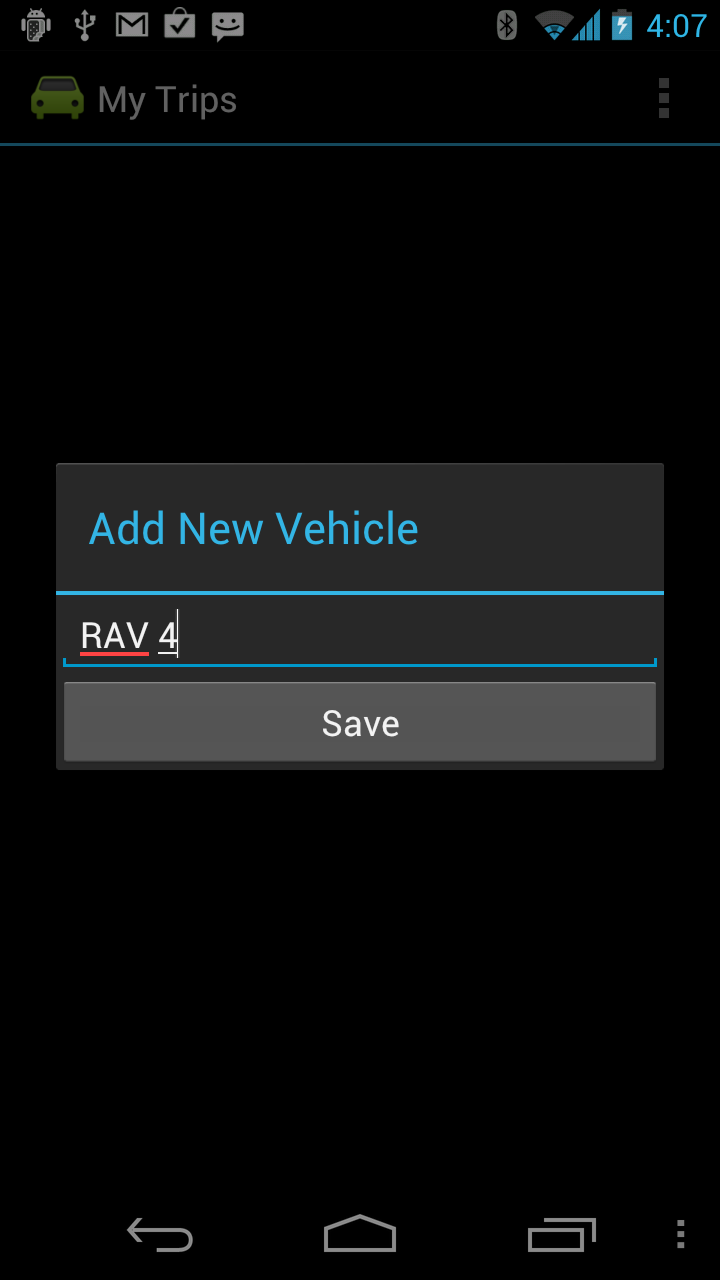
DialogFragment 是一個片段,用來在 [活動] 視窗頂端的 Fragment 內顯示對話框物件。 其旨在取代受控對話 API(從 Android 3.0 開始)。 下列螢幕快照顯示 的 DialogFragment範例:
可確保 DialogFragment 片段與對話框之間的狀態保持一致。 對話物件的所有互動和控件都應該透過 DialogFragment API 發生,而不是透過對話物件上的直接呼叫來進行。 DialogFragment API 會為每個實例Show()提供用來顯示片段的方法。 有兩種方式可以清除片段:
在實體上
DialogFragment呼叫DialogFragment.Dismiss()。顯示另一個
DialogFragment。
若要建立 DialogFragment,類別繼承自 Android.App.DialogFragment, ,然後覆寫下列兩種方法之一:
OnCreateView – 這會建立並傳回檢視。
OnCreateDialog – 這會建立自定義對話方塊。 它通常用來顯示 AlertDialog。 覆寫此方法時,不需要覆寫
OnCreateView。
簡單對話框
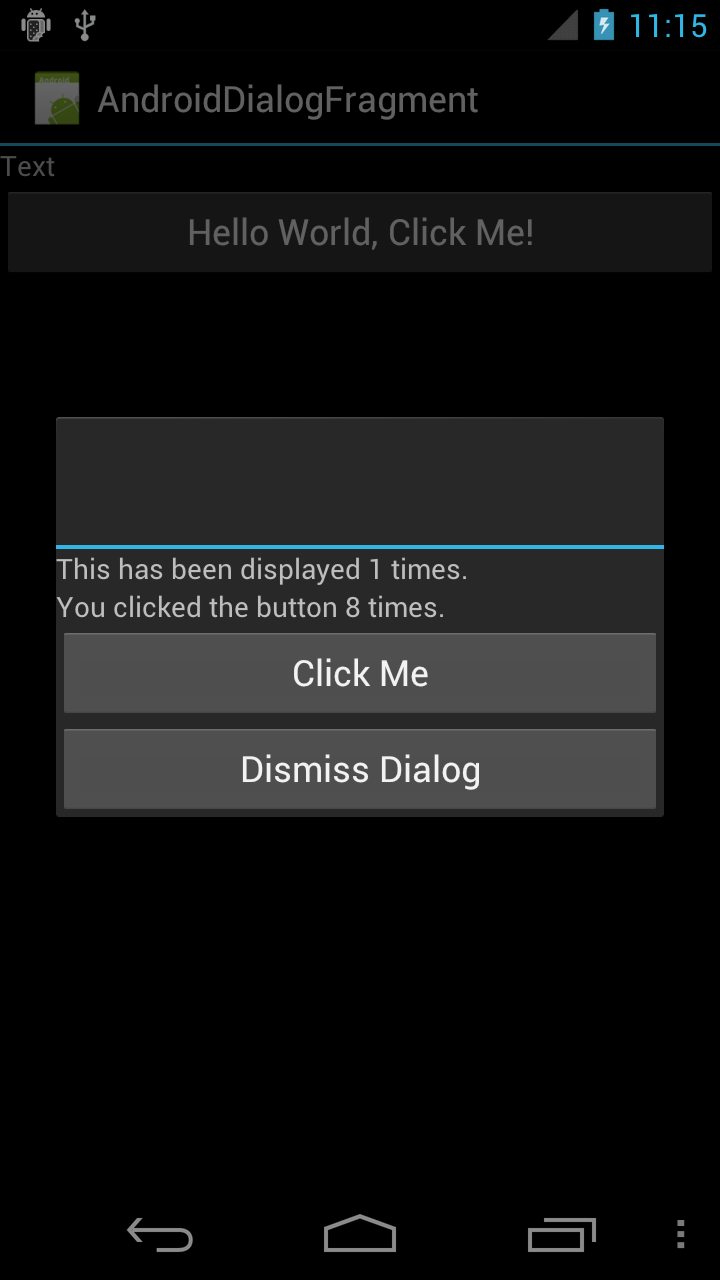
下列螢幕快照顯示具有和 TextView 兩Button個 的簡單DialogFragment:
TextView會顯示使用者在 中DialogFragment按兩下一個按鈕的次數,而按下另一個按鈕將會關閉片段。 的程式代碼 DialogFragment 為:
public class MyDialogFragment : DialogFragment
{
    private int _clickCount;
    public override void OnCreate(Bundle savedInstanceState)
    {
        _clickCount = 0;
    }

    public override View OnCreateView(LayoutInflater inflater, ViewGroup container, Bundle savedInstanceState)
    {
        base.OnCreate(savedInstanceState)

        var view = inflater.Inflate(Resource.Layout.dialog_fragment_layout, container, false);
        var textView = view.FindViewById<TextView>(Resource.Id.dialog_text_view);

        view.FindViewById<Button>(Resource.Id.dialog_button).Click += delegate
            {
                textView.Text = "You clicked the button " + _clickCount++ + " times.";
            };

        // Set up a handler to dismiss this DialogFragment when this button is clicked.
        view.FindViewById<Button>(Resource.Id.dismiss_dialog_button).Click += (sender, args) => Dismiss();
        return view;
        }
    }
}
顯示片段
如同所有片段, DialogFragment 會在的內容 FragmentTransaction中顯示 。
上的 Show()DialogFragment 方法接受 FragmentTransaction 和 string 做為輸入。 對話框將會新增至 [活動] 和 [ FragmentTransaction 認可]。
下列程式代碼示範 Activity 可能用來 Show() 顯示 的方法之一 DialogFragment:
public void ShowDialog()
{
    var transaction = FragmentManager.BeginTransaction();
    var dialogFragment = new MyDialogFragment();
    dialogFragment.Show(transaction, "dialog_fragment");
}
關閉片段
在的實例DialogFragment上呼叫Dismiss()會導致 Fragment 從 Activity 中移除,並認可該交易。
將會呼叫與片段解構相關的標準片段生命週期方法。
警示對話框
而不是覆寫 OnCreateView, DialogFragment 可能會改為覆寫 OnCreateDialog。 這可讓應用程式建立 由 Fragment 管理的 AlertDialog 。 下列程式代碼是使用 AlertDialog.Builder 來建立 的 Dialog範例:
public class AlertDialogFragment : DialogFragment
{
    public override Dialog OnCreateDialog(Bundle savedInstanceState)
    {
        EventHandler<DialogClickEventArgs> okhandler;
        var builder = new AlertDialog.Builder(Activity)
            .SetMessage("This is my dialog.")
            .SetPositiveButton("Ok", (sender, args) =>
                                         {
                                             // Do something when this button is clicked.
                                         })
            .SetTitle("Custom Dialog");
        return builder.Create();
    }
}
PreferenceFragment
為了協助管理喜好設定,Fragments API 會提供 PreferenceFragment 子類別。 PreferenceFragment類似於PreferencesActivity, 它會在 Fragment 中向使用者顯示喜好設定階層。 當使用者與喜好設定互動時,它們會自動儲存至 共用喜好設定。
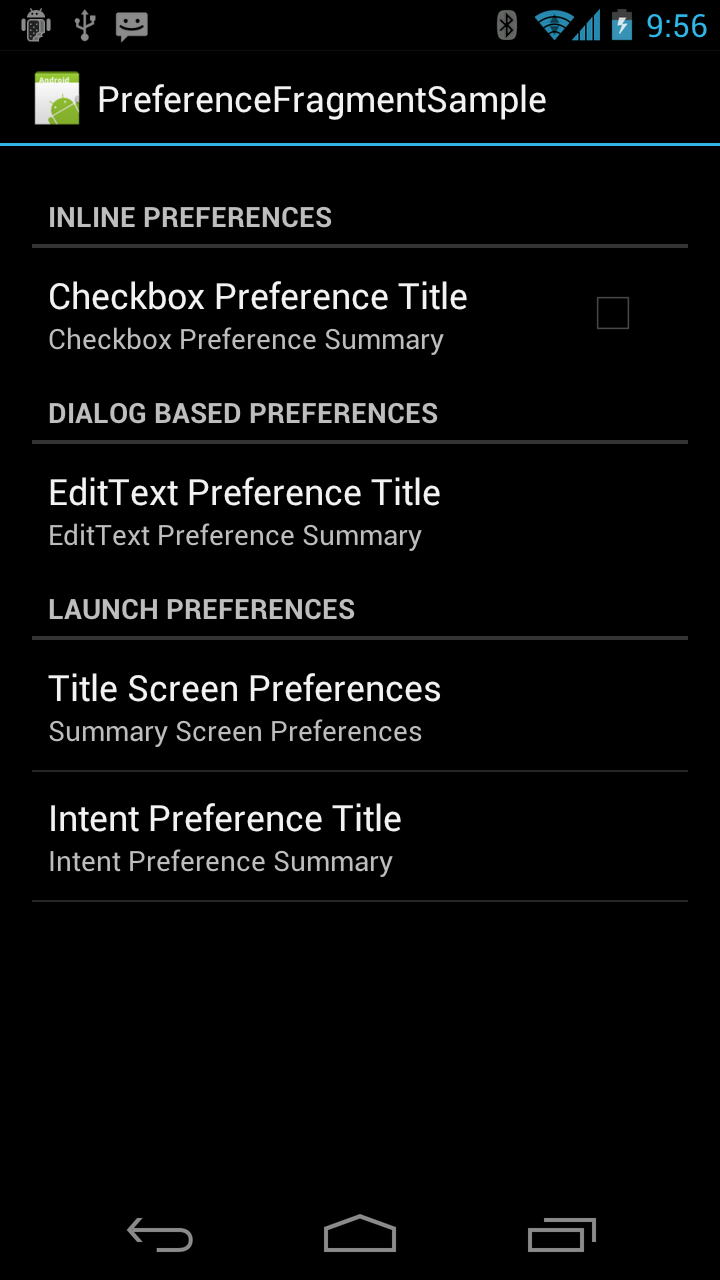
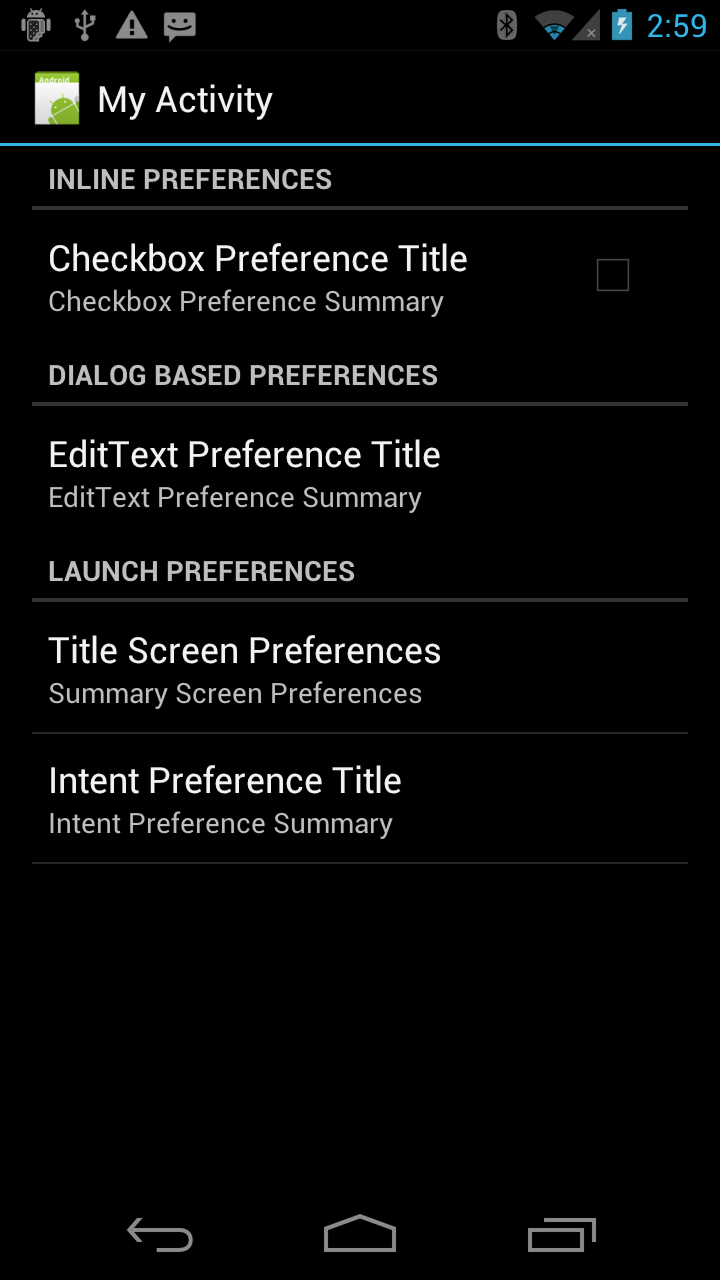
在 Android 3.0 或更新版本中,使用 PreferenceFragment 來處理應用程式中的喜好設定。 下圖顯示 的 PreferenceFragment範例:
從資源建立喜好設定片段
喜好設定片段可能會從 XML 資源文件擴充,方法是使用 PreferencesFragment.AddPreferencesFromResource 方法。 在 Fragment 生命週期中呼叫這個方法的邏輯位置會位於 方法中 OnCreate 。
上 PreferenceFragment 圖是透過從 XML 載入資源所建立。 資源檔案為:
<?xml version="1.0" encoding="utf-8"?>

<PreferenceScreen xmlns:android="http://schemas.android.com/apk/res/android">

  <PreferenceCategory android:title="Inline Preferences">
    <CheckBoxPreference android:key="checkbox_preference"
                        android:title="Checkbox Preference Title"
                        android:summary="Checkbox Preference Summary" />

  </PreferenceCategory>

  <PreferenceCategory android:title="Dialog Based Preferences">

    <EditTextPreference android:key="edittext_preference"
                        android:title="EditText Preference Title"
                        android:summary="EditText Preference Summary"
                        android:dialogTitle="Edit Text Preferrence Dialog Title" />

  </PreferenceCategory>

  <PreferenceCategory android:title="Launch Preferences">

    <!-- This PreferenceScreen tag serves as a screen break (similar to page break
             in word processing). Like for other preference types, we assign a key
             here so it is able to save and restore its instance state. -->
    <PreferenceScreen android:key="screen_preference"
                      android:title="Title Screen Preferences"
                      android:summary="Summary Screen Preferences">

      <!-- You can place more preferences here that will be shown on the next screen. -->

      <CheckBoxPreference android:key="next_screen_checkbox_preference"
                          android:title="Next Screen Toggle Preference Title"
                          android:summary="Next Screen Toggle Preference Summary" />

    </PreferenceScreen>

    <PreferenceScreen android:title="Intent Preference Title"
                      android:summary="Intent Preference Summary">

      <intent android:action="android.intent.action.VIEW"
              android:data="http://www.android.com" />

    </PreferenceScreen>

  </PreferenceCategory>

</PreferenceScreen>
喜好設定片段的程式代碼如下所示:
public class PrefFragment : PreferenceFragment
{
    public override void OnCreate(Bundle savedInstanceState)
    {
        base.OnCreate(savedInstanceState);
        AddPreferencesFromResource(Resource.Xml.preferences);
    }
}
查詢活動以建立喜好設定片段
另一 PreferenceFragment 種建立的技術牽涉到查詢活動。 每個活動都可以使用 指向 XML 資源檔的 METADATA_KEY_PREFERENCE 屬性。 在 Xamarin.Android 中,這是藉由使用 裝飾活動 MetaDataAttribute,然後指定要使用的資源檔來完成。 類別PreferenceFragment提供 AddPreferenceFromIntent 方法,可用來查詢活動來尋找此 XML 資源,併為其擴充喜好設定階層。
下列代碼段中會提供此程式的範例,此代碼段會使用 AddPreferencesFromIntent 來建立 PreferenceFragment:
public class MyPreferenceFragment : PreferenceFragment
{
    public override void OnCreate(Bundle savedInstanceState)
    {
        base.OnCreate(savedInstanceState);
        var intent = new Intent(this.Activity, typeof (MyActivityWithPreferences));
        AddPreferencesFromIntent(intent);
    }
}
Android 會查看 類別 MyActivityWithPreference。 類別必須使用 裝飾 MetaDataAttribute, ,如下列代碼段所示:
[Activity(Label = "My Activity with Preferences")]
[MetaData(PreferenceManager.MetadataKeyPreferences, Resource = "@xml/preference_from_intent")]
public class MyActivityWithPreferences : Activity
{
    protected override void OnCreate(Bundle bundle)
    {
        base.OnCreate(bundle);
        // This is deliberately blank
    }
}
宣告 MetaDataAttribute 將用來擴充喜好設定階層的 XML 資源檔 PreferenceFragment 。 MetatDataAttribute如果未提供 ,則會在運行時間擲回例外狀況。 當此程式代碼執行時,會顯示 PreferenceFragment 為下列螢幕快照:
