Configure the inbox
As an administrator, you can configure the inbox setting so that when your agents open Customer Service workspace or Omnichannel for Customer Service, they can select the inbox icon to show all the cases, conversations, and records that are assigned to them. The inbox is designed to help agents efficiently work on high-velocity tasks, and promote inbox sessions to regular sessions when they need more time to resolve cases and complete their conversations.
You can configure the inbox settings for custom experiences only.
The following channels are supported in the inbox:
- Live chat
- Asynchronous chat
- Case
- Voice
- Unified routing enabled records
The following asynchronized channels are available in the conversation inbox:
- SMS
- Persistent chat
- LINE
- Teams
Live chat and voice channel in inbox
Note the following about live conversation settings in the inbox:
- When an agent accepts a live work item, that item is then added to the relevant view in the inbox, whether or not the agent is using the inbox at the time of the live work item.
- Voice calls always open as a new session with the card added to the inbox for awareness.
- Live work item cards have a "live" visual indicator.
- Live work item unread counts accrue to the unread count on the view.
Prerequisites
Channel providers must have All active channels set to On to use and configure the chat setting in the inbox.
Configure the inbox setting for agents
You can configure the inbox in the Customer Service admin center by editing the agent experience profile to meet your preferred inbox settings.
Open the Customer Service admin center app.
In Agent experience, select Workspaces.
In Agent experience profiles, select Manage.
Select the profile for which you want to configure the inbox.
In Inbox, select the Settings icon, and then turn on the Inbox toggle.
You can either modify an existing view or create a new one by selecting Edit. The following fields can be configured:
- Name: Specify a name that shows in the inbox. Alphanumeric values are valid names.
- Record Type: Select the record types for which the settings need to be applied. You can select more than one record type.
- Chat Status: Is available if you select the record type as chat. Select one or more of the following settings:
- Assigned
- Unassigned
- Resolved
- Email: Is available if you select the record type as Email. Select all the options that you want to enable.
- Assigned to me:
- Emails sent to me
- Emails assigned to me
- Unassigned:
- Emails in my team
- Emails in my queue(s)
- Emails in a shared mailbox
- Assigned to me:
- Agent Visibility: Select one of the following options to show or hide the view to agents:
- Show
- Hide
Preconfigured inbox views
The following views are supported out of the box in the inbox:
- Cases: Shows all cases that the user owns, including active and resolved cases.
- Assigned Conversations: Shows all conversations assigned to the user, including active and closed conversations.
- Resolved Conversations: Shows all conversations marked as closed, and where the user was the primary agent in the conversation.
- Unassigned Conversations: Shows all active conversations and emails in a team or queue in which the user is a member. The user is able to assign conversations to themselves and reply to emails directly from this view.
Inbox views are refreshed every five minutes. Agents can manually refresh the view by using the Refresh icon.
Configure custom views for the inbox
You can configure a customized view for the inbox so that agents can see their cases, conversations, emails, and voicemails all in a single view.
To configure multiple views for the inbox, complete the following steps.
Go to the agent experience profile for which you want to configure a custom view.
On the Inbox card, select Edit. The Inbox page is displayed.
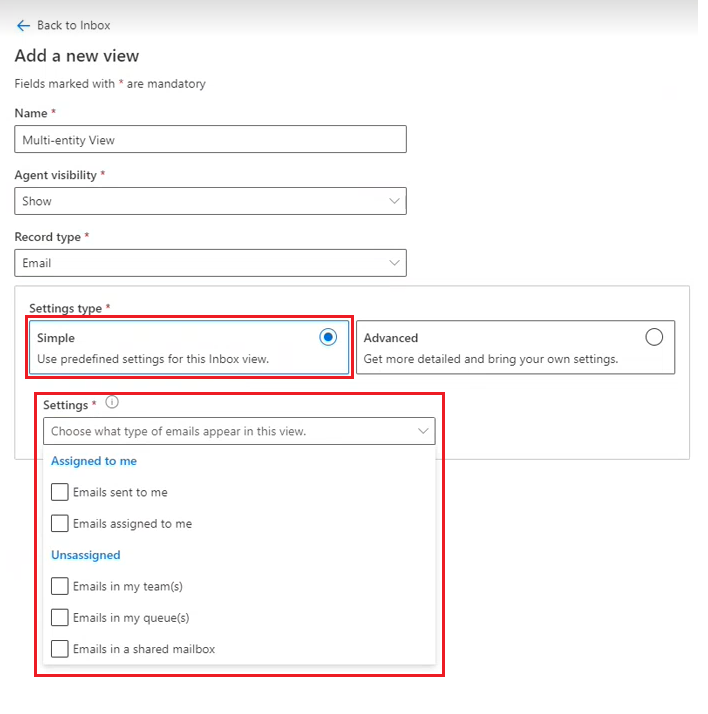
Toggle Enable Inbox to On if it isn't already on, and then select + Add. The Add a new view page is displayed.
On the Add a new view page, enter the following details:
- Name: Type a name for the view.
- Agent visibility: Select whether to Show or Hide the view from agents.
- Record type: Select the records that you want to include in the multi-entity view.
For each record type, choose one of the following settings. The settings are different for each record type.
Simple opens a dropdown menu where you can choose the type of records that appears in your multi-entity view. More information: Simple settings
Advanced opens a Conditions option where you can set the desired conditions for your multi-entity view. More information: Advanced condition builder

Select Save.
Note
If you've configured new views or migrated existing views for unified routing enabled records, you might see a message that the read/unread functionality isn't supported. You can open and save the view again to ensure that the read/unread functionality is supported.
Simple settings
The following simple settings are available out of the box for the record types.
| Record type | Simple settings |
|---|---|
| - Emails sent to me - Emails assigned to me - Emails in my team(s) - Emails in my queue(s) - Emails in a shared mailbox |
|
| Chat | - Assigned - Unassigned - Resolved |
| Case | - Cases assigned to me - Cases in my team(s) - Case(s) in my queue(s) |
| Voicemail | - Assigned - Unassigned - Resolved |
| Unified Routing enabled records | - Assigned - Open - Closed |
Configure custom sort in the inbox
You can configure a customized sort option for the inbox so that users can choose their desired attributes to sort by, beyond just customer and date.
In the Customer Service admin center app site map, select Workspaces.
On the Workspaces page, next to Agent experience profiles, select Manage.
On the Agent experience profiles page, select the profile you want to edit.
On the Profile page, in Inbox, select Edit.
In the Edit view pane, in the Sort section, select the entity and attributes, along with sort order.
Select Save.
Bring your own entity to the inbox
By default, the inbox supports entities such as case, emails, conversations, and voicemails. You can also bring your own entities into the inbox to create a more customized experience, tailored to the needs of your users.
- In the Customer Service admin center site map, select Workspaces.
- On the Workspaces page, next to Agent experience profiles, select the profile you want to edit.
- On the Profile page, in Inbox, select Edit.
- In the Inbox settings pane, select the Inbox record types tab.
- Select +Add, and then chose the record type you want to add.
- Select Save and close.
Custom card configuration
You can help users personalize how their information displays in the inbox by customizing the card configuration.
-
- In the Customer Service admin center site map, select Workspaces.
- On the Workspaces page, next to Agent experience profiles, select the profile you want to edit.
- On the Profile page, in Inbox, select Edit.
- In the Inbox settings pane, select the Inbox record types tab.
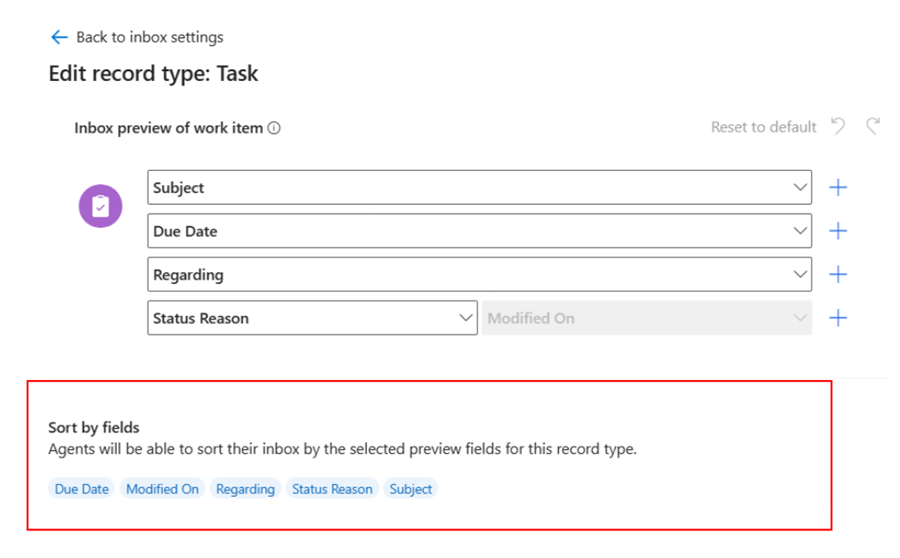
- Select the attribute you want to edit. The Edit record type pane is displayed, showing the inbox preview of the work item.
- Rearrange the attributes if desired.
- To add new attributes, select the plus sign (+), and then use the dropdown menu to select a field.
- When finished, select Save and close.
Real-time translation
For information about how to configure real-time translation for conversations in the inbox, see Enable real-time translation of conversations.
See also
Create and use agent experience profiles
Overview of agent experience profiles
Use the inbox
Configure voicemail to manage inbound calls
Feedback
Coming soon: Throughout 2024 we will be phasing out GitHub Issues as the feedback mechanism for content and replacing it with a new feedback system. For more information see: https://aka.ms/ContentUserFeedback.
Submit and view feedback for