Discover ONVIF cameras with Akri
Akri is a Kubernetes resource interface that lets you easily expose heterogeneous leaf devices (such as IP cameras and USB devices) as resources in a Kubernetes cluster, and it continually detects nodes that have access to these devices to schedule workloads based on them. Akri is a CNCF sandbox project made for the edge, handling the dynamic appearance and disappearance of leaf devices. It currently supports OPC UA, ONVIF and udev protocols, but you can also implement custom protocol handlers provided by the template. Read more about Akri here.
This article describes how you can discover ONVIF cameras that are connected to the same network as your AKS Edge Essentials cluster. ONVIF is an open industry standard for IP security devices, commonly used for video surveillance. Read more about ONVIF profiles here. This demo helps you get started using Akri to discover IP cameras through the ONVIF protocol and use them via a video broker that enables you to consume the footage from the camera and display it in a web application.

Prerequisites
- A single-machine deployment or full deployment of AKS Edge Essentials up and running (if you're using a real ONVIF IP camera, you must create a full deployment with an external switch).
- Akri only works on Linux: use Linux nodes for this exercise.
- An ONVIF IP camera connected to the same network as your external switch cluster, or a mock ONVIF container running (deployment steps as follows).
Note
This sample ONVIF broker currently does not support connecting to cameras that require authentication. To run this demo, disable authentication on your ONVIF camera.
Mock ONVIF container
If you don't have an ONVIF IP camera, you can use our mock ONVIF container for this exercise. The mock container works on both a single-machine or a full deployment.
(Optional) If you want to set up a custom RTSP video feed for your ONVIF container, save your mp4 video (works best if quality is SD rather than HD), and copy the file from your host machine directory into your Linux node using the following command (make sure to replace the host machine directory and appropriate video file name):
Copy-AksEdgeNodeFile -FromFile C:\Users\WinIotUser\Downloads\sample.mp4 -toFile /home/aksedge-user/sample.mp4 -PushFileOpen an empty YAML file and copy/paste the following contents. Make sure to replace the value after
/mnt/with your video file name underMP4FILE. Save the file as onvif-mock.yaml:apiVersion: apps/v1 kind: Deployment metadata: name: onvif-camera-mocking spec: replicas: 1 selector: matchLabels: app: onvif-camera-mocking strategy: type: RollingUpdate rollingUpdate: maxSurge: 1 maxUnavailable: 1 minReadySeconds: 5 template: metadata: labels: app: onvif-camera-mocking spec: nodeSelector: "kubernetes.io/os": linux containers: - name: azure-vote-front image: winiotsaleskit.azurecr.io/onvif-camera-mocking:latest ports: - containerPort: 8554 - containerPort: 1000 - containerPort: 3702 env: - name: INTERFACE value: "eth0" - name: DIRECTORY value: "/onvif-camera-mock" - name: MP4FILE value: /mnt/sample.mp4 volumeMounts: - name: sample-volume mountPath: /mnt volumes: - name: sample-volume hostPath: path: /home/aksedge-user type: DirectoryApply the YAML and make sure that the pod is running:
kubectl apply -f onvif-mock.yaml
kubectl get pods
To enable the IP rules for this mock ONVIF camera to be discovered:
If your CNI is Flannel:
Invoke-AksEdgeNodeCommand -NodeType "Linux" -command "sudo ip route add 239.255.255.250/32 dev cni0"If your CNI is Calico:
Find the IP of mock ONVIF container:
kubectl get pods -o wideFind the network interface name that matches the IP of the ONVIF pod (i.e.
cali909b8c65537):Invoke-AksEdgeNodeCommand -NodeType "Linux" -command "route"Now enable the ONVIF discovery:
Invoke-AksEdgeNodeCommand -NodeType "Linux" -command "sudo ip route add 239.255.255.250/32 dev <insert interface name>"
Additionally, if you are running a full-deployment with an external switch, enable the
dport 3702and save the IP tables:Invoke-AksEdgeNodeCommand -NodeType "Linux" -command "sudo iptables -A INPUT -p udp --dport 3702 -j ACCEPT" Invoke-AksEdgeNodeCommand -NodeType "Linux" -command "sudo sed -i '/-A OUTPUT -j ACCEPT/i-A INPUT -p udp -m udp --dport 3702 -j ACCEPT' /etc/systemd/scripts/ip4save"
Now you're ready to run Akri and discover the mock ONVIF camera.
Run Akri
Add the Akri Helm charts if you've haven't already:
helm repo add akri-helm-charts https://project-akri.github.io/akri/If you have already added Akri helm chart previously, update your repo for the latest build:
helm repo updateInstall Akri using Helm. When installing Akri, specify that you want to deploy the ONVIF discovery handlers by setting the helm value
onvif.discovery.enabled=true. Also, specify that you want to deploy the ONVIF video broker:helm install akri akri-helm-charts/akri ` --set onvif.discovery.enabled=true ` --set onvif.configuration.enabled=true ` --set onvif.configuration.capacity=2 ` --set onvif.configuration.brokerPod.image.repository='ghcr.io/project-akri/akri/onvif-video-broker' ` --set onvif.configuration.brokerPod.image.tag='latest'Learn more about the ONVIF configuration settings here.
Open the WS-Discovery port
In order for the AKS Edge Essentials cluster to discover your camera, open the port for WS-Discovery (Web Services Dynamic Discovery), which is a multicast discovery protocol that operates over TCP and UDP port 3702.
Run the following command to open
sport 3702within the Linux node and save the IP tables:Invoke-AksEdgeNodeCommand -NodeType "Linux" -command "sudo iptables -A INPUT -p udp --sport 3702 -j ACCEPT" Invoke-AksEdgeNodeCommand -NodeType "Linux" -command "sudo sed -i '/-A OUTPUT -j ACCEPT/i-A INPUT -p udp -m udp --sport 3702 -j ACCEPT' /etc/systemd/scripts/ip4save"Verify that Akri can now discover your camera. You should see one Akri instance for your ONVIF camera:
kubectl get akrii

Deploy video streaming web application
Open a blank YAML file and copy/paste the following contents into the file:
apiVersion: apps/v1
kind: Deployment
metadata:
  name: akri-video-streaming-app
spec:
  replicas: 1
  selector:
    matchLabels:
      app: akri-video-streaming-app
  template:
    metadata:
      labels:
        app: akri-video-streaming-app
    spec:
      nodeSelector:
        "kubernetes.io/os": linux
      serviceAccountName: akri-video-streaming-app-sa
      containers:
      - name: akri-video-streaming-app
        image: ghcr.io/project-akri/akri/video-streaming-app:latest-dev
        imagePullPolicy: Always
        env:
        - name: CONFIGURATION_NAME
          value: akri-onvif
---
apiVersion: v1
kind: Service
metadata:
  name: akri-video-streaming-app
  namespace: default
  labels:
    app: akri-video-streaming-app
spec:
  selector:
    app: akri-video-streaming-app
  ports:
  - name: http
    port: 80
    targetPort: 5000
  type: NodePort
---
apiVersion: v1
kind: ServiceAccount
metadata:
  name: akri-video-streaming-app-sa
---
kind: ClusterRole
apiVersion: rbac.authorization.k8s.io/v1
metadata:
  name: akri-video-streaming-app-role
rules:
- apiGroups: [""]
  resources: ["services"]
  verbs: ["list"]
---
apiVersion: rbac.authorization.k8s.io/v1
kind: ClusterRoleBinding
metadata:
  name: akri-video-streaming-app-binding
roleRef:
  apiGroup: ""
  kind: ClusterRole
  name: akri-video-streaming-app-role
subjects:
  - kind: ServiceAccount
    name: akri-video-streaming-app-sa
    namespace: default
Save the file as akri-video-streaming-app.yaml.
In your PowerShell window, change the directory to the location of your akri-video-straming-app.yaml file and deploy it to your cluster:
kubectl apply -f akri-video-streaming-app.yamlMake sure all your pods are up and running:

Find your Linux node IP and the port of your web app service:
Get-AksEdgeNodeAddrkubectl get svc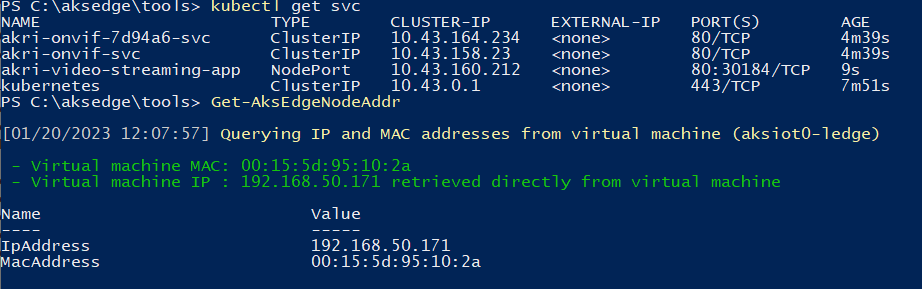
Now you can view the video footage by navigating to your web application, which is
<NODE IP>:<PORT OF SERVICE>: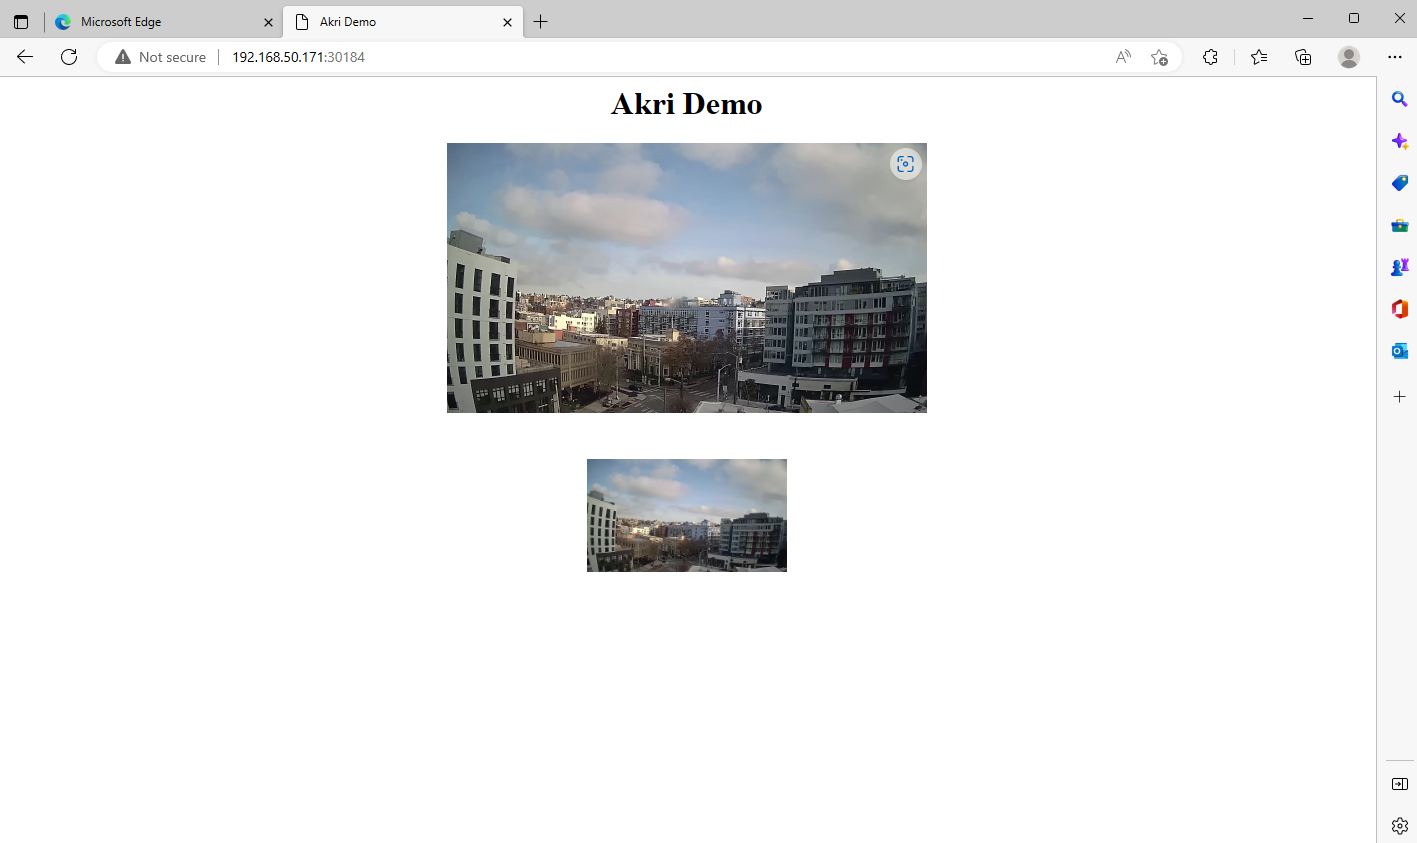


Clean up
Delete the video streaming web application:
kubectl delete -f akri-video-streaming-app.yamlUninstall Akri from your cluster:
helm delete akri(Optional) If you used the mock ONVIF camera, delete the deployment:
kubectl delete -f onvif-mock.yaml
Next steps
Feedback
Coming soon: Throughout 2024 we will be phasing out GitHub Issues as the feedback mechanism for content and replacing it with a new feedback system. For more information see: https://aka.ms/ContentUserFeedback.
Submit and view feedback for