Discover OPC UA servers with Akri
Akri is a Kubernetes resource interface that enables you to easily expose heterogenous leaf devices (such as IP cameras and USB devices) as resources in a Kubernetes cluster. Akri continually detects nodes that have access to these devices to schedule workloads based on them. Akri is a CNCF sandbox project made for the edge, handling the dynamic appearance and disappearance of leaf devices. It currently supports OPC UA, ONVIF and udev protocols, but you can also implement custom protocol handlers provided by the template. Read more about Akri here.
This article describes how you can deploy sample OPC PLC server containers in Azure and discover them by deploying Akri on your AKS Edge Essentials cluster. OPC UA is a communication protocol for industrial automation. It is a client/server technology that comes with a security and communication framework. If at any point in the demo, you want to dive deeper into OPC UA or clarify a term, see the online OPC UA specifications.
This demo helps you get started using Akri to discover OPC UA servers and use them via a broker that contains an OPC UA client. Specifically, an Akri configuration called OPC UA Monitoring was created for this scenario. This configuration shows how you can use Akri to detect anomaly values of a specific OPC UA variable. To do so, the OPC UA clients in the brokers subscribe to that variable and serve its value over gRPC for an anomaly detection web application to consume. You can use this configuration to monitor a barometer, CO detector, and more. However, for this example, the OPC UA variable represents the PLC (programmable logic controller) values for the temperature of a thermostat. Any value outside the range of 70-80 degrees is an anomaly. Additionally, if you want to use certificates for security, skip to the section at the end.

Prerequisites
- AKS Edge Essentials cluster up and running.
- Azure subscription and a resource group to which to deploy OPC PLC servers.
- Akri only works on Linux: use Linux nodes for this exercise.
Create OPC UA servers
Now, create some OPC UA PLC servers to discover. Instead of starting from scratch, deploy OPC PLC server containers. You can read more about the containers and their parameters here. This demo uses the template provided to deploy OPC PLC server container instances to Azure.
Go to the Azure IoT Edge OPC PLC sample's readme and select Deploy to Azure.
Select Edit Template and navigate to line 172. Replace the entire line with the following code, to add the necessary flags for deploying the desired OPC PLC servers:
"[concat('./opcplc --pn=50000 --sph --fn=1 --fr=1 --ft=uint --ftl=65 --ftu=85 --ftr=True --aa --sph --ftl=65 --ftu=85 --ftr=True --ut', ' --ph=', variables('aciPlc'), add(copyIndex(), 1), '.', resourceGroup().location, '.azurecontainer.io')]"Save the template, and fill in the project and instance details. For
Number of Simulations, specify2in order to run two OPC PLC servers.Select Review and Create, then Create to deploy your servers on Azure.
You've now successfully created two OPC UA PLC servers, each with one fast PLC node, which generates an unsigned integer with lower bound = 65 and upper bound = 85 at a rate of 1.
Run Akri
Make sure your OPC UA servers are running by checking to see that the container instances have been started on your Azure portal.
In order for Akri to discover the servers properly, specify the correct discovery URLs when installing Akri.
Discovery URLs appear as
opc.tcp://<FQDN>:50000/. In order to get the FQDNs of your OPC PLC servers, navigate to your deployments in Azure and you'll see the FQDN. Copy and paste the FQDN into your discovery URLs for each server.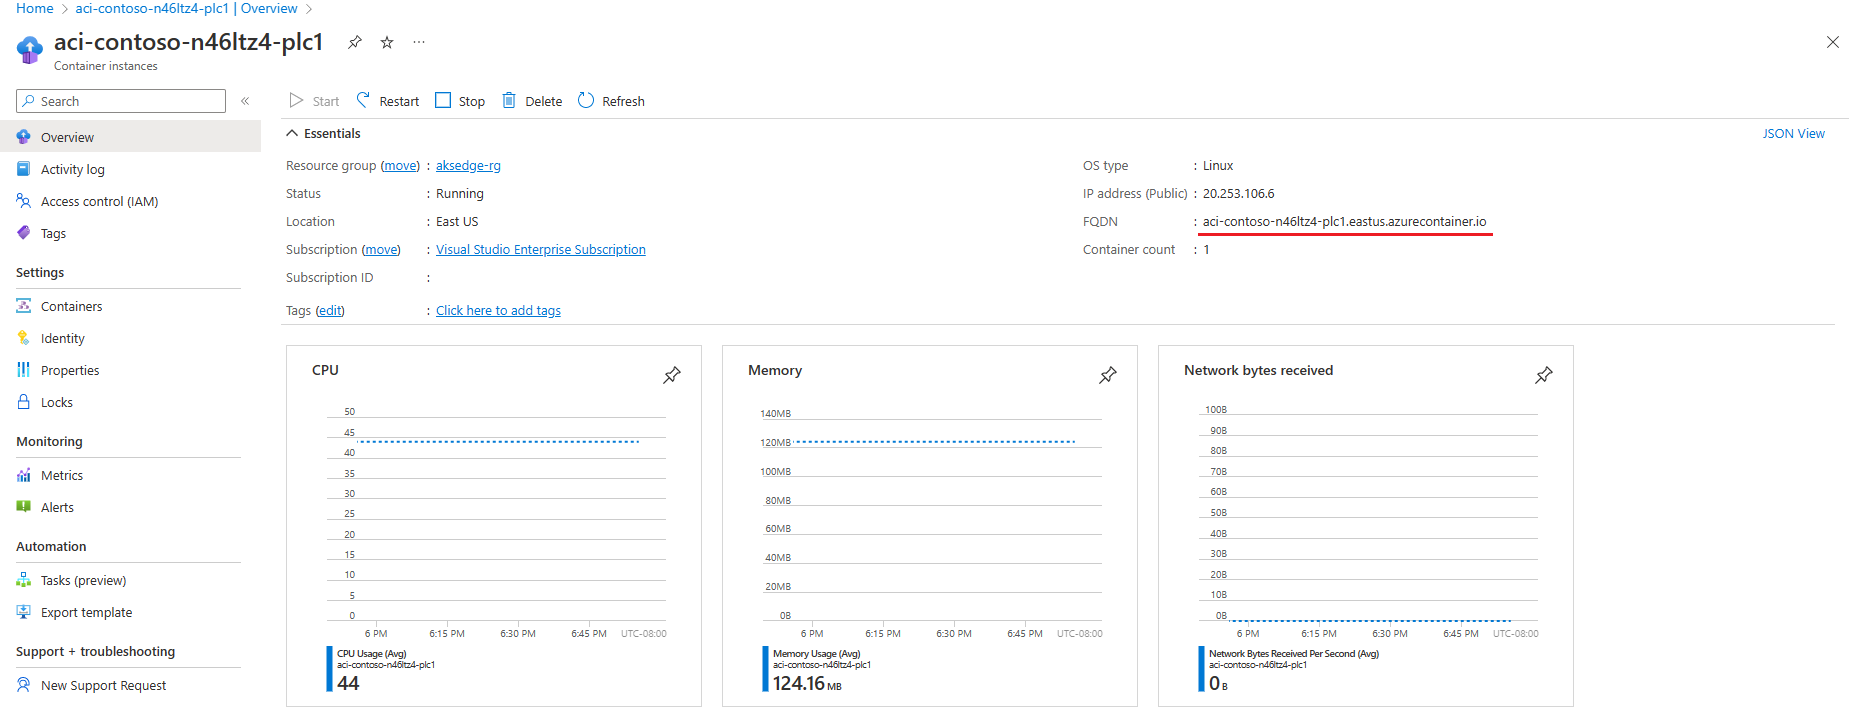
Add the Akri helm charts, if you've haven't already:
helm repo add akri-helm-charts https://project-akri.github.io/akri/If you have already added Akri helm chart previously, update your repo for the latest build:
helm repo updateInstall Akri using Helm. When you install Akri, specify that you want to deploy the OPC UA discovery handlers by setting the helm value
opcua.discovery.enabled=true.In this scenario, specify the
IdentifierandNamespaceIndexof the NodeID you want the brokers to monitor. In this case, that's the temperature variable created previously, which has anIdentifierofFastUInt1andNamespaceIndexof2.Make sure to replace the
opcua.configuration.discoveryDetails.discoveryUrlswith the URLs you obtained in the previous step:helm install akri akri-helm-charts/akri ` --set opcua.discovery.enabled=true ` --set opcua.configuration.enabled=true ` --set opcua.configuration.name=akri-opcua-monitoring ` --set opcua.configuration.brokerPod.image.repository="ghcr.io/project-akri/akri/opcua-monitoring-broker" ` --set opcua.configuration.brokerPod.image.tag="latest-dev" ` --set opcua.configuration.brokerProperties.IDENTIFIER='FastUInt1' ` --set opcua.configuration.brokerProperties.NAMESPACE_INDEX='2' ` --set opcua.configuration.discoveryDetails.discoveryUrls[0]="opc.tcp://<FQDN of 1st container instance>:50000/" ` --set opcua.configuration.discoveryDetails.discoveryUrls[1]="opc.tcp://<FQDN of 2nd container instance>:50000/" `Note
FastUInt1is the identifier of the fast changing node that is provided by the OPC PLC server.Learn more about the OPC UA configuration settings here.
Once Akri is installed, the Akri agent discovers the two servers and creates an instance for each server. Watch two broker pods spin up, one for each server:
kubectl get pods -o wide --watchYou can also ensure that Akri's monitoring pod has successfully connected to the OPC UA server:
kubectl logs <name of OPC UA monitoring pod>To inspect more of the elements of Akri:
- Run
kubectl get crd, and you should see the CRDs listed. - Run
kubectl get akric, and you should seeakri-opcua-monitoring. - If the OPC PLC servers were discovered and pods spun up, you can see the instances by running
kubectl get akrii, and you can inspect further by runningkubectl get akrii akri-opcua-monitoring-<ID> -o yaml.
- Run

Deploy an anomaly detection web application as an end consumer of the brokers
A sample anomaly detection web application was created for this end-to-end demo. It has a gRPC stub that calls the brokers' gRPC services, getting the latest temperature value. It then determines whether this value is an outlier to the dataset using the Local Outlier Factor strategy. The dataset is simply a CSV file with the numbers between 70-80 repeated several times; therefore, any value significantly outside this range will be seen as an outlier. The web application serves as a log, displaying all the temperature values and the address of the OPC UA server that sent the values. It shows anomaly values in red. The anomalies always have a value of 120 due to how the DoSimulation function is set up in the OPC UA servers.
Deploy the anomaly detection app and watch a pod spin up for the app:
kubectl apply -f https://raw.githubusercontent.com/project-akri/akri/main/deployment/samples/akri-anomaly-detection-app.yamlkubectl get pods -o wide --watchOnce the pods are running, get your node IP and the service port number of the app:
Get-AKSEdgeNodeAddrkubectl get svcNavigate to
http://<NODE IP>:<SERVICE PORT NUM>/. It takes a few seconds for the site to load, then you should see a log of the temperature values, which updates every few seconds. Note how the values come from two different discovery URLs, specifically the ones for each of the two OPC UA servers.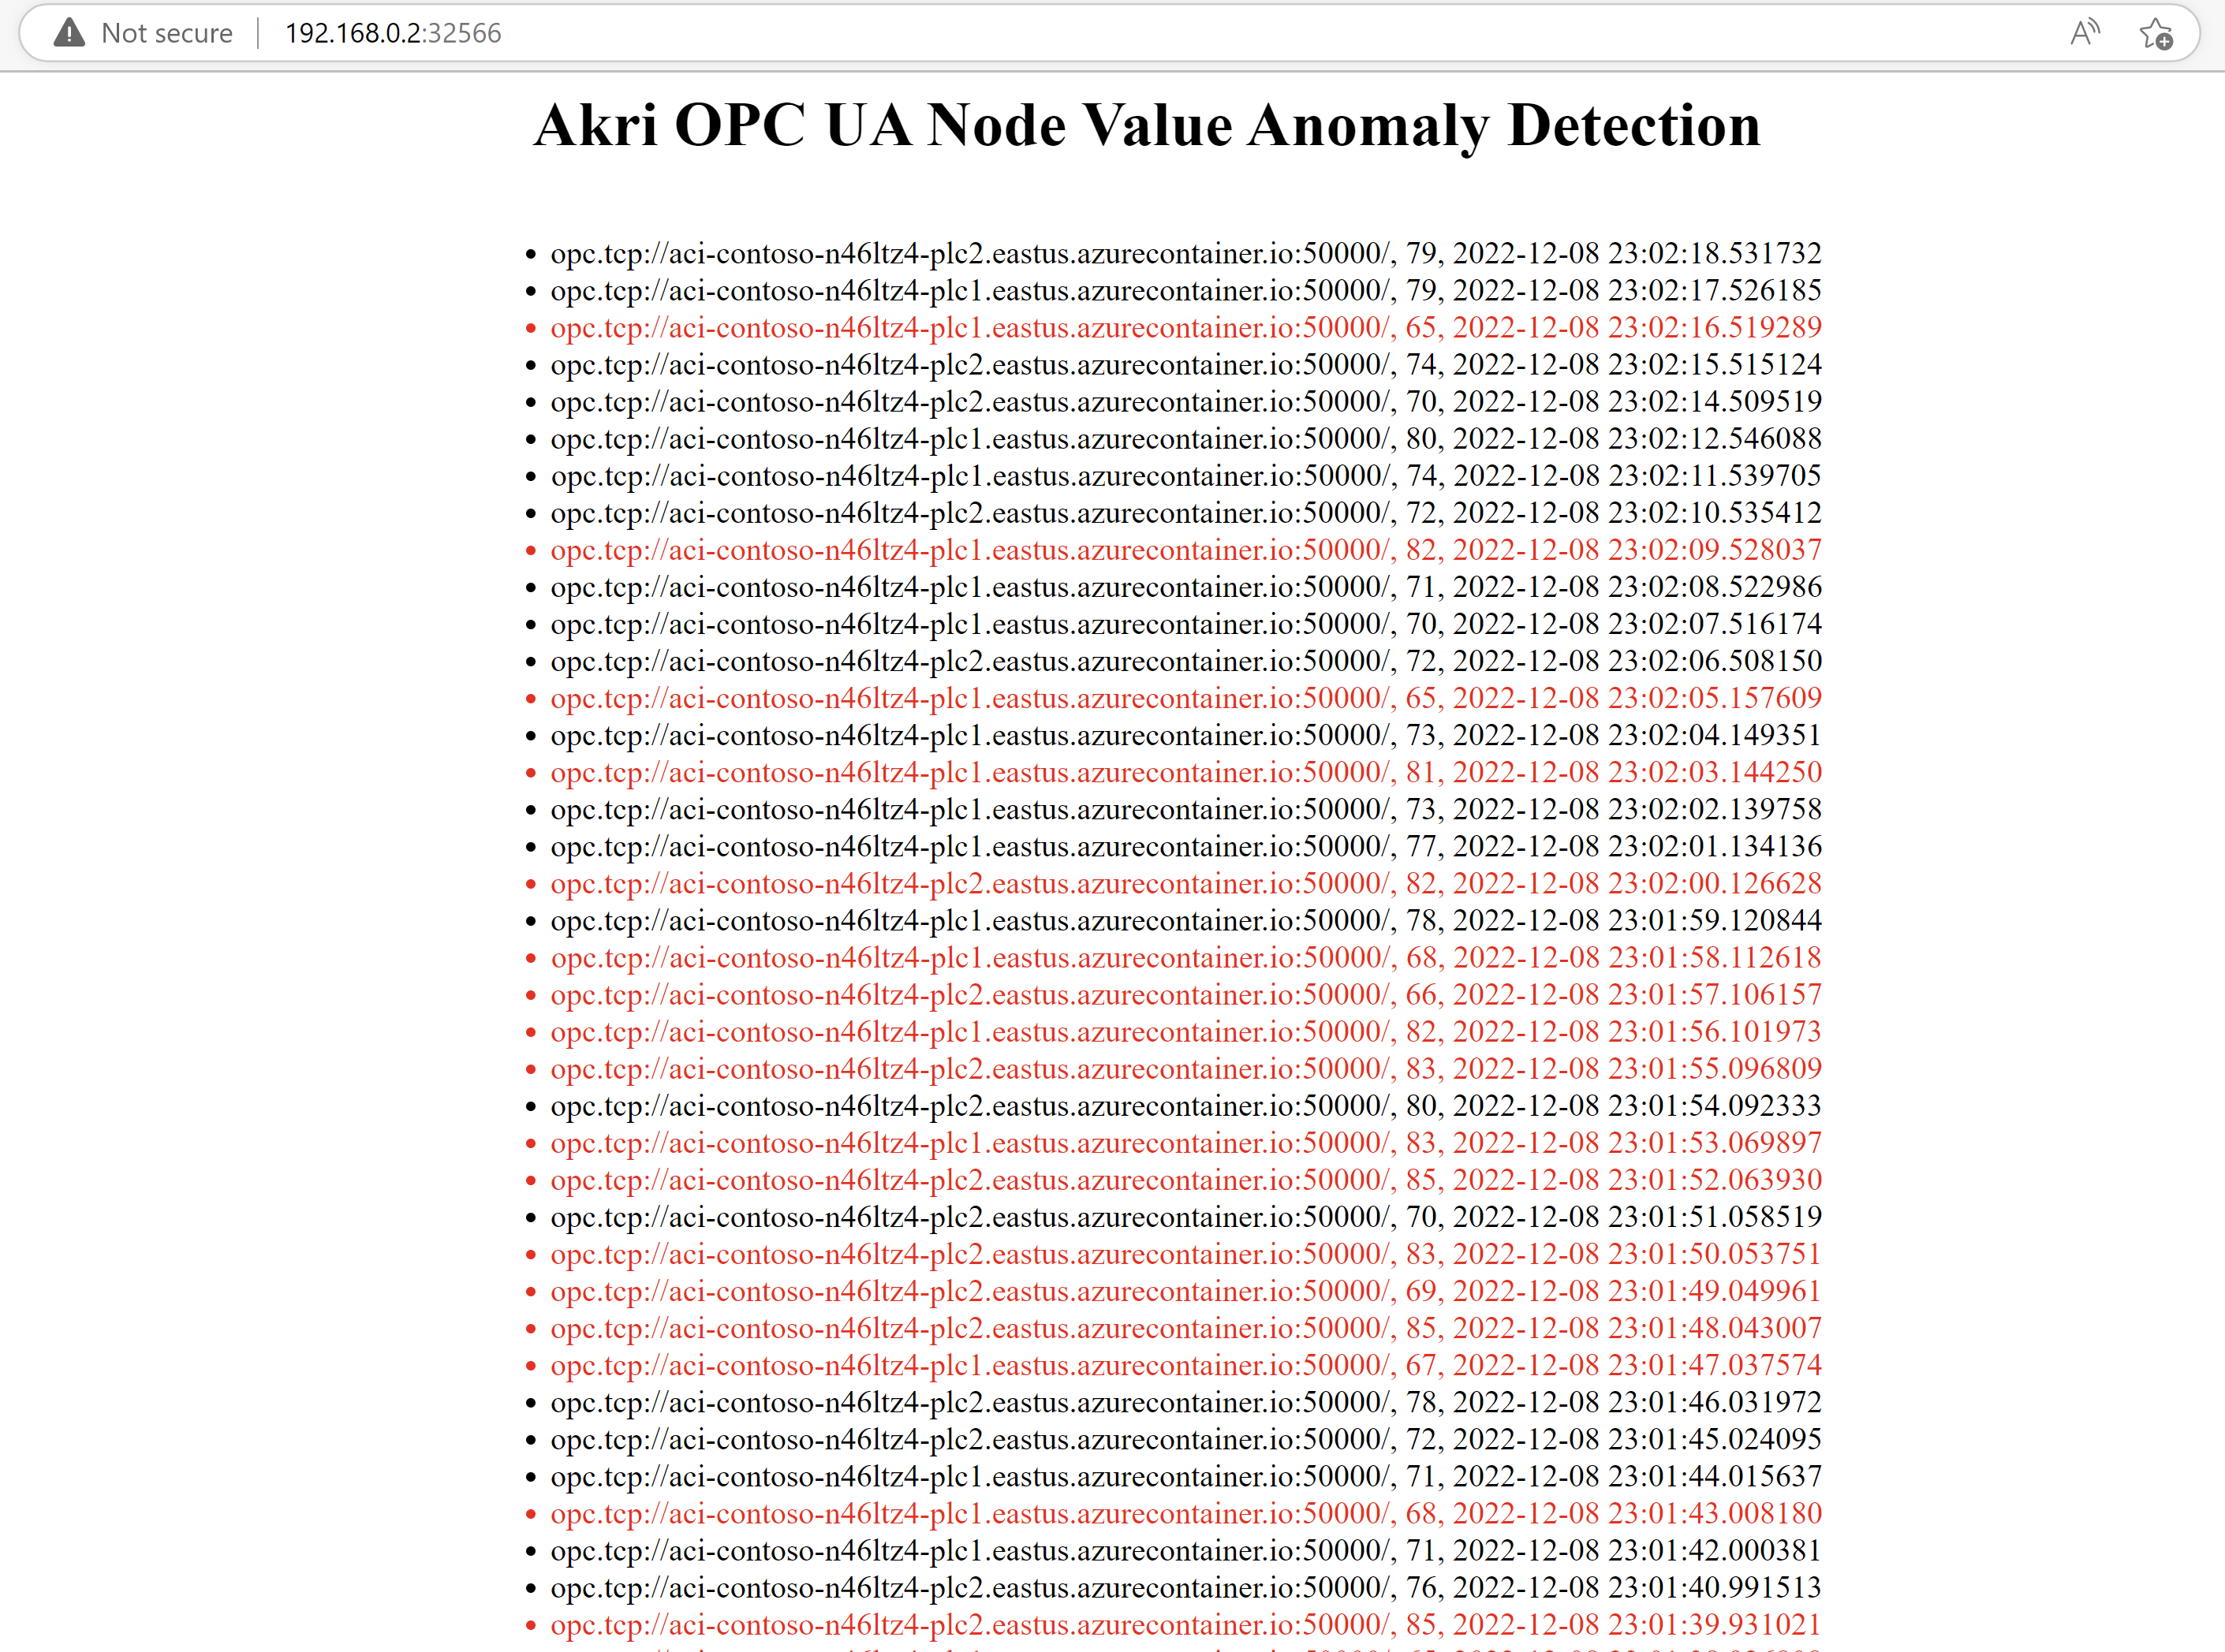

Optional: certificates for the OPC UA server and broker
This an optional procedure you can use to try out Akri with certificates for added security. Follow these steps to deploy OPC PLC servers with security and create a Kubernetes secret that can be used to authenticate the server and broker.
Create OPC UA servers with security
Go to the Azure IoT Edge OPC PLC sample's readme and select Deploy to Azure.
Select Edit Template and navigate to line 172. Replace the entire line with the following code to add the necessary flags for deploying the desired OPC PLC servers:
"[concat('./opcplc --pn=50000 --sph --fn=1 --fr=1 --ft=uint --ftl=65 --ftu=85 --ftr=True --aa --sph --ftl=65 --ftu=85 --ftr=True', ' --ph=', variables('aciPlc'), add(copyIndex(), 1), '.', resourceGroup().location, '.azurecontainer.io')]"Under the
resourcessection, add the following code inside the thirdproperties(line 167) section (same level asimage,command,ports, etc.):"volumeMounts": [ { "name": "filesharevolume", "mountPath": "/app/pki" } ],Then, add the following code inside the second "properties" (line 163) section (same level as
containers):"volumes": [ { "name": "filesharevolume", "azureFile": { "shareName": "acishare", "storageAccountName": "<storageAccName>", "storageAccountKey": "<storageAccKey>" } } ]Save the template, and fill in the project and instance details. For
Number of Simulations, specify2in order to run two OPC PLC servers.Select Review and Create, then select Create to deploy your servers on Azure.
You've now successfully created two OPC UA PLC servers, each with one fast PLC node, which generates an unsigned integer with lower bound = 65 and upper bound = 85 at a rate of 1.
Create X.509 v3 certificates
Create three OPC UA compliant X.509v3 certificates (one for the broker and one for each server), ensuring that the certificate contains the necessary components, such as an application URI.
Requirements for certificates:
- They should all be signed by a common Certificate Authority (CA), and the signing algorithms for all certificates should be
SHA256. - The key size also must be greater than or equal to
2048bits. - The DNS of server certificates and AkriBroker certificate should contain the FQDN of OPC UA server container instance created (go to Step 3 of Run Akri to learn how to get the FQDN).
- The OPC UA server certificate should be named
OpcPlc(in certificate-generating terms,CN=OpcPlc) and the Akri broker certificate should be namedAkriBroker(CN=AkriBroker) (there are no requirements for the CA name).
There are many tools for generating proper certificates for OPC UA, such as the OPC Foundation's Certificate Generator or OpenSSL. The OPC Foundation's Certificate Generator can be a more convenient option, whereas OpenSSL provides more room for customization.
If you choose to use OPC Foundation's Certificate Generator, follow these steps to build:
Install Perl.
Download the .zip file or clone the OPC Foundation's Certificate Generator repo (Misc-Tools).
Run
build_certificate-generator.batfrom the Visual Studio developer command prompt (Visual Studio 2022 is recommended).Build
Opc.Ua.CertificateGeneratorsolution from Visual Studio 2022.Check if
Opc.Ua.CertificateGenerator.exehas been successfully built in thebuild/Debug/Opc.Ua.CertificateGeneratordirectory.Use following example commands to create certificates. See Misc-Tools for more options:
- Self-Signed CA:
.\Opc.Ua.CertificateGenerator.exe -cmd issue -sp . -sn CN=<CA name e.g. MyCA> -ca true -pw <password>- OPC UA server certificate:
.\Opc.Ua.CertificateGenerator.exe -cmd issue -sp . -an OpcPlc -ikf '.\private\MyCA [hash].pfx' -ikp <password>-dn <DNS separated by commas>- Akri broker certificate:
.\Opc.Ua.CertificateGenerator.exe -cmd issue -sp . -an AkriBroker -ikf '.\private\MyCA [hash].pfx' -ikp <password>-dn <DNS separated by commas>Create a
.crlfile for CA using OpenSSL (only if you created CA from the generator, which would be missing the.crlfile).
If you choose to use OpenSSL, here is a list of references:
Create an opcua-broker-credentials Kubernetes secret
The OPC UA client certificate is passed to the OPC UA monitoring broker as a Kubernetes secret mounted as a volume.
Create a Kubernetes secret, projecting each certificate/crl/private key with the expected key name (client_certificate, client_key, ca_certificate, and ca_crl). Specify the file paths so that they point to the credentials created in the previous section:
kubectl create secret generic opcua-broker-credentials `
--from-file=client_certificate=/path/to/AkriBroker/own/certs/AkriBroker\ \[<hash>\].der `
--from-file=client_key=/path/to/AkriBroker/own/private/AkriBroker\ \[<hash>\].pfx `
--from-file=ca_certificate=/path/to/ca/certs/SomeCA\ \[<hash>\].der `
--from-file=ca_crl=/path/to/ca/crl/SomeCA\ \[<hash>\].crl
The certificate is mounted to the volume credentials at the mountPath /etc/opcua-certs/client-pki, as shown in the OPC UA configuration helm template. This path is where the brokers expect to find the certificates.
Mount the folder of certificates to the ACI
Follow these instructions to create an Azure file share.
After creating the Azure file share and certificates, upload the CA and OPC UA server certificates to the file share as described.
├── own
│ ├── certs
│ │ └── OpcPlc [hash].der
│ └── private
│ └── OpcPlc [hash].pfx
└── trusted
├── certs
│ └── CA.der
└── crl
└── CA.crl
Note
Because we added a flag for security in the template, this causes an arbitrary certificate to be generated in the file share. You can delete any unidentified certificates in the file share (the folder paths should look exactly the same as the previous diagram).
After following these steps for security, click Restart on your container instance to update it and run with the mounted certificates.
Run Akri and deploy web app
Follow the previous section to run Akri and discover your servers, but now add a line --set opcua.configuration.mountCertificates='true' to the end of the command. Make sure to replace opcua.configuration.discoveryDetails.discoveryUrls with the URLs found from the Azure portal:
helm install akri akri-helm-charts/akri `
   --set opcua.discovery.enabled=true `
   --set opcua.configuration.enabled=true `
   --set opcua.configuration.name=akri-opcua-monitoring `
   --set opcua.configuration.brokerPod.image.repository="ghcr.io/project-akri/akri/opcua-monitoring-broker" `
   --set opcua.configuration.brokerPod.image.tag="latest-dev" `
   --set opcua.configuration.brokerProperties.IDENTIFIER='FastUInt1' `
   --set opcua.configuration.brokerProperties.NAMESPACE_INDEX='2' `
   --set opcua.configuration.discoveryDetails.discoveryUrls[0]="opc.tcp://<FQDN of 1st container instance>:50000/" `
   --set opcua.configuration.discoveryDetails.discoveryUrls[1]="opc.tcp://<FQDN of 2nd container instance>:50000/" `
--set opcua.configuration.mountCertificates='true'
From here, you can follow the section on deploying an anomaly detection web application as an end consumer of the brokers to see your OPC PLC values on your web page.
Clean up
Delete the anomaly detection application:
kubectl delete -f https://raw.githubusercontent.com/project-akri/akri/main/deployment/samples/akri-anomaly-detection-app.yamlUninstall Akri from your cluster.
helm delete akriDelete the OPC UA server deployment by navigating to your container instance, then select Delete in the Azure portal.
Next steps
Feedback
Coming soon: Throughout 2024 we will be phasing out GitHub Issues as the feedback mechanism for content and replacing it with a new feedback system. For more information see: https://aka.ms/ContentUserFeedback.
Submit and view feedback for