Use Dynamic M query parameters with Azure Data Explorer for Power BI
Azure Data Explorer is a fast and highly scalable data exploration service for log and telemetry data. Power BI is a business analytics solution that lets you visualize your data and share the results across your organization. With Dynamic M parameters, you can create Power BI reports that give viewers the ability to use filters or slicers to set values for KQL query parameters.
In this article, you'll start with a new Power BI project and use the sample data to create a report that uses a slicer to filter data, in a dynamic M query linked to a KQL function.
Prerequisites
You need the following to complete this article:
- A Microsoft account or a Microsoft Entra user identity to sign in to the help cluster.
- Power BI Desktop (select DOWNLOAD FREE)
- Enabling Dynamic M query parameters
Add direct query connection to KQL function
First, set up a connector for Power BI.
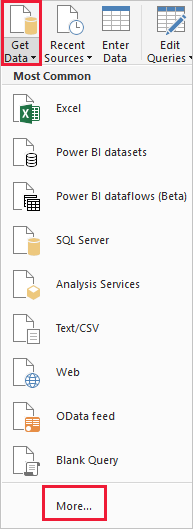
In Power BI Desktop, on the Home tab, select Get Data then More.
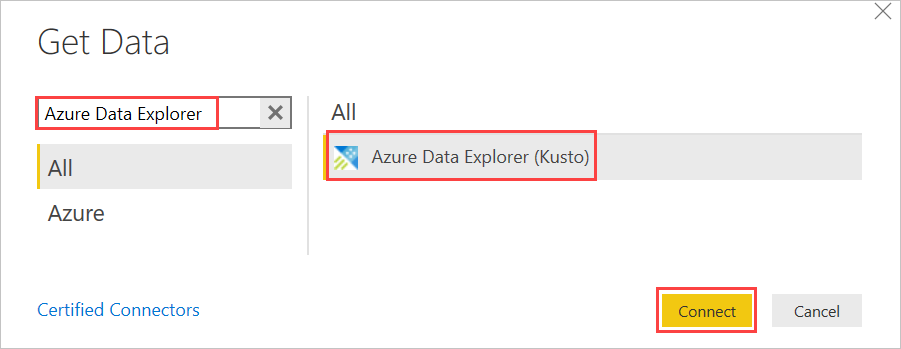
Search for Azure Data Explorer, select Azure Data Explorer then Connect.
On the connector screen, fill out the form with the following information.
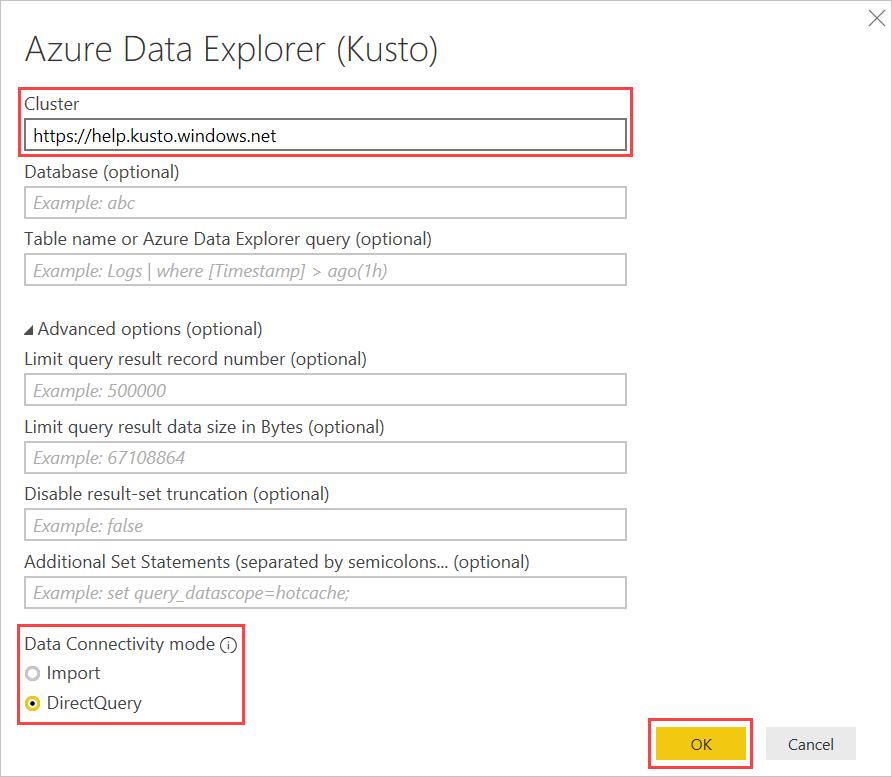
Setting Value Field description Cluster https://help.kusto.windows.net The URL for the help cluster. For other clusters, the URL is in the form https://<ClusterName>.<Region>.kusto.windows.net. Database Leave blank A database that is hosted on the cluster you're connecting to. We'll select this in a later step. Table name Leave blank One of the tables in the database, or a query like StormEvents | take 1000. We'll select this in a later step.Advanced options Leave blank Options for your queries, such as result set size. Data connectivity mode DirectQuery Determines whether Power BI imports the data or connects directly for Dynamic M queries. Note
In Import mode, data is moved to Power BI. In DirectQuery mode, data is queried directly from your cluster.
Use Import mode when:
- Your dataset is small.
- You don't need near real-time data.
- Your data is already aggregated or you perform aggregation in Kusto
Use DirectQuery mode when:
- Your dataset is very large.
- You need near real-time data.
Advanced options
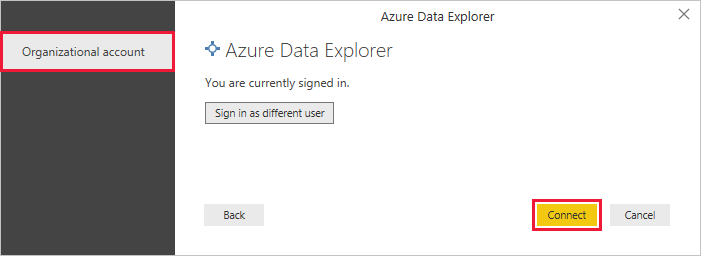
Setting Sample value Field description Limit query result record number 300000The maximum number of records to return in the result Limit query result data size 4194304The maximum data size in bytes to return in the result Disable result set truncation trueEnable/disable result truncation by using the notruncation request option Additional set statements set query_datascope=hotcacheSets request properties for the duration of the query. Request properties control how a query executes and returns results. If you don't already have a connection to the help cluster, sign in. Sign in with an organizational account, then select Connect.
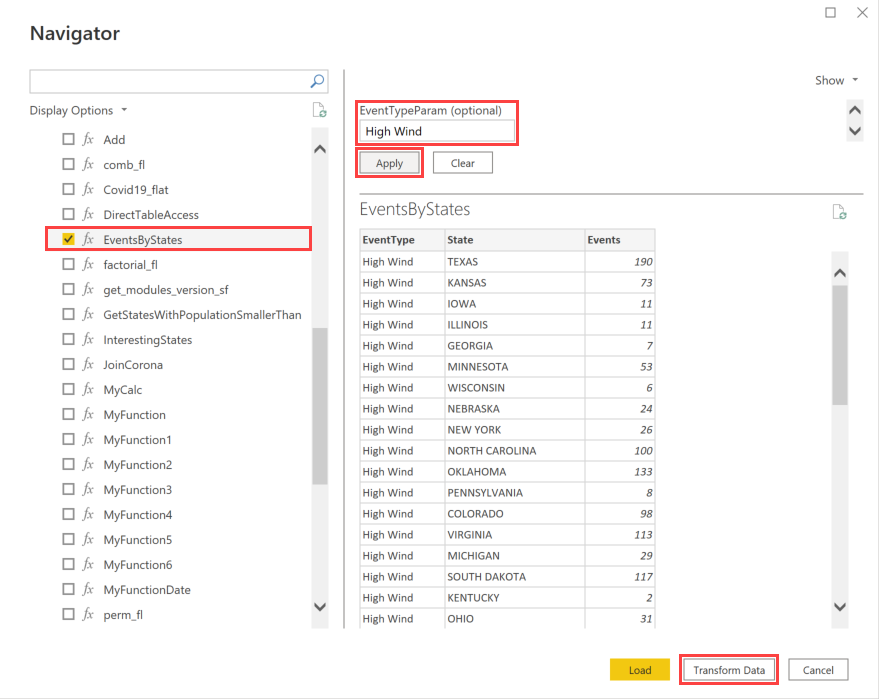
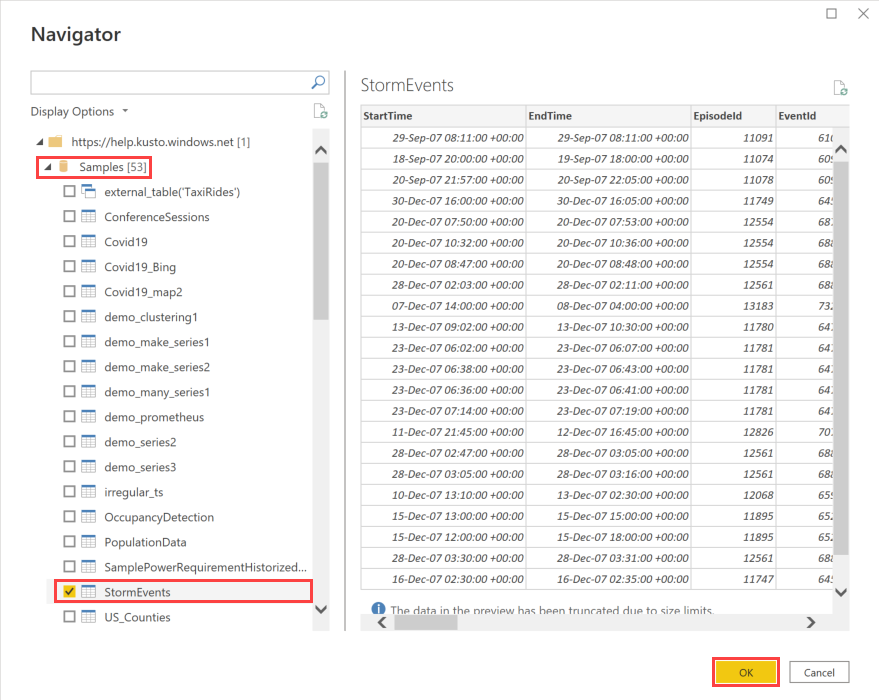
On the Navigator screen, do the following:
- Expand the Samples database.
- Select the EventsByStates function.
- For EventTypeParam, enter High Wind, and then select Apply to preview the data.
- Select Transform Data.
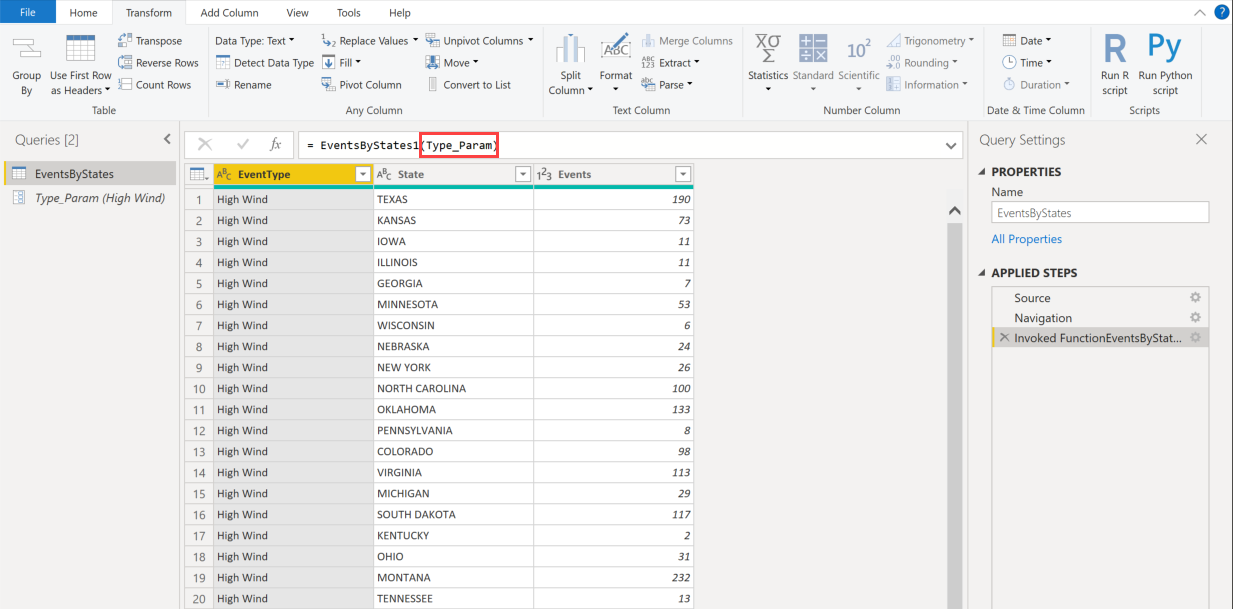
The function opens as a dynamic M query in Power Query Editor, where we proceed to create a parameter to use with the dynamic M query.
Note
The EventsByStates function is a read only sample function that you can use to test the functionality of the Dynamic M query parameters. It defines the final version which supports multiple and select all values for the parameter. If you want to test the single selection functionality in your own cluster and progressively test the functionality, you can start with the following single selection definition of the function.
.create-or-alter function EventsByStates (EventTypeParam:string)
{
  StormEvents
  | where EventType == EventTypeParam
  | summarize Events=count() by EventType, State
}
In the Power Query Editor, do the following:
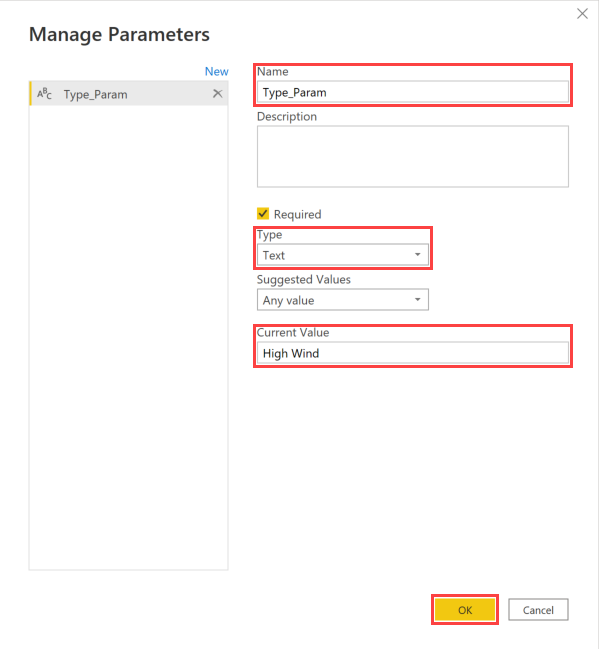
Select Manage Parameters > New Parameter.
Fill out the details with the following information, and then select OK.
Setting Suggested value Description Name Type_Param The name of the parameter. We recommend adding a suffix, such as _Param, that lets you easily recognize and differentiate it from other parameters you might create. Type Text The type of the parameter. The type of the parameter must match the type declared in the KQL function. Text in Power BI is equivalent to string in KQL. Current Value High Wind The value of the parameter. You must provide a default value for this field.
Back on the Navigation screen, replace the M function's parameter value with the new parameter.
Optionally, repeat the steps to create more parameters and replace them in the Dynamic M query.
Create a table with values for the report slicer.
Note
The table will list the event types that you want to filter by. You can either import the table or create a new table and manually enter the data.
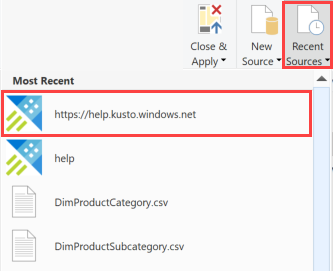
On the Home tab, select Recent Sources, and then select the help cluster.
On the Navigator screen, expand the Samples database, select the StormEvents table, and then select OK.
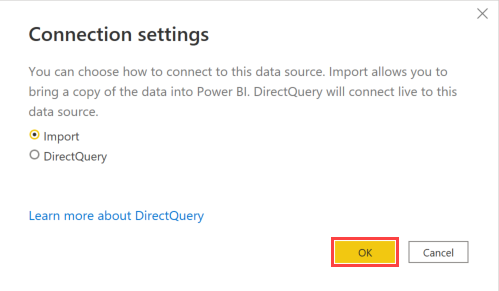
On the Connection Settings dialog box, select Import, and then select OK.
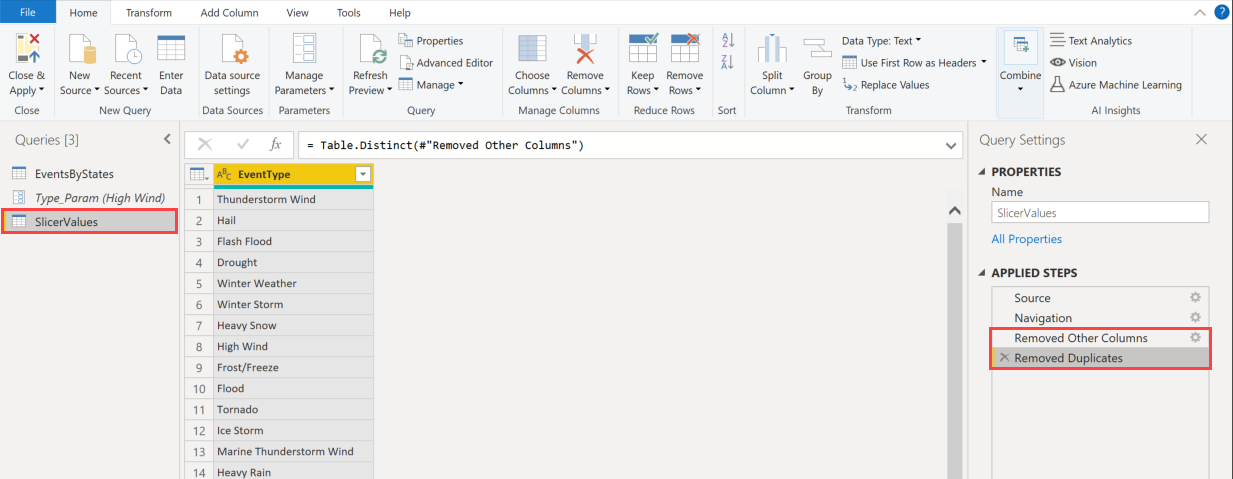
Right-click the EventType column, and then select Remove Other Columns.
Right-click the EventType column again, and then select Remove Duplicates.
Optionally add another column to define the sort order for the slicer values.
Rename the table to SlicerValues.
On the Home tab, select Close & Apply.
Note
A dialog box warning about security risk appears. Click OK to continue. The reason the dialog appears is because Power BI is adding a second data source. For more information, see Power BI Desktop privacy levels. However, the way the data sources are used in this example is perfectly safe.
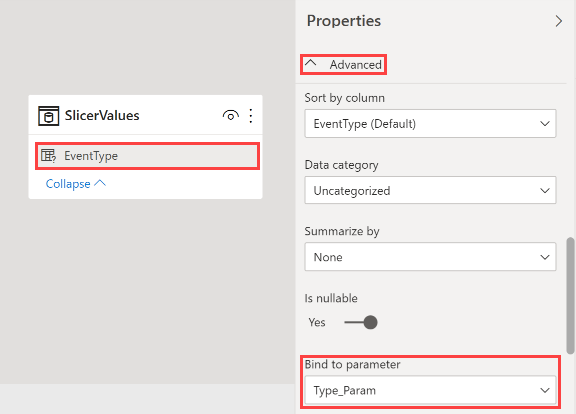
Bind the EventType column in the SlicerValues table to the parameter.
- Select the Model view on the left.
- In the SlicerValues table, select the EventType column.
- In the Properties pane, expand Advanced.
- Under Bind to Parameter, select Type_Param. This binds the EventType column to the parameter.
Note
A dialog box warning about security risk appears. Click Continue to continue. The reason the dialog appears is because Power BI is sending data from one source to another. For more information, see Power BI Desktop privacy levels. However, the way the parameter is used in this example is perfectly safe.
Visualize data in a report
Now that you have data in Power BI Desktop, you can create reports based on that data. You'll create a simple report with a table showing the summary of events by state and a slicer to filter the table by event type.
Select the Report view on the left.
Add the table to the report.
- In the Visualization pane, select Table. A blank table is added to the report canvas.
- In the Fields pane, expand EventsByStates, and select State and Events. You now have a table showing the summary of events by state.
Add the slicer to the report.
- In the Visualization pane, select Slicer. A blank slicer is added to the report canvas.
- In the Fields pane, expand SlicerValues, and select EventType. You now have a slicer showing the event types.
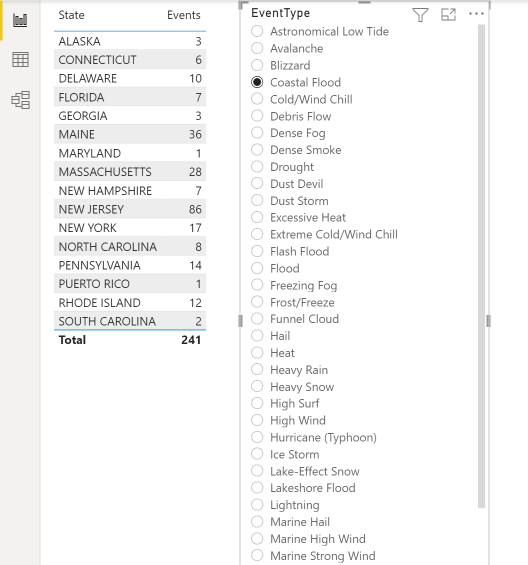
The report is now ready to be viewed. Notice that when selecting event type values in the slicer, the table based on the M query is filtered by the event type that is bound to the M query's parameter.
Save the report.
Accepting multiple parameter values
If you want filter on multiple parameter values in the slicer, you can achieve this by adjusting the properties of the EventType column and modifying the KQL function, as follows:
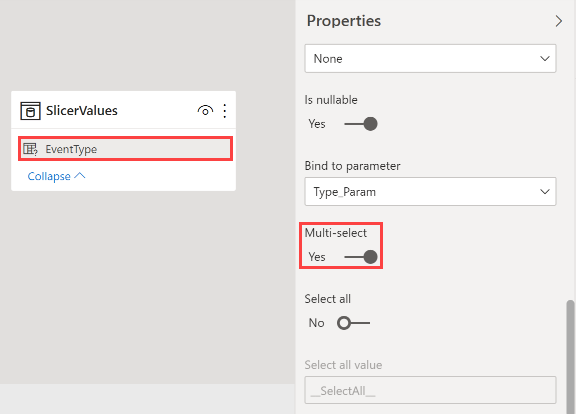
Adjust the properties of the EventType column in the SlicerValues table.
- Select the Model view on the left.
- In the SlicerValues table, select the EventType column.
- In the Properties pane, expand Advanced, and turn on the Multi-select setting.
Modify the KQL function, setting the parameter type to dynamic and changing the
wherecondition to check the list of parameter values..create-or-alter function EventsByStates (EventTypeParam:dynamic) { StormEvents | where EventType in (EventTypeParam) | summarize Events=count() by EventType, State }
You can now head back to the report and select multiple event types in the slicer.
Accepting all parameter values
If you want filter on all parameter values in the slicer, you can achieve this by adjusting the properties of the EventType column, modifying the KQL function, and updating the slicer control, as follows:
Adjust the properties of the EventType column in the SlicerValues table.
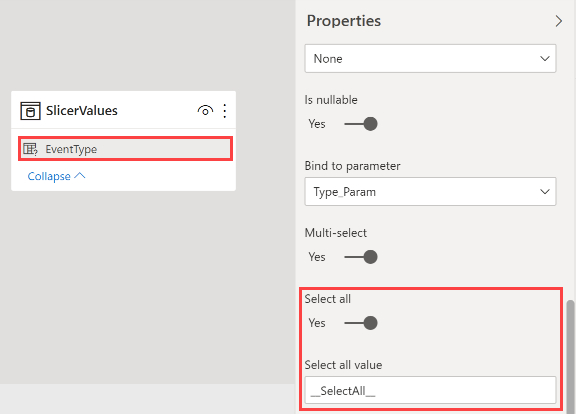
- Select the Model view on the left.
- In the SlicerValues table, select the EventType column.
- In the Properties pane, expand Advanced, and turn on the Select all setting.
- Optionally, change the Select all value setting. In this example, you'll use the default value of SelectAll.
Update the slicer control to show the Select all option.
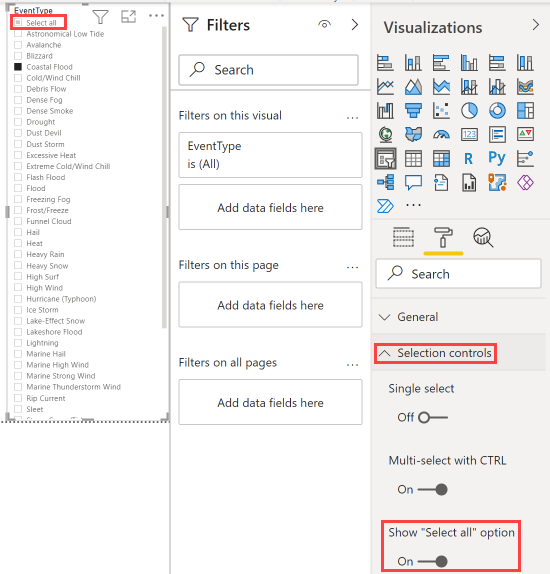
- Select the Report view on the left.
- Select the EventType slicer.
- In the Visualizations pane, select Format, expand Selection controls, and turn on the Show "Select all" option setting. The event type slicer shows the select all option at the top of the list.
Modify the KQL function, setting the parameter type to dynamic and changing the
wherecondition to check for the SelectAll value or the list of parameter values..create-or-alter function EventsByStates (EventTypeParam:dynamic) { StormEvents | where ("__SelectAll__" in (EventTypeParam)) or (EventType in (EventTypeParam)) | summarize Events=count() by EventType, State }
You can now head back to the report and select all event types in the slicer.
Considerations and limitations
There are some considerations and limitations to consider when using dynamic M query parameters:
- A single parameter can't be bound to multiple fields nor vice-versa.
- The following parameter types aren't supported:
- Any
- Duration
- True / False
- Binary
- The following filters aren't supported:
- Relative time slicer or filter
- Relative date
- Hierarchy slicer
- Multi-field include filter
- Exclude filter / Not filters
- Cross-highlighting
- Drill-down filter
- Cross drill filter
- Top N filter
Clean up resources
If you no longer need the report you created for this article, delete the Power BI Desktop (.pbix) file.
Related content
Feedback
Coming soon: Throughout 2024 we will be phasing out GitHub Issues as the feedback mechanism for content and replacing it with a new feedback system. For more information see: https://aka.ms/ContentUserFeedback.
Submit and view feedback for