Set up and manage Teams Rooms on Windows custom backgrounds
You can create custom background images for your Teams Rooms on Windows devices to represent your brand or to provide instructions to Teams Rooms users. For example, you can add your company logo and include contact information for your organization's help desk to your custom background.
The custom background options available to you and how you configure them depend on the Teams Rooms app version installed on your device and whether the resource account logged in on your device has a Teams Rooms Pro or Teams Rooms Basic license.
To check which version of Teams Rooms app is installed and which Teams Rooms license is applied to your device:
- On your Teams Rooms device:
- Select More and then Settings
- Enter your admin password and select Yes
- On the Settings screen
- Find the version under App version
- Find the Teams Rooms license under Room License
- In Teams admin center:
- Go to https://admin.teams.microsoft.com and sign in with your admin account
- Select Teams Rooms on Windows and then find the device you want to see the app version and Teams Rooms license for
- On the details page, look next to the device name to find the license type
- Pro - Teams Rooms Pro license
- Basic - Teams Rooms Basic license
- Any other license type - equivalent to Teams Rooms Basic license
- Select the Health tab
- On the Health tab, go to the Software health section and find the version under Teams App
Select the tab that corresponds to the version of Teams Rooms and the Teams Rooms license that applies to your device.
| Teams Rooms version | Teams Rooms Pro | Teams Rooms Basic |
|---|---|---|
| Teams Rooms 4.17 and later | Enhanced and Standard | N/A |
| Teams Rooms 4.16 and earlier | Standard | N/A |
Teams Rooms 4.17 and later with Teams Rooms Pro license
Enhanced backgrounds lets you configure up to three custom background images and specify which image goes on the main front-of-room display, extended front-of-room display, and touch console.
Note
In a dual screen set up, the main display is where the room calendar is shown and is meant to be installed on the right side; the extended display is where the date/time and room information is shown and is meant to be placed on the left side.
When you enable custom backgrounds, you must provide custom backgrounds for all of your front-of-room displays. If you have two front-of-room displays, you need to provide a custom background for each display. Providing a custom background for your touch console is optional. Otherwise, if you enable custom backgrounds and don't provide custom backgrounds for all of your front-of-room displays, all displays, including the touch console, default to No Theme.
Tip
If you've been using the <CustomThemeImageUrl> element to provide a single custom background image for your front-of-room displays, you can continue using it if it suits your needs. However, if you want to provide separate custom backgrounds for each front-of-room display, or replace your existing backgrounds with higher resolution images, or configure a custom background on your touch console, you need to use the elements provided in this section.
For more information about using <CustomThemeImageUrl>, see Standard backgrounds.
Supported resolutions
Minimum resolutions
Front-of-room displays and touch consoles have minimum supported custom background resolutions:
- For front-of-room displays, the minimum supported resolution is 1920 x 1080.
- For touch consoles, the minimum supported resolution is 1280 x 800.
If the resolution of any custom background is below the minimum supported resolution for the display or console it's added to, all displays default to No Theme.
Recommended resolutions
The recommended custom background resolution for front-of-room displays and touch consoles depends on their aspect ratios. The following lists the aspect ratios supported by each display and the recommended custom background resolution for each:
- Single and dual front-of-room displays (per display)
- 16:9 displays – 1920 x 1080 for 1080p displays, 3840 x 2160 for 4K displays. Up to two 16:9 displays are supported.
- 21:9 displays – 2560 x 1080 for 1080p displays, 3840 x 1645 for 4K displays. Only one 21:9 display is supported.
- Touch console displays
- 16:9 displays – 1920 x 1080
- 16:10 displays – 1280 x 800
- 3:2 displays – 1920 x 800
- Touch board displays (4K displays)
- 16:9 – 3840 x 2160
- 3:2 – 3840 x 2560
If you're not sure what the aspect ratio of your display is, check your display's specifications.
Important
Custom backgrounds with resolutions or aspect ratios higher than the recommended resolution for a display may be center-cropped.
Custom backgrounds with resolutions or aspect ratios lower than the recommended resolution but higher than the minimum supported resolution are scaled to fill the frame of the display and are then center-cropped. The original aspect ratio of the custom background is maintained.
Supported formats
The custom background image file must be in one of the following formats: JPG, JPEG, and PNG.
Custom background content guidelines
Follow the best practices listed in this section to ensure the following:
- Content doesn't collide with on-screen elements
- Content remains legible when placed in front of visual elements in the custom background
- Content remains visible if a custom background is cropped
The following guidelines apply for front-of-room, touch console, and touch board displays:
- Use a darker background on the top and bottom left corners to ensure users can read the clock, room information, and tips in those locations in white.
- For the best experience, use a contrast ratio of 4.5:1 for small text and 3:1 for large text. Use an accessibility contrast checker on the Internet to input color values to see if their contrast ratio is acceptable.
- Place text, logos, or icons, in the middle of the screen so it isn't blocked by home screen elements.
Tip
Use the custom background template in designing your custom background images.
Front-of-room displays
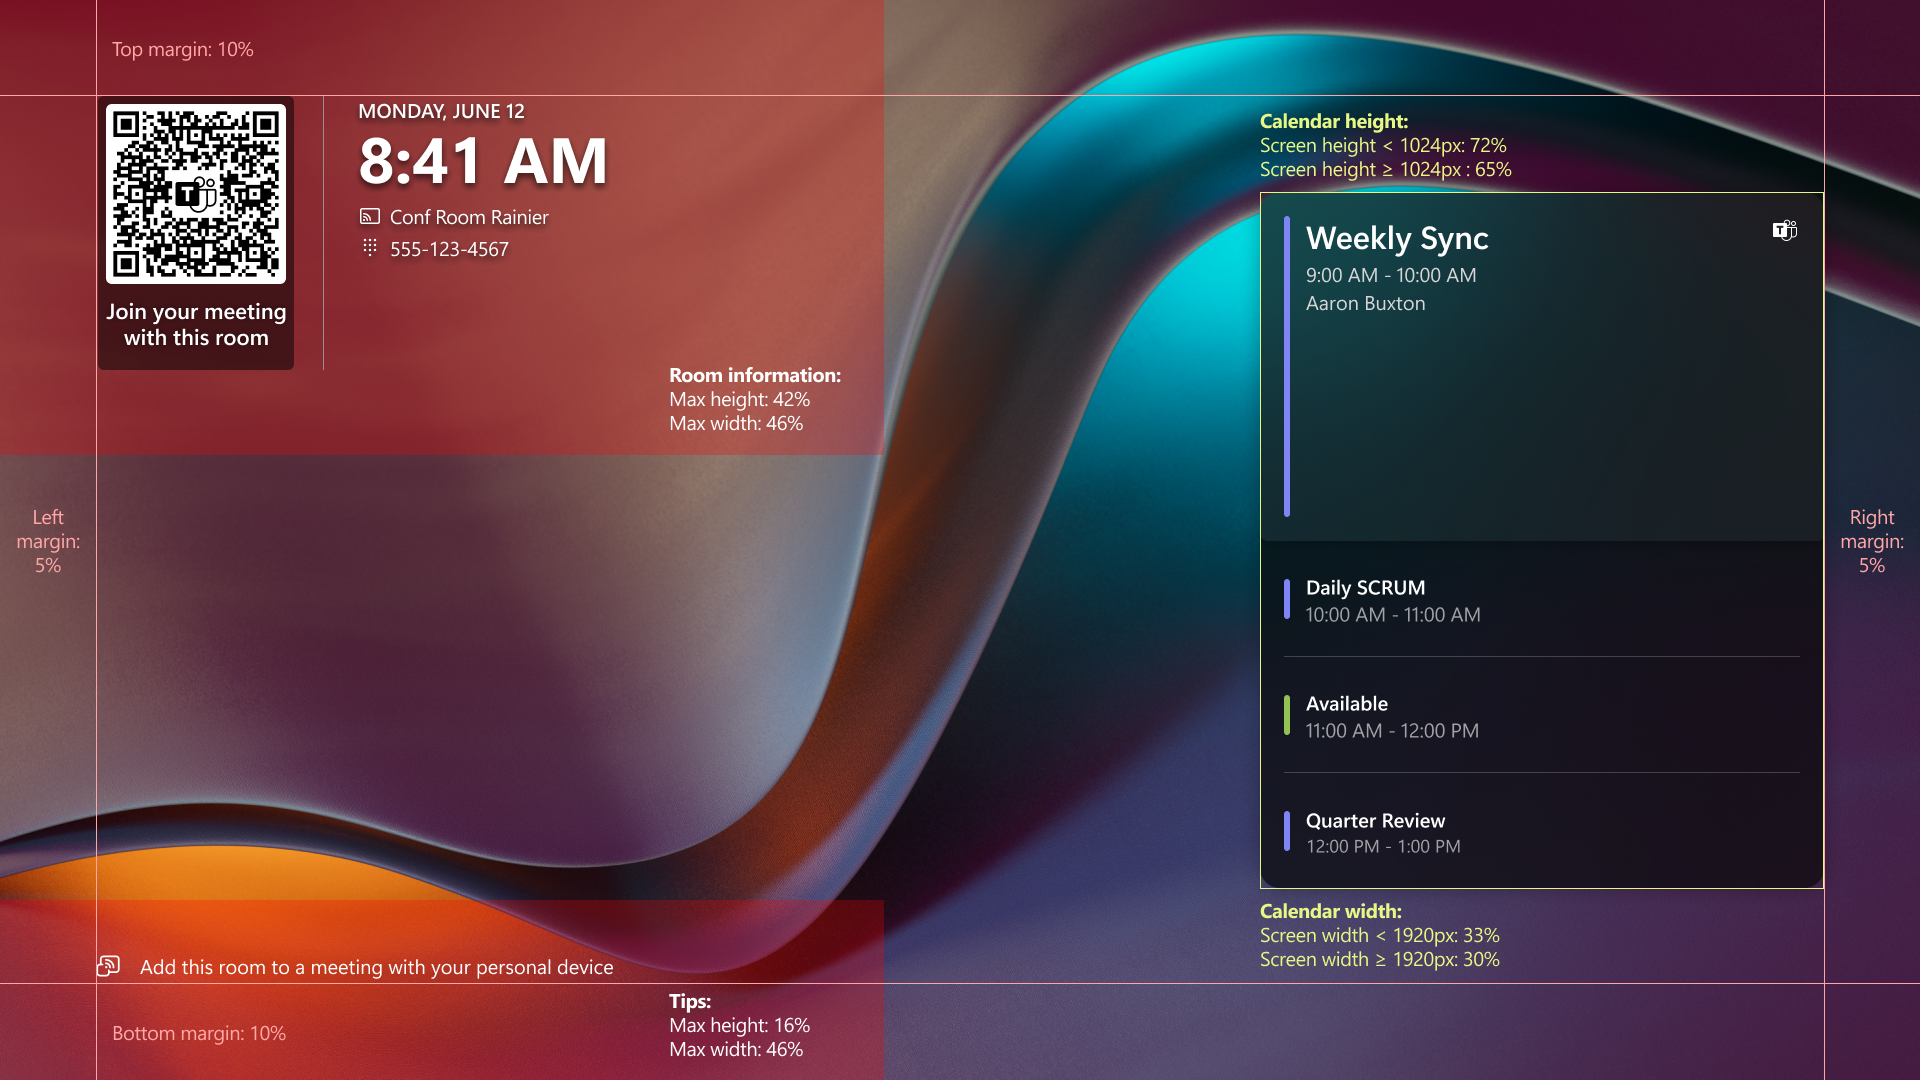
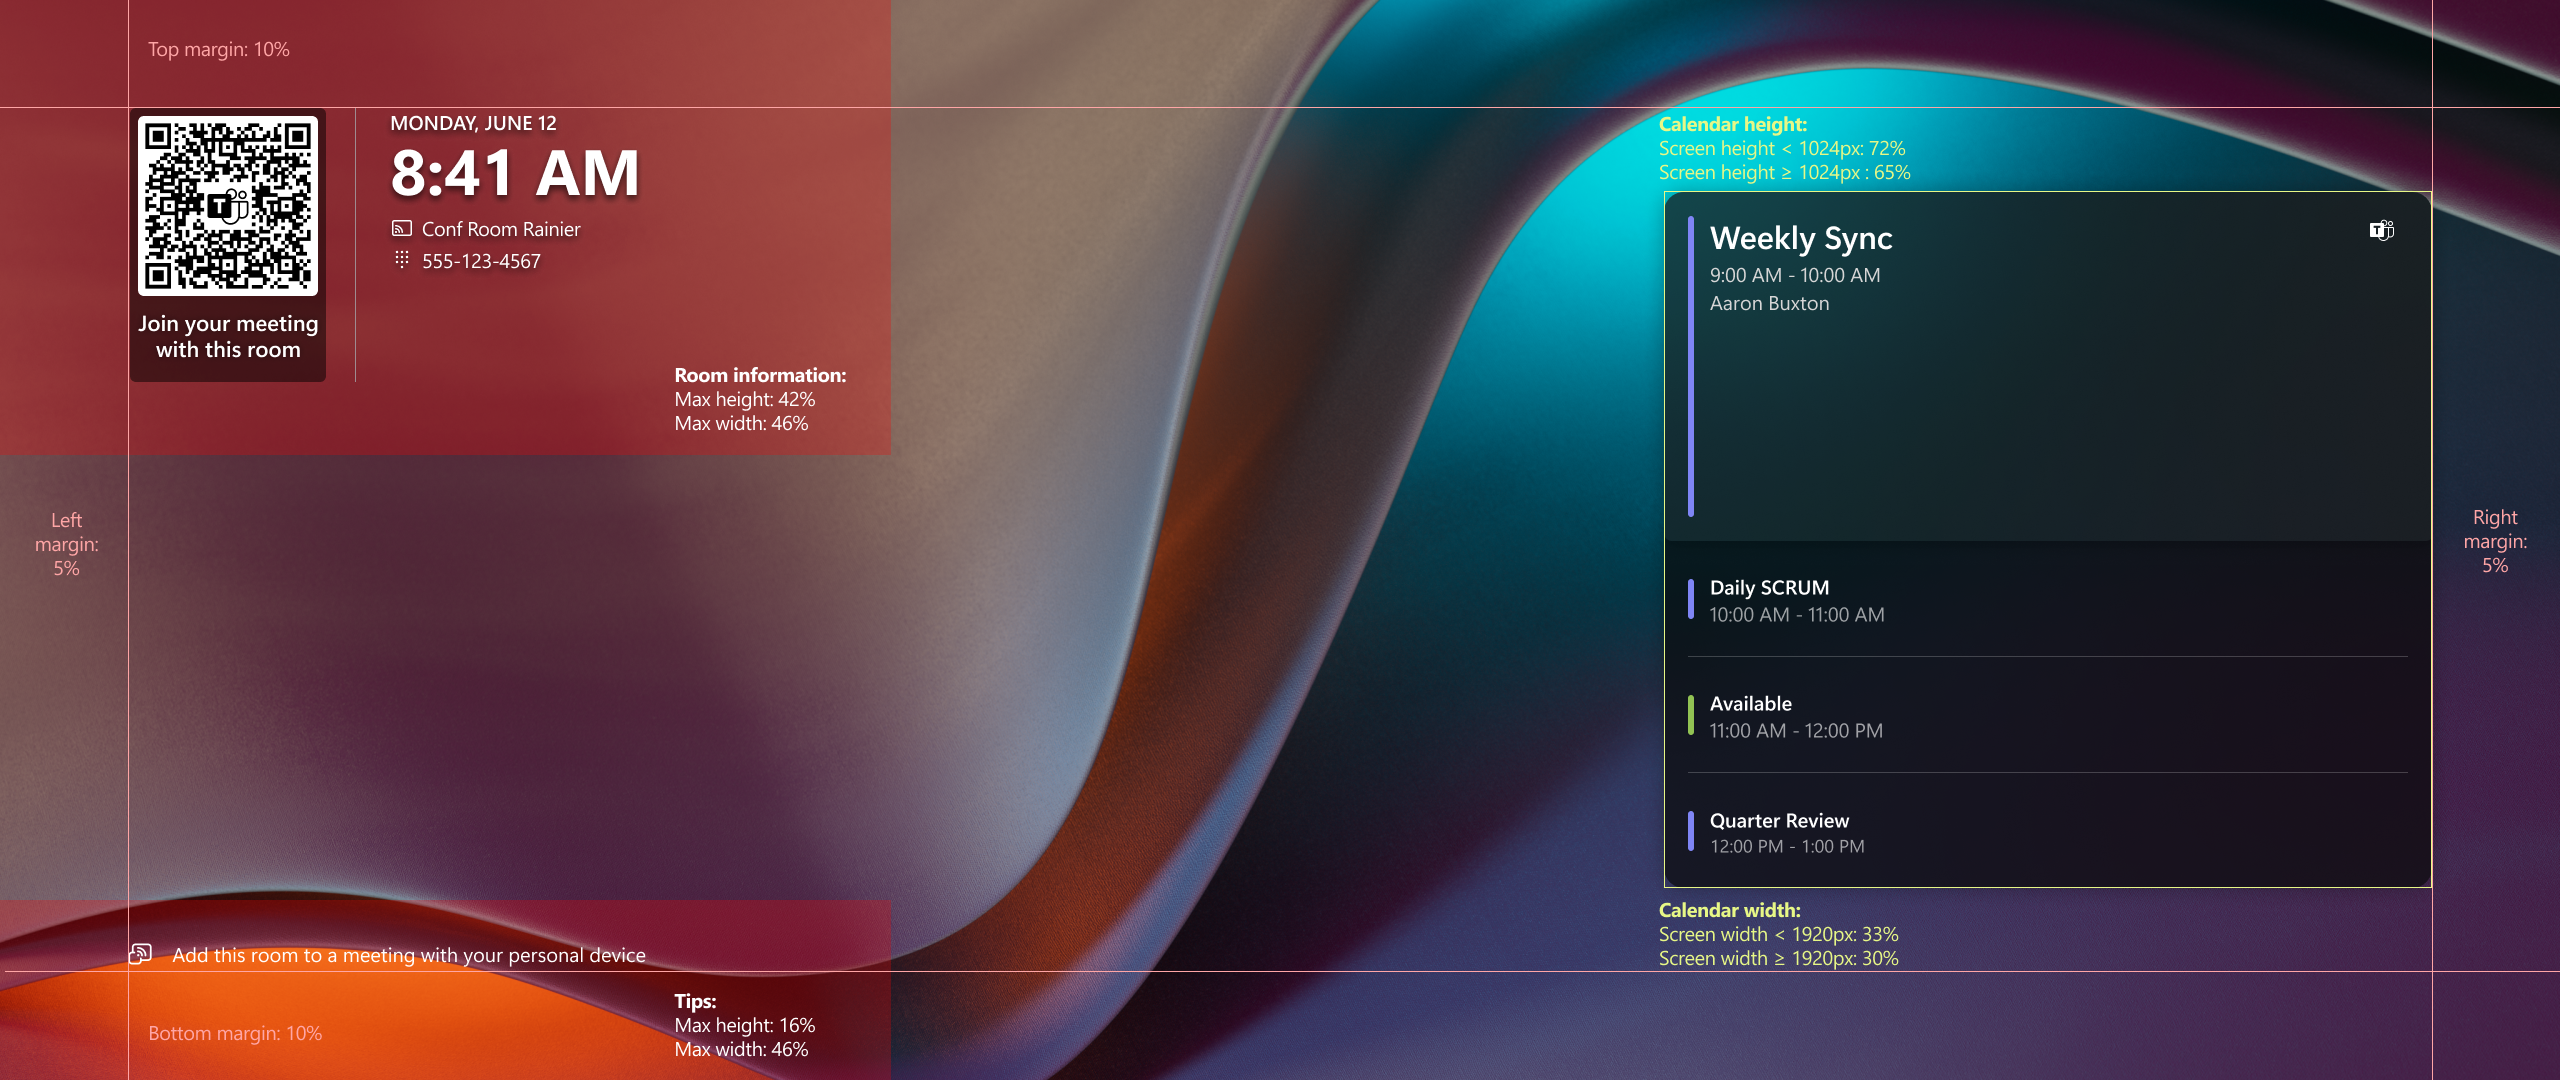
When you create a custom background, avoid placing text, logos, or icons, near these locations:
- Upper left corner - Time and room information.
- Size: up to 46% of the screen width, up to 42% of the screen height depending on the display settings
- Bottom left corner - Tips.
- Size: up to 46% of the screen width, up to 16% of the screen height depending on the display settings
- Right side - Room calendar.
- Size: up to 36% of the screen width, up to 72% of the screen height depending on the display settings
16:9 - Single front-of-room display dimensions
16:9 - Dual front-of-room display dimensions
21:9 - Single front-of-room display dimensions
Touch console displays
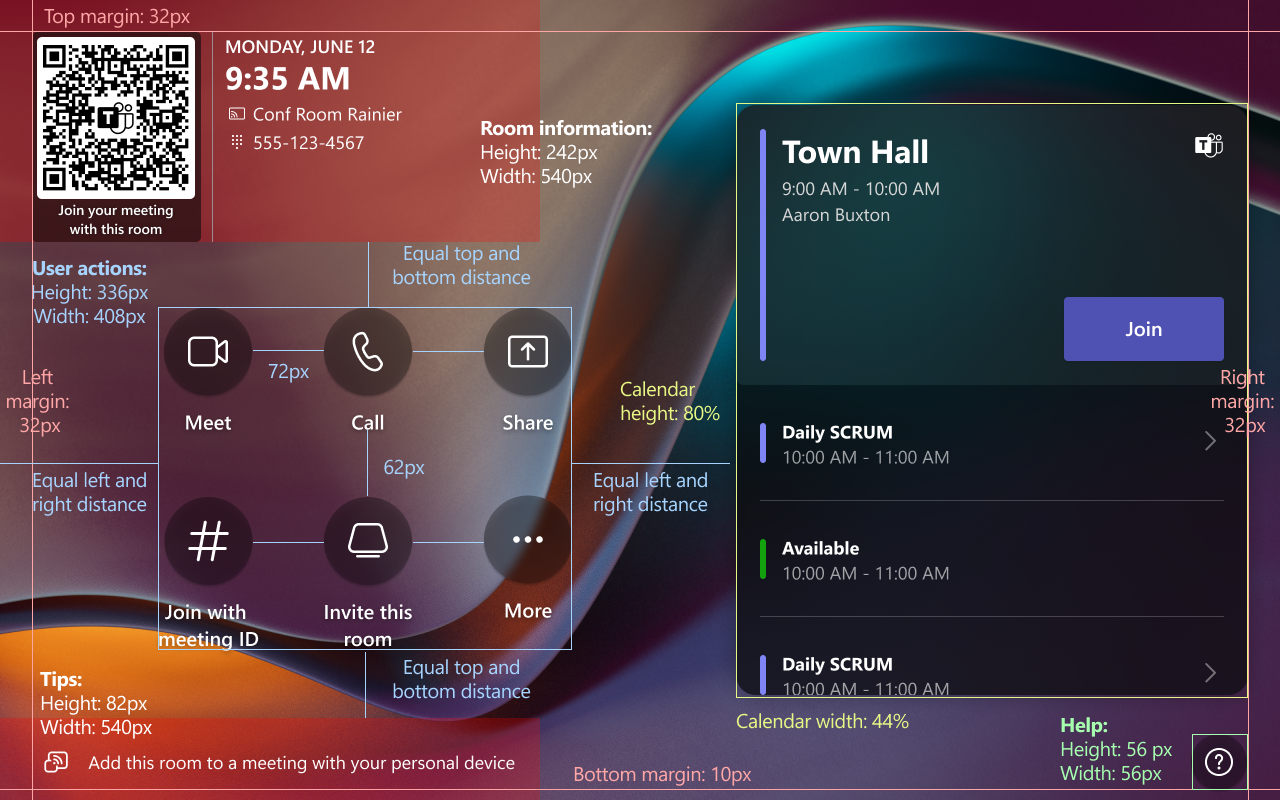
When you create a custom background, avoid placing text, logos, or icons, near these locations:
- Upper left corner - Time and room information.
- Size: 540 x 242 px
- Bottom left corner - Tips.
- Size: 540 x 82 px
- Middle - User actions.
- Size: 408 x 336 px
- Right side - Room calendar.
- Size: up to 44% of the screen width, up to 80% of the screen height depending on the display settings
- Bottom right corner - Help.
- Size: 56 x 56 px
16:9 - Touch console dimensions
Touch board displays
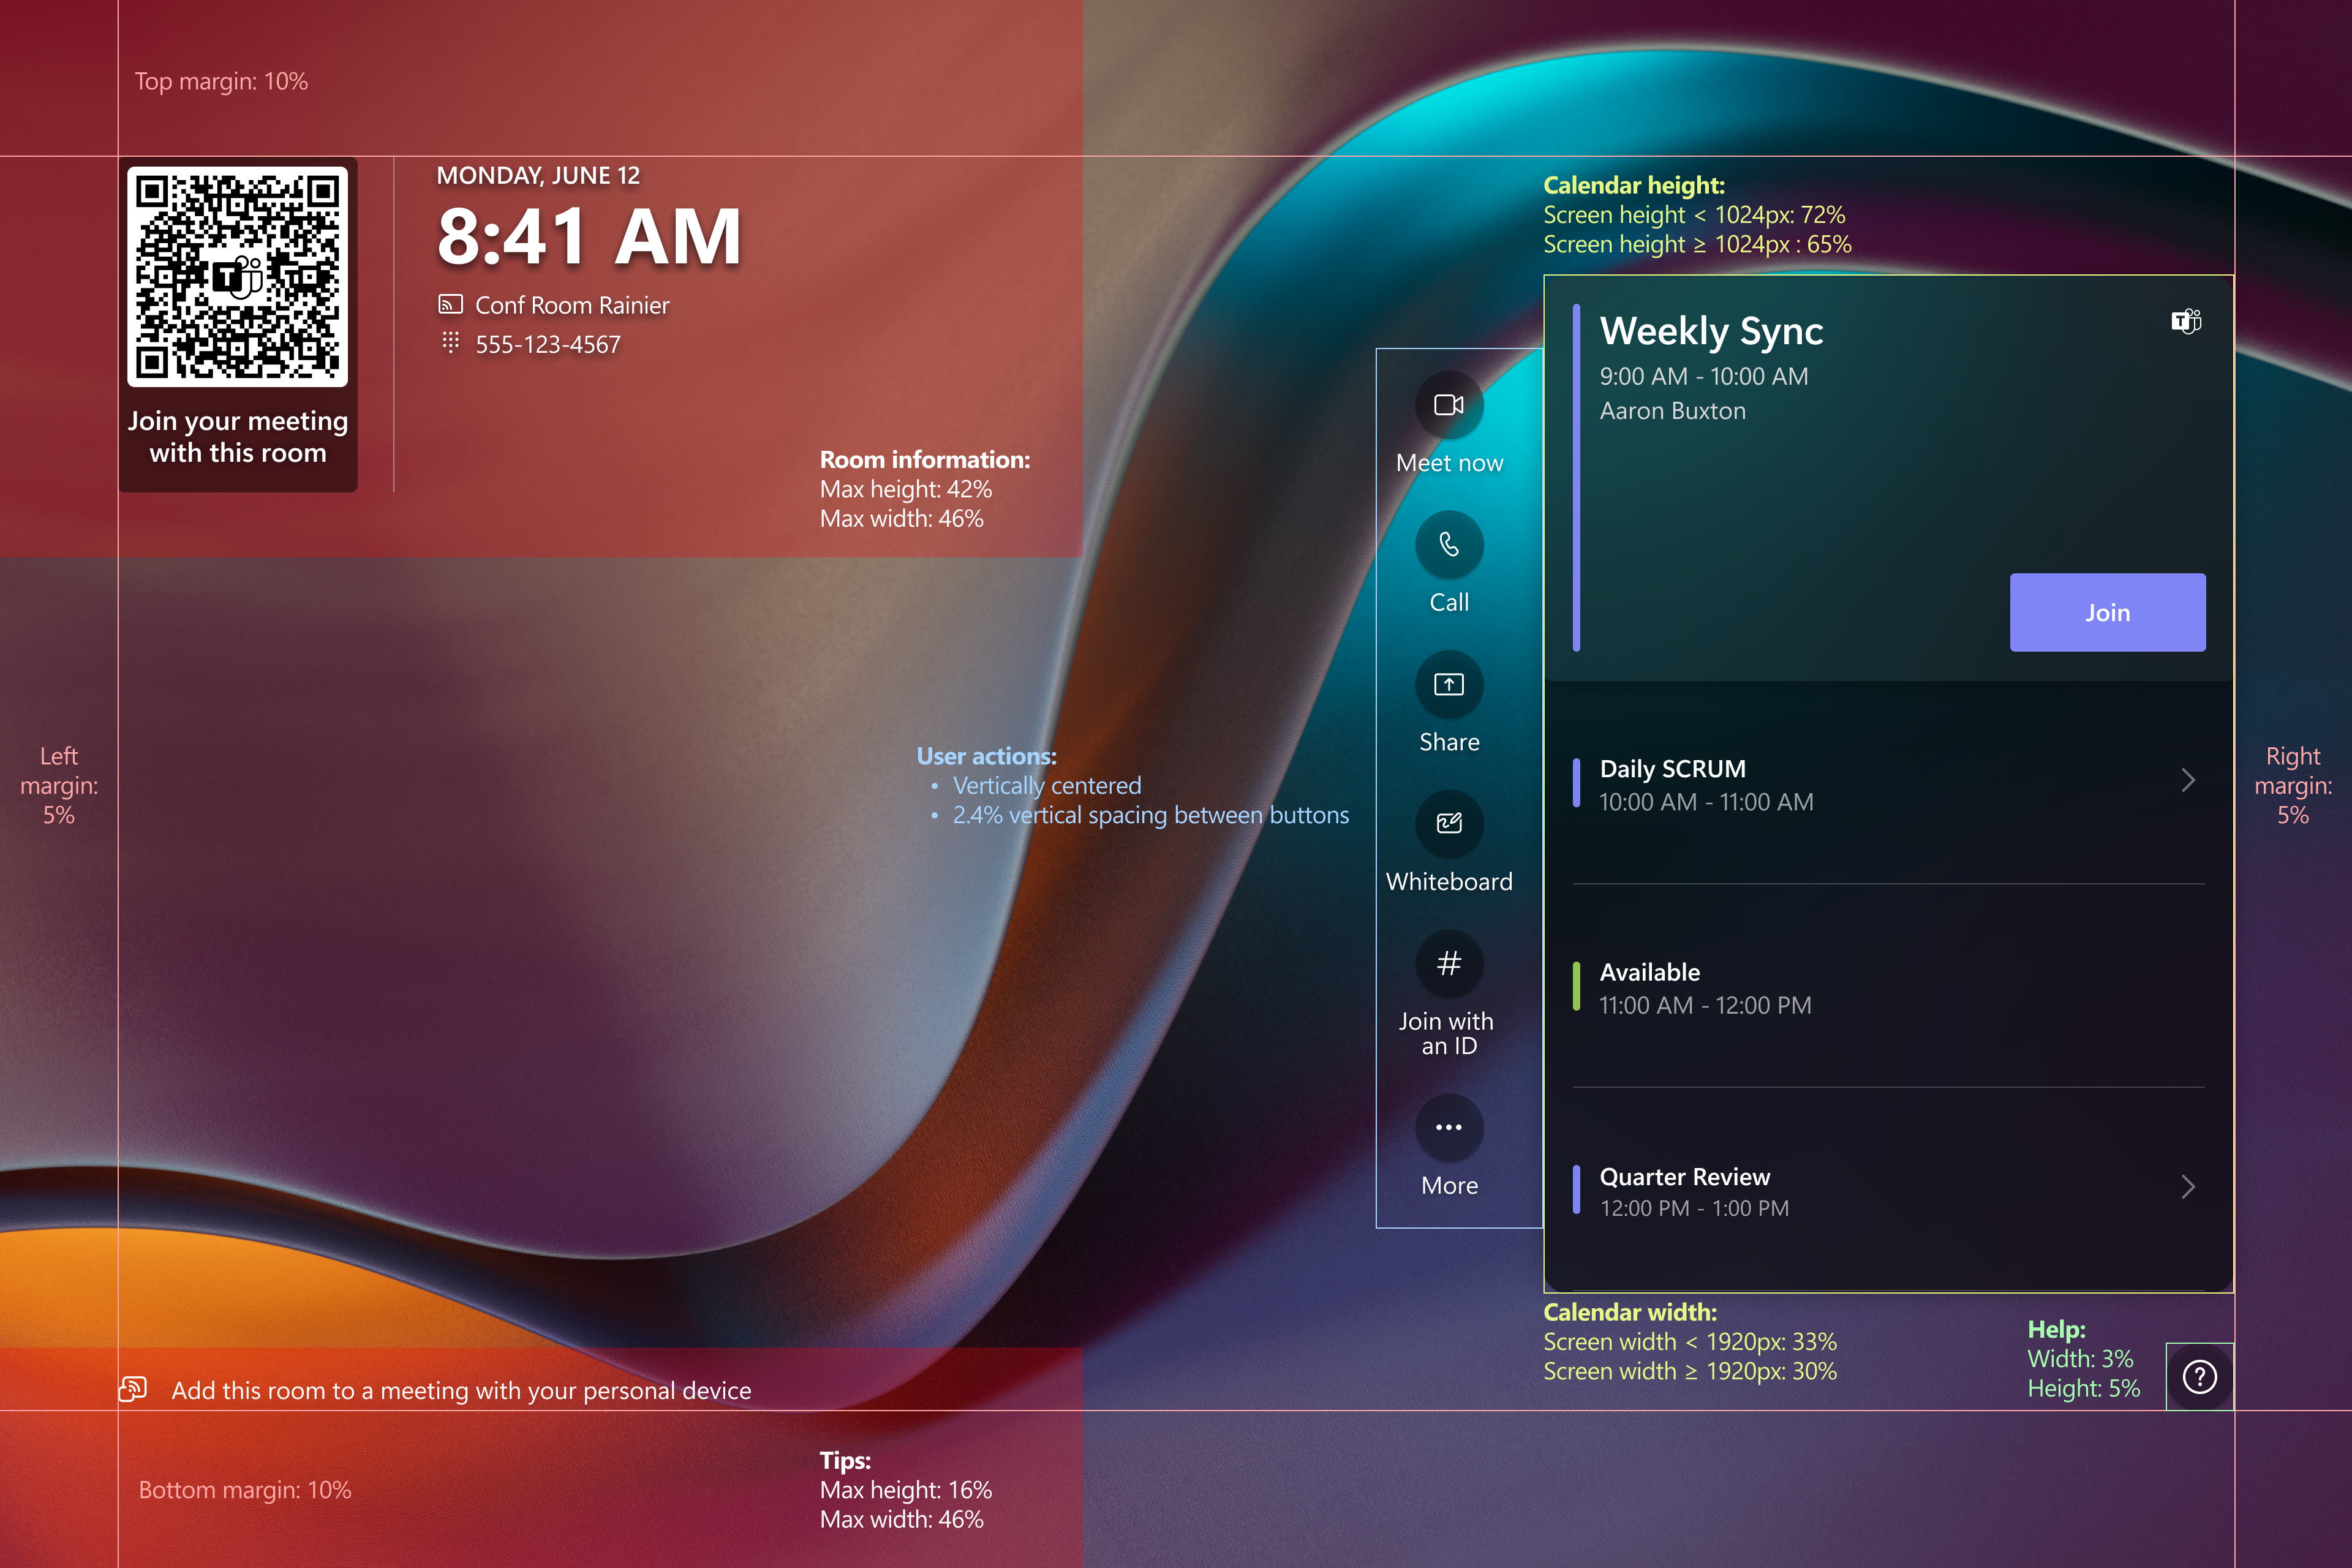
When you create a custom background, avoid placing text, logos, or icons, on these locations:
- Upper left corner - Time and room information.
- Size: up to 46% of the screen width, up to 42% of the screen height depending on the display settings
- Bottom left corner - Tips.
- Size: up to 46% of the screen width, up to 16% of the screen height depending on the display settings
- Right side - User actions and room calendar.
- Size: up to 43% of the screen width, up to 72% of the screen height depending on display settings
- Bottom right corner - Help.
- Size: up to 3% of the screen width, up to 5% of the screen height depending on display settings
16:9 - Touch board display dimensions
3:2 - Touch board display dimensions
Custom background template
To create custom backgrounds that meet the guidelines in the previous section, you can download the Microsoft Teams Rooms Theme Template.
The template is a .PSD file that can be opened by apps such as Adobe Photoshop or Paint.NET (a plug-in may be required). The template provides assets and guidelines to help you place text and graphics in your custom backgrounds that won't be obscured by on-screen elements.
Deploy updated custom backgrounds
After you've created backgrounds:
- Save them with unique and descriptive filenames. For example,
ContosoBackground-Right-FoR.jpg(main/right display),ContosoBackground-Left-FoR.jpg(extended/left display), andContosoBackground-Console.jpg(touch console display). - Copy them to the
C:\Users\Skype\AppData\Local\Packages\Microsoft.SkypeRoomSystem_8wekyb3d8bbwe\LocalStatefolder on your Teams Rooms device. You can use a USB drive or remotely connect to the network share of your device to copy the file. - To tell the Teams Rooms on Windows app to use custom backgrounds and which files to use, you must add the
<Theming>element to your XML configuration file. Within the<Theming>element, you need to provide the elements in the table below.
Note
If the <CustomThemeImageUrl> element is also included in the XML configuration file, the following elements override the value provided in that element.
| Element | Description | Required? |
|---|---|---|
<ThemeName> |
Set to Custom to use custom backgrounds. |
Yes, if <Theming> element is provided. |
<CustomBackgroundMainFoRDisplay> |
Filename of main/right custom background. e.g., ContosoBackground-Right-FoR.jpg |
If <ThemeName> is set to:
|
<CustomBackgroundExtendedFoRDisplay> |
Filename of extended/left custom background. e.g., ContosoBackground-Left-FoR.jpg |
Yes, if both of the following are true:
|
<CustomBackgroundConsole> |
Filename of touch console background. e.g., ContosoBackground-Console.jpg |
No |
Here's an example XML snippet showing background images being provided for dual front-of-room displays and the touch console:
<Theming>
    <ThemeName>Custom</ThemeName>
    <CustomBackgroundMainFoRDisplay>ContosoBackground-Right-FoR.jpg</CustomBackgroundMainFoRDisplay>
    <CustomBackgroundExtendedFoRDisplay>ContosoBackground-Left-FoR.jpg</CustomBackgroundExtendedFoRDisplay>
    <CustomBackgroundConsole>ContosoBackground-Console.jpg</CustomBackgroundConsole>
</Theming>
To apply the configuration changes included in this article to your Teams Rooms for Windows devices, you need to use the Teams Rooms XML configuration file. The XML configuration file lets you remotely deploy configuration changes to one or more Teams Rooms devices in your organization. For more information, see Manage a Microsoft Teams Rooms console settings remotely with an XML configuration file.
Feedback
Coming soon: Throughout 2024 we will be phasing out GitHub Issues as the feedback mechanism for content and replacing it with a new feedback system. For more information see: https://aka.ms/ContentUserFeedback.
Submit and view feedback for


