Integrate Power BI data alerts with Power Automate
Use Power Automate to integrate Power BI with your favorite apps and services. With Power Automate, you create automated workflows to get notifications, synchronize files, collect data, and more. In this article, you automate generating an email from a Power BI data alert.
Prerequisites
This article shows how to create two different flows: one from a template and one from scratch. To follow along, create a data alert in Power BI, and sign up for Power Automate. It's free!
Create a flow from a template
In this task, we use a template to create a flow that's triggered by a Power BI data alert (notification).
Sign in to Power Automate (https://flow.microsoft.com).
Select Templates, search for Power BI > Send an e-mail to any audience when a Power BI data alert is triggered.

Build the flow
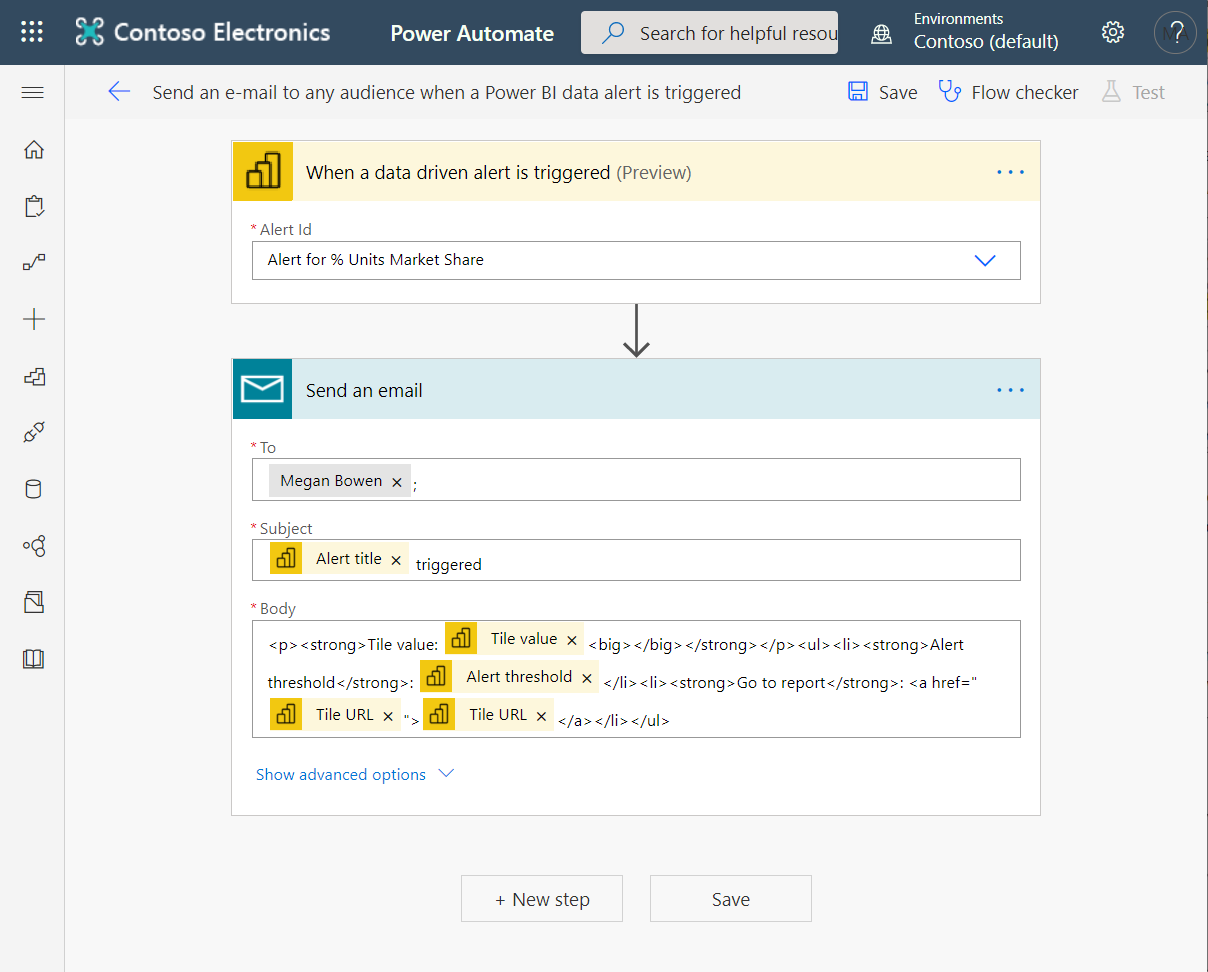
This template has one trigger, a Power BI data alert, and one action, to send an email. As you select a field, Power Automate displays dynamic content that you can include. In this example, we include the tile value and the tile URL in the message body.
Select Continue.

In the Alert ID box, select a Power BI data alert. To learn how to create an alert, see Data alerts in Power BI.

Enter one or more valid email addresses.
Power Automate automatically generates a Subject and Body for you, which you can keep or modify. The body text uses HTML for formatting.

When you're done with the message, select New step or Save. Power Automate creates and evaluates the flow.
If Power Automate finds errors, it lets you know.
Select Edit flow to fix the errors. Otherwise, select Done to run the new flow.

When a change triggers a data alert, Power Automate sends an email to the addresses you indicated.

Create a flow from scratch
In this task, we create a simple flow from scratch that is triggered by a Power BI data alert (notification).
Sign in to Power Automate.
Select Create > Automated flow.

In Build an automated flow, give your flow a name.
In Choose your flow's trigger, search for Power BI.
Select Power BI - When a data driven alert is triggered > Create.

Build your flow
In the Alert ID box, select the name of your alert. To learn how to create an alert, see Data alerts in Power BI.

Select New step.
In Choose an action, search for Outlook > Create event.

Fill in the event fields. As you select a field, Power Automate displays dynamic content that you can include.

Select Create flow when done. Power Automate saves and evaluates the flow. If there are no errors, select Done to run this flow. The new flow is added to your My flows page.

When your Power BI data alert triggers the flow, you'll receive an Outlook event notification similar to this one.
