Provision access to system metadata in Azure SQL Managed Instance using Microsoft Purview DevOps policies
DevOps policies are a type of Microsoft Purview access policies. They allow you to manage access to system metadata on data sources that have been registered for data policy enforcement in Microsoft Purview. These policies are configured directly from the Microsoft Purview governance portal, and after they're saved, they get automatically published and then enforced by the data source. Microsoft Purview policies only manage access for Microsoft Entra principals.
This how-to guide covers how to configure Azure SQL Managed Instance to enforce policies created in Microsoft Purview. It covers the configuration steps for Azure SQL MI and the ones in Microsoft Purview to provision access to Azure SQL MI system metadata (DMVs and DMFs) using the DevOps policies actions SQL Performance Monitoring or SQL Security Auditing.
Prerequisites
An Azure account with an active subscription. Create an account for free.
A new or existing Microsoft Purview account. Follow this quickstart guide to create one.
- Create a new Azure SQL MI or use an existing one in one of the currently available regions for this feature. You can follow this guide to create a new Azure SQL MI.
Region support
All Microsoft Purview regions are supported.
Enforcement of Microsoft Purview policies is available only in the following regions for Azure SQL MI:
Public cloud:
- East US
- East US2
- South Central US
- West Central US
- West US3
- Canada Central
- Brazil South
- West Europe
- North Europe
- France Central
- UK South
- South Africa North
- Central India
- South East Asia
- East Asia
- Australia East
Azure SQL MI configuration
This section explains how you can set up Azure SQL MI to honor policies from Microsoft Purview. Check first whether Azure SQL MI is configured for public or private endpoint. This guide explains how to do so.
Configuration for SQL MI public endpoint
If Azure SQL MI is configured for public endpoint, follow these steps:
Configure a Microsoft Entra Admin. In Azure portal navigate to the Azure SQL MI then navigate to Microsoft Entra ID on the side menu (formerly called Active Directory admin). Set an Admin name and then select Save.
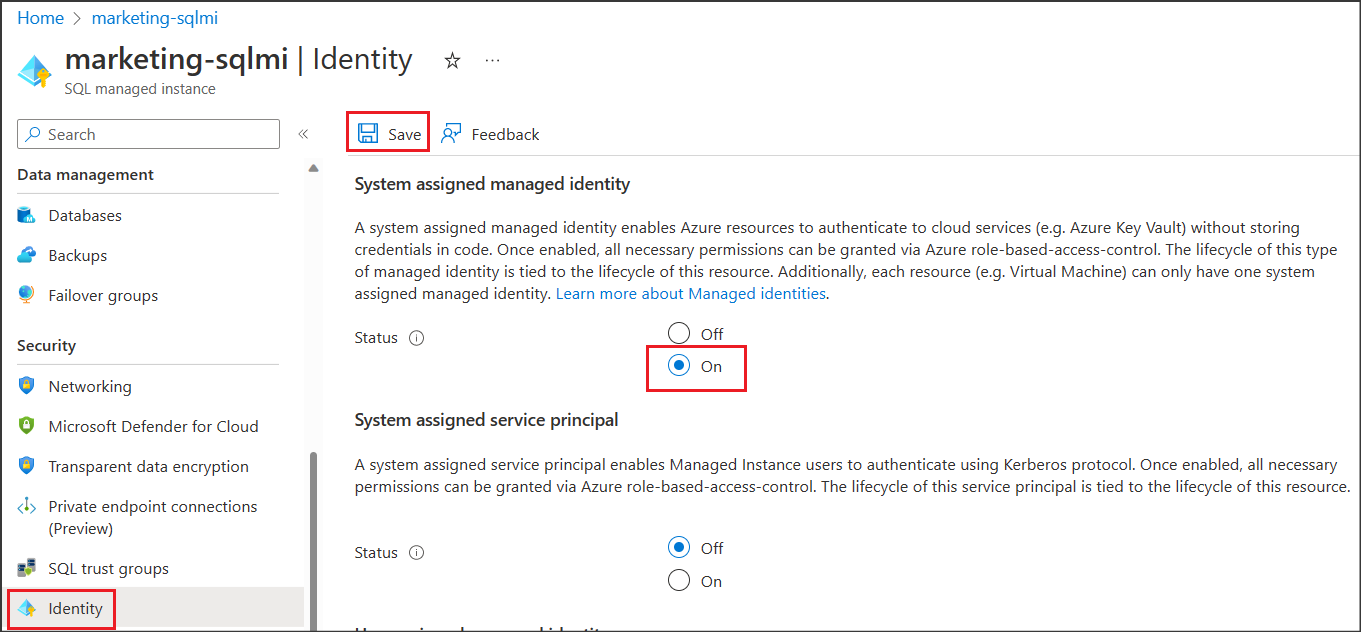
Then navigate to Identity on the side menu. Under System assigned managed identity check status to On and then select Save. See screenshot:

Configuration for SQL MI private endpoint
If Azure SQL MI is configured to use private endpoint, execute the same steps outlined in the configuration for public endpoint, and in addition, do the following:
Navigate to the Network Security Group (NSG) associated to your Azure SQL MI.
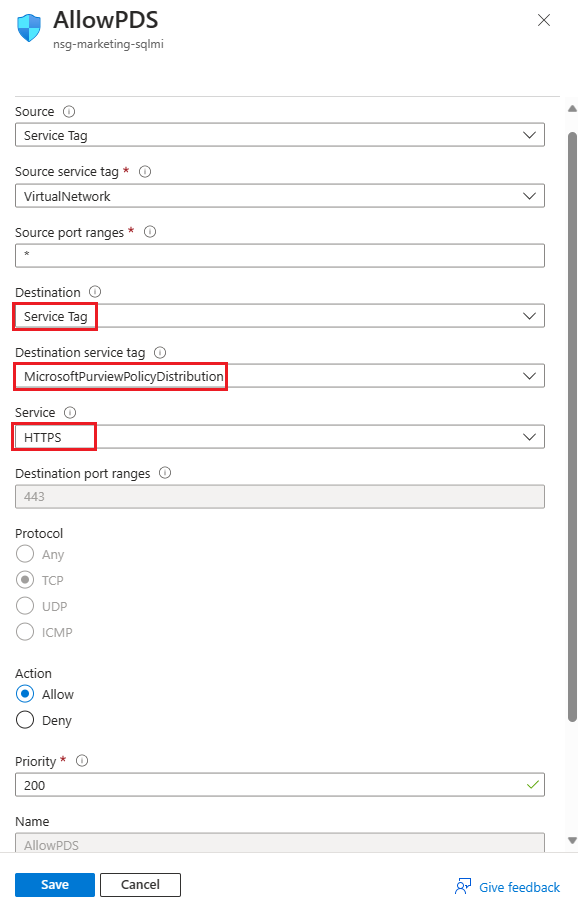
Add an outbound security rule similar to the one in the following screenshot. Destination = Service Tag, Destination service tag = MicrosoftPurviewPolicyDistribution, Service = HTTPS, Action = Allow. Ensure also that this rule's priority is lower than the one for the deny_all_outbound rule.
Microsoft Purview Configuration
Register the data source in Microsoft Purview
Before a policy can be created in Microsoft Purview for a data resource, you must register that data resource in Microsoft Purview Studio. You will find the instructions related to registering the data resource later in this guide.
Note
Microsoft Purview policies rely on the data resource ARM path. If a data resource is moved to a new resource group or subscription it will need to be de-registered and then registered again in Microsoft Purview.
Configure permissions to enable Data policy enforcement on the data source
Once a resource is registered, but before a policy can be created in Microsoft Purview for that resource, you must configure permissions. A set of permissions are needed to enable the Data policy enforcement. This applies to data sources, resource groups, or subscriptions. To enable Data policy enforcement, you must have both specific Identity and Access Management (IAM) privileges on the resource as well as specific Microsoft Purview privileges:
You must have either one of the following IAM role combinations on the resource's Azure Resource Manager path or any parent of it (that is, using IAM permission inheritance):
- IAM Owner
- Both IAM Contributor and IAM User Access Administrator
To configure Azure role-based access control (RBAC) permissions, follow this guide. The following screenshot shows how to access the Access Control section in the Azure portal for the data resource to add a role assignment.

Note
The IAM Owner role for a data resource can be inherited from a parent resource group, a subscription, or a subscription management group. Check which Microsoft Entra users, groups, and service principals hold or are inheriting the IAM Owner role for the resource.
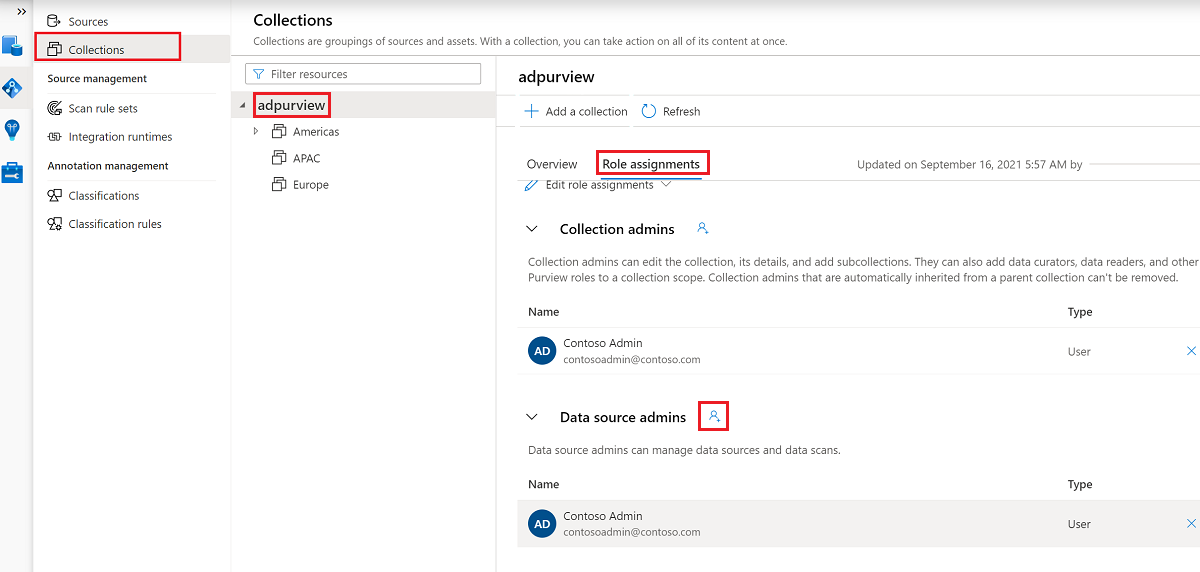
You also need to have the Microsoft Purview Data source admin role for the collection or a parent collection (if inheritance is enabled). For more information, see the guide on managing Microsoft Purview role assignments.
The following screenshot shows how to assign the Data source admin role at the root collection level.


Configure Microsoft Purview permissions to create, update, or delete access policies
To create, update or delete policies, you need to get the Policy author role in Microsoft Purview at root collection level:
- The Policy author role can create, update, and delete DevOps and Data Owner policies.
- The Policy author role can delete self-service access policies.
For more information about managing Microsoft Purview role assignments, see Create and manage collections in the Microsoft Purview Data Map.
Note
Policy author role must be configured at the root collection level.
In addition, to easily search Microsoft Entra users or groups when creating or updating the subject of a policy, you can greatly benefit from getting the Directory Readers permission in Microsoft Entra ID. This is a common permission for users in an Azure tenant. Without the Directory Reader permission, the Policy Author will have to type the complete username or email for all the principals included in the subject of a data policy.
Configure Microsoft Purview permissions for publishing Data Owner policies
Data Owner policies allow for checks and balances if you assign the Microsoft Purview Policy author and Data source admin roles to different people in the organization. Before a Data owner policy takes effect, a second person (Data source admin) must review it and explicitly approve it by publishing it. This does not apply to DevOps or Self-service access policies as publishing is automatic for them when those policies are created or updated.
To publish a Data owner policy you need to get the Data source admin role in Microsoft Purview at root collection level.
For more information about managing Microsoft Purview role assignments, see Create and manage collections in the Microsoft Purview Data Map.
Note
To publish Data owner policies, the Data source admin role must be configured at the root collection level.
Delegate access provisioning responsibility to roles in Microsoft Purview
After a resource has been enabled for Data policy enforcement, any Microsoft Purview user with the Policy author role at the root collection level can provision access to that data source from Microsoft Purview.
Note
Any Microsoft Purview root Collection admin can assign new users to root Policy author roles. Any Collection admin can assign new users to a Data source admin role under the collection. Minimize and carefully vet the users who hold Microsoft Purview Collection admin, Data source admin, or Policy author roles.
If a Microsoft Purview account with published policies is deleted, such policies will stop being enforced within an amount of time that depends on the specific data source. This change can have implications on both security and data access availability. The Contributor and Owner roles in IAM can delete Microsoft Purview accounts. You can check these permissions by going to the Access control (IAM) section for your Microsoft Purview account and selecting Role Assignments. You can also use a lock to prevent the Microsoft Purview account from being deleted through Resource Manager locks.
Register the data sources in Microsoft Purview
The Azure SQL Managed Instance data source needs to be registered first with Microsoft Purview, before you can create access policies. You can follow the "Prerequisites" and "Register the data source" sections in this guide: Register and scan Azure SQL MI.
After you've registered your resources, you'll need to enable data policy enforcement (formerly Data Use Management). Data policy enforcement needs certain permissions and can affect the security of your data, as it delegates to certain Microsoft Purview roles the ability to manage access to data sources. Go through the secure practices related to data policy enforcement in this guide: How to enable policy enforcement
Once your data source has the Data policy enforcement toggle Enabled, it will look like this screenshot. This will enable the access policies to be used with the given data source.

Return to the Azure portal for Azure SQL Database to verify it's now governed by Microsoft Purview:
Sign in to the Azure portal through this link
Select the Azure SQL Server that you want to configure.
Go to Microsoft Entra ID on the left pane.
Scroll down to Microsoft Purview access policies.
Select the button to Check for Microsoft Purview Governance. Wait while the request is processed. It could take a few minutes.

Confirm that the Microsoft Purview Governance Status shows
Governed. Note that it could take a few minutes after you enable Data policy enforcement in Microsoft Purview for the correct status to be reflected.

Note
If you disable Data policy enforcement for this Azure SQL Database data source, it might take up to 24 hours for the Microsoft Purview Governance Status to be updated automatically to Not Governed. This can be accelerated by selecting Check for Microsoft Purview Governance. Before you enable Data policy enforcement for the data source in another Microsoft Purview account, ensure that the Purview Governance Status shows as Not Governed. Then repeat the steps above with the new Microsoft Purview account.
Create a new DevOps policy
Follow this link for the steps to create a new DevOps policy in Microsoft Purview.
List DevOps policies
Follow this link for the steps to list DevOps policies in Microsoft Purview.
Update a DevOps policy
Follow this link for the steps to update a DevOps policies in Microsoft Purview.
Delete a DevOps policy
Follow this link for the steps to delete a DevOps policies in Microsoft Purview.
Important
DevOps policies are auto-published and changes can take up to 5 minutes to be enforced by the data source.
Test the DevOps policy
See how to test the policy you created.
Role definition detail
See the mapping of DevOps role to data source actions.
Next steps
Feedback
Coming soon: Throughout 2024 we will be phasing out GitHub Issues as the feedback mechanism for content and replacing it with a new feedback system. For more information see: https://aka.ms/ContentUserFeedback.
Submit and view feedback for