An ASP.NET Core web app authenticating users against Azure AD for Customers using Microsoft Identity Web
- Overview
- Scenario
- Prerequisites
- Setup the sample
- Explore the sample
- Troubleshooting
- About the code
- Contributing
- Learn More
Overview
This sample demonstrates an ASP.NET Core web app that authenticates users against Azure AD for Customers with the help of Microsoft.Identity.Web
Scenario
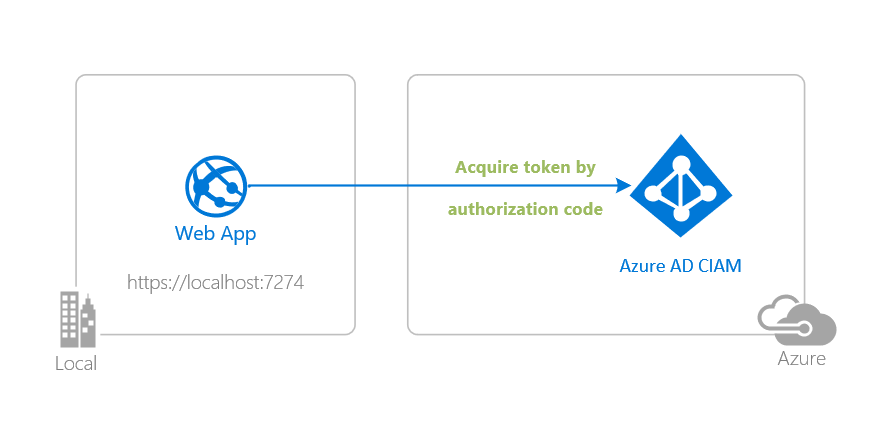
- The client ASP.NET Core web app uses the to sign-in a user and obtain a JWT ID Token from Azure AD for Customers.
- The ID Token proves that the user has successfully authenticated against Azure AD for Customers.
Prerequisites
- Either Visual Studio or Visual Studio Code and .NET Core SDK
- An Azure AD for Customers tenant. For more information, see: How to get an Azure AD for Customers tenant
- A user account in your Azure AD for Customers tenant.
Setup the sample
Step 1: Clone or download this repository
From your shell or command line:
git clone https://github.com/Azure-Samples/ms-identity-ciam-dotnet-tutorial.git
or download and extract the repository .zip file.
⚠️ To avoid path length limitations on Windows, we recommend cloning into a directory near the root of your drive.
Step 2: Navigate to project folder
cd 1-Authentication\1-sign-in-aspnet-core-mvc
Step 3: Register the sample application(s) in your tenant
There is one project in this sample. To register it, you can:
- follow the steps below for manually register your apps
- or use PowerShell scripts that:
- automatically creates the Azure AD applications and related objects (passwords, permissions, dependencies) for you.
- modify the projects' configuration files.
Expand this section if you want to use this automation:
⚠️ If you have never used Microsoft Graph PowerShell before, we recommend you go through the App Creation Scripts Guide once to ensure that your environment is prepared correctly for this step.
Ensure that you have PowerShell 7 or later.
Run the script to create your Azure AD application and configure the code of the sample application accordingly.
For interactive process -in PowerShell, run:
cd .\AppCreationScripts\
.\Configure.ps1 -TenantId "[Optional] - your tenant id" -AzureEnvironmentName "[Optional] - Azure environment, defaults to 'Global'"
Other ways of running the scripts are described in App Creation Scripts guide. The scripts also provide a guide to automated application registration, configuration and removal which can help in your CI/CD scenarios.
ℹ️ This sample can make use of client certificates. You can use AppCreationScripts to register an Azure AD application with certificates. See: How to use certificates instead of client secrets
Choose the Azure AD for Customers tenant where you want to create your applications
To manually register the apps, as a first step you'll need to:
- Sign in to the Azure portal.
- If your account is present in more than one Azure AD for Customers tenant, select your profile at the top right corner in the menu on top of the page, and then switch directory to change your portal session to the desired Azure AD for Customers tenant.
Create User Flows
Please refer to: Tutorial: Create user flow in Azure Active Directory CIAM
ℹ️ To enable password reset in Customer Identity Access Management (CIAM) in Azure Active Directory (Azure AD), please refer to: Tutorial: Enable self-service password reset
Add External Identity Providers
Please refer to:
Register the client app (ciam-aspnet-webapp)
- Navigate to the Azure portal and select the Azure AD for Customers service.
- Select the App Registrations blade on the left, then select New registration.
- In the Register an application page that appears, enter your application's registration information:
- In the Name section, enter a meaningful application name that will be displayed to users of the app, for example
ciam-aspnet-webapp. - Under Supported account types, select Accounts in this organizational directory only
- Select Register to create the application.
- In the Name section, enter a meaningful application name that will be displayed to users of the app, for example
- In the Overview blade, find and note the Application (client) ID. You use this value in your app's configuration file(s) later in your code.
- In the app's registration screen, select the Authentication blade to the left.
- If you don't have a platform added, select Add a platform and select the Web option.
- In the Redirect URI section enter the following redirect URIs:
https://localhost:7274/https://localhost:7274/signin-oidc
- In the Front-channel logout URL section, set it to
https://localhost:7274/signout-callback-oidc. - Enable ID tokens to be issued to the authorization endpoint.
- Click Save to save your changes.
- In the Redirect URI section enter the following redirect URIs:
Configure the client app (ciam-aspnet-webapp) to use your app registration
Open the project in your IDE (like Visual Studio or Visual Studio Code) to configure the code.
In the steps below, "ClientID" is the same as "Application ID" or "AppId".
Open the
appsettings.jsonfile.Find the placeholder
Enter_the_Application_Id_Hereand replace the existing value with the application ID (clientId) ofciam-aspnet-webappapp copied from the Azure portal.Find the placeholder
Enter_the_Tenant_Subdomain_Hereand replace it with the Directory (tenant) subdomain. For instance, if your tenant primary domain is contoso.onmicrosoft.com, use contoso.ℹ️ To use a CIAM custom domain instead in the previous step, you can replace the entire
https://Enter_the_Tenant_Subdomain_Here.ciamlogin.com/placeholder with the (custom domain)/tenant/v2.0. For instance, if you custom domain is contoso.ciamcustom.com, you can usehttps://contoso.consotoextensibility.com/tenant/v2.0.
Step 4: Running the sample
From your shell or command line, execute the following commands:
    cd 1-Authentication\1-sign-in-aspnet-core-mvc
    dotnet run
Explore the sample
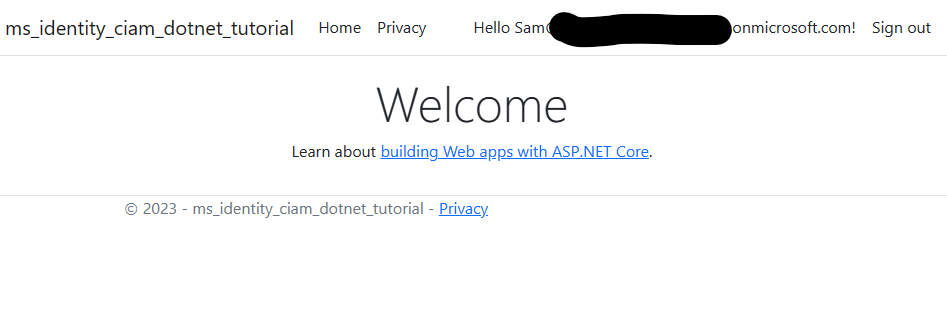
- Open your web browser and navigate to https://localhost:7274.
- Sign-in with an account registered to the CIAM tenant.
- You should now see your display name next to a Sign out button.
- When you're done exploring you can end the session and sign out with the Sign out button
ℹ️ Did the sample not work for you as expected? Then please reach out to us using the GitHub Issues page.
We'd love your feedback!
Were we successful in addressing your learning objective? Consider taking a moment to share your experience with us.
Troubleshooting
Expand for troubleshooting info
ASP.NET core applications create session cookies that represent the identity of the caller. Some Safari users using iOS 12 had issues which are described in ASP.NET Core #4467 and the Web kit bugs database Bug 188165 - iOS 12 Safari breaks ASP.NET Core 2.1 OIDC authentication.
If your web site needs to be accessed from users using iOS 12, you probably want to disable the SameSite protection, but also ensure that state changes are protected with CSRF anti-forgery mechanism. See the how to fix section of Microsoft Security Advisory: iOS12 breaks social, WSFed and OIDC logins #4647
To provide feedback on or suggest features for Azure Active Directory, visit User Voice page.
About the code
This sample shows how to use the OpenID Connect ASP.NET Core middleware to sign in users from a single Azure AD for Customers tenant. The middleware is initialized in the Program.cs file by passing it the Client ID of the app, and the URL of the Azure AD tenant where the app is registered. These values are read from the appsettings.json file. The middleware takes care of:
- Downloading the Azure AD metadata, finding the signing keys, and finding the issuer name for the tenant.
- Processing OpenID Connect sign-in responses by validating the signature and issuer in an incoming JWT, extracting the user's claims, and putting the claims in
ClaimsPrincipal.Current. - Integrating with the session cookie ASP.NET Core middleware to establish a session for the user.
You can trigger the middleware to send an OpenID Connect sign-in request by decorating a class or method with the [Authorize] attribute or by issuing a challenge (see the AccountController.cs file which is part of ASP.NET Core):
The middleware in this project is created as a part of the open-source ASP.NET Core Security project.
These steps are encapsulated in the Microsoft.Identity.Web library.
Deploying Web app to Azure App Service
There is one web app in this sample. To deploy it to Azure App Services, you'll need to:
- create an Azure App Service
- publish the projects to the App Services, and
- update its client(s) to call the website instead of the local environment.
Publish your files (ciam-aspnet-webapp)
Publish using Visual Studio
Follow the link to Publish with Visual Studio.
Publish using Visual Studio Code
- Install the Visual Studio Code extension Azure App Service.
- Follow the link to Publish with Visual Studio Code
Update the CIAM app registration (ciam-aspnet-webapp)
- Navigate back to to the Azure portal. In the left-hand navigation pane, select the Azure Active Directory service, and then select App registrations (Preview).
- In the resulting screen, select the
ciam-aspnet-webappapplication. - In the app's registration screen, select Authentication in the menu.
- In the Redirect URIs section, update the reply URLs to match the site URL of your Azure deployment. For example:
https://ciam-aspnet-webapp.azurewebsites.net/https://ciam-aspnet-webapp.azurewebsites.net/signin-oidc
- Update the Front-channel logout URL fields with the address of your service, for example https://ciam-aspnet-webapp.azurewebsites.net
- In the Redirect URIs section, update the reply URLs to match the site URL of your Azure deployment. For example:
⚠️ If your app is using an in-memory storage, Azure App Services will spin down your web site if it is inactive, and any records that your app was keeping will be empty. In addition, if you increase the instance count of your website, requests will be distributed among the instances. Your app's records, therefore, will not be the same on each instance.
Contributing
If you'd like to contribute to this sample, see CONTRIBUTING.MD.
This project has adopted the Microsoft Open Source Code of Conduct. For more information, see the Code of Conduct FAQ or contact opencode@microsoft.com with any additional questions or comments.