Hyper-V
A Windows technology providing a hypervisor-based virtualization solution enabling customers to consolidate workloads onto a single server.
2,555 questions
This browser is no longer supported.
Upgrade to Microsoft Edge to take advantage of the latest features, security updates, and technical support.
' cx='32' cy='32' r='32' /%3E%3Ctext x='50%25' y='55%25' dominant-baseline='middle' text-anchor='middle' fill='%23FFF' %3ESE%3C/text%3E%3C/svg%3E)
I am currently trying to run Hyper-V without virtualization-based security enabled, and I have encountered some problems.
My first attempt at doing this involved enabling the "Virtual Machine Platform" feature, and setting some of the registry keys described in the following documentation. More specifically, I set the following values:
Path: "HKLM\SYSTEM\CurrentControlSet\Control\DeviceGuard"
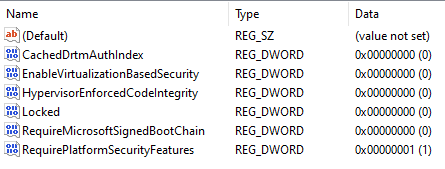
Path: "HKLM\SYSTEM\CurrentControlSet\Control\DeviceGuard\Scenarios\HypervisorEnforcedCodeIntegrity"
After a reboot, however, it still very much appears as though virtualization-based security features are still enabled.
Reported in msinfo32:

Reported via the powershell command below:
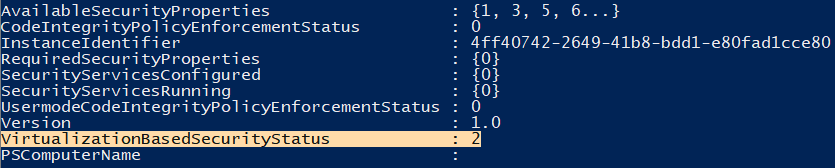
(For expected values see the following MSDN post)
Get-CimInstance -ClassName Win32_DeviceGuard -Namespace root\Microsoft\Windows\DeviceGuard
After unsuccessful attempts at disabling VBS/HVCI in the registry, I found a very informative post with alternative configurations on this stackoverflow post. That, along with two other posts on this forum (here and here), lead me to attempt to disable VBS via the boot configuration. I also got an interesting idea from Nicholas's forum post (the latter-most) which hypothesized that the "Windows Hypervisor Platform" feature would utilize VBS as a consumer, and would thereby have to be disabled in order to get Hyper-V to exhibit the behavior I seek.
I started by disabling the "Windows Hypervisor Platform" feature in my version of windows, and instead set the hypervisorlaunchtype boot variable manually via bcdedit to auto. After this, I took from the above stackoverflow post and set the loadoptions variable to DISABLE-VBS.
The complete boot configuration output is provided below.
   Windows Boot Manager

   \--------------------

   identifier              {bootmgr}
   device                  partition=\Device\HarddiskVolume1
   path                    \EFI\Microsoft\Boot\bootmgfw.efi
   description             Windows Boot Manager
   locale                  en-US
   inherit                 {globalsettings}
   default                 {current}
   resumeobject            {491e8af1-5c83-11eb-900b-af7c947bc517}
   displayorder            {current}
   toolsdisplayorder       {memdiag}
   timeout                 30

   Windows Boot Loader

   \-------------------

   identifier              {current}
   device                  partition=C:
   path                    \Windows\system32\winload.efi
   description             Windows 10
   locale                  en-US
   loadoptions             DISABLE-VBS
   inherit                 {bootloadersettings}
   recoverysequence        {491e8af3-5c83-11eb-900b-af7c947bc517}
   displaymessageoverride  Recovery
   recoveryenabled         Yes
   isolatedcontext         Yes
   allowedinmemorysettings 0x15000075
   osdevice                partition=C:
   systemroot              \Windows
   resumeobject            {491e8af1-5c83-11eb-900b-af7c947bc517}
   nx                      OptIn
   bootmenupolicy          Standard
   hypervisorlaunchtype    Auto
Per my post here, the above did not help me to succeed in my efforts to disable virtualization-based security while not disabling Hyper-V as a whole.
My test machine is running running Windows 10 version 20H2, and is fully updated at the time of writing this post.
Thank you for your time.
---
EDIT
So I ended up downloading the hardware readiness tool @Mico Mi linked, and while it didn't seem to work, it actually ended up working fine. The command I used is linked down below. It does display errors during it's runtime, but a sequence in the script which creates a temporary boot entry is what ultimately solved the problem.
./DG_Readiness_Tool_v3.6 -Disable
The following is a play on the working portion of the script (which is heavily context-driven) from this MSDN article which ultimately solves the problem:
   mountvol X: /s
   copy %WINDIR%\System32\SecConfig.efi X:\EFI\Microsoft\Boot\SecConfig.efi /Y
   bcdedit /create {0cb3b571-2f2e-4343-a879-d86a476d7215} /d "DebugTool" /application osloader
   bcdedit /set {0cb3b571-2f2e-4343-a879-d86a476d7215} path "\EFI\Microsoft\Boot\SecConfig.efi"
   bcdedit /set {bootmgr} bootsequence {0cb3b571-2f2e-4343-a879-d86a476d7215}
   bcdedit /set {0cb3b571-2f2e-4343-a879-d86a476d7215} loadoptions DISABLE-LSA-ISO
   bcdedit /set {0cb3b571-2f2e-4343-a879-d86a476d7215} device partition=X:
   mountvol X: /d
While this is a solution, and I would be happy to accept it as the answer to my question, I was curious: is there a more persistent option to achieve this behavior?
You see, after rebooting the target system, the original problem is still unfixed. Setting options in the boot configuration and the registry values linked in the MSDN article you posted do not seem to effect the outcome of enabling/disabling Device Guard at all; and I wouldn't like to have to run the script every time I want Hyper-V to run without Device Guard.
Thank you for taking the time to help me search for a solution. I really do appreciate it.
Some additional information:
vsmlaunchtype variable to my boot loader configuration, and it doesn't effect the outcome of the secure system running loadoptions mentioned previously (DISABLE-LSA-ISO,DISABLE-VBS to the boot manager configuration in the hopes that I had previously (and incorrectly) set it on the boot loader configuration, but I also observed no change in operations Perhaps that same MSDN article on managing Device Guard gave insight as to what the problem was:
If Credential Guard was enabled with UEFI Lock then you must use the following procedure as the settings are persisted in EFI (firmware) variables and it will require physical presence at the machine to press a function key to accept the change.
If this is indeed the problem, I wouldn't know how to go about solving it, and I haven't been able to find any information on how to set the EFI firmware variables in a persistent fashion.
---
EDIT (2):
I have now tried all of the above with another physical machine that I have ensured does not have secure boot enabled, and it also seems to disregard all of the registry values configuring Device/Credential Guard. The only way to solve the problem is running the script and rebooting. This is an upsetting situation.
' cx='32' cy='32' r='32' /%3E%3Ctext x='50%25' y='55%25' dominant-baseline='middle' text-anchor='middle' fill='%23FFF' %3EMM%3C/text%3E%3C/svg%3E)
Hi,
Please check if this doc could help at your side:
https://learn.microsoft.com/en-us/windows/security/identity-protection/credential-guard/credential-guard-manage#disable-windows-defender-credential-guard
Or you can download the tool provided by Microsoft:
You can use this tool in the following ways:
- Check if the device can run Device Guard or Credential Guard
- Check if the device is compatible with the Hardware Lab Kit tests that are ran by partners
- Enable and disable Device Guard or Credential Guard
- Check the status of Device Guard or Credential Guard on the device
- Integrate with System Center Configuration Manager or any other deployment mechanism to configure registry settings that reflect the device capabilities
- Use an embedded ConfigCI policy in audit mode that can be used by default to enable Device Guard when a custom policy is not provided
Usage:
DG_Readiness.ps1 –[Enable/Disable/Capable/Ready] –[DG/CG/HVCI/HLK] -Path <ConfigCI policy> -AutoReboot
Thanks for your time!
Best Regards,
Mico Mi
-----------------------------
If the Answer is helpful, please click "Accept Answer" and upvote it.
Note: Please follow the steps in our documentation to enable e-mail notifications if you want to receive the related email notification for this thread.
' cx='32' cy='32' r='32' /%3E%3Ctext x='50%25' y='55%25' dominant-baseline='middle' text-anchor='middle' fill='%23FFF' %3EJ%3C/text%3E%3C/svg%3E)
I have had the exact same experience. The only way to temporarily disable VBS with Hyper-V enabled is to use the SecConfig EFI bootloader, and it will disable VBS for the first boot immediately following the process.
The next normal boot, however, VBS will become enabled again, no matter what settings I try telling it not to run.
I check the VBS status in msinfo32 or using the following command and referencing this support document:
Get-CimInstance -classname Win32_DeviceGuard -namespace root\Microsoft\Windows\DeviceGuard
I notice that VirtualizationBasedSecurityStatus reports 2 (enabled and running) even when SecurityServicesRunning is 0. (none enabled.)
Why does VBS run when nothing is requesting it, and when is explicitly disabled?
Surely it must be a bug. Either VBS is running when it should not be, or it incorrectly reports that it is running when it is actually disabled.