Windows 10 Network
Windows 10: A Microsoft operating system that runs on personal computers and tablets.Network: A group of devices that communicate either wirelessly or via a physical connection.
2,272 questions
This browser is no longer supported.
Upgrade to Microsoft Edge to take advantage of the latest features, security updates, and technical support.
' cx='32' cy='32' r='32' /%3E%3Ctext x='50%25' y='55%25' dominant-baseline='middle' text-anchor='middle' fill='%23FFF' %3EH%3C/text%3E%3C/svg%3E)
I have a crossover cable connecting a Windows 10 and a Windows 7 system. They are connected but can't see each other. Both show public network. I would like to be able to copy files across using the connection. I don't have other network or router to use.
I don't seem to be able to find Open Start > Settings > Network & Internet, under Change your network settings, click Sharing options. As far as I know the system is up to date.
Windows 10 Version 2004 (OSBuild 19041.450)

Hi,
Just checking in to see if the information provided was helpful. Please let us know if you would like further assistance.

From Taskbar
You can change the network setting of your Wi-Fi connection right from the Windows taskbar. Choosing the network, you’re planning to use when you switch network types is essential. If you use multiple networks, you might want to go through these steps more than once to ensure each is set as you prefer.
1. Click the Wi-Fi symbol on the right side of your taskbar. A list of networks should appear, including the network to which you’re currently connected.
2. Click Properties. It will appear in the faint text under the network connection status.
3. Choose Public or Private by clicking the appropriate option on the new windows.
Windows displays a basic explanation of private and public network types in this area, explaining that your computer is hidden from other devices on the network if you select public. You can’t use it to share printers or files.
Though it’s easy to change the network connection this way, it must be a network you’re actively connected to. If you need to change it on multiple Wi-Fi networks, connect to each and repeat the steps.
Using Settings
You can also change the network connection type in Settings. Many people choose this option if they’re using an Ethernet cable to connect to the Internet.
1. Press Windows key + X.
2. Choose Settings.
3. Click Network and Internet.
4. On the left-side pane, Choose Ethernet.
5. Click on the name of your connection. You may have multiple connections listed, so choose the one you’re actively using.
6. Choose Private.
7. Close the window.
Now you should find other computers on your network and use networked printers. You can always return to the page and change the network back to the public setting in the same way later if you prefer.
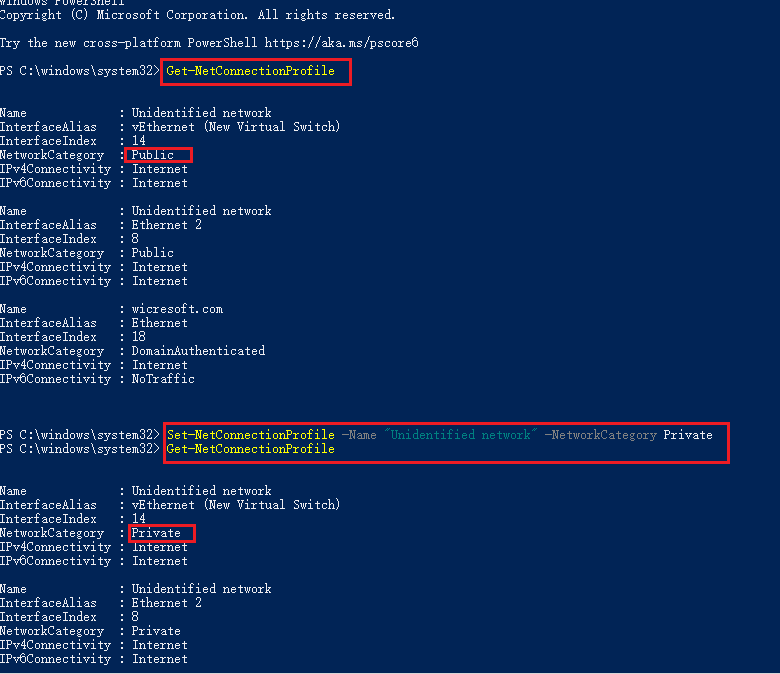
From PowerShell
If you prefer to use commands to change the network type, you can do it in PowerShell. It’s crucial to run PowerShell as an administrator because making these kinds of changes requires that level of access.
1. Press Windows key + X.
2. Click Windows PowerShell (Admin).
3. Click Yes to confirm that the program can run as an administrator.
4. Type “get-netconnectionprofile” without quotes and then press Enter. You’ll see detailed information about your current network connection, including the interface, category, and which IP protocol it’s using.
5. Make a note of the network name you’re trying to adjust, because you have to use the exact name in the following command.
6. Type “set-netconnectionprofile -name “network name” -network category private” without external quotes. Replace the word network name with the exact name of your network.
o It should end up looking like this: –set-netconnectionprofile -name “My Wi-Fi Network” -network category private.
7. Press Enter.
8. Type “get-netconnectionprofile” without quotes and press Enter. You can confirm that the type of network connection has changed this way.
You don’t have to copy the exact capitalization of your network name. Just make sure you do include the spaces, and the name must be in quotes.
Using Local Group Policy Editor
The group policy editor is a Windows utility that lets users adjust their PC settings. With this program, you can switch the type of network from public to private.
1. Press Windows key + R.
2. Type “gpedit.msc” without quotes and then press Enter.
3. Expand the following categories:
Computer Configuration > Windows Settings > Security Settings
4. Highlight Network List Manager Policies. A list of options will appear in the pane to the right of the categories.
5. Double-click the name of your network. If you don’t see it, then double-click Unidentified Networks.
6. Click the Network Location tab. Some types of networks may not have multiple tabs available.
7. Click Private.
8. Click Apply.
9. Click OK and then close the Local Policy Group Editor.
10. Restart your computer.
Unless you’re the admin on a network or configuring a computer for multiple users, there are more straightforward ways to change the network type. However, this can be useful to people setting up computers for specific purposes.
Making Registry Changes
You can also change the network type by editing the registry. However, this is probably overkill and unnecessary for most users.
If you have difficulty changing network types of the other way, try this as a last resort. Remember to always back up your PC before making changes to the registry since doing so can create problems for your system.
1. Press Windows key + R.
2. Type “regedit” without quotes. Press Enter.
3. Click Yes.
4. Expand the following categories:
Computer > HKEY_LOCAL_MACHINE > Software > Microsoft > Windows NT > CurrentVersion > Network List > Profiles
5. Under profiles, you’ll see a list of folders that display information in the right-side pane when highlighted. Each of these represents a connection your computer has made to the Internet. The numbers and letters are called a globally unique identifier, and each one will be different.
6. Highlight a GUID and look at the Profile Name listing. Continue highlighting them until you find one with a network name that matches the network you want to adjust.
7. Double-click the Category entry in the same pane.
8. Change the Value Data entry to 1 to set the network to private.
9. Click OK.
10. Close the registry.
11. Restart your computer.
One of the benefits of changing the network type through the registry is that you can quickly change the network type for multiple networks.
If you need to use the Domain setting instead of public or private, you can do that through the registry as well. The Value Data should be set to 0 for public and 1 for private.
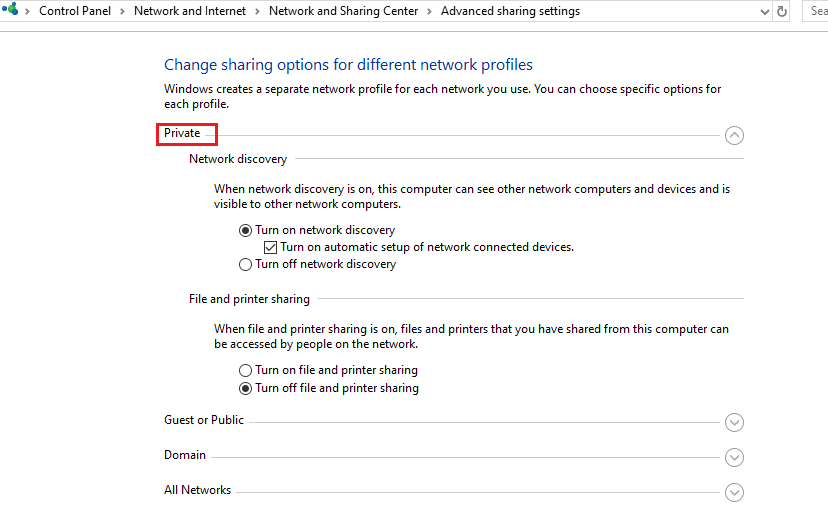
Changing Network Settings
Your network settings aren’t set in stone. You can change what each network type actually means in your Windows settings.
1. Press Windows key + X.
2. Choose Settings.
3. Click Network and Internet.
4. Click Network and Sharing Center.
5. Click Change Advanced Sharing Settings.
6. Expand the network type you want to change. You can choose between three.
o Private
o Guest or Public
o All Networks
7. Decide what you want to share and how you want to share it.
8. Close the window.
You can opt-in or out of network discovery or printer sharing on both private and public options.
In the All-Networks option, you can adjust what kind of encryption you use and choose whether sharing should be password protected.
Stick with 128-bit encryption as long as your system supports it. There shouldn’t be much need to change this particular setting.
There are only specific circumstances where this will be necessary, and most users are unlikely to encounter them unless they already have the specialized knowledge to know they need to switch.
You can choose to use password-protected sharing or not, as you prefer. Remember that using a password is always more secure than not doing so.
If you require a password, remember that you’ll have to share it with other people on your network if you want to connect with other users’ computers and not just network your own devices.
' cx='32' cy='32' r='32' /%3E%3Ctext x='50%25' y='55%25' dominant-baseline='middle' text-anchor='middle' fill='%23FFF' %3ESR%3C/text%3E%3C/svg%3E)
For the PowerShell approach, you need to remove the space from the option or it will just fail with the error: "Cannot convert value "category" to type"
So “set-netconnectionprofile -name “network name” -networkcategory private”
rather than
“set-netconnectionprofile -name “network name” -network category private”
Hi,
In regards to your issue, here're my suggestions:
You can use PowerShell command to change network settings from public to private: Run PS as administrater
-------If my answer is helpful to you, please remember to mark them as answer. Thank you!------
Regards
Gloria
Hi,
Just checking in to see if the information provided was helpful. Please let us know if you would like further assistance.
' cx='32' cy='32' r='32' /%3E%3Ctext x='50%25' y='55%25' dominant-baseline='middle' text-anchor='middle' fill='%23FFF' %3EFP%3C/text%3E%3C/svg%3E)
Used the Powershell as Admin
Typed in your commands as you listed them.
It accepted the commands
But did not change the network to private.
This is my home network. I have Windows 10 Ver 2004
Been working on the problem for a long time this year.
Can't get the network to say private no matter what I do.
Help
' cx='32' cy='32' r='32' /%3E%3Ctext x='50%25' y='55%25' dominant-baseline='middle' text-anchor='middle' fill='%23FFF' %3EMS%3C/text%3E%3C/svg%3E)
It works by why in the world do users have to jump these command line hoops instead of using the windows control panel or settings GUI?
' cx='32' cy='32' r='32' /%3E%3Ctext x='50%25' y='55%25' dominant-baseline='middle' text-anchor='middle' fill='%23FFF' %3EER%3C/text%3E%3C/svg%3E)
Tried the method mentioned just above yours of modifying the registry value & rebooting - that worked for about 10 seconds, then one of my various protection softwares put it back (go figure, the software did it's job!)
Your option worked, and my machine has been showing 'private network' for more than 20 minutes, and stayed as such after reboot.
thank you muchly!
' cx='32' cy='32' r='32' /%3E%3Ctext x='50%25' y='55%25' dominant-baseline='middle' text-anchor='middle' fill='%23FFF' %3EA%3C/text%3E%3C/svg%3E)
You don't, you can change this under Network Settings and clicking on either the Wifi settings or Ethernet settings then clicking on the network you're connected to which opens a properties setting which allows you to toggle the network category as either Public or Private.
If this setting isn't available, and what I found out after hours of frustration, is to check your Windows Services and ensure Wired or WLAN AutoConifg is running. In my case, these 2 services has always been set to Automatic and never posed an issue, but recently, thanks to a wonderfully forced Windows update, these services were still set to Automatic but lo' and behold, they were not running for whatever reason. After manually starting these supposed-to-be-automatically-starting services, I was able to access the Ethernet settings in Windows to change said Network Category Type
' cx='32' cy='32' r='32' /%3E%3Ctext x='50%25' y='55%25' dominant-baseline='middle' text-anchor='middle' fill='%23FFF' %3EMR%3C/text%3E%3C/svg%3E)
@AggrivatedWindowsUser I tried out your suggestion, but it didn't enable the Network Profile selection for my Ethernet connection. In my case, WLAN AutoConfig was already running, but Wired AutoConfig was not, and I started it manually, but it didn't seem to help. The description for the Wired service seems to indicate it is only used for a network that needs 802.1x authentication:
The Wired AutoConfig (DOT3SVC) service is responsible for performing IEEE 802.1X authentication on Ethernet interfaces. If your current wired network deployment enforces 802.1X authentication, the DOT3SVC service should be configured to run for establishing Layer 2 connectivity and/or providing access to network resources. Wired networks that do not enforce 802.1X authentication are unaffected by the DOT3SVC service.
@Gloria Gu 's method worked for me. As others have mentioned, though, it is annoying that this isn't surfaced in the GUI.
' cx='32' cy='32' r='32' /%3E%3Ctext x='50%25' y='55%25' dominant-baseline='middle' text-anchor='middle' fill='%23FFF' %3ESS%3C/text%3E%3C/svg%3E)
' cx='32' cy='32' r='32' /%3E%3Ctext x='50%25' y='55%25' dominant-baseline='middle' text-anchor='middle' fill='%23FFF' %3EP%3C/text%3E%3C/svg%3E)
How long it took forever turnén it off in a second
' cx='32' cy='32' r='32' /%3E%3Ctext x='50%25' y='55%25' dominant-baseline='middle' text-anchor='middle' fill='%23FFF' %3EJR%3C/text%3E%3C/svg%3E)
Man, BUZZZZZZZ wrong, because I've worked on over 3600 workstations in my life and that's an option about only 35% of the time maybe 37%.
HERE'S A THOUGHT JUST REMOVE THAT POWERFUL STUPID OPTION TO BEGIN WITH.... And fire whomever added it to begin with, overkill and just powerful stupid.

Windows 11 (Powershell):
get-netconnectionprofile
set-netconnectionprofile -InterfaceAlias "Name_of_InterfaceAlias" -NetworkCategory "Private"
' cx='32' cy='32' r='32' /%3E%3Ctext x='50%25' y='55%25' dominant-baseline='middle' text-anchor='middle' fill='%23FFF' %3EN%3C/text%3E%3C/svg%3E)
I had this problem due to using a crossover network cable and the PCs not allowing me to change the network type.
Your commands worked perfectly. What a headache to find something that worked. Hope none of these other people are programmers because OMG they'd have syntax errors of every line of code they wrote.
Thank you for the right commands, without spaces or hyphens where they shouldn't be.

Hello,
See if this helps you:
https://www.kapilarya.com/switch-network-from-public-to-private-and-domain-windows-10
Hope this helps!
Note: Included link in this reply refers to blog post by a trusted Microsoft MVP.
' cx='32' cy='32' r='32' /%3E%3Ctext x='50%25' y='55%25' dominant-baseline='middle' text-anchor='middle' fill='%23FFF' %3EML%3C/text%3E%3C/svg%3E)
This article was very helpful! Thanks!
' cx='32' cy='32' r='32' /%3E%3Ctext x='50%25' y='55%25' dominant-baseline='middle' text-anchor='middle' fill='%23FFF' %3EAP%3C/text%3E%3C/svg%3E)
HI ,
Try Changing this
Control Panel\Network and Internet\Network and Sharing Center\Advanced sharing settings
You can find all networks below as drop down menu
Make sure IP's Configurations are proper .Both PC's IP should be on same network ,Automatically its not going to connect since you don't have router or switch
1.Default gateway should be same for both PC's
2.Ip's of systems should be on same network
try to ping each other