Azure Key Vault
An Azure service that is used to manage and protect cryptographic keys and other secrets used by cloud apps and services.
1,116 questions
This browser is no longer supported.
Upgrade to Microsoft Edge to take advantage of the latest features, security updates, and technical support.
' cx='32' cy='32' r='32' /%3E%3Ctext x='50%25' y='55%25' dominant-baseline='middle' text-anchor='middle' fill='%23FFF' %3EC2%3C/text%3E%3C/svg%3E)
We encrypt all of our Windows VMs with Azure Disk Encryption, and back them up with Azure Backup. We know the process on how to encrypt VMs and the requirements, etc.
We recently had to restore a file from an encrypted disk. Since single file recovery is not supported with ADE, we restored all the disks, and attempted to attach them to an existing Windows VM in Azure. We got the "Unlock Drive" prompt to enter the 48 character bitlocker key.
My question - Where the heck is this key stored? Is it located in the Key Vault? I got as far as finding the current version of the key in use, going to Key Vault and correlating it to a Secret that was associated with the Disk we were trying to restore. But there is nowhere I can see a 48 character bitlocker key. Or is mounting a bitlocker drive to a separate VM unsupported as well??
Thanks.

@CarmeloLoPresti-2973
I just wanted to check in and see if you had any other questions or if you were able to resolve this issue?
If you have any other questions, please let me know.
Thank you for your time and patience throughout this issue.
@CarmeloLoPresti-2973
Thank you for following up on this and I apologize for the delayed response!
How do I take the txt file and make it a readable BitLocker key?
BitLocker Extension Key Protector along with the special characters? The BEK key that is generated needs to be saved to the BEK VOLUME on the rescue VM so it can retrieve the key upon boot up.
copy and paste the BEK folder from your local machine to your VM (i.e. C:\BEK). In order to unlock your data disk, you'll also need to confirm the drive letter that needs to be unlocked. Once the drive to be unlocked is identified, you have a valid BEK, copied the BEK folder to your VM, have a valid backup of your disk/ disk's data prior to manually trying to unlock your disk, you can unlock the drive using the manage-bde unlock command.
Example:
To unlock drive E with a recovery key file that's been saved to a backup folder on another drive, type:
manage-bde –unlock E: -recoverykey C:\BEK\recoverykey.bek
I hope this helps!
If you have any other questions, please let me know.
Thank you for your time and patience throughout this issue.
----------
Please remember to "Accept Answer" if any answer/reply helped, so that others in the community facing similar issues can easily find the solution.
@CarmeloLoPresti-2973
I just wanted to check in and see if you had any other questions or if you were able to resolve this issue?
@CarmeloLoPresti-2973
Thank you for your post!
A VM's BitLocker Encryption Key, when leveraging Azure Disk Encryption, is stored in the Key Vault as a Secret. The 48-character BitLocker Key can only be generated by leveraging the GenerateBEKFileForDiskUnlock.ps1 along with the Secret URL taken from the Key Vault.
Executing the PowerShell script:
#Note: This outputs to the C: drive
#If everything worked correctly, you can open up the file and you will see "BitLocker Extension Key Protector".
C:\Scripts\RetreiveEncryptionSecretViaUrl.ps1 -secretUrl https://<<myVault>>.vault.azure.net/secrets/70F ... -secretFilePath C:\BEK\Test

Using the PowerShell script when unlocking an encrypted VM - you'll be taking a manual process of creating a Rescue VM, attaching a copy of the encrypted OS disk as a data disk to that rescue VM (during creation), and manually retrieving the BEK to unlock the disk. However, in your specific scenario, prior to manually trying to unlock your VM, you can Repair your Windows VM by using the Azure Virtual Machine repair commands.
Unlocking an Encrypted VM with repair commands:
Note: VMs using Azure Disk Encryption, only managed disks encrypted with single pass encryption (with or without KEK) are supported.
#If this is the first time you have used the az vm repair commands, add the vm-repair CLI extension.
az extension add -n vm-repair
#If you have previously used the az vm repair commands, apply any updates to the vm-repair extension.
az extension update -n vm-repair
#Run the create command on a encrypted VM.
#This command will create a copy of the OS disk for the non-functional VM, create a repair VM in a new Resource Group, and attach the OS disk copy.
az vm repair create -g MyResourceGroup -n source-vm-name --repair-username username --repair-password 'password!234' --verbose
#If your VM is using Azure Disk Encryption, use --unlock-encrypted-vm to unlock the encrypted disk so that it is accessible when attached to the repair VM.
az vm repair create -g MyResourceGroup -n source-vm-name --repair-username username --repair-password 'password!234' --unlock-encrypted-vm --verbose
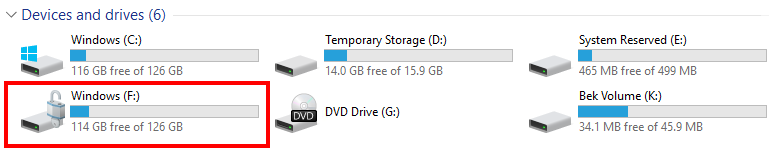
#Note: Once the az vm repair create command finishes running, you can login to the new VM and verify that the disk is already unlocked. See below image.
#Run az vm repair restore.
#This command will swap the repaired OS disk with the original OS disk of the VM. The Resource Group and VM name used here are for the non-functional VM.
az vm repair restore -g MyResourceGroup -n MyVM --verbose
Verify and enable boot diagnostics as needed.
I hope this helps!
If you're still having issues, please let me know.
Thank you for your time and patience throughout this issue.
----------
Please remember to "Accept Answer" if any answer/reply helped, so that others in the community facing similar issues can easily find the solution.
@CarmeloLoPresti-2973
I just wanted to check in and see if you had any other questions or if you were able to resolve this issue?
Hi @JamesTran-MSFT
Thank you for pointing me in the right direction.
I was able to run a modified version of the script that was documented in the link, and I was able to export the "Bitlocker extension key protector" file.
My next question is - how do I take the txt file and make it a readable bitlocker key? It's a bunch of special characters and it doesn't actually give me the 48 digit key.
I have the encrypted disk restored and it is mounted to a VM - but it's asking for the 48 digit bitlocker key.
Edit - OK, so if I understand this correctly, the BEK key that is generated needs to be saved to the BEK VOLUME on the rescue VM so it can retrieve the key upon boot up. Then, the attached disk should be readable? The disk we're trying to restore from is a DATA disk, not an OS disk.
Thanks!
@CarmeloLoPresti-2973
Thank you for following up on this and I apologize for the delayed response!
How do I take the txt file and make it a readable BitLocker key?
BitLocker Extension Key Protector along with the special characters? The BEK key that is generated needs to be saved to the BEK VOLUME on the rescue VM so it can retrieve the key upon boot up.
copy and paste the BEK folder from your local machine to your VM (i.e. C:\BEK). In order to unlock your data disk, you'll also need to confirm the drive letter that needs to be unlocked. Once the drive to be unlocked is identified, you have a valid BEK, copied the BEK folder to your VM, have a valid backup of your disk/ disk's data prior to manually trying to unlock your disk, you can unlock the drive using the manage-bde unlock command.
Example:
To unlock drive E with a recovery key file that's been saved to a backup folder on another drive, type:
manage-bde –unlock E: -recoverykey C:\BEK\recoverykey.bek
I hope this helps!
If you have any other questions, please let me know.
Thank you for your time and patience throughout this issue.
----------
Please remember to "Accept Answer" if any answer/reply helped, so that others in the community facing similar issues can easily find the solution.
@CarmeloLoPresti-2973
I just wanted to check in and see if you had any other questions or if you were able to resolve this issue?
If you have any other questions, please let me know.
Thank you for your time and patience throughout this issue.
----------
Please remember to "Accept Answer" if any answer/reply helped, so that others in the community facing similar issues can easily find the solution.