إشعار
يتطلب الوصول إلى هذه الصفحة تخويلاً. يمكنك محاولة تسجيل الدخول أو تغيير الدلائل.
يتطلب الوصول إلى هذه الصفحة تخويلاً. يمكنك محاولة تغيير الدلائل.
يهدف هذا المشروع إلى توجيه المطورين لبدء مكالمة من Azure Communication Services Calling Web SDK إلى Teams Call Queue والردود التلقائية باستخدام مكتبة واجهة مستخدم اتصالات Azure.
وفقا لمتطلباتك، قد تحتاج إلى تقديم طريقة سهلة لعملائك للتواصل معك دون أي إعداد معقد.
يعد الاتصال بقائمة انتظار المكالمات والردود التلقائية في Teams مفهوما بسيطا وفعالا يسهل التفاعل الفوري مع دعم العملاء والمستشار المالي والفرق الأخرى التي تواجه العملاء. الهدف من هذا البرنامج التعليمي هو مساعدتك في بدء التفاعلات مع عملائك عند النقر فوق زر على الويب.
إذا كنت ترغب في تجربتها، يمكنك تنزيل التعليمات البرمجية من GitHub.
بعد هذا البرنامج التعليمي سوف:
- السماح لك بالتحكم في تجربة الصوت والفيديو للعملاء وفقا لسيناريو العميل
- تعلمك كيفية إنشاء عنصر واجهة مستخدم لبدء المكالمات على تطبيق الويب الخاص بك باستخدام مكتبة واجهة المستخدم.
المتطلبات الأساسية
هذه الخطوات مطلوبة من أجل اتباع هذا البرنامج التعليمي. اتصل بمسؤول Teams للحصول على العنصرين الأخيرين للتأكد من إعدادك بشكل مناسب.
- Visual Studio Code في واحدة من النظم الأساسية المدعومة.
-
Node.js، يوصى باستخدام Active LTS (الدعم طويل الأجل) والإصدارات Node 20. يمكنك استخدام أمر
node --versionللتحقق من الإصدار الخاص بك. - مورد Azure Communication Services. إنشاء مورد اتصالات
- إكمال إعداد مستأجر Teams للتشغيل التفاعلي مع مورد Azure Communication Services
- العمل مع Teams Call Queues وAzure Communication Services.
- العمل مع Teams Auto Attendants وAzure Communication Services.
التحقق من العقدة وVisual Studio Code
يمكنك التحقق من تثبيت Node بشكل صحيح باستخدام هذا الأمر.
node -v
يخبرك الإخراج بالإصدار الذي لديك، فإنه يفشل إذا لم يتم تثبيت العقدة وإضافتها إلى .PATH تماما كما هو الحال مع Node، يمكنك التحقق لمعرفة ما إذا كان قد تم تثبيت VS Code مع هذا الأمر.
code --version
مثل العقدة يفشل هذا الأمر إذا كانت هناك مشكلة في تثبيت VS Code على جهازك.
الشروع في العمل
يحتوي هذا البرنامج التعليمي على 7 خطوات وفي النهاية سيتمكن التطبيق من الاتصال بتطبيق صوت Teams. الخطوات هي:
- إعداد المشروع
- الحصول على تبعياتك
- الإعداد الأولي للتطبيق
- إنشاء عنصر واجهة المستخدم
- نمط عنصر واجهة المستخدم
- إعداد قيم الهوية
- تشغيل التطبيق
1. إعداد المشروع
استخدم هذه الخطوة فقط إذا كنت تقوم بإنشاء تطبيق جديد.
لإنشاء تطبيق react، نستخدم vite. وهي أداة بناء تهدف إلى توفير تجربة تطوير أسرع وأكثر رنين لمشاريع الويب الحديثة.
يمكنك قراءة المزيد حول vite هنا إنشاء تطبيق React من البدايةوالبدء باستخدام Vite
لاحظ أن مكتبة واجهة مستخدم Azure Communication Service تدعم فقط ما يصل إلى React 18. تحقق من أنك تستخدم الإصدار المدعوم بعد إنشاء تطبيق react عن طريق التحقق package.json
للتأكد من تثبيت Node على جهازك، قم بتشغيل هذا الأمر في PowerShell أو المحطة الطرفية لمشاهدة إصدار Node الخاص بك:
node -v
2. الحصول على تبعياتك
بعد ذلك، تحتاج إلى تحديث صفيف التبعية في لتضمين package.json بعض الحزم من Azure Communication Services لتجربة عنصر واجهة المستخدم التي سننشئها للعمل:
"@azure/communication-calling": "^1.23.1",
"@azure/communication-chat": "^1.4.0",
"@azure/communication-react": "^1.15.0",
"@azure/communication-calling-effects": "1.0.1",
"@azure/communication-common": "2.3.0",
"@fluentui/react-icons": "~2.0.203",
"@fluentui/react": "~8.98.3",
لتثبيت الحزم المطلوبة، قم بتشغيل الأمر مدير الحِزَم Node التالي.
npm install
بعد تثبيت هذه الحزم، يتم تعيينك جميعا لبدء كتابة التعليمات البرمجية التي تنشئ التطبيق. في هذا البرنامج التعليمي، نقوم بتعديل الملفات في src الدليل.
3. الإعداد الأولي للتطبيق
للبدء، نقوم باستبدال المحتوى المقدم App.tsx بصفحة رئيسية من شأنها:
- قم بتخزين جميع معلومات اتصالات Azure التي نحتاجها لإنشاء CallAdapter لتشغيل تجربة الاتصال الخاصة بنا
- عرض عنصر واجهة المستخدم الذي يتم عرضه للمستخدم النهائي.
App.tsx يجب أن يبدو الملف كما يلي:
src/App.tsx
import "./App.css";
import {
  CommunicationIdentifier,
  MicrosoftTeamsAppIdentifier,
} from "@azure/communication-common";
import {
  Spinner,
  Stack,
  initializeIcons,
  registerIcons,
  Text,
} from "@fluentui/react";
import { CallAdd20Regular, Dismiss20Regular } from "@fluentui/react-icons";
import logo from "./logo.svg";

import { CallingWidgetComponent } from "./components/CallingWidgetComponent";

registerIcons({
  icons: { dismiss: <Dismiss20Regular />, callAdd: <CallAdd20Regular /> },
});
initializeIcons();
function App() {
  /**
   * Token for local user.
   */
  const token = "<Enter your ACS Token here>";

  /**
   * User identifier for local user.
   */
  const userId: CommunicationIdentifier = {
    communicationUserId: "Enter your ACS Id here",
  };

  /**
   * Enter your Teams voice app identifier from the Teams admin center here
   */
  const teamsAppIdentifier: MicrosoftTeamsAppIdentifier = {
    teamsAppId: "<Enter your Teams Voice app id here>",
    cloud: "public",
  };

  const widgetParams = {
    userId,
    token,
    teamsAppIdentifier,
  };

  if (!token || !userId || !teamsAppIdentifier) {
    return (
      <Stack verticalAlign="center" style={{ height: "100%", width: "100%" }}>
        <Spinner
          label={"Getting user credentials from server"}
          ariaLive="assertive"
          labelPosition="top"
        />
      </Stack>
    );
  }

  return (
    <Stack
      style={{ height: "100%", width: "100%", padding: "3rem" }}
      tokens={{ childrenGap: "1.5rem" }}
    >
      <Stack tokens={{ childrenGap: "1rem" }} style={{ margin: "auto" }}>
        <Stack
          style={{ padding: "3rem" }}
          horizontal
          tokens={{ childrenGap: "2rem" }}
        >
          <Text style={{ marginTop: "auto" }} variant="xLarge">
            Welcome to a Calling Widget sample
          </Text>
          <img
            style={{ width: "7rem", height: "auto" }}
            src={logo}
            alt="logo"
          />
        </Stack>

        <Text>
          Welcome to a Calling Widget sample for the Azure Communication
          Services UI Library. Sample has the ability to connect you through
          Teams voice apps to a agent to help you.
        </Text>
        <Text>
          As a user all you need to do is click the widget below, enter your
          display name for the call - this will act as your caller id, and
          action the <b>start call</b> button.
        </Text>
      </Stack>
      <Stack
        horizontal
        tokens={{ childrenGap: "1.5rem" }}
        style={{ overflow: "hidden", margin: "auto" }}
      >
        <CallingWidgetComponent
          widgetAdapterArgs={widgetParams}
          onRenderLogo={() => {
            return (
              <img
                style={{ height: "4rem", width: "4rem", margin: "auto" }}
                src={logo}
                alt="logo"
              />
            );
          }}
        />
      </Stack>
    </Stack>
  );
}

export default App;
في هذه القصاصة البرمجية، نسجل رمزين جديدين <Dismiss20Regular/> و <CallAdd20Regular>. يتم استخدام هذه الأيقونات الجديدة داخل مكون عنصر واجهة المستخدم الذي نقوم بإنشاءه في القسم التالي.
4. إنشاء عنصر واجهة المستخدم
الآن نحن بحاجة إلى إنشاء عنصر واجهة مستخدم يمكن أن يظهر في ثلاثة أوضاع مختلفة:
- الانتظار: حالة عنصر واجهة المستخدم هذه هي الطريقة التي سيكون بها المكون قبل إجراء استدعاء وبعده
- الإعداد: هذه الحالة هي عندما يطلب عنصر واجهة المستخدم معلومات من المستخدم مثل اسمه.
- في مكالمة: يتم استبدال عنصر واجهة المستخدم هنا بمكتبة واجهة المستخدم Call Composite. يكون وضع عنصر واجهة المستخدم هذا عندما يتصل المستخدم بتطبيق الصوت أو يتحدث مع وكيل.
يتيح إنشاء مجلد يسمى src/components. في هذا المجلد، قم بإنشاء ملف جديد يسمى CallingWidgetComponent.tsx. يجب أن يبدو هذا الملف مثل القصاصة البرمجية التالية:
CallingWidgetComponent.tsx
import {
  IconButton,
  PrimaryButton,
  Stack,
  TextField,
  useTheme,
  Checkbox,
  Icon,
  Spinner,
} from "@fluentui/react";
import React, { useEffect, useRef, useState } from "react";
import {
  callingWidgetSetupContainerStyles,
  checkboxStyles,
  startCallButtonStyles,
  callingWidgetContainerStyles,
  callIconStyles,
  logoContainerStyles,
  collapseButtonStyles,
} from "../styles/CallingWidgetComponent.styles";

import {
  AzureCommunicationTokenCredential,
  CommunicationUserIdentifier,
  MicrosoftTeamsAppIdentifier,
} from "@azure/communication-common";
import {
  CallAdapter,
  CallAdapterState,
  CallComposite,
  CommonCallAdapterOptions,
  StartCallIdentifier,
  createAzureCommunicationCallAdapter,
} from "@azure/communication-react";
// lets add to our react imports as well
import { useMemo } from "react";

import { callingWidgetInCallContainerStyles } from "../styles/CallingWidgetComponent.styles";

/**
 * Properties needed for our widget to start a call.
 */
export type WidgetAdapterArgs = {
  token: string;
  userId: CommunicationUserIdentifier;
  teamsAppIdentifier: MicrosoftTeamsAppIdentifier;
};

export interface CallingWidgetComponentProps {
  /**
   *  arguments for creating an AzureCommunicationCallAdapter for your Calling experience
   */
  widgetAdapterArgs: WidgetAdapterArgs;
  /**
   * Custom render function for displaying logo.
   * @returns
   */
  onRenderLogo?: () => JSX.Element;
}

/**
 * Widget for Calling Widget
 * @param props
 */
export const CallingWidgetComponent = (
  props: CallingWidgetComponentProps
): JSX.Element => {
  const { onRenderLogo, widgetAdapterArgs } = props;

  const [widgetState, setWidgetState] = useState<"new" | "setup" | "inCall">(
    "new"
  );
  const [displayName, setDisplayName] = useState<string>();
  const [consentToData, setConsentToData] = useState<boolean>(false);
  const [useLocalVideo, setUseLocalVideo] = useState<boolean>(false);
  const [adapter, setAdapter] = useState<CallAdapter>();

  const callIdRef = useRef<string>();

  const theme = useTheme();

  // add this before the React template
  const credential = useMemo(() => {
    try {
      return new AzureCommunicationTokenCredential(widgetAdapterArgs.token);
    } catch {
      console.error("Failed to construct token credential");
      return undefined;
    }
  }, [widgetAdapterArgs.token]);

  const adapterOptions: CommonCallAdapterOptions = useMemo(
    () => ({
      callingSounds: {
        callEnded: { url: "/sounds/callEnded.mp3" },
        callRinging: { url: "/sounds/callRinging.mp3" },
        callBusy: { url: "/sounds/callBusy.mp3" },
      },
    }),
    []
  );

  const callAdapterArgs = useMemo(() => {
    return {
      userId: widgetAdapterArgs.userId,
      credential: credential,
      targetCallees: [
        widgetAdapterArgs.teamsAppIdentifier,
      ] as StartCallIdentifier[],
      displayName: displayName,
      options: adapterOptions,
    };
  }, [
    widgetAdapterArgs.userId,
    widgetAdapterArgs.teamsAppIdentifier.teamsAppId,
    credential,
    displayName,
  ]);

  useEffect(() => {
    if (adapter) {
      adapter.on("callEnded", () => {
        /**
         * We only want to reset the widget state if the call that ended is the same as the current call.
         */
        if (
          adapter.getState().acceptedTransferCallState &&
          adapter.getState().acceptedTransferCallState?.id !== callIdRef.current
        ) {
          return;
        }
        setDisplayName(undefined);
        setWidgetState("new");
        setConsentToData(false);
        setAdapter(undefined);
        adapter.dispose();
      });

      adapter.on("transferAccepted", (e) => {
        console.log("transferAccepted", e);
      });

      adapter.onStateChange((state: CallAdapterState) => {
        if (state?.call?.id && callIdRef.current !== state?.call?.id) {
          callIdRef.current = state?.call?.id;
          console.log(`Call Id: ${callIdRef.current}`);
        }
      });
    }
  }, [adapter]);

  /** widget template for when widget is open, put any fields here for user information desired */
  if (widgetState === "setup") {
    return (
      <Stack
        styles={callingWidgetSetupContainerStyles(theme)}
        tokens={{ childrenGap: "1rem" }}
      >
        <IconButton
          styles={collapseButtonStyles}
          iconProps={{ iconName: "Dismiss" }}
          onClick={() => {
            setDisplayName(undefined);
            setConsentToData(false);
            setUseLocalVideo(false);
            setWidgetState("new");
          }}
        />
        <Stack tokens={{ childrenGap: "1rem" }} styles={logoContainerStyles}>
          <Stack style={{ transform: "scale(1.8)" }}>
            {onRenderLogo && onRenderLogo()}
          </Stack>
        </Stack>
        <TextField
          label={"Name"}
          required={true}
          placeholder={"Enter your name"}
          onChange={(_, newValue) => {
            setDisplayName(newValue);
          }}
        />
        <Checkbox
          styles={checkboxStyles(theme)}
          label={
            "Use video - Checking this box will enable camera controls and screen sharing"
          }
          onChange={(_, checked?: boolean | undefined) => {
            setUseLocalVideo(!!checked);
            setUseLocalVideo(true);
          }}
        ></Checkbox>
        <Checkbox
          required={true}
          styles={checkboxStyles(theme)}
          disabled={displayName === undefined}
          label={
            "By checking this box, you are consenting that we will collect data from the call for customer support reasons"
          }
          onChange={async (_, checked?: boolean | undefined) => {
            setConsentToData(!!checked);
            if (callAdapterArgs && callAdapterArgs.credential) {
              setAdapter(
                await createAzureCommunicationCallAdapter({
                  displayName: displayName ?? "",
                  userId: callAdapterArgs.userId,
                  credential: callAdapterArgs.credential,
                  targetCallees: callAdapterArgs.targetCallees,
                  options: callAdapterArgs.options,
                })
              );
            }
          }}
        ></Checkbox>
        <PrimaryButton
          styles={startCallButtonStyles(theme)}
          onClick={() => {
            if (displayName && consentToData && adapter) {
              setWidgetState("inCall");
              adapter?.startCall(callAdapterArgs.targetCallees, {
                audioOptions: { muted: false },
              });
            }
          }}
        >
          {!consentToData && `Enter your name`}
          {consentToData && !adapter && (
            <Spinner ariaLive="assertive" labelPosition="top" />
          )}
          {consentToData && adapter && `StartCall`}
        </PrimaryButton>
      </Stack>
    );
  }

  if (widgetState === "inCall" && adapter) {
    return (
      <Stack styles={callingWidgetInCallContainerStyles(theme)}>
        <CallComposite
          adapter={adapter}
          options={{
            callControls: {
              cameraButton: useLocalVideo,
              screenShareButton: useLocalVideo,
              moreButton: false,
              peopleButton: false,
              displayType: "compact",
            },
            localVideoTile: !useLocalVideo ? false : { position: "floating" },
          }}
        />
      </Stack>
    );
  }

  return (
    <Stack
      horizontalAlign="center"
      verticalAlign="center"
      styles={callingWidgetContainerStyles(theme)}
      onClick={() => {
        setWidgetState("setup");
      }}
    >
      <Stack
        horizontalAlign="center"
        verticalAlign="center"
        style={{
          height: "4rem",
          width: "4rem",
          borderRadius: "50%",
          background: theme.palette.themePrimary,
        }}
      >
        <Icon iconName="callAdd" styles={callIconStyles(theme)} />
      </Stack>
    </Stack>
  );
};
CallAdapterOptionsفي ، نرى بعض ملفات الصوت المشار إليها، هذه الملفات هي لاستخدام ميزة Calling Sounds في CallComposite. إذا كنت مهتما باستخدام الأصوات، فشاهد التعليمات البرمجية المكتملة لتنزيل ملفات الصوت.
5. نمط عنصر واجهة المستخدم
نحن بحاجة إلى كتابة بعض الأنماط للتأكد من أن عنصر واجهة المستخدم يبدو مناسبا ويمكنه الاحتفاظ بمركب المكالمة. يجب استخدام هذه الأنماط بالفعل في عنصر واجهة المستخدم في حالة نسخ القصاصة البرمجية التي أضفناها إلى الملف CallingWidgetComponent.tsx.
يتيح إنشاء مجلد جديد يسمى src/styles في هذا المجلد، قم بإنشاء ملف يسمى CallingWidgetComponent.styles.ts. يجب أن يبدو الملف مثل القصاصة البرمجية التالية:
import {
  IButtonStyles,
  ICheckboxStyles,
  IIconStyles,
  IStackStyles,
  Theme,
} from "@fluentui/react";

export const checkboxStyles = (theme: Theme): ICheckboxStyles => {
  return {
    label: {
      color: theme.palette.neutralPrimary,
    },
  };
};

export const callingWidgetContainerStyles = (theme: Theme): IStackStyles => {
  return {
    root: {
      width: "5rem",
      height: "5rem",
      padding: "0.5rem",
      boxShadow: theme.effects.elevation16,
      borderRadius: "50%",
      bottom: "1rem",
      right: "1rem",
      position: "absolute",
      overflow: "hidden",
      cursor: "pointer",
      ":hover": {
        boxShadow: theme.effects.elevation64,
      },
    },
  };
};

export const callingWidgetSetupContainerStyles = (
  theme: Theme
): IStackStyles => {
  return {
    root: {
      width: "18rem",
      minHeight: "20rem",
      maxHeight: "25rem",
      padding: "0.5rem",
      boxShadow: theme.effects.elevation16,
      borderRadius: theme.effects.roundedCorner6,
      bottom: 0,
      right: "1rem",
      position: "absolute",
      overflow: "hidden",
      cursor: "pointer",
      background: theme.palette.white,
    },
  };
};

export const callIconStyles = (theme: Theme): IIconStyles => {
  return {
    root: {
      paddingTop: "0.2rem",
      color: theme.palette.white,
      transform: "scale(1.6)",
    },
  };
};

export const startCallButtonStyles = (theme: Theme): IButtonStyles => {
  return {
    root: {
      background: theme.palette.themePrimary,
      borderRadius: theme.effects.roundedCorner6,
      borderColor: theme.palette.themePrimary,
    },
    textContainer: {
      color: theme.palette.white,
    },
  };
};

export const logoContainerStyles: IStackStyles = {
  root: {
    margin: "auto",
    padding: "0.2rem",
    height: "5rem",
    width: "10rem",
    zIndex: 0,
  },
};

export const collapseButtonStyles: IButtonStyles = {
  root: {
    position: "absolute",
    top: "0.2rem",
    right: "0.2rem",
    zIndex: 1,
  },
};

export const callingWidgetInCallContainerStyles = (
  theme: Theme
): IStackStyles => {
  return {
    root: {
      width: "35rem",
      height: "25rem",
      padding: "0.5rem",
      boxShadow: theme.effects.elevation16,
      borderRadius: theme.effects.roundedCorner6,
      bottom: 0,
      right: "1rem",
      position: "absolute",
      overflow: "hidden",
      cursor: "pointer",
      background: theme.semanticColors.bodyBackground,
    },
  };
};
6. إعداد قيم الهوية
قبل تشغيل التطبيق، انتقل إلى App.tsx قيم العنصر النائب هناك واستبدلها بهوياتAzure Communication Services ومعرف حساب المورد لتطبيق Teams Voice الخاص بك. فيما يلي قيم الإدخال ل tokenوuserId.teamsAppIdentifier
./src/App.tsx
/**
 * Token for local user.
 */
const token = "<Enter your ACS Token here>";

/**
 * User identifier for local user.
 */
const userId: CommunicationIdentifier = {
  communicationUserId: "Enter your ACS Id here",
};

/**
 * Enter your Teams voice app identifier from the Teams admin center here
 */
const teamsAppIdentifier: MicrosoftTeamsAppIdentifier = {
  teamsAppId: "<Enter your Teams Voice app id here>",
  cloud: "public",
};
7. تشغيل التطبيق
وأخيرا يمكننا تشغيل التطبيق لإجراء مكالماتنا! قم بتشغيل الأوامر التالية لتثبيت تبعياتنا وتشغيل تطبيقنا.
# Install the new dependencies
npm install

# run the React app
npm run dev
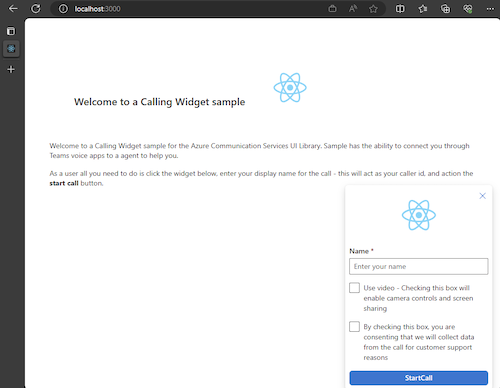
بمجرد تشغيل التطبيق، يمكنك رؤيته في http://localhost:3000 المستعرض. يجب أن تشاهد شاشة البداية التالية:
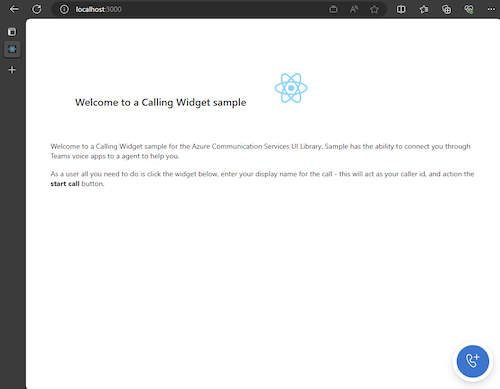
ثم عند إجراء زر عنصر واجهة المستخدم، يجب أن تشاهد قائمة صغيرة:
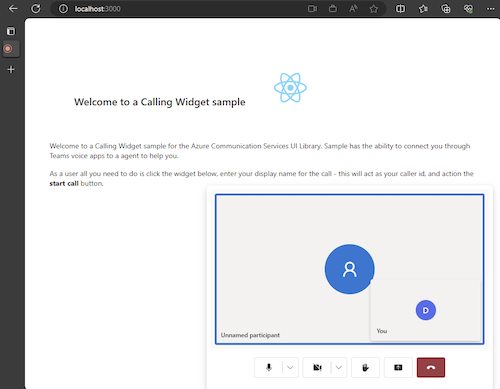
بعد ملء اسمك، انقر فوق بدء المكالمة ومن المفترض أن تبدأ المكالمة. يجب أن يبدو عنصر واجهة المستخدم كما يلي بعد بدء مكالمة:
الخطوات التالية
لمزيد من المعلومات حول تطبيقات Teams الصوتية، راجع وثائقنا حول الردود التلقائية ل Teams وقوائم انتظار المكالمات في Teams. أو راجع أيضا برنامجنا التعليمي حول كيفية بناء تجربة مماثلة مع حزم JavaScript.
التشغيل السريع: انضم إلى تطبيق المكالمات إلى قائمة انتظار مكالمات Teams
التشغيل السريع: انضم إلى تطبيق المكالمات إلى "الرد التلقائي ل Teams"