In this article, you'll learn how to use Open Neural Network Exchange (ONNX) to make predictions on computer vision models generated from automated machine learning (AutoML) in Azure Machine Learning.
To use ONNX for predictions, you need to:
Download ONNX model files from an AutoML training run.
Understand the inputs and outputs of an ONNX model.
Preprocess your data so that it's in the required format for input images.
Perform inference with ONNX Runtime for Python.
Visualize predictions for object detection and instance segmentation tasks.
ONNX is an open standard for machine learning and deep learning models. It enables model import and export (interoperability) across the popular AI frameworks. For more details, explore the ONNX GitHub project.
ONNX Runtime is an open-source project that supports cross-platform inference. ONNX Runtime provides APIs across programming languages (including Python, C++, C#, C, Java, and JavaScript). You can use these APIs to perform inference on input images. After you have the model that has been exported to ONNX format, you can use these APIs on any programming language that your project needs.
In this guide, you learn how to use Python APIs for ONNX Runtime to make predictions on images for popular vision tasks. You can use these ONNX exported models across languages.
Install the onnxruntime package. The methods in this article have been tested with versions 1.3.0 to 1.8.0.
Download ONNX model files
You can download ONNX model files from AutoML runs by using the Azure Machine Learning studio UI or the Azure Machine Learning Python SDK. We recommend downloading via the SDK with the experiment name and parent run ID.
Azure Machine Learning studio
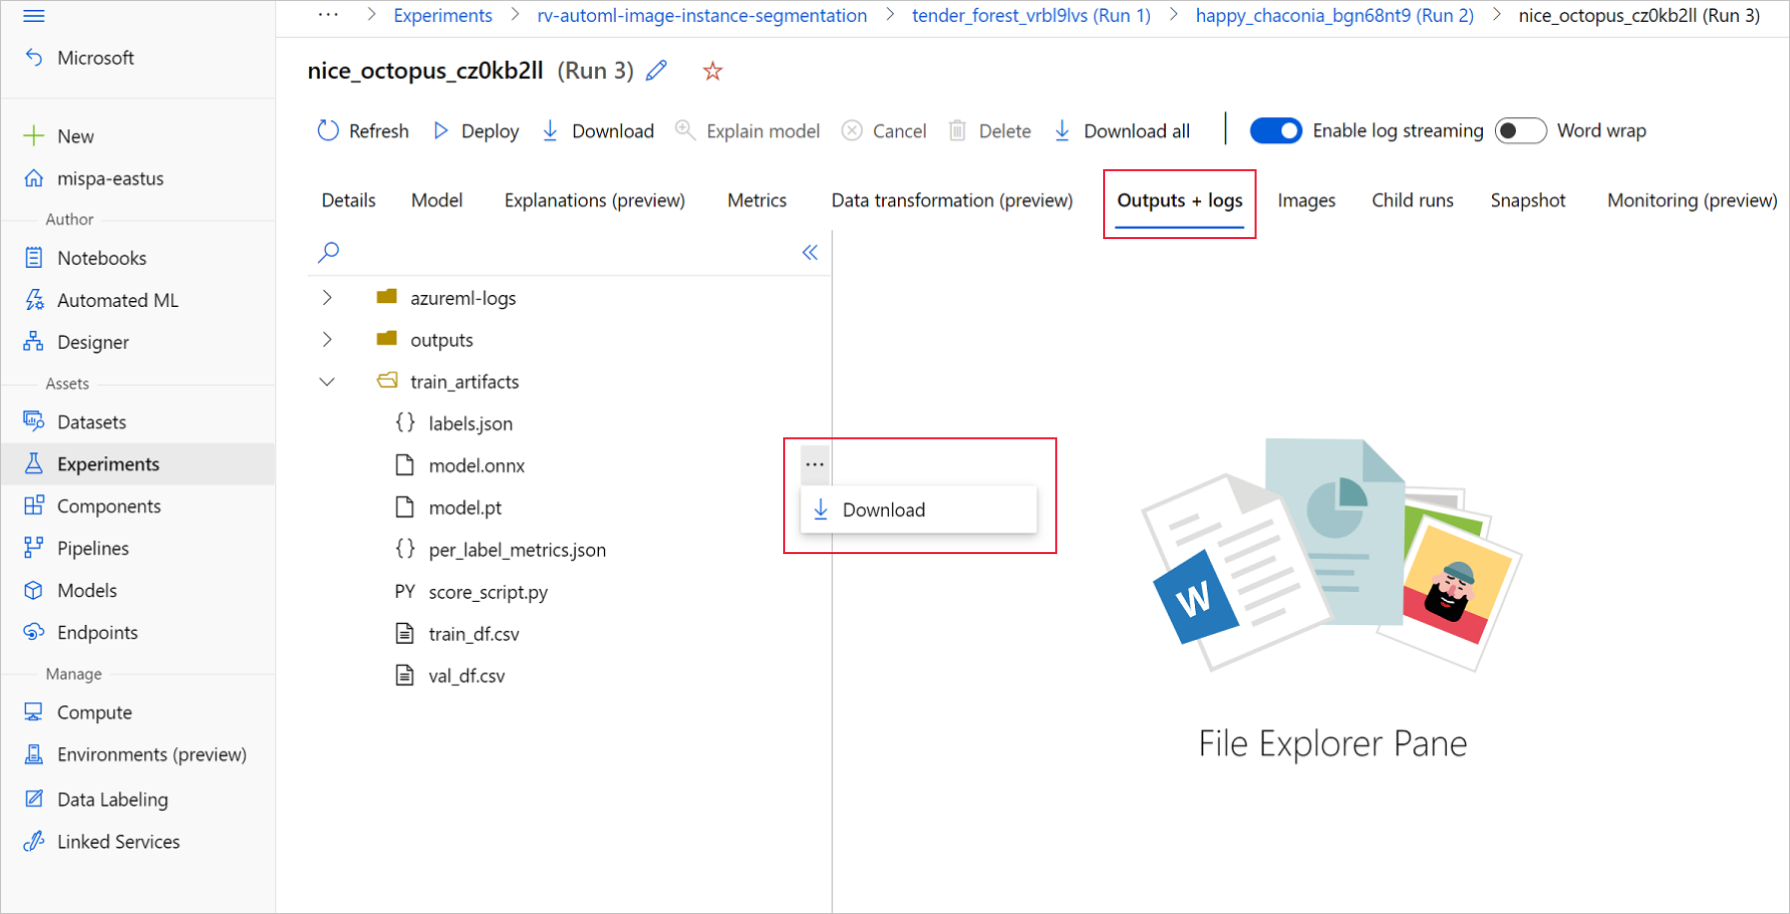
On Azure Machine Learning studio, go to your experiment by using the hyperlink to the experiment generated in the training notebook, or by selecting the experiment name on the Experiments tab under Assets. Then select the best child run.
Within the best child run, go to Outputs+logs > train_artifacts. Use the Download button to manually download the following files:
labels.json: File that contains all the classes or labels in the training dataset.
model.onnx: Model in ONNX format.
Save the downloaded model files in a directory. The example in this article uses the ./automl_models directory.
Azure Machine Learning Python SDK
With the SDK, you can select the best child run (by primary metric) with the experiment name and parent run ID. Then, you can download the labels.json and model.onnx files.
The following code returns the best child run based on the relevant primary metric.
from azure.identity import DefaultAzureCredential
from azure.ai.ml import MLClient
mlflow_client = MlflowClient()

credential = DefaultAzureCredential()
ml_client = None
try:
    ml_client = MLClient.from_config(credential)
except Exception as ex:
    print(ex)
    # Enter details of your Azure Machine Learning workspace
    subscription_id = ''
    resource_group = ''
    workspace_name = ''
    ml_client = MLClient(credential, subscription_id, resource_group, workspace_name)
import mlflow
from mlflow.tracking.client import MlflowClient

# Obtain the tracking URL from MLClient
MLFLOW_TRACKING_URI = ml_client.workspaces.get(
    name=ml_client.workspace_name
).mlflow_tracking_uri

mlflow.set_tracking_uri(MLFLOW_TRACKING_URI)

# Specify the job name
job_name = ''

# Get the parent run
mlflow_parent_run = mlflow_client.get_run(job_name)
best_child_run_id = mlflow_parent_run.data.tags['automl_best_child_run_id']
# get the best child run
best_run = mlflow_client.get_run(best_child_run_id)
Download the labels.json file, which contains all the classes and labels in the training dataset.
local_dir = './automl_models'
if not os.path.exists(local_dir):
    os.mkdir(local_dir)

labels_file = mlflow_client.download_artifacts(
    best_run.info.run_id, 'train_artifacts/labels.json', local_dir
)
In case of batch inferencing for Object Detection and Instance Segmentation using ONNX models, refer to the section on model generation for batch scoring.
Model generation for batch scoring
By default, AutoML for Images supports batch scoring for classification. But object detection and instance segmentation ONNX models don't support batch inferencing. In case of batch inference for object detection and instance segmentation, use the following procedure to generate an ONNX model for the required batch size. Models generated for a specific batch size don't work for other batch sizes.
Download the conda environment file and create an environment object to be used with command job.
#  Download conda file and define the environment

conda_file = mlflow_client.download_artifacts(
    best_run.info.run_id, "outputs/conda_env_v_1_0_0.yml", local_dir
)
from azure.ai.ml.entities import Environment
env = Environment(
    name="automl-images-env-onnx",
    description="environment for automl images ONNX batch model generation",
    image="mcr.microsoft.com/azureml/openmpi4.1.0-cuda11.1-cudnn8-ubuntu18.04",
    conda_file=conda_file,
)
To get the argument values needed to create the batch scoring model, refer to the scoring scripts generated under the outputs folder of the AutoML training runs. Use the hyperparameter values available in the model settings variable inside the scoring file for the best child run.
For multi-class image classification, the generated ONNX model for the best child-run supports batch scoring by default. Therefore, no model specific arguments are needed for this task type and you can skip to the Load the labels and ONNX model files section.
For multi-label image classification, the generated ONNX model for the best child-run supports batch scoring by default. Therefore, no model specific arguments are needed for this task type and you can skip to the Load the labels and ONNX model files section.
inputs = {'model_name': 'fasterrcnn_resnet34_fpn',  # enter the faster rcnn or retinanet model name
         'batch_size': 8,  # enter the batch size of your choice
         'height_onnx': 600,  # enter the height of input to ONNX model
         'width_onnx': 800,  # enter the width of input to ONNX model
         'job_name': job_name,
         'task_type': 'image-object-detection',
         'min_size': 600,  # minimum size of the image to be rescaled before feeding it to the backbone
         'max_size': 1333,  # maximum size of the image to be rescaled before feeding it to the backbone
         'box_score_thresh': 0.3,  # threshold to return proposals with a classification score > box_score_thresh
         'box_nms_thresh': 0.5,  # NMS threshold for the prediction head
         'box_detections_per_img': 100   # maximum number of detections per image, for all classes
         }
inputs = {'model_name': 'yolov5',  # enter the yolo model name
          'batch_size': 8,  # enter the batch size of your choice
          'height_onnx': 640,  # enter the height of input to ONNX model
          'width_onnx': 640,  # enter the width of input to ONNX model
          'job_name': job_name,
          'task_type': 'image-object-detection',
          'img_size': 640,  # image size for inference
          'model_size': 'small',  # size of the yolo model
          'box_score_thresh': 0.1,  # threshold to return proposals with a classification score > box_score_thresh
          'box_iou_thresh': 0.5
        }
inputs = {'model_name': 'maskrcnn_resnet50_fpn',  # enter the maskrcnn model name
         'batch_size': 8,  # enter the batch size of your choice
         'height_onnx': 600,  # enter the height of input to ONNX model
         'width_onnx': 800,  # enter the width of input to ONNX model
         'job_name': job_name,
         'task_type': 'image-instance-segmentation',
         'min_size': 600,  # minimum size of the image to be rescaled before feeding it to the backbone
         'max_size': 1333,  # maximum size of the image to be rescaled before feeding it to the backbone
         'box_score_thresh': 0.3,  # threshold to return proposals with a classification score > box_score_thresh
         'box_nms_thresh': 0.5,  # NMS threshold for the prediction head
         'box_detections_per_img': 100  # maximum number of detections per image, for all classes
         }
Download and keep the ONNX_batch_model_generator_automl_for_images.py file in the current directory to submit the script. Use the following command job to submit the script ONNX_batch_model_generator_automl_for_images.py available in the azureml-examples GitHub repository, to generate an ONNX model of a specific batch size. In the following code, the trained model environment is used to submit this script to generate and save the ONNX model to the outputs directory.
For multi-class image classification, the generated ONNX model for the best child-run supports batch scoring by default. Therefore, no model specific arguments are needed for this task type and you can skip to the Load the labels and ONNX model files section.
For multi-label image classification, the generated ONNX model for the best child-run supports batch scoring by default. Therefore, no model specific arguments are needed for this task type and you can skip to the Load the labels and ONNX model files section.
from azure.ai.ml import command

job = command(
    code="./onnx_generator_files",  # local path where the code is stored
    command="python ONNX_batch_model_generator_automl_for_images.py --model_name ${{inputs.model_name}} --batch_size ${{inputs.batch_size}} --height_onnx ${{inputs.height_onnx}} --width_onnx ${{inputs.width_onnx}} --job_name ${{inputs.job_name}} --task_type ${{inputs.task_type}} --min_size ${{inputs.min_size}} --max_size ${{inputs.max_size}} --box_score_thresh ${{inputs.box_score_thresh}} --box_nms_thresh ${{inputs.box_nms_thresh}} --box_detections_per_img ${{inputs.box_detections_per_img}}",
    inputs=inputs,
    environment=env,
    compute=compute_name,
    display_name="ONNX-batch-model-generation-rcnn",
    description="Use the PyTorch to generate ONNX batch scoring model.",
)
returned_job = ml_client.create_or_update(job)
ml_client.jobs.stream(returned_job.name)
from azure.ai.ml import command

job = command(
    code="./onnx_generator_files",  # local path where the code is stored
    command="python ONNX_batch_model_generator_automl_for_images.py --model_name ${{inputs.model_name}} --batch_size ${{inputs.batch_size}} --height_onnx ${{inputs.height_onnx}} --width_onnx ${{inputs.width_onnx}} --job_name ${{inputs.job_name}} --task_type ${{inputs.task_type}} --img_size ${{inputs.img_size}} --model_size ${{inputs.model_size}} --box_score_thresh ${{inputs.box_score_thresh}} --box_iou_thresh ${{inputs.box_iou_thresh}}",
    inputs=inputs,
    environment=env,
    compute=compute_name,
    display_name="ONNX-batch-model-generation",
    description="Use the PyTorch to generate ONNX batch scoring model.",
)
returned_job = ml_client.create_or_update(job)
ml_client.jobs.stream(returned_job.name)
from azure.ai.ml import command

job = command(
    code="./onnx_generator_files",  # local path where the code is stored
    command="python ONNX_batch_model_generator_automl_for_images.py --model_name ${{inputs.model_name}} --batch_size ${{inputs.batch_size}} --height_onnx ${{inputs.height_onnx}} --width_onnx ${{inputs.width_onnx}} --job_name ${{inputs.job_name}} --task_type ${{inputs.task_type}} --min_size ${{inputs.min_size}} --max_size ${{inputs.max_size}} --box_score_thresh ${{inputs.box_score_thresh}} --box_nms_thresh ${{inputs.box_nms_thresh}} --box_detections_per_img ${{inputs.box_detections_per_img}}",
    inputs=inputs,
    environment=env,
    compute=compute_name,
    display_name="ONNX-batch-model-generation-maskrcnn",
    description="Use the PyTorch to generate ONNX batch scoring model.",
)
returned_job = ml_client.create_or_update(job)
ml_client.jobs.stream(returned_job.name)
Once the batch model is generated, either download it from Outputs+logs > outputs manually through UI, or use the following method:
batch_size = 8  # use the batch size used to generate the model
returned_job_run = mlflow_client.get_run(returned_job.name)

# Download run's artifacts/outputs
onnx_model_path = mlflow_client.download_artifacts(
    returned_job_run.info.run_id, 'outputs/model_'+str(batch_size)+'.onnx', local_dir
)
After the model downloading step, you use the ONNX Runtime Python package to perform inferencing by using the model.onnx file. For demonstration purposes, this article uses the datasets from How to prepare image datasets for each vision task.
We trained the models for all vision tasks with their respective datasets to demonstrate ONNX model inference.
Load the labels and ONNX model files
The following code snippet loads labels.json, where class names are ordered. That is, if the ONNX model predicts a label ID as 2, then it corresponds to the label name given at the third index in the labels.json file.
import json
import onnxruntime

labels_file = "automl_models/labels.json"
with open(labels_file) as f:
    classes = json.load(f)
print(classes)
try:
    session = onnxruntime.InferenceSession(onnx_model_path)
    print("ONNX model loaded...")
except Exception as e:
    print("Error loading ONNX file: ", str(e))
Get expected input and output details for an ONNX model
When you have the model, it's important to know some model-specific and task-specific details. These details include the number of inputs and number of outputs, expected input shape or format for preprocessing the image, and output shape so you know the model-specific or task-specific outputs.
sess_input = session.get_inputs()
sess_output = session.get_outputs()
print(f"No. of inputs : {len(sess_input)}, No. of outputs : {len(sess_output)}")

for idx, input_ in enumerate(range(len(sess_input))):
    input_name = sess_input[input_].name
    input_shape = sess_input[input_].shape
    input_type = sess_input[input_].type
    print(f"{idx} Input name : { input_name }, Input shape : {input_shape}, \
    Input type  : {input_type}")

for idx, output in enumerate(range(len(sess_output))):
    output_name = sess_output[output].name
    output_shape = sess_output[output].shape
    output_type = sess_output[output].type
    print(f" {idx} Output name : {output_name}, Output shape : {output_shape}, \
    Output type  : {output_type}")
Expected input and output formats for the ONNX model
Every ONNX model has a predefined set of input and output formats.
This example applies the model trained on the fridgeObjects dataset with 134 images and 4 classes/labels to explain ONNX model inference. For more information on training an image classification task, see the multi-class image classification notebook.
Input format
The input is a preprocessed image.
Input name
Input shape
Input type
Description
input1
(batch_size, num_channels, height, width)
ndarray(float)
Input is a preprocessed image, with the shape (1, 3, 224, 224) for a batch size of 1, and a height and width of 224. These numbers correspond to the values used for crop_size in the training example.
Output format
The output is an array of logits for all the classes/labels.
Output name
Output shape
Output type
Description
output1
(batch_size, num_classes)
ndarray(float)
Model returns logits (without softmax). For instance, for batch size 1 and 4 classes, it returns (1, 4).
Input is a preprocessed image, with the shape (1, 3, 224, 224) for a batch size of 1, and a height and width of 224. These numbers correspond to the values used for crop_size in the training example.
Output format
The output is an array of logits for all the classes/labels.
Output name
Output shape
Output type
Description
output1
(batch_size, num_classes)
ndarray(float)
Model returns logits (without sigmoid). For instance, for batch size 1 and 4 classes, it returns (1, 4).
This object detection example uses the model trained on the fridgeObjects detection dataset of 128 images and 4 classes/labels to explain ONNX model inference. This example trains Faster R-CNN models to demonstrate inference steps. For more information on training object detection models, see the object detection notebook.
Input format
Input is a preprocessed image.
Input name
Input shape
Input type
Description
Input
(batch_size, num_channels, height, width)
ndarray(float)
Input is a preprocessed image, with the shape (1, 3, 600, 800) for a batch size of 1, and a height of 600 and width of 800.
Output format
The output is a tuple of output_names and predictions. Here, output_names and predictions are lists with length 3*batch_size each. For Faster R-CNN order of outputs are boxes, labels and scores, whereas for RetinaNet outputs are boxes, scores, labels.
Output name
Output shape
Output type
Description
output_names
(3*batch_size)
List of keys
For a batch size of 2, output_names is ['boxes_0', 'labels_0', 'scores_0', 'boxes_1', 'labels_1', 'scores_1']
predictions
(3*batch_size)
List of ndarray(float)
For a batch size of 2, predictions takes the shape of [(n1_boxes, 4), (n1_boxes), (n1_boxes), (n2_boxes, 4), (n2_boxes), (n2_boxes)]. Here, values at each index correspond to same index in output_names.
The following table describes boxes, labels, and scores returned for each sample in the batch of images.
Name
Shape
Type
Description
Boxes
(n_boxes, 4), where each box has x_min, y_min, x_max, y_max
ndarray(float)
Model returns n boxes with their top-left and bottom-right coordinates.
Labels
(n_boxes)
ndarray(float)
Label or class ID of an object in each box.
Scores
(n_boxes)
ndarray(float)
Confidence score of an object in each box.
This object detection example uses the model trained on the fridgeObjects detection dataset of 128 images and 4 classes/labels to explain ONNX model inference. This example trains YOLO models to demonstrate inference steps. For more information on training object detection models, see the object detection notebook.
Input format
The input is a preprocessed image, with the shape (1, 3, 640, 640) for a batch size of 1, and a height and width of 640. These numbers correspond to the values used in the training example.
Input name
Input shape
Input type
Description
Input
(batch_size, num_channels, height, width)
ndarray(float)
Input is a preprocessed image, with the shape (1, 3, 640, 640) for a batch size of 1, and a height of 640 and width of 640.
Output format
ONNX model predictions contain multiple outputs. The first output is needed to perform nonmax suppression for detections. For ease of use, automated ML displays the output format after the NMS postprocessing step. The output after NMS is a list of boxes, labels, and scores for each sample in the batch.
Output name
Output shape
Output type
Description
Output
(batch_size)
List of ndarray(float)
Model returns box detections for each sample in the batch
Each cell in the list indicates box detections of a sample with shape (n_boxes, 6), where each box has x_min, y_min, x_max, y_max, confidence_score, class_id.
For this instance segmentation example, you use the Mask R-CNN model that has been trained on the fridgeObjects dataset with 128 images and 4 classes/labels to explain ONNX model inference. For more information on training of the instance segmentation model, see the instance segmentation notebook.
Important
Only Mask R-CNN is supported for instance segmentation tasks. The input and output formats are based on Mask R-CNN only.
Input format
The input is a preprocessed image. The ONNX model for Mask R-CNN has been exported to work with images of different shapes. We recommend that you resize them to a fixed size that's consistent with training image sizes, for better performance.
Input name
Input shape
Input type
Description
Input
(batch_size, num_channels, height, width)
ndarray(float)
Input is a preprocessed image, with shape (1, 3, input_image_height, input_image_width) for a batch size of 1, and a height and width similar to an input image.
Output format
The output is a tuple of output_names and predictions. Here, output_names and predictions are lists with length 4*batch_size each.
Output name
Output shape
Output type
Description
output_names
(4*batch_size)
List of keys
For a batch size of 2, output_names is ['boxes_0', 'labels_0', 'scores_0', 'masks_0', 'boxes_1', 'labels_1', 'scores_1', 'masks_1']
predictions
(4*batch_size)
List of ndarray(float)
For a batch size of 2, predictions takes the shape of [(n1_boxes, 4), (n1_boxes), (n1_boxes), (n1_boxes, 1, height_onnx, width_onnx), (n2_boxes, 4), (n2_boxes), (n2_boxes), (n2_boxes, 1, height_onnx, width_onnx)]. Here, values at each index correspond to same index in output_names.
Name
Shape
Type
Description
Boxes
(n_boxes, 4), where each box has x_min, y_min, x_max, y_max
ndarray(float)
Model returns n boxes with their top-left and bottom-right coordinates.
Labels
(n_boxes)
ndarray(float)
Label or class ID of an object in each box.
Scores
(n_boxes)
ndarray(float)
Confidence score of an object in each box.
Masks
(n_boxes, 1, height_onnx, width_onnx)
ndarray(float)
Masks (polygons) of detected objects with the shape height and width of an input image.
Perform the following preprocessing steps for the ONNX model inference:
Convert the image to RGB.
Resize the image to valid_resize_size and valid_resize_size values that correspond to the values used in the transformation of the validation dataset during training. The default value for valid_resize_size is 256.
Center crop the image to height_onnx_crop_size and width_onnx_crop_size. It corresponds to valid_crop_size with the default value of 224.
Change HxWxC to CxHxW.
Convert to float type.
Normalize with ImageNet's mean = [0.485, 0.456, 0.406] and std = [0.229, 0.224, 0.225].
If you chose different values for the hyperparametersvalid_resize_size and valid_crop_size during training, then those values should be used.
import glob
import numpy as np
from PIL import Image

def preprocess(image, resize_size, crop_size_onnx):
    """Perform pre-processing on raw input image

    :param image: raw input image
    :type image: PIL image
    :param resize_size: value to resize the image
    :type image: Int
    :param crop_size_onnx: expected height of an input image in onnx model
    :type crop_size_onnx: Int
    :return: pre-processed image in numpy format
    :rtype: ndarray 1xCxHxW
    """

    image = image.convert('RGB')
    # resize
    image = image.resize((resize_size, resize_size))
    #  center  crop
    left = (resize_size - crop_size_onnx)/2
    top = (resize_size - crop_size_onnx)/2
    right = (resize_size + crop_size_onnx)/2
    bottom = (resize_size + crop_size_onnx)/2
    image = image.crop((left, top, right, bottom))

    np_image = np.array(image)
    # HWC -> CHW
    np_image = np_image.transpose(2, 0, 1) # CxHxW
    # normalize the image
    mean_vec = np.array([0.485, 0.456, 0.406])
    std_vec = np.array([0.229, 0.224, 0.225])
    norm_img_data = np.zeros(np_image.shape).astype('float32')
    for i in range(np_image.shape[0]):
        norm_img_data[i,:,:] = (np_image[i,:,:]/255 - mean_vec[i])/std_vec[i]

    np_image = np.expand_dims(norm_img_data, axis=0) # 1xCxHxW
    return np_image

# following code loads only batch_size number of images for demonstrating ONNX inference
# make sure that the data directory has at least batch_size number of images

test_images_path = "automl_models_multi_cls/test_images_dir/*" # replace with path to images
# Select batch size needed
batch_size = 8
# you can modify resize_size based on your trained model
resize_size = 256
# height and width will be the same for classification
crop_size_onnx = height_onnx_crop_size

image_files = glob.glob(test_images_path)
img_processed_list = []
for i in range(batch_size):
    img = Image.open(image_files[i])
    img_processed_list.append(preprocess(img, resize_size, crop_size_onnx))

if len(img_processed_list) > 1:
    img_data = np.concatenate(img_processed_list)
elif len(img_processed_list) == 1:
    img_data = img_processed_list[0]
else:
    img_data = None

assert batch_size == img_data.shape[0]
With PyTorch
import glob
import torch
import numpy as np
from PIL import Image
from torchvision import transforms

def _make_3d_tensor(x) -> torch.Tensor:
    """This function is for images that have less channels.

    :param x: input tensor
    :type x: torch.Tensor
    :return: return a tensor with the correct number of channels
    :rtype: torch.Tensor
    """
    return x if x.shape[0] == 3 else x.expand((3, x.shape[1], x.shape[2]))

def preprocess(image, resize_size, crop_size_onnx):
    transform = transforms.Compose([
        transforms.Resize(resize_size),
        transforms.CenterCrop(crop_size_onnx),
        transforms.ToTensor(),
        transforms.Lambda(_make_3d_tensor),
        transforms.Normalize([0.485, 0.456, 0.406], [0.229, 0.224, 0.225])])

    img_data = transform(image)
    img_data = img_data.numpy()
    img_data = np.expand_dims(img_data, axis=0)
    return img_data

# following code loads only batch_size number of images for demonstrating ONNX inference
# make sure that the data directory has at least batch_size number of images

test_images_path = "automl_models_multi_cls/test_images_dir/*"  # replace with path to images
# Select batch size needed
batch_size = 8
# you can modify resize_size based on your trained model
resize_size = 256
# height and width will be the same for classification
crop_size_onnx = height_onnx_crop_size

image_files = glob.glob(test_images_path)
img_processed_list = []
for i in range(batch_size):
    img = Image.open(image_files[i])
    img_processed_list.append(preprocess(img, resize_size, crop_size_onnx))

if len(img_processed_list) > 1:
    img_data = np.concatenate(img_processed_list)
elif len(img_processed_list) == 1:
    img_data = img_processed_list[0]
else:
    img_data = None

assert batch_size == img_data.shape[0]
Perform the following preprocessing steps for the ONNX model inference. These steps are the same for multi-class image classification.
Convert the image to RGB.
Resize the image to valid_resize_size and valid_resize_size values that correspond to the values used in the transformation of the validation dataset during training. The default value for valid_resize_size is 256.
Center crop the image to height_onnx_crop_size and width_onnx_crop_size. This corresponds to valid_crop_size with the default value of 224.
Change HxWxC to CxHxW.
Convert to float type.
Normalize with ImageNet's mean = [0.485, 0.456, 0.406] and std = [0.229, 0.224, 0.225].
If you chose different values for the hyperparametersvalid_resize_size and valid_crop_size during training, then those values should be used.
import glob
import numpy as np
from PIL import Image

def preprocess(image, resize_size, crop_size_onnx):
    """Perform pre-processing on raw input image

    :param image: raw input image
    :type image: PIL image
    :param resize_size: value to resize the image
    :type image: Int
    :param crop_size_onnx: expected height of an input image in onnx model
    :type crop_size_onnx: Int
    :return: pre-processed image in numpy format
    :rtype: ndarray 1xCxHxW
    """

    image = image.convert('RGB')
    # resize
    image = image.resize((resize_size, resize_size))
    # center  crop
    left = (resize_size - crop_size_onnx)/2
    top = (resize_size - crop_size_onnx)/2
    right = (resize_size + crop_size_onnx)/2
    bottom = (resize_size + crop_size_onnx)/2
    image = image.crop((left, top, right, bottom))

    np_image = np.array(image)
    # HWC -> CHW
    np_image = np_image.transpose(2, 0, 1) # CxHxW

    # normalize the image
    mean_vec = np.array([0.485, 0.456, 0.406])
    std_vec = np.array([0.229, 0.224, 0.225])
    norm_img_data = np.zeros(np_image.shape).astype('float32')
    for i in range(np_image.shape[0]):
        norm_img_data[i,:,:] = (np_image[i,:,:] / 255 - mean_vec[i]) / std_vec[i]
    np_image = np.expand_dims(norm_img_data, axis=0) # 1xCxHxW
    return np_image

# following code loads only batch_size number of images for demonstrating ONNX inference
# make sure that the data directory has at least batch_size number of images

test_images_path = "automl_models_multi_label/test_images_dir/*" # replace with path to images
# Select batch size needed
batch_size = 8
# you can modify resize_size based on your trained model
resize_size = 256
# height and width will be the same for classification
crop_size_onnx = height_onnx_crop_size

image_files = glob.glob(test_images_path)
img_processed_list = []
for i in range(batch_size):
    img = Image.open(image_files[i])
    img_processed_list.append(preprocess(img, resize_size, crop_size_onnx))

if len(img_processed_list) > 1:
    img_data = np.concatenate(img_processed_list)
elif len(img_processed_list) == 1:
    img_data = img_processed_list[0]
else:
    img_data = None

assert batch_size == img_data.shape[0]
With PyTorch
import glob
import torch
import numpy as np
from PIL import Image
from torchvision import transforms

def _make_3d_tensor(x) -> torch.Tensor:
    """This function is for images that have less channels.

    :param x: input tensor
    :type x: torch.Tensor
    :return: return a tensor with the correct number of channels
    :rtype: torch.Tensor
    """
    return x if x.shape[0] == 3 else x.expand((3, x.shape[1], x.shape[2]))

def preprocess(image, resize_size, crop_size_onnx):
    """Perform pre-processing on raw input image

    :param image: raw input image
    :type image: PIL image
    :param resize_size: value to resize the image
    :type image: Int
    :param crop_size_onnx: expected height of an input image in onnx model
    :type crop_size_onnx: Int
    :return: pre-processed image in numpy format
    :rtype: ndarray 1xCxHxW
    """
    transform = transforms.Compose([
        transforms.Resize(resize_size),
        transforms.CenterCrop(crop_size_onnx),
        transforms.ToTensor(),
        transforms.Lambda(_make_3d_tensor),
        transforms.Normalize([0.485, 0.456, 0.406], [0.229, 0.224, 0.225])])

    img_data = transform(image)
    img_data = img_data.numpy()
    img_data = np.expand_dims(img_data, axis=0)

    return img_data

# following code loads only batch_size number of images for demonstrating ONNX inference
# make sure that the data directory has at least batch_size number of images

test_images_path = "automl_models_multi_label/test_images_dir/*"  # replace with path to images
# Select batch size needed
batch_size = 8
# you can modify resize_size based on your trained model
resize_size = 256
# height and width will be the same for classification
crop_size_onnx = height_onnx_crop_size

image_files = glob.glob(test_images_path)
img_processed_list = []
for i in range(batch_size):
    img = Image.open(image_files[i])
    img_processed_list.append(preprocess(img, resize_size, crop_size_onnx))

if len(img_processed_list) > 1:
    img_data = np.concatenate(img_processed_list)
elif len(img_processed_list) == 1:
    img_data = img_processed_list[0]
else:
    img_data = None

assert batch_size == img_data.shape[0]
For object detection with the Faster R-CNN architecture, follow the same preprocessing steps as image classification, except for image cropping. You can resize the image with height 600 and width 800. You can get the expected input height and width with the following code.
import glob
import numpy as np
from PIL import Image

def preprocess(image, height_onnx, width_onnx):
    """Perform pre-processing on raw input image

    :param image: raw input image
    :type image: PIL image
    :param height_onnx: expected height of an input image in onnx model
    :type height_onnx: Int
    :param width_onnx: expected width of an input image in onnx model
    :type width_onnx: Int
    :return: pre-processed image in numpy format
    :rtype: ndarray 1xCxHxW
    """

    image = image.convert('RGB')
    image = image.resize((width_onnx, height_onnx))
    np_image = np.array(image)
    # HWC -> CHW
    np_image = np_image.transpose(2, 0, 1) # CxHxW
    # normalize the image
    mean_vec = np.array([0.485, 0.456, 0.406])
    std_vec = np.array([0.229, 0.224, 0.225])
    norm_img_data = np.zeros(np_image.shape).astype('float32')
    for i in range(np_image.shape[0]):
        norm_img_data[i,:,:] = (np_image[i,:,:] / 255 - mean_vec[i]) / std_vec[i]
    np_image = np.expand_dims(norm_img_data, axis=0) # 1xCxHxW
    return np_image

# following code loads only batch_size number of images for demonstrating ONNX inference
# make sure that the data directory has at least batch_size number of images

test_images_path = "automl_models_od/test_images_dir/*" # replace with path to images
image_files = glob.glob(test_images_path)
img_processed_list = []
for i in range(batch_size):
    img = Image.open(image_files[i])
    img_processed_list.append(preprocess(img, height_onnx, width_onnx))

if len(img_processed_list) > 1:
    img_data = np.concatenate(img_processed_list)
elif len(img_processed_list) == 1:
    img_data = img_processed_list[0]
else:
    img_data = None

assert batch_size == img_data.shape[0]
For object detection with the YOLO architecture, follow the same preprocessing steps as image classification, except for image cropping. You can resize the image with height 600 and width 800, and get the expected input height and width with the following code.
import glob
import numpy as np
from yolo_onnx_preprocessing_utils import preprocess

# use height and width based on the generated model
test_images_path = "automl_models_od_yolo/test_images_dir/*" # replace with path to images
image_files = glob.glob(test_images_path)
img_processed_list = []
pad_list = []
for i in range(batch_size):
    img_processed, pad = preprocess(image_files[i])
    img_processed_list.append(img_processed)
    pad_list.append(pad)

if len(img_processed_list) > 1:
    img_data = np.concatenate(img_processed_list)
elif len(img_processed_list) == 1:
    img_data = img_processed_list[0]
else:
    img_data = None

assert batch_size == img_data.shape[0]
Important
Only Mask R-CNN is supported for instance segmentation tasks. The preprocessing steps are based on Mask R-CNN only.
Perform the following preprocessing steps for the ONNX model inference:
Convert the image to RGB.
Resize the image.
Change HxWxC to CxHxW.
Convert to float type.
Normalize with ImageNet's mean = [0.485, 0.456, 0.406] and std = [0.229, 0.224, 0.225].
For resize_height and resize_width, you can also use the values that you used during training, bounded by the min_size and max_sizehyperparameters for Mask R-CNN.
import glob
import numpy as np
from PIL import Image

def preprocess(image, resize_height, resize_width):
    """Perform pre-processing on raw input image

    :param image: raw input image
    :type image: PIL image
    :param resize_height: resize height of an input image
    :type resize_height: Int
    :param resize_width: resize width of an input image
    :type resize_width: Int
    :return: pre-processed image in numpy format
    :rtype: ndarray of shape 1xCxHxW
    """

    image = image.convert('RGB')
    image = image.resize((resize_width, resize_height))
    np_image = np.array(image)
    # HWC -> CHW
    np_image = np_image.transpose(2, 0, 1)  # CxHxW
    # normalize the image
    mean_vec = np.array([0.485, 0.456, 0.406])
    std_vec = np.array([0.229, 0.224, 0.225])
    norm_img_data = np.zeros(np_image.shape).astype('float32')
    for i in range(np_image.shape[0]):
        norm_img_data[i,:,:] = (np_image[i,:,:]/255 - mean_vec[i])/std_vec[i]
    np_image = np.expand_dims(norm_img_data, axis=0)  # 1xCxHxW
    return np_image

# following code loads only batch_size number of images for demonstrating ONNX inference
# make sure that the data directory has at least batch_size number of images
# use height and width based on the trained model
# use height and width based on the generated model
test_images_path = "automl_models_is/test_images_dir/*" # replace with path to images
image_files = glob.glob(test_images_path)
img_processed_list = []
for i in range(batch_size):
    img = Image.open(image_files[i])
    img_processed_list.append(preprocess(img, height_onnx, width_onnx))

if len(img_processed_list) > 1:
    img_data = np.concatenate(img_processed_list)
elif len(img_processed_list) == 1:
    img_data = img_processed_list[0]
else:
    img_data = None

assert batch_size == img_data.shape[0]
Inference with ONNX Runtime
Inferencing with ONNX Runtime differs for each computer vision task.
def get_predictions_from_ONNX(onnx_session, img_data):
    """Perform predictions with ONNX runtime

    :param onnx_session: onnx model session
    :type onnx_session: class InferenceSession
    :param img_data: pre-processed numpy image
    :type img_data: ndarray with shape 1xCxHxW
    :return: scores with shapes
            (1, No. of classes in training dataset)
    :rtype: numpy array
    """

    sess_input = onnx_session.get_inputs()
    sess_output = onnx_session.get_outputs()
    print(f"No. of inputs : {len(sess_input)}, No. of outputs : {len(sess_output)}")
    # predict with ONNX Runtime
    output_names = [ output.name for output in sess_output]
    scores = onnx_session.run(output_names=output_names,\
                                               input_feed={sess_input[0].name: img_data})

    return scores[0]

scores = get_predictions_from_ONNX(session, img_data)
def get_predictions_from_ONNX(onnx_session,img_data):
    """Perform predictions with ONNX runtime

    :param onnx_session: onnx model session
    :type onnx_session: class InferenceSession
    :param img_data: pre-processed numpy image
    :type img_data: ndarray with shape 1xCxHxW
    :return: scores with shapes
            (1, No. of classes in training dataset)
    :rtype: numpy array
    """

    sess_input = onnx_session.get_inputs()
    sess_output = onnx_session.get_outputs()
    print(f"No. of inputs : {len(sess_input)}, No. of outputs : {len(sess_output)}")
    # predict with ONNX Runtime
    output_names = [ output.name for output in sess_output]
    scores = onnx_session.run(output_names=output_names,\
                                               input_feed={sess_input[0].name: img_data})

    return scores[0]

scores = get_predictions_from_ONNX(session, img_data)
def get_predictions_from_ONNX(onnx_session, img_data):
    """perform predictions with ONNX runtime

    :param onnx_session: onnx model session
    :type onnx_session: class InferenceSession
    :param img_data: pre-processed numpy image
    :type img_data: ndarray with shape 1xCxHxW
    :return: boxes, labels , scores
            (No. of boxes, 4) (No. of boxes,) (No. of boxes,)
    :rtype: tuple
    """

    sess_input = onnx_session.get_inputs()
    sess_output = onnx_session.get_outputs()

    # predict with ONNX Runtime
    output_names = [output.name for output in sess_output]
    predictions = onnx_session.run(output_names=output_names,\
                                               input_feed={sess_input[0].name: img_data})

    return output_names, predictions

output_names, predictions = get_predictions_from_ONNX(session, img_data)
def get_predictions_from_ONNX(onnx_session,img_data):
    """perform predictions with ONNX Runtime

    :param onnx_session: onnx model session
    :type onnx_session: class InferenceSession
    :param img_data: pre-processed numpy image
    :type img_data: ndarray with shape 1xCxHxW
    :return: boxes, labels , scores
    :rtype: list
    """
    sess_input = onnx_session.get_inputs()
    sess_output = onnx_session.get_outputs()
    # predict with ONNX Runtime
    output_names = [ output.name for output in sess_output]
    pred = onnx_session.run(output_names=output_names,\
                                               input_feed={sess_input[0].name: img_data})
    return pred[0]

result = get_predictions_from_ONNX(session, img_data)
The instance segmentation model predicts boxes, labels, scores, and masks. ONNX outputs a predicted mask per instance, along with corresponding bounding boxes and class confidence score. You might need to convert from binary mask to polygon if necessary.
def get_predictions_from_ONNX(onnx_session, img_data):
    """Perform predictions with ONNX runtime

    :param onnx_session: onnx model session
    :type onnx_session: class InferenceSession
    :param img_data: pre-processed numpy image
    :type img_data: ndarray with shape 1xCxHxW
    :return: boxes, labels , scores , masks with shapes
            (No. of instances, 4) (No. of instances,) (No. of instances,)
            (No. of instances, 1, HEIGHT, WIDTH))
    :rtype: tuple
    """

    sess_input = onnx_session.get_inputs()
    sess_output = onnx_session.get_outputs()
    # predict with ONNX Runtime
    output_names = [ output.name for output in sess_output]
    predictions = onnx_session.run(output_names=output_names,\
                                               input_feed={sess_input[0].name: img_data})
    return output_names, predictions

output_names, predictions = get_predictions_from_ONNX(session, img_data)
Apply softmax() over predicted values to get classification confidence scores (probabilities) for each class. Then the prediction will be the class with the highest probability.
conf_scores = torch.nn.functional.softmax(torch.from_numpy(scores), dim=1)
class_preds = torch.argmax(conf_scores, dim=1)
print("predicted classes:", ([(class_idx.item(), classes[class_idx]) for class_idx in class_preds]))
This step differs from multi-class classification. You need to apply sigmoid to the logits (ONNX output) to get confidence scores for multi-label image classification.
Without PyTorch
def sigmoid(x):
    return 1 / (1 + np.exp(-x))

# we apply a threshold of 0.5 on confidence scores
score_threshold = 0.5
conf_scores = sigmoid(scores)
image_wise_preds = np.where(conf_scores > score_threshold)
for image_idx, class_idx in zip(image_wise_preds[0], image_wise_preds[1]):
    print('image: {}, class_index: {}, class_name: {}'.format(image_files[image_idx], class_idx, classes[class_idx]))
With PyTorch
# we apply a threshold of 0.5 on confidence scores
score_threshold = 0.5
conf_scores = torch.sigmoid(torch.from_numpy(scores))
image_wise_preds = torch.where(conf_scores > score_threshold)
for image_idx, class_idx in zip(image_wise_preds[0], image_wise_preds[1]):
    print('image: {}, class_index: {}, class_name: {}'.format(image_files[image_idx], class_idx, classes[class_idx]))
For multi-class and multi-label classification, you can follow the same steps mentioned earlier for all the supported model architectures in AutoML.
For object detection, predictions are automatically on the scale of height_onnx, width_onnx. To transform the predicted box coordinates to the original dimensions, you can implement the following calculations.
Xmin * original_width/width_onnx
Ymin * original_height/height_onnx
Xmax * original_width/width_onnx
Ymax * original_height/height_onnx
Another option is to use the following code to scale the box dimensions to be in the range of [0, 1]. Doing so allows the box coordinates to be multiplied with original images height and width with respective coordinates (as described in visualize predictions section) to get boxes in original image dimensions.
def _get_box_dims(image_shape, box):
    box_keys = ['topX', 'topY', 'bottomX', 'bottomY']
    height, width = image_shape[0], image_shape[1]

    box_dims = dict(zip(box_keys, [coordinate.item() for coordinate in box]))

    box_dims['topX'] = box_dims['topX'] * 1.0 / width
    box_dims['bottomX'] = box_dims['bottomX'] * 1.0 / width
    box_dims['topY'] = box_dims['topY'] * 1.0 / height
    box_dims['bottomY'] = box_dims['bottomY'] * 1.0 / height

    return box_dims

def _get_prediction(boxes, labels, scores, image_shape, classes):
    bounding_boxes = []
    for box, label_index, score in zip(boxes, labels, scores):
        box_dims = _get_box_dims(image_shape, box)

        box_record = {'box': box_dims,
                      'label': classes[label_index],
                      'score': score.item()}

        bounding_boxes.append(box_record)

    return bounding_boxes

# Filter the results with threshold.
# Please replace the threshold for your test scenario.
score_threshold = 0.8
filtered_boxes_batch = []
for batch_sample in range(0, batch_size*3, 3):
    # in case of retinanet change the order of boxes, labels, scores to boxes, scores, labels
    # confirm the same from order of boxes, labels, scores output_names
    boxes, labels, scores = predictions[batch_sample], predictions[batch_sample + 1], predictions[batch_sample + 2]
    bounding_boxes = _get_prediction(boxes, labels, scores, (height_onnx, width_onnx), classes)
    filtered_bounding_boxes = [box for box in bounding_boxes if box['score'] >= score_threshold]
    filtered_boxes_batch.append(filtered_bounding_boxes)
The following code creates boxes, labels, and scores. Use these bounding box details to perform the same postprocessing steps as you did for the Faster R-CNN model.
You can either use the steps mentioned for Faster R-CNN (in case of Mask R-CNN, each sample has four elements boxes, labels, scores, masks) or refer to the visualize predictions section for instance segmentation.
 Python SDK azure-ai-ml v2 (current)