How to submit specific formatted circuits to Azure Quantum
Learn how to use the azure-quantum Python package to submit circuits in specific formats to the Azure Quantum service. This article shows you how to submit circuits in the following formats:
For more information, see Quantum circuits.
Prerequisites
To run your circuits in a Notebook in Azure portal, you need:
- An Azure account with an active subscription. If you don’t have an Azure account, register for free and sign up for a pay-as-you-go subscription.
- An Azure Quantum workspace. For more information, see Create an Azure Quantum workspace.
To develop and run your circuits in Visual Studio Code, you also need:
A Python environment with Python and Pip installed.
VS Code with the Azure Quantum Development Kit, Python, and Jupyter extensions installed.
The Azure Quantum
qsharp,azure-quantum, andipykernelpackages.python -m pip install --upgrade qsharp azure-quantum ipykernel
Create a new Jupyter Notebook
You can create a notebook in VS Code or directly in the Azure Quantum portal.
- Log in to the Azure portal and select the workspace from the previous step.
- In the left blade, select Notebooks.
- Click My Notebooks and click Add New.
- In Kernel Type, select IPython.
- Type a name for the file, and click Create file.
When your new Notebook opens, it automatically creates the code for the first cell, based on your subscription and workspace information.
from azure.quantum import Workspace
workspace = Workspace (
    resource_id = "", # Your resource_id
    location = ""  # Your workspace location (for example, "westus")
)

Submit QIR-formatted circuits
Quantum Intermediate Representation (QIR) is an intermediate representation which serves as a common interface between quantum programming languages/frameworks and targeted quantum computation platforms. For more information, see Quantum Intermediate Representation.
Create the QIR circuit. For example, the following code creates a simple entanglement circuit.
QIR_routine = """%Result = type opaque
%Qubit = type opaque

define void @ENTRYPOINT__main() #0 {
  call void @__quantum__qis__h__body(%Qubit* inttoptr (i64 0 to %Qubit*))
  call void @__quantum__qis__cx__body(%Qubit* inttoptr (i64 0 to %Qubit*), %Qubit* inttoptr (i64 1 to %Qubit*))
  call void @__quantum__qis__h__body(%Qubit* inttoptr (i64 2 to %Qubit*))
  call void @__quantum__qis__cz__body(%Qubit* inttoptr (i64 2 to %Qubit*), %Qubit* inttoptr (i64 0 to %Qubit*))
  call void @__quantum__qis__h__body(%Qubit* inttoptr (i64 2 to %Qubit*))
  call void @__quantum__qis__h__body(%Qubit* inttoptr (i64 3 to %Qubit*))
  call void @__quantum__qis__cz__body(%Qubit* inttoptr (i64 3 to %Qubit*), %Qubit* inttoptr (i64 1 to %Qubit*))
  call void @__quantum__qis__h__body(%Qubit* inttoptr (i64 3 to %Qubit*))
  call void @__quantum__qis__mz__body(%Qubit* inttoptr (i64 2 to %Qubit*), %Result* inttoptr (i64 0 to %Result*)) #1
  call void @__quantum__qis__mz__body(%Qubit* inttoptr (i64 3 to %Qubit*), %Result* inttoptr (i64 1 to %Result*)) #1
  call void @__quantum__rt__tuple_record_output(i64 2, i8* null)
  call void @__quantum__rt__result_record_output(%Result* inttoptr (i64 0 to %Result*), i8* null)
  call void @__quantum__rt__result_record_output(%Result* inttoptr (i64 1 to %Result*), i8* null)
  ret void
}

declare void @__quantum__qis__ccx__body(%Qubit*, %Qubit*, %Qubit*)
declare void @__quantum__qis__cx__body(%Qubit*, %Qubit*)
declare void @__quantum__qis__cy__body(%Qubit*, %Qubit*)
declare void @__quantum__qis__cz__body(%Qubit*, %Qubit*)
declare void @__quantum__qis__rx__body(double, %Qubit*)
declare void @__quantum__qis__rxx__body(double, %Qubit*, %Qubit*)
declare void @__quantum__qis__ry__body(double, %Qubit*)
declare void @__quantum__qis__ryy__body(double, %Qubit*, %Qubit*)
declare void @__quantum__qis__rz__body(double, %Qubit*)
declare void @__quantum__qis__rzz__body(double, %Qubit*, %Qubit*)
declare void @__quantum__qis__h__body(%Qubit*)
declare void @__quantum__qis__s__body(%Qubit*)
declare void @__quantum__qis__s__adj(%Qubit*)
declare void @__quantum__qis__t__body(%Qubit*)
declare void @__quantum__qis__t__adj(%Qubit*)
declare void @__quantum__qis__x__body(%Qubit*)
declare void @__quantum__qis__y__body(%Qubit*)
declare void @__quantum__qis__z__body(%Qubit*)
declare void @__quantum__qis__swap__body(%Qubit*, %Qubit*)
declare void @__quantum__qis__mz__body(%Qubit*, %Result* writeonly) #1
declare void @__quantum__rt__result_record_output(%Result*, i8*)
declare void @__quantum__rt__array_record_output(i64, i8*)
declare void @__quantum__rt__tuple_record_output(i64, i8*)

attributes #0 = { "entry_point" "output_labeling_schema" "qir_profiles"="base_profile" "required_num_qubits"="4" "required_num_results"="2" }
attributes #1 = { "irreversible" }

; module flags

!llvm.module.flags = !{!0, !1, !2, !3}

!0 = !{i32 1, !"qir_major_version", i32 1}
!1 = !{i32 7, !"qir_minor_version", i32 0}
!2 = !{i32 1, !"dynamic_qubit_management", i1 false}
!3 = !{i32 1, !"dynamic_result_management", i1 false}
"""
Create a
submit_qir_jobhelper function to submit the QIR circuit to a target. Note that the input and output data formats are specified asqir.v1andmicrosoft.quantum-results.v1, respectively.# Submit the job with proper input and output data formats def submit_qir_job(target, input, name, count=100): job = target.submit( input_data=input, input_data_format="qir.v1", output_data_format="microsoft.quantum-results.v1", name=name, input_params = { "entryPoint": "ENTRYPOINT__main", "arguments": [], "count": count } ) print(f"Queued job: {job.id}") job.wait_until_completed() print(f"Job completed with state: {job.details.status}") #if job.details.status == "Succeeded": result = job.get_results() return resultSelect a target and submit the QIR circuit to Azure Quantum. For example, to submit the QIR circuit to the IonQ simulator target:
target = workspace.get_targets(name="ionq.simulator")
result = submit_qir_job(target, QIR_routine, "QIR routine")
result
{'Histogram': ['(0, 0)', 0.5, '(1, 1)', 0.5]}
Submit a circuit with a provider-specific format to Azure Quantum
Besides QIR languages, such as Q# or Qiskit, you can submit quantum circuits in provider-specific formats to Azure Quantum. Each provider has its own format for representing quantum circuits.
Submit a circuit to IonQ using JSON format
Create a quantum circuit using the language-agnostic JSON format supported by the IonQ targets, as described in the IonQ API documentation. For example, the following sample creates a superposition between three qubits:
circuit = {
    "qubits": 3,
    "circuit": [
        {
        "gate": "h",
        "target": 0
        },
        {
        "gate": "cnot",
        "control": 0,
        "target": 1
        },
        {
        "gate": "cnot",
        "control": 0,
        "target": 2
        },
    ]
}
Submit the circuit to the IonQ target. The following example uses the IonQ simulator, which returns a
Jobobject.target = workspace.get_targets(name="ionq.simulator") job = target.submit(circuit)Wait until the job is complete and then fetch the results.
results = job.get_results()
print(results)
..... {'duration': 8240356, 'histogram': {'0': 0.5, '7': 0.5}}You can then visualize the results using Matplotlib.
import pylab as pl
pl.rcParams["font.size"] = 16
hist = {format(n, "03b"): 0 for n in range(8)}
hist.update({format(int(k), "03b"): v for k, v in results["histogram"].items()})
pl.bar(hist.keys(), hist.values())
pl.ylabel("Probabilities")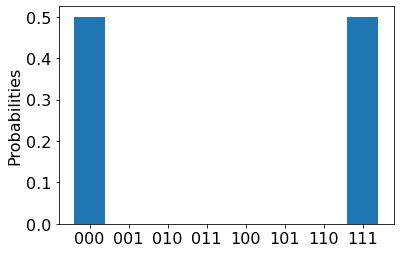
Before running a job on the QPU, you should estimate how much it will cost to run.
Note
For the most current pricing details, see IonQ Pricing, or find your workspace and view pricing options in the "Provider" tab of your workspace via: aka.ms/aq/myworkspaces.
Submit a circuit to PASQAL using Pulser SDK
To submit a circuit to PASQAL, you can use the Pulser SDK to create pulse sequences and submit them to the PASQAL target.
Install the Pulser SDK
Pulser is a framework for composing, simulating and executing pulse sequences for neutral-atom quantum devices. It's designed by PASQAL as a pass-through to submit quantum experiments to their quantum processors. For more information, see Pulser documentation.
To submit the pulse sequences, first install the Pulser SDK packages:
try:
    import pulser
except ImportError:
    !pip -q install pulser
Create a quantum register
First, you create a 'devices' object to import the PASQAL quantum computer target, Fresnel. Fresnel QPU provides predefined trap layouts that you can utilize to create your quantum register. To configure your quantum registers, you arrange an array of qubits.
from pulser_pasqal import PasqalCloud

devices = PasqalCloud().fetch_available_devices()
QPU = devices["FRESNEL"]

# List all available calibrated register layouts
for calibrated_register_layout in QPU.calibrated_register_layouts.keys():
    print(calibrated_register_layout)
Next, you define the layout for your qubit register. In this example, you use a
TriangularLatticeLayout(61, 5.0µm)as the trap layout.layout = QPU.calibrated_register_layouts[ "TriangularLatticeLayout(61, 5.0µm)" ] layout.draw()The following image shows the display of the chosen layout.

Then, you define the qubit register selecting a set of traps from the layout. In this example, the layout has 60 traps and you select 7 traps using their ids to define a quantum register of 7 qubits.
reg = layout.define_register(*[30, 21, 26, 35, 39, 34, 25])
reg.draw()
The following image shows the final display of the qubit register.

Write a pulse sequence
The neutral atoms are controlled with laser pulses. The Pulser SDK allows you to create pulse sequences to apply to the quantum register.
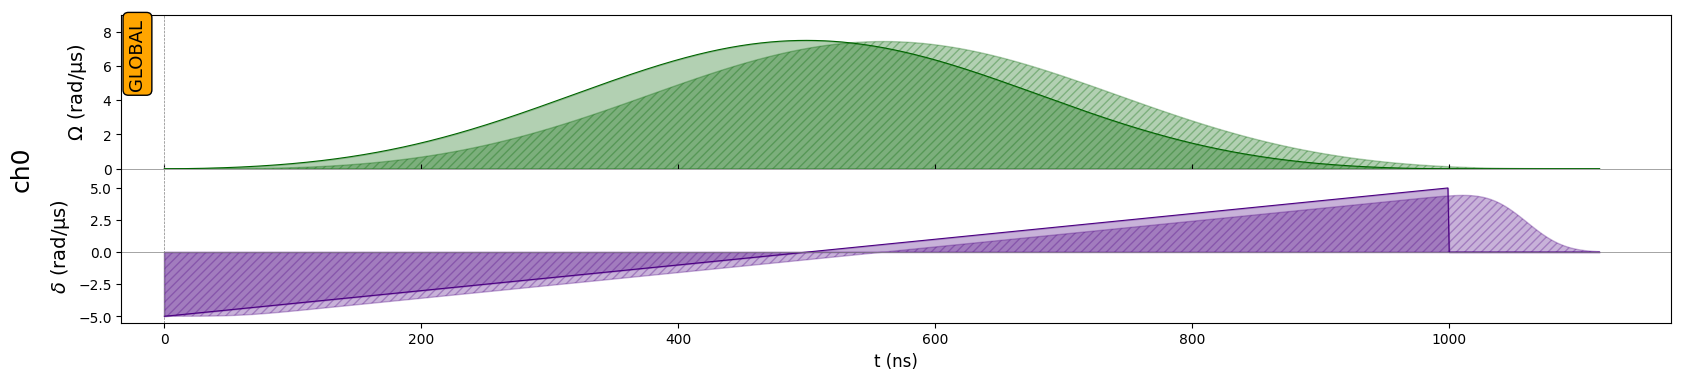
First, you define the pulse sequence attributes by declaring the channels that will be used to control the atoms. To create a
Sequence, you need to provide aRegisterinstance along with the device where the sequence will be executed. For example, the following code declares one channel:ch0.Note
You can use the
QPU = devices["FRESNEL"]device or import a virtual device from Pulser for more flexibility. The use of aVirtualDeviceallows for sequence creation that is less constrained by device specifications, making it suitable for execution on an emulator. For more information, see Pulser documentation.from pulser import Sequence seq = Sequence(reg, QPU) # print the available channels for your sequence print(seq.available_channels) # Declare a channel. In this example we will be using `rydberg_global` seq.declare_channel("ch0", "rydberg_global")Add pulses to your sequence. To do so, you create and add pulses to the channels you declared. For example, the following code creates a pulse and adds it to channel
ch0.from pulser import Pulse from pulser.waveforms import RampWaveform, BlackmanWaveform import numpy as np amp_wf = BlackmanWaveform(1000, np.pi) det_wf = RampWaveform(1000, -5, 5) pulse = Pulse(amp_wf, det_wf, 0) seq.add(pulse, "ch0") seq.draw()The following image shows the pulse sequence.
Convert the sequence to a JSON string
To submit the pulse sequences, you need to convert the Pulser objects into a JSON string that can be used as input data.
import json

# Convert the sequence to a JSON string
def prepare_input_data(seq):
    input_data = {}
    input_data["sequence_builder"] = json.loads(seq.to_abstract_repr())
    to_send = json.dumps(input_data)
    return to_send
Submit the pulse sequence to PASQAL target
First, you need to set the proper input and output data formats. For example, the following code sets the input data format to
pasqal.pulser.v1and the output data format topasqal.pulser-results.v1.# Submit the job with proper input and output data formats def submit_job(target, seq, shots): job = target.submit( input_data=prepare_input_data(seq), # Take the JSON string previously defined as input data input_data_format="pasqal.pulser.v1", output_data_format="pasqal.pulser-results.v1", name="PASQAL sequence", shots=shots # Number of shots ) print(f"Queued job: {job.id}") return jobNote
The time required to run a job on the QPU depends on current queue times. You can view the average queue time for a target by selecting the Providers blade of your workspace.
Submit the program to PASQAL. Before submitting your code to real quantum hardware, you can test your code using the emulator
pasqal.sim.emu-tnas a target.target = workspace.get_targets(name="pasqal.sim.emu-tn") # Change to "pasqal.qpu.fresnel" to use Fresnel QPU job = submit_job(target, seq, 10) job.wait_until_completed() print(f"Job completed with state: {job.details.status}") result = job.get_results() print(result){ "1000000": 3, "0010000": 1, "0010101": 1 }
Explore Advanced Emulator Features
PASQAL's emulator offers advanced features that are not yet supported by Fresnel QPU. You can organize your register in a custom way without any limitations from the pre-calibrated layouts. For example, the following code creates a 4x4 square lattice of qubits:
import numpy as np
from pulser import Register, Sequence

L = 4
square = np.array([[i, j] for i in range(L) for j in range(L)], dtype=float)
square -= np.mean(square, axis=0)
square *= 5

qubits = dict(enumerate(square))
custom_reg = Register(qubits)
custom_reg.draw()

seq = Sequence(custom_reg, QPU)

After defining a custom register, you can follow the exact same steps outlined in the previous section to send a specified sequence on our emulator.
Note
Custom register feature will soon be available on FRESNEL.
Submit a circuit to Quantinuum using OpenQASM
Create a quantum circuit in the OpenQASM representation. For example, the following example creates a Teleportation circuit:
circuit = """OPENQASM 2.0;
include "qelib1.inc";
qreg q[3];
creg c0[3];
h q[0];
cx q[0], q[1];
cx q[1], q[2];
measure q[0] -> c0[0];
measure q[1] -> c0[1];
measure q[2] -> c0[2];
"""
Optionally, you can load the circuit from a file:
with open("my_teleport.qasm", "r") as f:
    circuit = f.read()
Submit the circuit to the Quantinuum target. The following example uses the Quantinuum API validator, which returns a
Jobobject.target = workspace.get_targets(name="quantinuum.sim.h1-1sc") job = target.submit(circuit, shots=500)Wait until the job is complete and then fetch the results.
results = job.get_results()
print(results)
........ {'c0': ['000', '000', '000', '000', '000', '000', '000', ... ]}You can then visualize the results using Matplotlib.
import pylab as pl
pl.hist(results["c0"])
pl.ylabel("Counts")
pl.xlabel("Bitstring")
Looking at the histogram, you may notice that the random number generator returned 0 every time, which is not very random. This is because that, while the API Validator ensures that your code will run successfully on Quantinuum hardware, it also returns 0 for every quantum measurement. For a true random number generator, you need to run your circuit on quantum hardware.
Before running a job on the QPU, you should estimate how much it will cost to run.
Note
For the most current pricing details, see Azure Quantum pricing, or find your workspace and view pricing options in the "Provider" tab of your workspace via: aka.ms/aq/myworkspaces.
Submit a circuit to Rigetti using Quil
The easiest way to submit Quil jobs is using the pyquil-for-azure-quantum package, as it allows you to use the tools and documentation of the pyQuil library. Without this package, pyQuil can be used to construct Quil programs but not to submit them to Azure Quantum.
You can also construct Quil programs manually and submit them using the azure-quantum package directly.
First, load the required imports.
from pyquil.gates import CNOT, MEASURE, H
from pyquil.quil import Program
from pyquil.quilbase import Declare
from pyquil_for_azure_quantum import get_qpu, get_qvm
Use the
get_qvmorget_qpufunction to get a connection to the QVM or QPU.qc = get_qvm() # For simulation # qc = get_qpu("Ankaa-9Q-3") for submitting to a QPUCreate a Quil program. Any valid Quil program is accepted, but the readout must be named
ro.program = Program( Declare("ro", "BIT", 2), H(0), CNOT(0, 1), MEASURE(0, ("ro", 0)), MEASURE(1, ("ro", 1)), ).wrap_in_numshots_loop(5) # Optionally pass to_native_gates=False to .compile() to skip the compilation stage result = qc.run(qc.compile(program)) data_per_shot = result.readout_data["ro"]Here,
data_per_shotis anumpyarray, so you can usenumpymethods.assert data_per_shot.shape == (5, 2) ro_data_first_shot = data_per_shot[0] assert ro_data_first_shot[0] == 1 or ro_data_first_shot[0] == 0Print out all the data.
print("Data from 'ro' register:")
for i, shot in enumerate(data_per_shot):
    print(f"Shot {i}: {shot}")
Important
Submitting multiple circuits on a single job is currently not supported. As a workaround you can call the backend.run method to submit each circuit asynchronously, then fetch the results of each job. For example:
jobs = []
for circuit in circuits:
    jobs.append(backend.run(circuit, shots=N))

results = []
for job in jobs:
    results.append(job.result())