إشعار
يتطلب الوصول إلى هذه الصفحة تخويلاً. يمكنك محاولة تسجيل الدخول أو تغيير الدلائل.
يتطلب الوصول إلى هذه الصفحة تخويلاً. يمكنك محاولة تغيير الدلائل.
في هذا التشغيل السريع، تتعلم كيفية استخدام ذاكرة التخزين المؤقت Azure Managed Redis من تطبيق Node.js مكتوب بلغة TypeScript ومصادقة اتصال Redis باستخدام معرف Microsoft Entra.
المتطلبات الأساسية
اشتراك Azure - إنشاء اشتراك مجاني
تثبيت Node.js LTS
تثبيت TypeScript
أضف الحزم المستخدمة في هذا التشغيل السريع إلى مشروعك:
npm install redis @redis/entraid @redis/clientالمصادقة على Azure لبيئة التطوير الخاصة بك باستخدام Azure CLI:
az login
يتوفر نموذج التعليمات البرمجية للبدء السريع في هذه المقالة على GitHub.
إنشاء مثيل Azure Managed Redis
أولا، قم بإنشاء ذاكرة تخزين مؤقت Azure Managed Redis في مدخل Microsoft Azure.
عند إنشاء ذاكرة التخزين المؤقت، يتم تمكين مصادقة معرف Microsoft Entra بشكل افتراضي، مما يجعلها آمنة من البداية. بالنسبة لهذا التشغيل السريع، تستخدم ذاكرة التخزين المؤقت نقطة نهاية عامة. في الإنتاج، ضع في اعتبارك استخدام نقاط النهاية الخاصة وعناصر التحكم الأخرى في الشبكة.
- لإنشاء ذاكرة تخزين مؤقت باستخدام المدخل، اتبع أحد الإجراءات التالية:
-
اختياريا، يمكنك إنشاء ذاكرة تخزين مؤقت باستخدام Azure CLI أو PowerShell أو أي أداة تفضلها.
رمز للاتصال بذاكرة التخزين المؤقت Redis
في الجزء الأول من نموذج ملف التعليمات البرمجية TypeScript ، index.tsقم بتكوين اتصالك بذاكرة التخزين المؤقت:
import { DefaultAzureCredential } from '@azure/identity';
import { EntraIdCredentialsProviderFactory, REDIS_SCOPE_DEFAULT } from '@redis/entraid';
import { createCluster, RedisClusterType, RedisModules, RedisFunctions, RedisScripts } from '@redis/client';
import * as net from 'node:net';

const redisEndpoint = process.env.REDIS_ENDPOINT!;
if (!redisEndpoint) {
    console.error('REDIS_ENDPOINT is not set. It should look like: `cache-name.region-name.redis.azure.net:<PORT>`. Find the endpoint in the Azure portal.');
    process.exit(1);
}

const [redisHostName, _] = redisEndpoint.split(":");

let client;

function createRedisClient(): RedisClusterType<RedisModules, RedisFunctions, RedisScripts>  {

    const credential = new DefaultAzureCredential();

    const provider = EntraIdCredentialsProviderFactory.createForDefaultAzureCredential({
        credential,
        scopes: REDIS_SCOPE_DEFAULT,
        options: {},
        tokenManagerConfig: {
            expirationRefreshRatio: 0.8
        }
    });

    const client = createCluster<RedisModules, RedisFunctions, RedisScripts>({
        rootNodes: [{ url: `rediss://${redisEndpoint}` }],
        defaults: {
            credentialsProvider: provider,
            socket: {
                connectTimeout: 15000,
                tls: true,

                // This quickstart code uses a fail fast `reconnectStrategy` which
                // is suitable only in sample code. The purpose is to quickly
                // demonstrate the functionality without getting stuck in
                // reconnection loops if your endpoint or authentication is not
                // correctly configured. In production code, a more robust
                // `reconnectStrategy` should be implemented.
                reconnectStrategy: () => new Error('Failure to connect')
            }

        },
        nodeAddressMap(incomingAddress) {
            const [hostNameOrIP, port] = incomingAddress.split(":");

            const address =
                net.isIP(hostNameOrIP) !== 0
                    ? redisHostName
                    : hostNameOrIP;

            return {
                host: address,
                port: Number(port),
            };
        }

    });

    client.on('error', (err) => console.error('Redis cluster error:', err));

    return client;
}
استخدم هذه createRedisClient() الوظيفة لإنشاء اتصال عميل node-redis مع ذاكرة Redis المؤقتة.
client = createRedisClient();
await client.connect();
رمز لاختبار اتصال
في القسم التالي، اختبر الاتصال باستخدام الأمر Redis PING . إرجاع PONGخادم Redis .
const pingResult = await client.ping();
console.log('Ping result:', pingResult);
رمز تعيين مفتاح ، والحصول على مفتاح
في هذا القسم ، استخدم SET والأوامر GET لبدء كتابة البيانات وقراءتها في ذاكرة التخزين المؤقت Redis بأبسط طريقة.
const setResult = await client.set("Message", "Hello! The cache is working from Node.js!");
console.log('Set result:', setResult);

const getResult = await client.get("Message");
console.log('Get result:', getResult);
تشغيل التعليمات البرمجية
إنشاء وتشغيل تطبيق Node.js.
tsc
node index.js
تبدو النتيجة كما يلي:
Ping result: PONG
Set result: OK
Get result: Hello! The cache is working from Node.js!
هنا ، يمكنك رؤية نموذج التعليمات البرمجية هذا بالكامل.
import { DefaultAzureCredential } from '@azure/identity';
import { EntraIdCredentialsProviderFactory, REDIS_SCOPE_DEFAULT } from '@redis/entraid';
import { createCluster, RedisClusterType, RedisModules, RedisFunctions, RedisScripts } from '@redis/client';
import * as net from 'node:net';

const redisEndpoint = process.env.REDIS_ENDPOINT!;
if (!redisEndpoint) {
    console.error('REDIS_ENDPOINT is not set. It should look like: `cache-name.region-name.redis.azure.net:<PORT>`. Find the endpoint in the Azure portal.');
    process.exit(1);
}

const [redisHostName, _] = redisEndpoint.split(":");

let client;

function createRedisClient(): RedisClusterType<RedisModules, RedisFunctions, RedisScripts>  {

    const credential = new DefaultAzureCredential();

    const provider = EntraIdCredentialsProviderFactory.createForDefaultAzureCredential({
        credential,
        scopes: REDIS_SCOPE_DEFAULT,
        options: {},
        tokenManagerConfig: {
            expirationRefreshRatio: 0.8
        }
    });

    const client = createCluster<RedisModules, RedisFunctions, RedisScripts>({
        rootNodes: [{ url: `rediss://${redisEndpoint}` }],
        defaults: {
            credentialsProvider: provider,
            socket: {
                connectTimeout: 15000,
                tls: true,

                // This quickstart code uses a fail fast `reconnectStrategy` which
                // is suitable only in sample code. The purpose is to quickly
                // demonstrate the functionality without getting stuck in
                // reconnection loops if your endpoint or authentication is not
                // correctly configured. In production code, a more robust
                // `reconnectStrategy` should be implemented.
                reconnectStrategy: () => new Error('Failure to connect')
            }

        },
        nodeAddressMap(incomingAddress) {
            const [hostNameOrIP, port] = incomingAddress.split(":");

            const address =
                net.isIP(hostNameOrIP) !== 0
                    ? redisHostName
                    : hostNameOrIP;

            return {
                host: address,
                port: Number(port),
            };
        }

    });

    client.on('error', (err) => console.error('Redis cluster error:', err));

    return client;
}

try {

    client = createRedisClient();

    await client.connect();

    const pingResult = await client.ping();
    console.log('Ping result:', pingResult);

    const setResult = await client.set("Message", "Hello! The cache is working from Node.js!");
    console.log('Set result:', setResult);

    const getResult = await client.get("Message");
    console.log('Get result:', getResult);

} catch (err) {
    console.error('Error:', err);
} finally {
    if (client) {
        try {
            await client.quit();
        } catch (quitErr) {
            console.error('Error occurred while quitting Redis client:', quitErr);

        }
    }
}
تنظيف الموارد
إذا كنت تريد الاستمرار في استخدام الموارد التي قمت بإنشائها في هذه المقالة، فاحتفظ بمجموعة الموارد.
وإلا، إذا انتهيت من الموارد، يمكنك حذف مجموعة موارد Azure التي قمت بإنشائها لتجنب الرسوم.
هام
حذف مجموعة الموارد لا يمكن التراجع عنه. عند حذف مجموعة موارد، يتم حذف كافة الموارد الموجودة فيها نهائيًا. تأكد من عدم حذف مجموعة الموارد أو الموارد الخاطئة عن طريق الخطأ. إذا قمت بإنشاء الموارد داخل مجموعة موارد موجودة تحتوي على الموارد التي تريد الاحتفاظ بها، يمكنك حذف كل مورد على حدة بدلا من حذف مجموعة الموارد.
لحذف مجموعة موارد
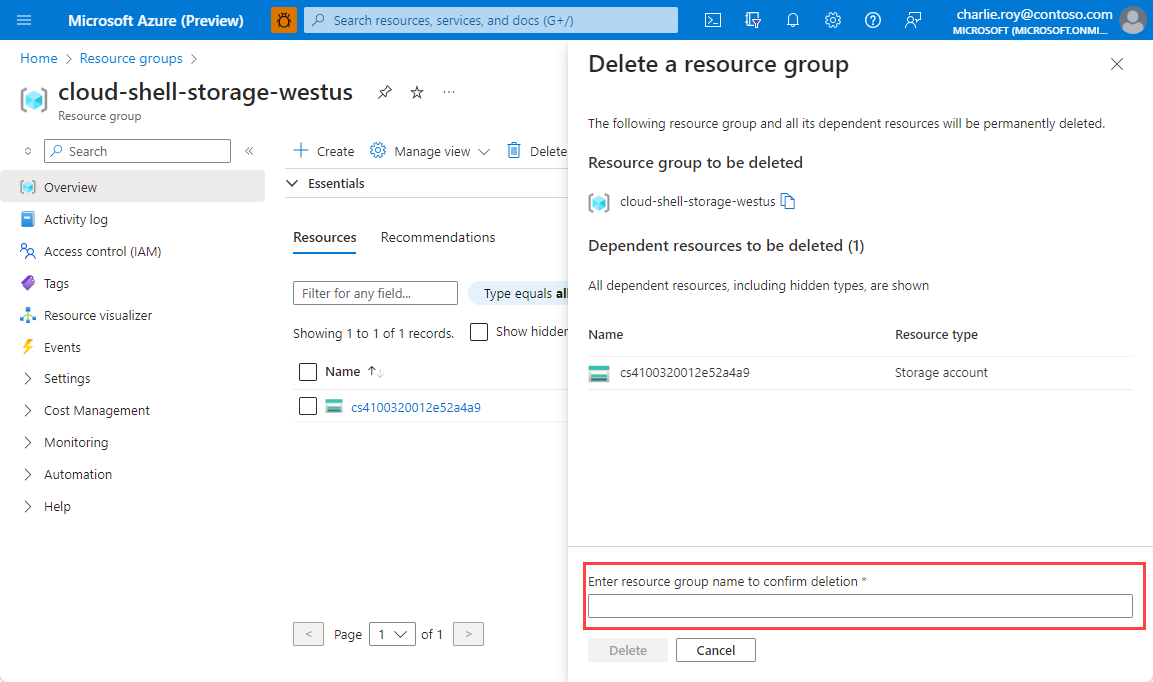
سجل الدخول إلى مدخل Azure، وحدد "Resource groups".
حدد مجموعة الموارد التي تريد حذفها.
إذا كان هناك العديد من مجموعات الموارد، فاستخدم المربع تصفية لأي حقل... ، واكتب اسم مجموعة الموارد التي أنشأتها لهذه المقالة. حدد مجموعة الموارد في قائمة النتائج.

حدد Delete resource group.
يُطلب منك تأكيد حذف مجموعة الموارد. اكتب اسم مجموعة الموارد لتأكيده، واختر "Delete".
بعد مرور لحظات قليلة، يتم حذف مجموعة الموارد وجميع مواردها.