مشاركة عبر


Quickstart: إنشاء تطبيق بايثون باستخدام Azure Managed Redis

في هذا المقال، تتعلم كيفية استخدام ذاكرة تخزين مؤقت Azure Managed Redis مع لغة بايثون والاتصال باستخدام Microsoft Entra ID.

المتطلبات الأساسية

  • اشتراك Azure - إنشاء اشتراك مجاني
  • قم بتثبيت بيئة لغة Python 3.7+
  • أضف هذه الواردات من إلى مشروعك وإلى بيئة التطوير الخاصة بك
    • redis - عميل Redis Python
    • redis-entraid - ملحق مصادقة معرف Redis Microsoft Entra
    • azure-identity - مكتبة مصادقة Azure

إنشاء مثيل Azure Managed Redis

أولا، قم بإنشاء ذاكرة تخزين مؤقت. يمكنك إنشاء ذاكرة تخزين مؤقت باستخدام Azure Managed Redis أو Azure Cache for Redis باستخدام مدخل Microsoft Azure. في هذا التشغيل السريع، نستخدم Azure Managed Redis.

عند إنشاء ذاكرة التخزين المؤقت، يتم تمكين معرف Microsoft Entra افتراضيا مما يجعله آمنا من البداية. يجب أن تستخدم ذاكرة التخزين المؤقت أيضا نقطة نهاية عامة لهذا التشغيل السريع.

لإنشاء ذاكرة تخزين مؤقت باستخدام المدخل، اتبع أحد الإجراءات التالية:

اختياريا، يمكنك إنشاء ذاكرة تخزين مؤقت باستخدام Azure CLI وPowerShell، أيهما تفضل.

التعليمات البرمجية للاتصال بذاكرة التخزين المؤقت Redis

في الجزء الأول من نموذج التعليمات البرمجية، قم بتعيين اتصالك بذاكرة التخزين المؤقت.

  • منافذ Azure Managed Redis وذاكرة التخزين المؤقت للمؤسسة: 10000
  • منافذ Azure Cache لمثيلات Redis: 6380
import redis
from azure.identity import DefaultAzureCredential
from redis_entraid.cred_provider import create_from_default_azure_credential

# Connection details for your cache
# Get the connection details for the Redis instance
redis_host = "contosob116.westus3.redis.azure.net"
redis_port = 10000  #For an Azure 

print("🚀 Starting Azure Redis Cache connection test...")
print(f"📡 Connecting to: {redis_host}:{redis_port}")

# Validate configuration
if not redis_host or not redis_port:
    print("❌ Error: Redis host and port must be configured")
    exit(1)

print()  # Add a new line

try:
    # Create credential provider using DefaultAzureCredential for Azure Entra ID authentication
    credential_provider = create_from_default_azure_credential(
         ("https://redis.azure.com/.default",),)

    # Create a Redis client with Azure Entra ID authentication
    r = redis.Redis(host=redis_host, 
                    port=redis_port, 
                    ssl=True, 
                    decode_responses=True, 
                    credential_provider=credential_provider,
                    socket_timeout=10,
                    socket_connect_timeout=10
                    )

التعليمات البرمجية لاختبار اتصال

في القسم التالي، اختبر الاتصال باستخدام الأمر ping Redis الذي يرجع القيمة True .

# Ping the Redis server to test the connection
result = r.ping()
if result:
    print("Ping returned: ", result)

التعليمات البرمجية تعيين مفتاح، والحصول على مفتاح

في هذا القسم، استخدم أساسي set وتسلسل get لبدء استخدام ذاكرة التخزين المؤقت Redis في أبسط طريقة للبدء.

    # Create a simple set and get operation
    result = r.set("Message", "Hello, The cache is working with Python!")
    print("✅ SET Message succeeded: " + str(result))
    print()  # Add a new line

    value = r.get("Message")

    if value is not None:
        print("✅ GET Message returned : " + str(value))
        print()  # Add a new line
    else:
        print("⚠️  GET Message returned None")
        print()  # Add a new line
    
    print("🎉 All Redis operations completed successfully!")
    print()  # Add a new line

قبل أن تتمكن من تشغيل هذا الرمز ، يجب عليك إضافة نفسك كمستخدم Redis إلى ذاكرة التخزين المؤقت.

يجب عليك أيضا تخويل الاتصال ب Azure من سطر الأوامر باستخدام سطر أوامر Azure أو سطر أوامر مطور Azure (azd).

يجب أيضا إضافة مستخدمين أو أساس نظام إلى ذاكرة التخزين المؤقت. أضف أي شخص قد يقوم بتشغيل البرنامج كمستخدم على ذاكرة التخزين المؤقت Redis.

والنتيجة تبدو كما يلي:

C:\utils\python-quickstart>python quickstart-amr.py
🚀 Starting Azure Redis Cache connection test...
📡 Connecting to: contosob116.westus3.redis.azure.net:10000

✅ Ping returned : True

✅ SET Message succeeded: True

✅ GET Message returned : Hello, The cache is working with Python!

🎉 All Redis operations completed successfully!

🔐 Redis connection closed

هنا، يمكنك مشاهدة نموذج التعليمات البرمجية هذا بالكامل. يحتوي الكود على بعض التحقق من الأخطاء التي تم حذفها من تفسيرات التعليمات البرمجية السابقة من أجل البساطة. الخطوة الأخيرة هي إغلاق الاتصال بذاكرة التخزين المؤقت.

# Python Quickstart using Azure Entra ID authentication
# Azure Managed Redis cache that you created using the Azure portal, or CLI
# This script demonstrates secure connection using Microsoft Entra ID authentication
# This script demonstrates secure connection using the default Azure credential provider
# You should be a user on the cache and logged in to Azure CLI with the same account using `az login`

import redis
from azure.identity import DefaultAzureCredential
from redis_entraid.cred_provider import create_from_default_azure_credential

# Connection details for your cache
# Get the connection details for the Redis instance
redis_host = "<host-url>"  # Replace with your cache info
redis_port = <port number>  # Replace with your cache info 

print("🚀 Starting Azure Redis Cache connection test...")
print(f"📡 Connecting to: {redis_host}:{redis_port}")

# Validate configuration
if not redis_host or not redis_port:
    print("❌ Error: Redis host and port must be configured")
    exit(1)

print()  # Add a new line

try:
    # Create credential provider using DefaultAzureCredential for Azure Entra ID authentication
    credential_provider = create_from_default_azure_credential(
         ("https://redis.azure.com/.default",),)

    # Create a Redis client with Azure Entra ID authentication
    r = redis.Redis(host=redis_host, 
                    port=redis_port, 
                    ssl=True, 
                    decode_responses=True, 
                    credential_provider=credential_provider,
                    socket_timeout=10,
                    socket_connect_timeout=10
                    )

    # Test connection 
    result = r.ping()
    print("✅ Ping returned : " + str(result))
    print()  # Add a new line

    # Create a simple set and get operation
    result = r.set("Message", "Hello, The cache is working with Python!")
    print("✅ SET Message succeeded: " + str(result))
    print()  # Add a new line

    value = r.get("Message")

    if value is not None:
        print("✅ GET Message returned : " + str(value))
        print()  # Add a new line
    else:
        print("⚠️  GET Message returned None")
        print()  # Add a new line
    
    print("🎉 All Redis operations completed successfully!")
    print()  # Add a new line

except redis.ConnectionError as e:
    print(f"❌ Connection error: {e}")
    print("💡 Check if Redis host and port are correct, and ensure network connectivity")
    print()  # Add a new line
except redis.AuthenticationError as e:
    print(f"❌ Authentication error: {e}")
    print("💡 Check if Azure Entra ID authentication is properly configured")
    print()  # Add a new line
except redis.TimeoutError as e:
    print(f"❌ Timeout error: {e}")
    print("💡 Check network latency and Redis server performance")
    print()  # Add a new line
except Exception as e:
    print(f"❌ Unexpected error: {e}")
    if "999" in str(e):
        print("💡 Error 999 typically indicates a network connectivity issue or firewall restriction")
        print("   - Verify the Redis hostname is correct")
        print("   - Verify that you have logged in with Az CLI")
        print("   - Ensure the Redis cache is running and accessible")
    print()  # Add a new line
finally:
    # Clean up connection if it exists
    if 'r' in locals():
        try:
            r.close()
            print("🔐 Redis connection closed")
        except Exception as e:
            print(f"❌ Error closing connection: {e}")

تنظيف الموارد

إذا كنت تريد الاستمرار في استخدام الموارد التي قمت بإنشائها في هذه المقالة، فاحتفظ بمجموعة الموارد.

وإلا، إذا انتهيت من الموارد، يمكنك حذف مجموعة موارد Azure التي قمت بإنشائها لتجنب الرسوم.

هام

حذف مجموعة الموارد لا يمكن التراجع عنه. عند حذف مجموعة موارد، يتم حذف كافة الموارد الموجودة فيها نهائيًا. تأكد من عدم حذف مجموعة الموارد أو الموارد الخاطئة عن طريق الخطأ. إذا قمت بإنشاء الموارد داخل مجموعة موارد موجودة تحتوي على الموارد التي تريد الاحتفاظ بها، يمكنك حذف كل مورد على حدة بدلا من حذف مجموعة الموارد.

لحذف مجموعة موارد

  1. سجل الدخول إلى مدخل Azure، وحدد "Resource groups".

  2. حدد مجموعة الموارد التي تريد حذفها.

    إذا كان هناك العديد من مجموعات الموارد، فاستخدم المربع تصفية لأي حقل... ، واكتب اسم مجموعة الموارد التي أنشأتها لهذه المقالة. حدد مجموعة الموارد في قائمة النتائج.

    لقطة شاشة تعرض قائمة بمجموعات الموارد المراد حذفها في جزء العمل.

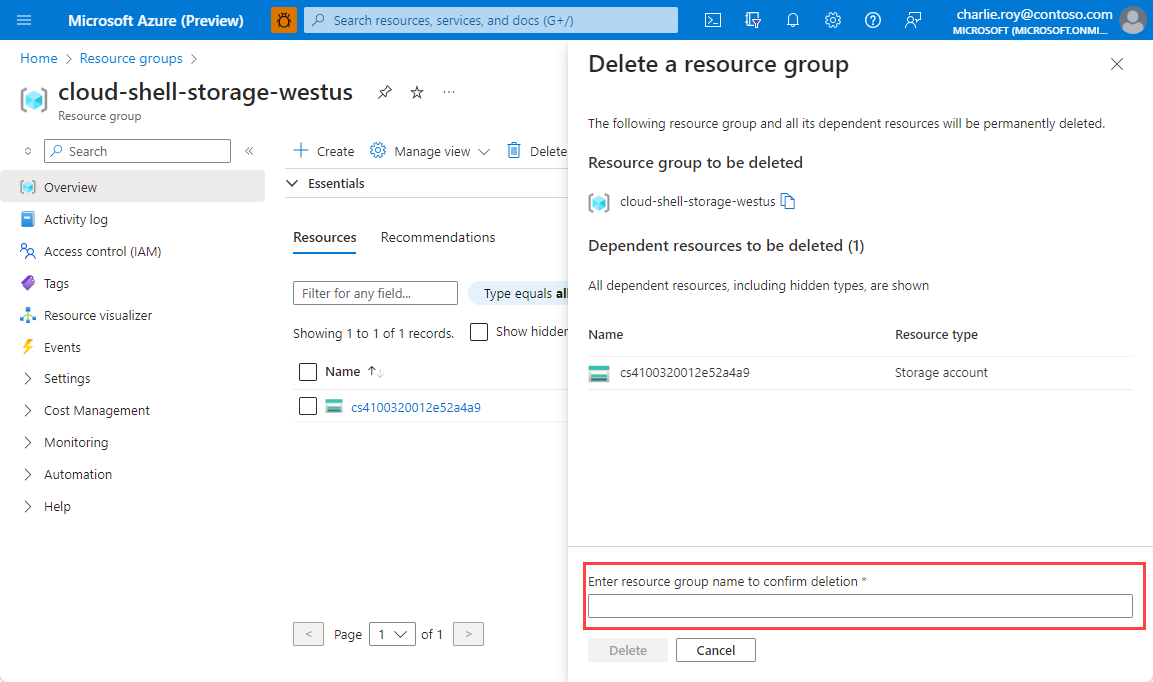
  3. حدد Delete resource group.

  4. يُطلب منك تأكيد حذف مجموعة الموارد. اكتب اسم مجموعة الموارد لتأكيده، واختر "Delete".

    لقطة شاشة تعرض نموذجا يتطلب اسم المورد لتأكيد الحذف.

بعد مرور لحظات قليلة، يتم حذف مجموعة الموارد وجميع مواردها.