إشعار
يتطلب الوصول إلى هذه الصفحة تخويلاً. يمكنك محاولة تسجيل الدخول أو تغيير الدلائل.
يتطلب الوصول إلى هذه الصفحة تخويلاً. يمكنك محاولة تغيير الدلائل.
Fabric Maps are defined by a public definition (map.json) that describes the basemap, data sources, layer sources, and rendering behavior.
This tutorial demonstrates a static data scenario using files stored in a Lakehouse. For real-time streaming scenarios using Eventstream and Eventhouse, see Create a real-time map using REST APIs and Python.
The most reliable way to automate map creation is to provide the map definition inline, so the map is fully configured and ready to render on creation.
For more information about the map definition structure, see Map item definition.
Using the Fabric REST API, you:
- Create a Lakehouse using the Fabric REST API
- Upload a GeoJSON file to OneLake
- Upload a custom SVG marker icon to OneLake
- Build a map.json definition that references Lakehouse data
- Create a map with the definition provided inline
This tutorial follows a common automation pattern in Fabric: create infrastructure → upload data → define visualization → render map.
When to use this approach
This pattern is best for:
- Static geospatial datasets
- Reference layers (for example, points of interest, boundaries)
- Historical or batch-processed data
For scenarios that require continuously updating data (for example, live tracking or telemetry), see Create a real-time map using REST APIs and Python.
Prerequisites
- Python 3.10 or later
- Azure CLI
- Fabric workspace ID
- Permissions to call Fabric REST APIs, such as:
Item.ReadWrite.All
Note
Delegated scopes such as Item.ReadWrite.All are granted to the signed-in identity through its workspace role. Make sure the identity you use with az login is assigned the Contributor, Member, or Admin role on the target Fabric workspace before running the script.
Authentication
This tutorial uses DefaultAzureCredential, which can authenticate using several local/dev credentials sources. For first-time readers, the simplest approach is Azure CLI sign-in.
Authenticate locally (recommended for first run)
- Open a terminal.
- Run:
az login
DefaultAzureCredential can use your signed-in identity to acquire access tokens for:
- Fabric REST APIs (resource:
https://api.fabric.microsoft.com/.default) - OneLake access via ADLS Gen2 APIs and SDKs, including GUID-based addressing for workspaces and items.
Tip
About https://api.fabric.microsoft.com/.default
This value is a token request scope, not a URL that you call directly. It tells Microsoft Entra that the access token should be issued for the Microsoft Fabric REST API and should include all Fabric permissions that are already granted to the authenticated identity (such as Item.ReadWrite.All or Workspace.ReadWrite.All).
The .default scope is used only during token acquisition and is never sent to Fabric REST API endpoints.
For more information about how the .default scope works in the Microsoft identity platform, see Scopes and permissions in the Microsoft identity platform.
Sign in to Microsoft Fabric (recommended)
Before you run this tutorial, we recommend signing in to Microsoft Fabric at least once:
https://app.fabric.microsoft.com
Signing in ensures that your Fabric identity, workspace role membership, and capacity assignments are fully provisioned before acquiring a Microsoft Entra access token programmatically.
This step is especially helpful if:
- You're new to Microsoft Fabric
- The workspace was recently created
- Your role assignment was added recently
Note
This tutorial authenticates using Microsoft Entra ID via DefaultAzureCredential. Fabric REST APIs don't require a browser session, but signing in to the Fabric web experience can prevent first‑run authorization issues caused by delayed role provisioning.
Create the GeoJSON file
The GeoJSON file in this tutorial is used as the map's data layer. Once you create the file, update the local_geojson_path variable to reflect the correct path.
Copy the following GeoJSON into a blank text file, and save the file as starbucks-seattle.geojson:
{
  "type": "FeatureCollection",
  "features": [
    {
      "type": "Feature",
      "properties": { "name": "Starbucks - 999 3rd Ave" },
      "geometry": { "type": "Point", "coordinates": [-122.334389, 47.605278] }
    },
    {
      "type": "Feature",
      "properties": { "name": "Starbucks - 1201 3rd Ave" },
      "geometry": { "type": "Point", "coordinates": [-122.335167, 47.608040] }
    },
    {
      "type": "Feature",
      "properties": { "name": "Starbucks - 221 Pike St" },
      "geometry": { "type": "Point", "coordinates": [-122.340057, 47.609450] }
    },
    {
      "type": "Feature",
      "properties": { "name": "Starbucks - 800 5th Ave" },
      "geometry": { "type": "Point", "coordinates": [-122.330048, 47.604550] }
    },
    {
      "type": "Feature",
      "properties": { "name": "Starbucks - 1420 5th Ave" },
      "geometry": { "type": "Point", "coordinates": [-122.334091, 47.610041] }
    },
    {
      "type": "Feature",
      "properties": { "name": "Starbucks - 1524 7th Ave" },
      "geometry": { "type": "Point", "coordinates": [-122.334915, 47.614498] }
    },
    {
      "type": "Feature",
      "properties": { "name": "Starbucks - 2011 7th Ave" },
      "geometry": { "type": "Point", "coordinates": [-122.338165, 47.616341] }
    },
    {
      "type": "Feature",
      "properties": { "name": "Starbucks - 2001 8th Ave" },
      "geometry": { "type": "Point", "coordinates": [-122.338806, 47.616848] }
    },
    {
      "type": "Feature",
      "properties": { "name": "Starbucks - 4147 University Way NE" },
      "geometry": { "type": "Point", "coordinates": [-122.313873, 47.658298] }
    },
    {
      "type": "Feature",
      "properties": { "name": "Starbucks - 2200 NW Market St" },
      "geometry": { "type": "Point", "coordinates": [-122.384056, 47.668581] }
    },
    {
      "type": "Feature",
      "properties": { "name": "Starbucks - 101 Broadway E" },
      "geometry": { "type": "Point", "coordinates": [-122.320457, 47.620480] }
    },
    {
      "type": "Feature",
      "properties": { "name": "Starbucks - 824 E Pike St" },
      "geometry": { "type": "Point", "coordinates": [-122.320282, 47.614212] }
    },
    {
      "type": "Feature",
      "properties": { "name": "Starbucks - 6501 California Ave SW" },
      "geometry": { "type": "Point", "coordinates": [-122.387016, 47.545376] }
    },
    {
      "type": "Feature",
      "properties": { "name": "Starbucks - 1501 4th Ave" },
      "geometry": { "type": "Point", "coordinates": [-122.336212, 47.610325] }
    },
    {
      "type": "Feature",
      "properties": { "name": "Starbucks - 701 5th Ave" },
      "geometry": { "type": "Point", "coordinates": [-122.330704, 47.604298] }
    },
    {
      "type": "Feature",
      "properties": { "name": "Starbucks - 2344 Eastlake Ave E" },
      "geometry": { "type": "Point", "coordinates": [-122.325874, 47.640884] }
    },
    {
      "type": "Feature",
      "properties": { "name": "Starbucks - 5221 15th Ave NW" },
      "geometry": { "type": "Point", "coordinates": [-122.376595, 47.668210] }
    },
    {
      "type": "Feature",
      "properties": { "name": "Starbucks - 4408 Fauntleroy Way SW" },
      "geometry": { "type": "Point", "coordinates": [-122.377693, 47.564991] }
    },
    {
      "type": "Feature",
      "properties": { "name": "Starbucks - 7303 35th Ave NE" },
      "geometry": { "type": "Point", "coordinates": [-122.290611, 47.682518] }
    },
    {
      "type": "Feature",
      "properties": { "name": "Starbucks - 2742 Alki Ave SW" },
      "geometry": { "type": "Point", "coordinates": [-122.408028, 47.579311] }
    }
  ]
}
Important
Make sure the file path used in local_geojson_path matches where you saved the file on your machine.
Step 1—Create a new Python project file
In this step, you create a blank Python file that you'll build up section-by-section.
Create a new file named:
create_map_from_geojson.py
Open the file in your editor.
Step 2—Install required libraries and add required import statements
In this step, you install the dependencies and add the imports your script uses.
Install required libraries
Run:
pip install httpx azure-identity azure-storage-file-datalake
What each library is for
- httpx: makes HTTP requests to the Fabric REST APIs.
- azure-identity: provides
DefaultAzureCredentialfor Microsoft Entra authentication. - azure-storage-file-datalake: uploads files to OneLake using ADLS Gen2-compatible APIs.
Add import statements to your .py file
At the top of create_map_from_geojson.py, add:
import base64
import json
import os
import time
import uuid
from pathlib import Path

import httpx
from azure.identity import DefaultAzureCredential
from azure.storage.filedatalake import DataLakeServiceClient
Step 3—Add a configuration section
In this step, you define the variables your application uses, including the workspace ID, file paths, and feature toggles.
Centralizing configuration in a single Config class — rather than scattering hard-coded values across functions — gives you three concrete advantages:
- Environment portability: Workspace IDs, file paths, and resource names live in one place, so you can rerun the script against a different workspace or machine by changing a few lines (or an environment variable) instead of hunting through the code.
- Cleaner function signatures: Step functions accept a single
cfgobject instead of long parameter lists, which keeps the orchestration inmain()easy to read. - Safer secrets handling: Sensitive values such as the workspace ID are loaded from environment variables, so they're never committed alongside the script.
Add the following below the import statements:
# =========================================================
# Configuration (centralized)
# =========================================================

class Config:
    """
    Central configuration: workspace ID, file paths, resource names, and
    toggles for the optional custom SVG marker. A single instance is built
    in main() and passed to each step function.
    """
    def __init__(self):
        # Workspace
        self.workspace_id = os.environ.get("FABRIC_WORKSPACE_ID", "")
        if not self.workspace_id:
            raise RuntimeError("Set FABRIC_WORKSPACE_ID environment variable before running the script.")

        # Local file (source) and OneLake destination paths (inside Lakehouse Files/)
        self.local_geojson_path = Path(r"C:\tutorial\starbucks-seattle.geojson")
        self.geojson_relative_path = "Files/vector/starbucks-seattle.geojson"

        # Optional SVG marker settings
        self.svg_relative_path = "Files/icons/starbucks-marker.svg"
        self.use_custom_svg_marker = True
        self.builtin_icon_name_fallback = "BuildingShop"

        # SVG content (kept < 1 MB, scales cleanly)
        self.starbucks_marker_svg = """\
<svg xmlns="http://www.w3.org/2000/svg" width="64" height="64" viewBox="0 0 64 64">
  <path d="M32 2C20.4 2 11 11.4 11 23c0 15.6 18.7 36.6 19.5 37.5a2 2 0 0 0 3 0C34.3 59.6 53 38.6 53 23 53 11.4 43.6 2 32 2z"
        fill="#006241" stroke="#ffffff" stroke-width="2"/>
  <circle cx="32" cy="23" r="13" fill="#ffffff" opacity="0.95"/>
  <path d="M26 20h12v10c0 3-2.5 5-6 5s-6-2-6-5V20z" fill="#006241"/>
</svg>
"""

        # Resource display names / descriptions
        self.lakehouse_display_name = "lh_starbucks_seattle"
        self.lakehouse_description = "Stores Starbucks Seattle GeoJSON + marker icon for a Fabric Maps tutorial"

        self.map_display_name = "My Fabric Map"
        self.map_description = "Created using Fabric Maps REST API"
Set the workspace ID using an environment variable
Instead of hardcoding the workspace ID directly in the script, this tutorial reads it from an environment variable. This keeps environment-specific values out of source code and lets you reuse the script across workspaces or machines without editing it.
Before running the script, create an environment variable named FABRIC_WORKSPACE_ID.
Important
An environment variable set from a terminal exists only inside that single terminal session. It isn't shared with other terminal windows, with a different shell type, or with processes launched outside that terminal—including scripts started from VS Code's run button, which often spawns its own terminal. If the script can't find the variable, it fails with Set FABRIC_WORKSPACE_ID environment variable before running the script.
To avoid this, either run the script from the same terminal session where you set the variable, or set it persistently (see the Windows and macOS/Linux sections that follow) so every new terminal session picks it up automatically.
Set the environment variable on Windows
On Windows, you can set the variable from any terminal that supports environment variables—PowerShell, Windows PowerShell, the PowerShell or Command Prompt windows built into Visual Studio and Visual Studio Code, Windows Terminal, and most other shells.
Run the following in PowerShell or the VS Code integrated terminal:
$env:FABRIC_WORKSPACE_ID="<WORKSPACE_ID>"
To confirm the variable is set:
echo $env:FABRIC_WORKSPACE_ID
This sets the variable for the current terminal session only.
Set a persistent environment variable (Windows)
To make the variable available in future sessions, use either of the following:
- PowerShell (one-liner): Run
setx FABRIC_WORKSPACE_ID "<WORKSPACE_ID>". Thesetxcommand writes to the user environment but doesn't update the current terminal—close and reopen the terminal (or open a new one) before running the script. - GUI:
- Open System Properties.
- Select Advanced system settings.
- Choose Environment Variables.
- Under User variables, select New.
- Enter:
- Name:
FABRIC_WORKSPACE_ID - Value: your workspace ID
- Name:
- Select OK to save.
- Close and reopen your terminal before running the script again.
Set the environment variable on macOS or Linux
On macOS and Linux, you can set the variable from any shell that supports export—Bash, Zsh (the default on modern macOS), Fish (with a slightly different syntax), and the integrated terminals in Visual Studio Code and other editors.
Run:
export FABRIC_WORKSPACE_ID="<WORKSPACE_ID>"
To confirm the variable is set:
echo $FABRIC_WORKSPACE_ID
This sets the variable for the current shell session only.
Set a persistent environment variable (macOS or Linux)
To make the variable available in future sessions, add the export line to your shell profile:
- Zsh (default on macOS):
~/.zshrc - Bash:
~/.bashrc(Linux) or~/.bash_profile(macOS) - Fish: run
set -Ux FABRIC_WORKSPACE_ID "<WORKSPACE_ID>"instead of editing a file
After updating the profile, either open a new terminal or run source ~/.zshrc (or the appropriate file) so the change takes effect.
Note
The geojson_relative_path and svg_relative_path values define the location inside the Lakehouse Files area. These paths are relative to the Lakehouse root and are used both for uploading files and referencing them in the map definition.
Step 4—Add helper functions
In this step, you factor out cross-cutting concerns—authentication, header construction, long-running operation polling, and retryable data-plane uploads—into a small set of reusable helpers that every step function can call.
Centralizing these concerns in helpers — rather than inlining them at every call site — gives you three concrete advantages:
- Single source of truth for cross-cutting concerns: Authentication, headers, and LRO polling are needed by nearly every API call. Centralizing them keeps each step function focused on its own resource instead of re-implementing token acquisition and retry logic.
- Resilience without clutter: Helpers absorb transient conditions—asynchronous provisioning, backend propagation delay, retryable upload failures—so step functions stay short and read like a checklist.
- Easier to teach and modify: Each helper is introduced once and reused. If Fabric changes an LRO pattern or an auth scope, you fix it in one place.
The helpers you add in this step are:
- Auth helpers: build headers for Fabric REST APIs (and Power BI cluster LRO endpoints)
- FabricClient: lightweight wrapper for consistent API calls
- LRO handler: poll long-running operations using
Location/x-ms-operation-id/Retry-After, including200-with-Runningresponses, Power BI cluster endpoints, and status-only completion payloads (resolves bydisplayName) - Definition payload helper: base64-encode
map.jsonfor inline definitions - OneLake upload helpers: upload GeoJSON and SVG files to Lakehouse Files with retry
Note
This tutorial spans two planes:
- Control plane (Fabric REST APIs): create Lakehouse and Map items
- Data plane (OneLake DFS): upload files into the Lakehouse
Both are required to fully set up the map.
Create authentication helper functions
Every Fabric REST call this tutorial makes carries a Microsoft Entra access token (bearer token) in the Authorization header. Rather than acquiring tokens ad hoc, this step wraps DefaultAzureCredential in a small TokenProvider and exposes an audience-specific header builder for each endpoint family the script calls.
Centralizing token acquisition and header construction in helpers — rather than acquiring tokens at every call site — gives you three concrete advantages:
- Centralized credential: A single
DefaultAzureCredentialis wrapped inTokenProviderand reused for every API call, so identity discovery (Azure CLI, VS Code, managed identity, etc.) happens once. - Audience-aware tokens: Fabric REST APIs and Power BI cluster LRO endpoints require tokens issued for different audiences. A separate header builder per audience keeps the correct scope right next to the call site, so it's obvious which endpoint each function is targeting.
- Fresh on every request: Header builders construct the
Authorizationheader on demand rather than caching the token themselves. The underlying credential refreshes transparently, so call sites never have to think about expiry.
This tutorial calls Fabric REST APIs using delegated scopes such as Item.ReadWrite.All (or Lakehouse.ReadWrite.All for Lakehouse-specific operations).
Add the following after the Config class:
# =========================================================
# Auth helpers
#
# Authentication utilities built on `DefaultAzureCredential` that acquire and
# construct Authorization headers for calling Fabric REST APIs.
# =========================================================

class TokenProvider:
    """
    Thin wrapper around `DefaultAzureCredential` that acquires Entra access
    tokens. `_fabric_headers()` and `_pbi_headers()` call `get()` per
    request so the Authorization header is always fresh; the underlying
    credential refreshes transparently.
    """
    def __init__(self):
        self._cred = DefaultAzureCredential()

    def get(self, scope: str) -> str:
        return self._cred.get_token(scope).token


_tokens = TokenProvider()


def _fabric_headers() -> dict[str, str]:
    """
    Build headers for Fabric REST API calls.

    This function is called each time we make a Fabric REST call so the token is fresh.
    """
    return {
        "Authorization": f"Bearer {_tokens.get('https://api.fabric.microsoft.com/.default')}",
        "Content-Type": "application/json"
    }


def _pbi_headers() -> dict[str, str]:
    """
    Build headers for polling Power BI cluster LRO endpoints
    (e.g., df-*.analysis.windows.net) that require a Power BI audience token.
    """
    return {
        "Authorization": f"Bearer {_tokens.get('https://analysis.windows.net/powerbi/api/.default')}",
        "Content-Type": "application/json"
    }
Note
Some Fabric long-running operations (LROs) are hosted on Power BI cluster endpoints (*.analysis.windows.net) rather than on api.fabric.microsoft.com. Those endpoints require a Power BI audience token, so the LRO helper switches to _pbi_headers() automatically when it detects that polling URL.
Create a Fabric client wrapper
Most Fabric REST calls in this tutorial send the same Authorization and Content-Type headers. Rather than repeating them at every call site, this tutorial wraps httpx.Client in a small FabricClient that attaches the headers automatically while still returning the raw httpx.Response so each caller can inspect status codes (for example, to distinguish 201 from 202).
Wrapping httpx.Client like this — rather than passing headers=_fabric_headers() at every call site — gives you two concrete advantages:
- Headers in one place: Every call site picks up the latest
_fabric_headers()automatically, so a new request can't accidentally be sent without theAuthorizationheader. - Status codes stay visible:
request()returns the rawhttpx.Responseinstead of decoded JSON, so call sites can still branch on status (201vs202) and inspect headers likeLocationorRetry-Afterfor LRO handling.
Add the following after the authentication helper functions:
# =========================================================
# FabricClient (minimal wrapper so call sites stay clean)
# =========================================================

class FabricClient:
    """
    Small wrapper around httpx.Client so we don't repeat headers everywhere.

    Keeps the tutorial behavior:
    - request() returns the raw httpx.Response so the caller can handle 201 vs 202.
    """
    def __init__(self, http_client: httpx.Client):
        self._http = http_client

    def request(self, method: str, url: str, *, json_body=None) -> httpx.Response:
        return self._http.request(method, url, headers=_fabric_headers(), json=json_body)
Create an LRO helper function
Several Fabric REST APIs used in this tutorial — such as Create Lakehouse and Create Map — support long-running operations (LROs).
These APIs can return responses in several patterns:
201 Createdwith the resource body inline (synchronous)202 Acceptedwith aLocationheader pointing at an operation status URL (asynchronous)202 Acceptedwith anx-ms-operation-idheader instead ofLocation(asynchronous, alternate form)200 OKwithstatus: "Running"orstatus: "NotStarted"while polling (still in progress)200 OKwithstatus: "Succeeded"but no resource ID in the body (succeeded; resolve by listing and matchingdisplayName)
To handle all of these consistently, you create a single helper function that:
- Returns the resource ID immediately if the initial response already contains it.
- Otherwise polls the operation URL (built from either
Locationorx-ms-operation-id) usingRetry-After. - Treats
200 OKwithstatus: "Running"/"NotStarted"as still in progress and continues polling. - On success, returns the resource ID from the body, or falls back to listing resources and matching by
displayName(with retries) when the body is status-only. - Uses
_pbi_headers()when the polling URL is on a Power BI cluster (*.analysis.windows.net), and Fabric headers otherwise.
This single helper replaces the need for per-resource "resolve by name" helpers — every create_* function in this tutorial calls _handle_lro with the appropriate list_url and match_display_name.
Add the following after the FabricClient class:
# =========================================================
# LRO handler
# =========================================================

def _handle_lro(
    client: httpx.Client,
    initial_response: httpx.Response,
    *,
    list_url: str | None = None,
    match_display_name: str | None = None,
    id_field: str = "id",
    max_attempts: int = 10,
    delay: int = 5,
) -> str:
    """
    Handle a Fabric long-running operation (LRO) and return the resource id.

    Supports the response patterns used by Fabric REST APIs:
    - 200/201 with the resource body inline (synchronous).
    - 202 with a `Location` header or `x-ms-operation-id` (asynchronous).
    - 200 with `status: "Running"` / `"NotStarted"` while polling.
    - 200 with `status: "Succeeded"` but no id (resolve by listing and matching `displayName`).

    Polling uses `Retry-After` and switches to a Power BI audience token when
    the operation URL is on `*.analysis.windows.net`.
    """
    # Sync 200/201 with body: return the id immediately.
    if initial_response.status_code in (200, 201):
        try:
            body = initial_response.json() if initial_response.content else {}
        except ValueError:
            body = {}
        if isinstance(body, dict) and body.get(id_field):
            return body[id_field]

    # Location header, with x-ms-operation-id fallback.
    op_url = initial_response.headers.get("Location")
    if not op_url:
        op_id = initial_response.headers.get("x-ms-operation-id")
        if op_id:
            op_url = f"https://api.fabric.microsoft.com/v1/operations/{op_id}"
        else:
            raise RuntimeError(
                f"Missing LRO Location/x-ms-operation-id. "
                f"status={initial_response.status_code} body={initial_response.text[:500]!r}"
            )

    # Audience-aware polling: Power BI cluster endpoints need a different token.
    poll_headers = _pbi_headers() if "analysis.windows.net" in op_url else _fabric_headers()
    retry_after = int(initial_response.headers.get("Retry-After", "5"))

    while True:
        time.sleep(retry_after)
        poll = client.get(op_url, headers=poll_headers)

        if poll.status_code == 202:
            retry_after = int(poll.headers.get("Retry-After", "5"))
            continue

        poll.raise_for_status()
        body = poll.json() if poll.content else {}
        status = body.get("status") if isinstance(body, dict) else None

        if status in ("Running", "NotStarted"):
            retry_after = int(poll.headers.get("Retry-After", "5"))
            continue
        if status == "Failed":
            raise RuntimeError(f"LRO failed. Body: {body}")

        if isinstance(body, dict) and body.get(id_field):
            return body[id_field]

        # Status-only success: list and match by displayName, with retries.
        if status == "Succeeded" and list_url and match_display_name:
            for attempt in range(max_attempts):
                r = client.get(list_url, headers=_fabric_headers())
                r.raise_for_status()
                match = next(
                    (i for i in r.json().get("value", []) if i.get("displayName") == match_display_name),
                    None,
                )
                if match and match.get(id_field):
                    return match[id_field]
                time.sleep(delay)
            raise RuntimeError(
                f"LRO succeeded but resource not visible after retries. "
                f"match_display_name={match_display_name!r}"
            )

        raise RuntimeError(f"LRO completed but no resource id was returned. Body: {body}")
Note
Newly created resources might not appear immediately when calling list APIs because of backend propagation delays. The helper function automatically retries until the resource becomes visible.
Definition payload helper
When you create a map with a public definition, the create map REST API expects each part in definition.parts to carry a base64-encoded payload with "payloadType": "InlineBase64". The _json_to_b64 helper encodes a Python dict (your map.json) into that format so create_map can drop it straight into the request body.
Add the following after the _handle_lro function:
# =========================================================
# Definition payload helper
#
# Encodes map.json as base64 for inline Create map payloads.
# =========================================================

def _json_to_b64(obj: dict) -> str:
    """
    Convert a Python dict to base64-encoded JSON text.

    Fabric Map "Create map with definition inline" requires:
    - definition.parts[].payloadType = InlineBase64
    - definition.parts[].payload     = base64(json(map_json))
    """
    return base64.b64encode(json.dumps(obj).encode("utf-8")).decode("utf-8")
OneLake upload helpers
OneLake supports ADLS/Blob APIs and allows GUID-based addressing for workspaces and items:
https://onelake.dfs.fabric.microsoft.com/<workspaceGUID>/<itemGUID>/<path>/<fileName>
Add:
# ===============================================================================================
# ONE LAKE UPLOAD HELPERS
# OneLake supports GUID-based addressing:
#   https://onelake.dfs.fabric.microsoft.com/<workspaceGUID>/<itemGUID>/<path>/<fileName>
# We use the ADLS Gen2 SDK (DataLakeServiceClient) to upload files into the Lakehouse Files area.
# ===============================================================================================

def _onelake_client() -> DataLakeServiceClient:
    """
    Build a DataLakeServiceClient against the OneLake DFS endpoint,
    authenticated with `DefaultAzureCredential`. Used by `_upload_with_retry`
    to write files into the Lakehouse Files area.
    """
    return DataLakeServiceClient(
        account_url="https://onelake.dfs.fabric.microsoft.com",
        credential=DefaultAzureCredential()
    )


def _upload_with_retry(
    workspace_guid: str,
    item_guid: str,
    dest_relative_path: str,
    content: bytes,
    attempts: int = 6
) -> None:
    """
    Upload bytes into OneLake at `<workspace GUID>/<item GUID>/<relative path>`.
    Retries with linear backoff because a newly created Lakehouse can
    briefly return errors before its `Files/` area is provisioned.
    """
    service = _onelake_client()
    fs = service.get_file_system_client(file_system=workspace_guid)

    dest_path = f"{item_guid}/{dest_relative_path}".replace("\\", "/")

    last_exc = None
    for i in range(attempts):
        try:
            fs.get_file_client(dest_path).upload_data(content, overwrite=True)
            return
        except Exception as exc:
            last_exc = exc
            time.sleep(2 + i)

    raise RuntimeError(f"Upload failed after {attempts} attempts: {last_exc}")
Tip
You can verify the file was uploaded successfully by browsing to the Lakehouse Files area in the Fabric portal.
Create primary functions
Next, you add the primary functions that define the workflow. These are all called from main().
- Create a Lakehouse
- Upload GeoJSON to the Lakehouse
- Upload a custom SVG marker (optional)
- Build the map definition (
map.json) - Create the map with its definition inline
Create a Lakehouse
create_lakehouse creates the Lakehouse that stores the GeoJSON file and the optional SVG marker used by the map.
This function:
- Sends a POST to the Lakehouse REST endpoint with
displayNameanddescriptionfrom your config - Passes the response to
_handle_lro, which handles synchronous (201), asynchronous (202/LRO), and status-only responses uniformly - Returns the Lakehouse ID for use in later steps
Add the following after the _upload_with_retry function:
# =========================================================
# Step 1: Create a Lakehouse
# =========================================================

def create_lakehouse(client: httpx.Client, fabric: FabricClient, cfg: Config) -> str:
    """
    Create a Lakehouse and return its item ID.
    """
    lakehouse_url = f"https://api.fabric.microsoft.com/v1/workspaces/{cfg.workspace_id}/lakehouses"
    lakehouse_payload = {
        "displayName": cfg.lakehouse_display_name,
        "description": cfg.lakehouse_description
    }

    lh_resp = fabric.request("POST", lakehouse_url, json_body=lakehouse_payload)

    lakehouse_id = _handle_lro(
        client,
        lh_resp,
        list_url=lakehouse_url,
        match_display_name=cfg.lakehouse_display_name,
    )

    print("Lakehouse created. Lakehouse ID:", lakehouse_id)
    return lakehouse_id
Upload GeoJSON to the Lakehouse
upload_geojson uploads the local GeoJSON file into the Lakehouse Files area, where it becomes the spatial data source the map reads at render time.
This is the first step that crosses from the Fabric control plane (REST) into the OneLake data plane (ADLS Gen2). The function reads the local file into memory and delegates to _upload_with_retry, which performs the chunked DFS upload and retries on transient errors.
Add the following after the create_lakehouse function:
# =========================================================
# Step 2: Upload GeoJSON to the Lakehouse
# =========================================================

def upload_geojson(cfg: Config, lakehouse_id: str) -> None:
    """
    Upload the local GeoJSON file to the Lakehouse Files area at
    `cfg.geojson_relative_path` using the OneLake DFS endpoint.
    """
    _upload_with_retry(
        workspace_guid=cfg.workspace_id,
        item_guid=lakehouse_id,
        dest_relative_path=cfg.geojson_relative_path,
        content=cfg.local_geojson_path.read_bytes()
    )
    print("Uploaded GeoJSON to:", cfg.geojson_relative_path)
Upload a custom SVG marker
upload_svg_marker uploads a custom SVG icon into the same Lakehouse so the map can render each feature with that marker instead of a built-in one. The step is optional and gated by cfg.use_custom_svg_marker — when the flag is False, the function returns immediately and the map falls back to a built-in marker.
Like upload_geojson, this function delegates the actual upload to _upload_with_retry.
Add the following after the upload_geojson function:
# =========================================================
# Step 3: Upload a custom SVG marker (optional)
# =========================================================

def upload_svg_marker(cfg: Config, lakehouse_id: str) -> None:
    """
    Upload a custom SVG marker to the Lakehouse at
    `cfg.svg_relative_path` when `cfg.use_custom_svg_marker` is True;
    otherwise return without uploading.
    """
    if not cfg.use_custom_svg_marker:
        return

    _upload_with_retry(
        workspace_guid=cfg.workspace_id,
        item_guid=lakehouse_id,
        dest_relative_path=cfg.svg_relative_path,
        content=cfg.starbucks_marker_svg.encode("utf-8")
    )
    print("Uploaded custom SVG marker to:", cfg.svg_relative_path)
Tip
SVG markers scale cleanly across zoom levels and screen DPIs, which makes them a good fit for map icons.
Build map.json
build_map_json builds and returns the map.json payload that defines the Fabric Map's contents. The payload follows the map item definition schema and is composed of four sections: dataSources (where data comes from), iconSources (optional custom markers), layerSources (what is read and how often), and layerSettings (how the result is rendered on the map).
For this tutorial, dataSources points at the Lakehouse (itemType: "Lakehouse") created earlier, and the single entry in layerSources is a GeoJSON file layer (type: "geojson") that reads the file you uploaded via relativePath. refreshIntervalMs is set to 0 because the source file is static — the map renders the file once and doesn't poll for changes.
The matching layerSettings entry renders each feature as a marker and surfaces the GeoJSON name property in tooltips. When cfg.use_custom_svg_marker is True, an iconSources entry is added that references the SVG you uploaded, and the layer's iconOptions.image uses the composite key <layerSettingId>:<iconId> to bind the marker to that icon. When it's False, the layer falls back to a built-in marker (cfg.builtin_icon_name_fallback) styled with a Starbucks-green fill.
For more information on the map definition REST API, see Map item definition. For an example of a map.json, see MapDetails example.
Add the following after the upload_svg_marker function:
# =========================================================
# Step 4: Build map.json
# =========================================================

def build_map_json(cfg: Config, lakehouse_id: str) -> dict:
    """
    Build and return the map.json payload for the Fabric Map.

    Wires `dataSources` to the Lakehouse created earlier, defines a
    single GeoJSON layer in `layerSources` that reads the uploaded file
    via `cfg.geojson_relative_path` with `refreshIntervalMs: 0` (the
    source is static), and configures `layerSettings` to render each
    feature as a marker. When `cfg.use_custom_svg_marker` is True, adds
    an `iconSources` entry for the uploaded SVG and binds the layer to
    it via a `<layerSettingId>:<iconId>` composite key; otherwise falls
    back to a built-in marker.
    """
    layer_source_id = str(uuid.uuid4())
    layer_setting_id = str(uuid.uuid4())
    icon_source_id = str(uuid.uuid4())

    custom_svg_marker = f"{layer_setting_id}:{icon_source_id}"
    icon_source_name = "Starbucks Marker"

    map_json = {
        "$schema": "https://developer.microsoft.com/json-schemas/fabric/item/map/definition/2.0.0/schema.json",
        "basemap": {},

        "dataSources": [
            {"itemType": "Lakehouse", "workspaceId": cfg.workspace_id, "itemId": lakehouse_id}
        ],

        "iconSources": (
            [
                {
                    "id": icon_source_id,
                    "name": icon_source_name,
                    "type": "svg",
                    "itemId": lakehouse_id,
                    "relativePath": cfg.svg_relative_path
                }
            ] if cfg.use_custom_svg_marker else []
        ),

        "layerSources": [
            {
                "id": layer_source_id,
                "name": "starbucks_seattle_geojson",
                "type": "geojson",
                "itemId": lakehouse_id,
                "relativePath": cfg.geojson_relative_path,
                "refreshIntervalMs": 0
            }
        ],

        "layerSettings": [
            {
                "id": layer_setting_id,
                "name": "Starbucks (Seattle)",
                "sourceId": layer_source_id,
                "options": {
                    "type": "vector",
                    "visible": True,
                    "tooltipKeys": ["name"],
                    "pointLayerType": "marker",

                    "markerOptions": (
                        {
                            "iconOptions": {
                                "image": custom_svg_marker,
                                "anchor": "bottom",
                                "opacity": 1.0,
                                "rotation": 0,
                                "allowOverlap": False,
                                "rotationAlignment": "viewport",
                                "pitchAlignment": "viewport"
                            },
                            "icon": icon_source_id
                        }
                        if cfg.use_custom_svg_marker
                        else
                        {
                            "size": 22,
                            "fillColor": "#006241",
                            "strokeColor": "#FFFFFF",
                            "strokeWidth": 2,
                            "icon": cfg.builtin_icon_name_fallback,
                            "iconOptions": {
                                "image": f"{layer_setting_id}:{cfg.builtin_icon_name_fallback}",
                                "anchor": "bottom",
                                "opacity": 1.0,
                                "rotation": 0,
                                "allowOverlap": False,
                                "rotationAlignment": "viewport",
                                "pitchAlignment": "viewport"
                            }
                        }
                    )
                }
            }
        ]
    }

    return map_json
Tip
Tips related to the map definition:
- The
imageproperty uses a composite key in the format<layerSettingId>:<iconId>to reference the icon for the layer. This associates the marker rendering configuration with the icon source defined earlier in the map definition. - Setting
refreshIntervalMsto0disables automatic refresh. This is appropriate for static GeoJSON files stored in a Lakehouse.
Create a map with inline definition
create_map creates the map by POSTing the inline definition you've assembled and returns the new Map's item ID. For this tutorial the request carries a single base64-encoded part — map.json — wrapped as payloadType: "InlineBase64" and encoded through _json_to_b64. The map.json payload already references the Lakehouse data source and, when present, the SVG icon by relativePath, so the layer is fully wired by the Create Map call without a follow-up updateDefinition round trip. If you wanted to set non-default item metadata or pin a Git-friendly logicalId, you'd add a .platform part to the same parts array; Fabric applies default metadata when .platform is omitted, which is what this tutorial does.
The Create map REST API can answer with 201 Created (synchronous, ID inline), 202 Accepted (asynchronous LRO via Location or x-ms-operation-id), or 200 OK with a status-only completion payload where the map isn't yet visible in List Maps because of backend propagation delay. _handle_lro covers all of these cases — including listing and matching by displayName — so this function delegates the full response handling to it in a single call.
For more information, see Map item definition.
Add the following after the build_map_json function:
# =========================================================
# Step 5: Create a map with inline definition
# =========================================================

def create_map(client: httpx.Client, fabric: FabricClient, cfg: Config, map_json: dict) -> str:
    """
    Create the Fabric map with its definition inline and return its item ID.

    Sends a single Create map request whose `parts` array carries one
    base64-encoded payload, `map.json`. The map definition already
    references the Lakehouse data source (and, when present, the SVG
    icon) by `relativePath`, so the layer is wired by the Create Map
    call without a follow-up update. Delegates response handling to
    `_handle_lro`, which covers synchronous, asynchronous, and
    status-only completions.
    """
    create_map_url = f"https://api.fabric.microsoft.com/v1/workspaces/{cfg.workspace_id}/maps"

    create_map_payload = {
        "displayName": cfg.map_display_name,
        "description": cfg.map_description,
        "definition": {
            "parts": [
                {
                    "path": "map.json",
                    "payload": _json_to_b64(map_json),
                    "payloadType": "InlineBase64"
                }
            ]
        }
    }

    map_resp = fabric.request("POST", create_map_url, json_body=create_map_payload)

    return _handle_lro(
        client, map_resp,
        list_url=create_map_url,
        match_display_name=cfg.map_display_name,
    )
Orchestrate the workflow
main is the single entry point that runs the tutorial end-to-end. It instantiates Config, opens one httpx.Client reused across every helper, wraps it in a FabricClient, then calls each step function in dependency order: create_lakehouse → upload_geojson (writes the GeoJSON to OneLake under the new Lakehouse) → upload_svg_marker (optional; only runs when cfg.use_custom_svg_marker is set) → build_map_json → create_map.
Ordering matters because each step consumes something created by an earlier step — upload_geojson and upload_svg_marker need the Lakehouse item ID, and build_map_json references both uploads by relativePath so Create map can resolve them at render time. The final print block surfaces the Lakehouse ID, map ID, and the relative paths of the uploaded assets so you can find them in the Fabric portal.
Add the following after the create_map function:
# =========================================================
# main(): orchestrates the full workflow
# =========================================================

def main():
    """
    Orchestrate the tutorial workflow.

    1) Create a Lakehouse
    2) Upload GeoJSON to the Lakehouse
    3) Upload a custom SVG marker (optional)
    4) Build the map definition (map.json)
    5) Create the map with its definition inline
    """
    cfg = Config()

    print("Initializing clients...")
    with httpx.Client(timeout=60) as client:
        fabric = FabricClient(client)

        # Step 1
        lakehouse_id = create_lakehouse(client, fabric, cfg)

        # Step 2
        upload_geojson(cfg, lakehouse_id)

        # Step 3 (optional)
        upload_svg_marker(cfg, lakehouse_id)

        # Step 4
        map_json = build_map_json(cfg, lakehouse_id)

        # Step 5
        map_id = create_map(client, fabric, cfg, map_json)

        print("\nDONE")
        print("Lakehouse ID:", lakehouse_id)
        print("Map ID:", map_id)
        print("GeoJSON layer path:", cfg.geojson_relative_path)
        if cfg.use_custom_svg_marker:
            print("Custom SVG marker path:", cfg.svg_relative_path)


if __name__ == "__main__":
    main()
At this point, all configuration and code have been defined.
In the next step, you run the script to create the Lakehouse, upload data, and generate the map.
Run the application
Note
Lakehouse and map display names must be unique within a workspace. Before re-running the script, either delete the items created on the previous run from the Fabric workspace, or change lakehouse_display_name / map_display_name in Config. Otherwise the create calls fail with 409 ItemDisplayNameAlreadyInUse.
Run the script:
python create_map_from_geojson.py
If the script runs successfully, you see output similar to:
DONE
Lakehouse ID: <Lakehouse ID>
Map ID: <Map ID>
GeoJSON layer path: Files/vector/starbucks-seattle.geojson
Custom SVG marker path: Files/icons/starbucks-marker.svg
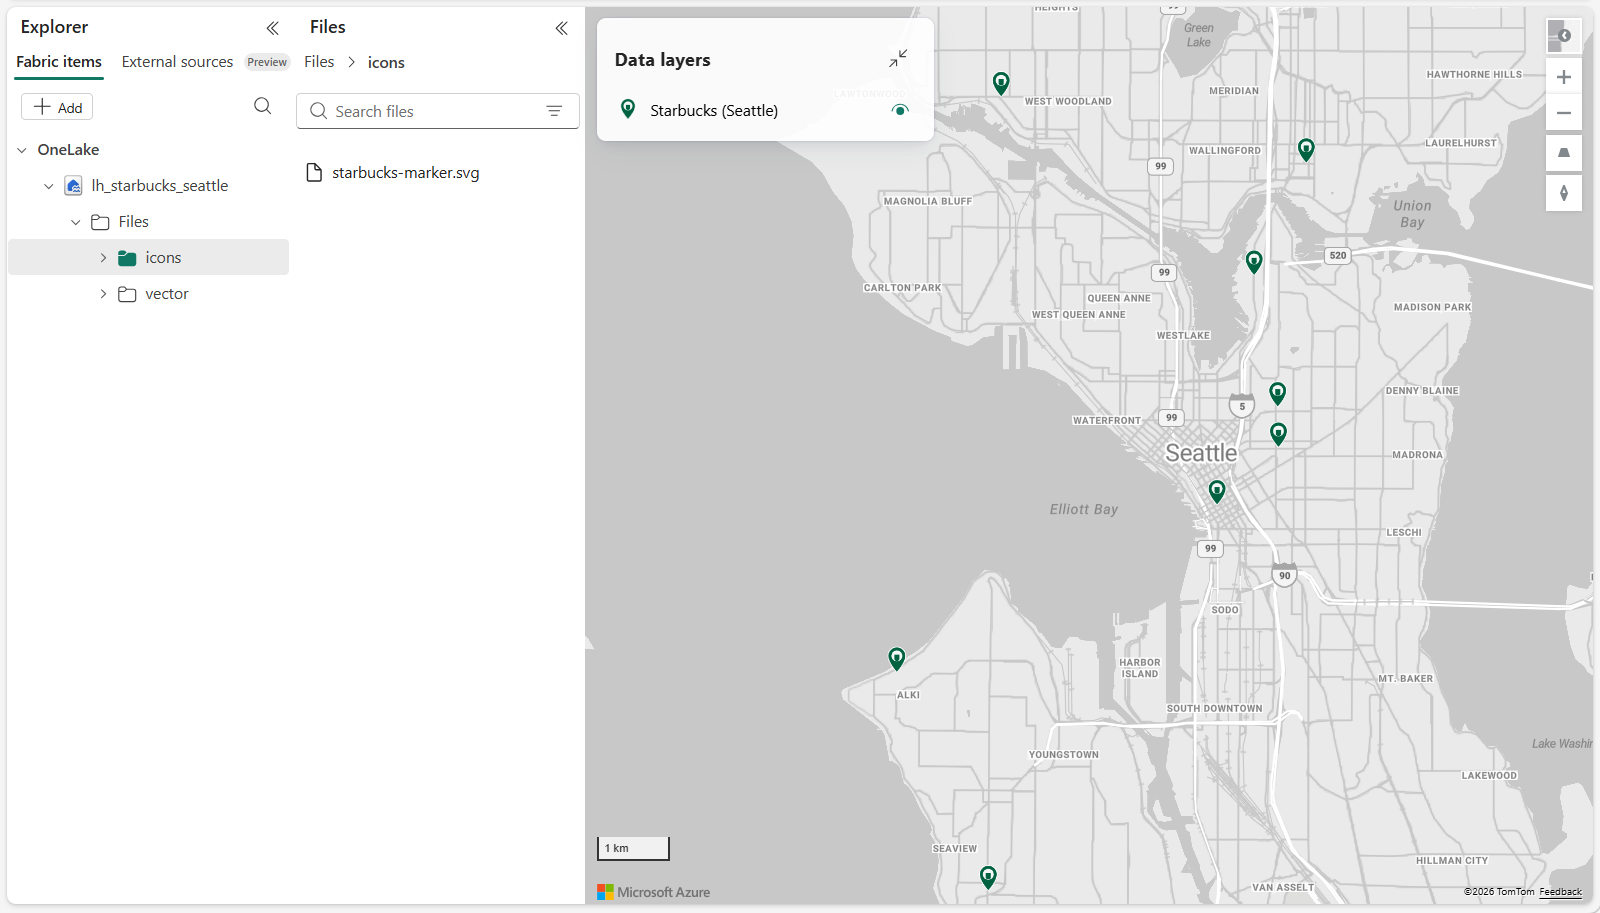
In Microsoft Fabric, your map should look similar to this:
Tip
If the map doesn't appear immediately, refresh the workspace or wait a few seconds for backend propagation to complete.
Summary
In this tutorial, you built an automated geospatial solution using Microsoft Fabric Maps and Lakehouse data.
You used Fabric REST APIs and Python to provision and configure all required resources, then visualized spatial data stored in OneLake.
You accomplished the following:
- Uploaded spatial data to a Lakehouse
- Configured a dataset for geospatial visualization
- Built a Fabric map with an inline definition
- Connected the map to Lakehouse data
- Configured map layers to render spatial features
This architecture demonstrates a common batch and historical spatial analytics pattern in Fabric:
- Data is stored in OneLake (Lakehouse)
- Maps query and render spatial datasets
- Layers provide visual insights into geographic data
By automating resource creation using Python and REST APIs, you now have a repeatable approach for building geospatial applications based on static or historical datasets.
Next steps
Now that you understand how to visualize spatial data from a Lakehouse, you can extend this solution:
- Combine multiple datasets for richer geospatial analysis
- Apply styling and filtering to highlight trends and patterns
- Add reference layers such as boundaries or routes
- Integrate data pipelines to refresh datasets automatically
- Explore real-time streaming scenarios using Eventstream and Eventhouse
For more information about working with spatial data and maps in Fabric, see:
For a tutorial that demonstrates creating a real-time map using REST APIs, see: