ملاحظة
يتطلب الوصول إلى هذه الصفحة تخويلاً. يمكنك محاولة تسجيل الدخول أو تغيير الدلائل.
يتطلب الوصول إلى هذه الصفحة تخويلاً. يمكنك محاولة تغيير الدلائل.
Important
- As of May 23, 2025, the following functionalities will no longer be available:
- The enhanced email template and legacy rich text editor.
- The drag and drop functionality of the enhanced email template editor.
- The modern rich text editor supports HTML formatting. Any existing templates created using the enhanced email template editor will now open in the modern rich text editor. If you any see any formatting issues, we recommend that you update or recreate the template using the modern rich text editor.
Email templates are a fast and easy way to send consistent, professional, preformatted email messages to your customers.
You can create email templates by using one of the following options:
- Start with a blank template: Create a template from scratch.
- Start with an existing template : Create a template by choosing an existing template.

Prerequisites
When you need to create an email template based on a table, make sure that you have the necessary permissions on the related tables, such as the Account table for the email template based on a case.
Start with a blank template
When you start with a blank template, nothing is provided for you. You must add everything you want customers to see.
On the Email Templates command bar, select New, and then select Start with a blank template.
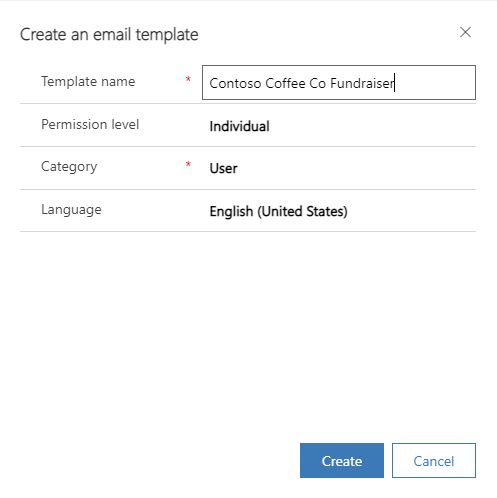
Enter the following details:
Template name: Give your email template a detailed name to help you identify it later.
Permission level: Select from Organization or Individual. More information: Permission level for email templates
Category: The default value is User. Categories determine which dynamic text fields are available for use in your template.
Language: Display installed language packs. Language also helps to categorize your templates.
Create: Opens one of two editors where you can build your template.

Select Create. The template editor is displayed.
Permission level for email templates
Selecting Organization permission level for email templates allows you to create templates that everyone in the organization can use. Individual permission level is for personal use.
Note
For Individual permission templates, these templates do not show up on the list of email templates unless your are the owner of the templates or the owner has shared the template with you.
For Organization permission templates, these templates show up for all users in the organization.
Start with existing templates
Start with an existing template to create an email template faster and with less effort. The template is pre-populated with data. All you need to do is customize it for your needs.
On the Email Templates command bar, select New, and then select Start with existing templates.
Enter the following details:
Search: Search for the name of a template to start from. Search doesn't support regular expressions.
Browse out-of-the-box templates, global and entity-specific, listed in alphabetical order. Global templates are shown as the type User. If you've created custom email templates, they're also listed.
Details. Preview the templates so that you can pick the one that best meets your needs. You can modify it as needed later.

The template editor page is displayed.
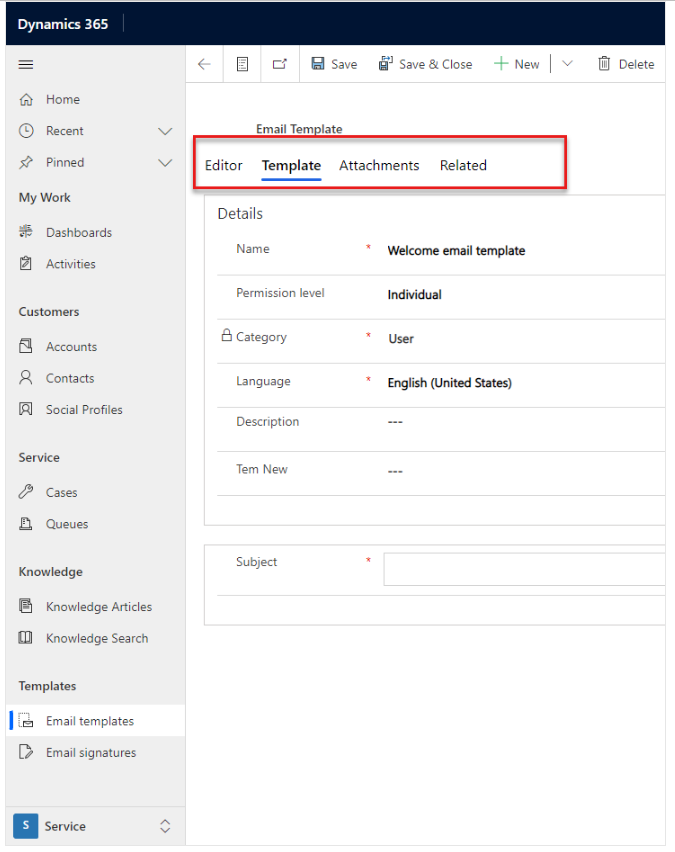
Email template editor
You can use the email template editor to to create a new email template or edit an existing template.

- Designer tab: Use this tab to draft and apply standard formatting to your email template. You can also add dynamic text, images, and attachments. You can add Copilot prompts to your email template for a consistent experience. Learn more in Add Copilot prompts to email template.
Note
Across all the model-driven apps, the email template editor supports upto 1048576 characters.
- HTML tab: Use this tab to view and edit the HTML code of your email template. You can add HTML code to customize your templates with elements such as layouts, images, and buttons.
- Template tab: Specify or change the template details and the email subject.
- Attachments tab: Add attachments to your template if needed.
See also
Personalize content with Insert dynamic text
Understand the email experience