Detailed troubleshooting steps for remote desktop connection issues to Windows VMs in Azure
Applies to: ✔️ Windows VMs
This article provides detailed troubleshooting steps to diagnose and fix complex Remote Desktop errors for Windows-based Azure virtual machines.
Important
To eliminate the more common Remote Desktop errors, make sure to read the basic troubleshooting article for Remote Desktop before proceeding.
You may encounter a Remote Desktop error message that does not resemble any of the specific error messages covered in the basic Remote Desktop troubleshooting guide. Follow these steps to determine why the Remote Desktop (RDP) client is unable to connect to the RDP service on the Azure VM.
Components of a Remote Desktop connection
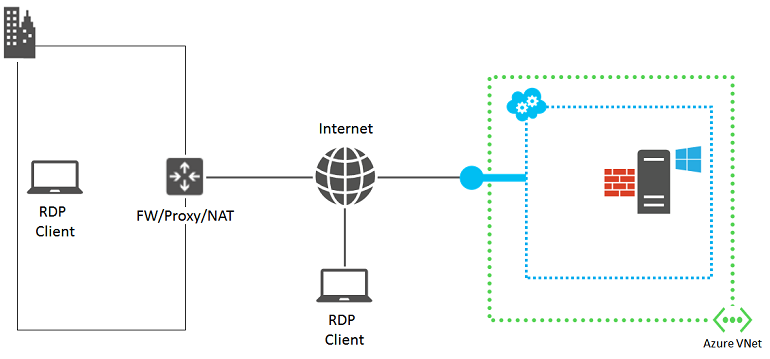
The following components are involved in an RDP connection:

Before proceeding, it might help to mentally review what has changed since the last successful Remote Desktop connection to the VM. For example:
- The public IP address of the VM or the cloud service containing the VM (also called the virtual IP address VIP) has changed. The RDP failure could be because your DNS client cache still has the old IP address registered for the DNS name. Flush your DNS client cache and try connecting the VM again. Or try connecting directly with the new VIP.
- You are using a third-party application to manage your Remote Desktop connections instead of using the connection generated by the Azure portal. Verify that the application configuration includes the correct TCP port for the Remote Desktop traffic. You can check this port for a classic virtual machine in the Azure portal, by clicking the VM's Settings > Endpoints.
Preliminary steps
Before proceeding to the detailed troubleshooting,
- Check the status of the virtual machine in the Azure portal for any obvious issues.
- Follow the quick fix steps for common RDP errors in the basic troubleshooting guide.
- For custom images, make sure that your VHD is properly prepared prior to upload it. For more information, see Prepare a Windows VHD or VHDX to upload to Azure.
Try reconnecting to the VM via Remote Desktop after these steps.
Detailed troubleshooting steps
The Remote Desktop client may not be able to reach the Remote Desktop service on the Azure VM due to issues at the following sources:
- Remote Desktop client computer
- Organization intranet edge device
- Network security groups
- Windows-based Azure VM
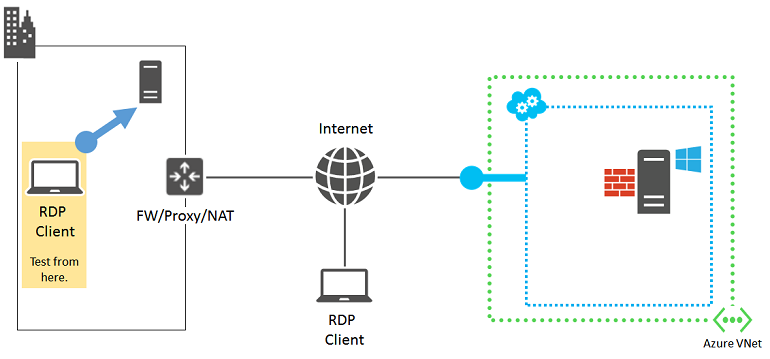
Source 1: Remote Desktop client computer
Verify that your computer can make Remote Desktop connections to another on-premises, Windows-based computer.

If you cannot, check for the following settings on your computer:
- A local firewall setting that is blocking Remote Desktop traffic.
- Locally installed client proxy software that is preventing Remote Desktop connections.
- Locally installed network monitoring software that is preventing Remote Desktop connections.
- Other types of security software that either monitor traffic or allow/disallow specific types of traffic that is preventing Remote Desktop connections.
In all these cases, temporarily disable the software and try to connect to an on-premises computer via Remote Desktop. If you can find out the actual cause this way, work with your network administrator to correct the software settings to allow Remote Desktop connections.
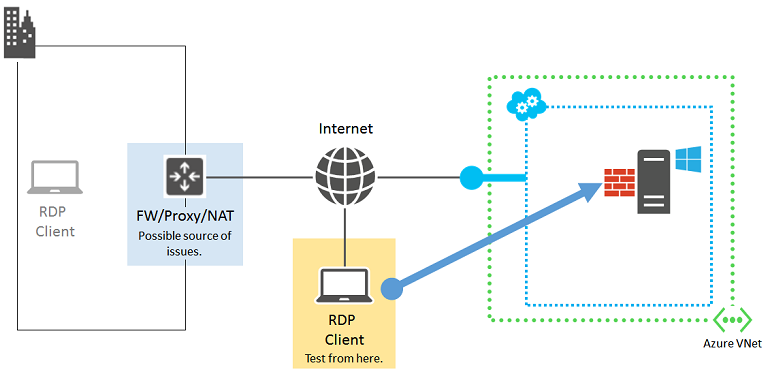
Source 2: Organization intranet edge device
Verify that a computer directly connected to the Internet can make Remote Desktop connections to your Azure virtual machine.

If you do not have a computer that is directly connected to the Internet, create and test with a new Azure virtual machine in a resource group or cloud service. For more information, see Create a virtual machine running Windows in Azure. You can delete the virtual machine and the resource group or the cloud service, after the test.
If you can create a Remote Desktop connection with a computer directly attached to the Internet, check your organization intranet edge device for:
- An internal firewall blocking HTTPS connections to the Internet.
- A proxy server preventing Remote Desktop connections.
- Intrusion detection or network monitoring software running on devices in your edge network that is preventing Remote Desktop connections.
Work with your network administrator to correct the settings of your organization intranet edge device to allow HTTPS-based Remote Desktop connections to the Internet.
Source 3: Network Security Groups
Network Security Groups allow more granular control of allowed inbound and outbound traffic. You can create rules spanning subnets and cloud services in an Azure virtual network.
Use IP flow verify to confirm if a rule in a Network Security Group is blocking traffic to or from a virtual machine. You can also review effective security group rules to ensure inbound "Allow" NSG rule exists and is prioritized for RDP port(default 3389). For more information, see Using Effective Security Rules to troubleshoot VM traffic flow.
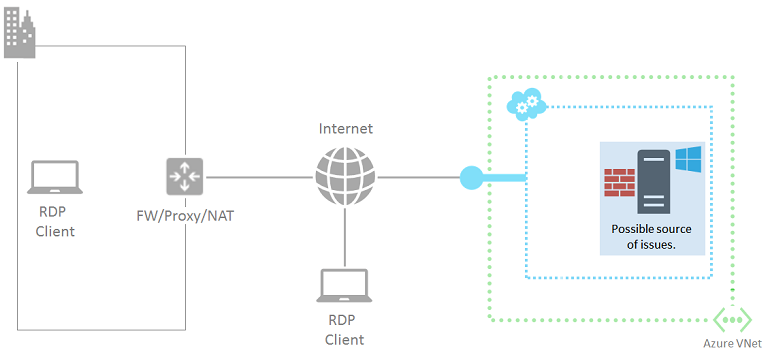
Source 4: Windows-based Azure VM

Follow the instructions in this article. This article resets the Remote Desktop service on the virtual machine:
- Enable the "Remote Desktop" Windows Firewall default rule (TCP port 3389).
- Enable Remote Desktop connections by setting the HKLM\System\CurrentControlSet\Control\Terminal Server\fDenyTSConnections registry value to 0.
Try the connection from your computer again. If you are still not able to connect via Remote Desktop, check for the following possible problems:
- The Remote Desktop service is not running on the target VM.
- The Remote Desktop service is not listening on TCP port 3389.
- Windows Firewall or another local firewall has an outbound rule that is preventing Remote Desktop traffic.
- Intrusion detection or network monitoring software running on the Azure virtual machine is preventing Remote Desktop connections.
For VMs created using the classic deployment model, you can use a remote Azure PowerShell session to the Azure virtual machine. First, you need to install a certificate for the virtual machine's hosting cloud service. Go to Configure Secure Remote PowerShell Access to Azure Virtual Machines and download the InstallWinRMCertAzureVM.ps1 script file to your local computer.
Next, install Azure PowerShell if you haven't already. See How to install and configure Azure PowerShell.
Next, open an Azure PowerShell command prompt and change the current folder to the location of the InstallWinRMCertAzureVM.ps1 script file. To run an Azure PowerShell script, you must set the correct execution policy. Run the Get-ExecutionPolicy command to determine your current policy level. For information about setting the appropriate level, see Set-ExecutionPolicy.
Next, fill in your Azure subscription name, the cloud service name, and your virtual machine name (removing the < and > characters), and then run these commands.
$subscr="<Name of your Azure subscription>"
$serviceName="<Name of the cloud service that contains the target virtual machine>"
$vmName="<Name of the target virtual machine>"
.\InstallWinRMCertAzureVM.ps1 -SubscriptionName $subscr -ServiceName $serviceName -Name $vmName
You can get the correct subscription name from the SubscriptionName property of the display of the Get-AzureSubscription command. You can get the cloud service name for the virtual machine from the ServiceName column in the display of the Get-AzureVM command.
Check if you have the new certificate. Open a Certificates snap-in for the current user and look in the Trusted Root Certification Authorities\Certificates folder. You should see a certificate with the DNS name of your cloud service in the Issued To column (example: cloudservice4testing.cloudapp.net).
Next, initiate a remote Azure PowerShell session by using these commands.
$uri = Get-AzureWinRMUri -ServiceName $serviceName -Name $vmName
$creds = Get-Credential
Enter-PSSession -ConnectionUri $uri -Credential $creds
After entering valid administrator credentials, you should see something similar to the following Azure PowerShell prompt:
[cloudservice4testing.cloudapp.net]: PS C:\Users\User1\Documents>
The first part of this prompt is your cloud service name that contains the target VM, which could be different from "cloudservice4testing.cloudapp.net". You can now issue Azure PowerShell commands for this cloud service to investigate the problems mentioned and correct the configuration.
To manually correct the Remote Desktop Services listening TCP port
At the remote Azure PowerShell session prompt, run this command.
Get-ItemProperty -Path "HKLM:\System\CurrentControlSet\Control\Terminal Server\WinStations\RDP-Tcp" -Name "PortNumber"
The PortNumber property shows the current port number. If needed, change the Remote Desktop port number back to its default value (3389) by using this command.
Set-ItemProperty -Path "HKLM:\System\CurrentControlSet\Control\Terminal Server\WinStations\RDP-Tcp" -Name "PortNumber" -Value 3389
Verify that the port has been changed to 3389 by using this command.
Get-ItemProperty -Path "HKLM:\System\CurrentControlSet\Control\Terminal Server\WinStations\RDP-Tcp" -Name "PortNumber"
Exit the remote Azure PowerShell session by using this command.
Exit-PSSession
Verify that the Remote Desktop endpoint for the Azure VM is also using TCP port 3398 as its internal port. Restart the Azure VM and try the Remote Desktop connection again.
Additional resources
How to reset a password or the Remote Desktop service for Windows virtual machines
How to install and configure Azure PowerShell
Troubleshoot Secure Shell (SSH) connections to a Linux-based Azure virtual machine
Troubleshoot access to an application running on an Azure virtual machine
Contact us for help
If you have questions or need help, create a support request, or ask Azure community support. You can also submit product feedback to Azure feedback community.