Tooling for ASP.NET Core Blazor
Note
This isn't the latest version of this article. For the current release, see the .NET 8 version of this article.
Important
This information relates to a pre-release product that may be substantially modified before it's commercially released. Microsoft makes no warranties, express or implied, with respect to the information provided here.
For the current release, see the .NET 8 version of this article.
This article describes tools for building Blazor apps using several tools:
- Visual Studio (VS): The most comprehensive integrated development environment (IDE) for .NET developers on Windows. Includes an array of tools and features to elevate and enhance every stage of software development.
- Visual Studio Code (VS Code) is an open source, cross-platform code editor that can be used to develop Blazor apps.
- .NET CLI: The .NET command-line interface (CLI) is a cross-platform toolchain for developing, building, running, and publishing .NET applications. The .NET CLI is included with the .NET SDK and runs on any platform supported by the SDK.
Select the pivot of this article that matches your tooling choice.
To create a Blazor app with Visual Studio, use the following guidance:
Install the latest version of Visual Studio with the ASP.NET and web development workload.
Create a new project using one of the available Blazor templates:
- Blazor Web App: Creates a Blazor web app that supports interactive server-side rendering (interactive SSR) and client-side rendering (CSR). The Blazor Web App template is recommended for getting started with Blazor to learn about server-side and client-side Blazor features.
- Blazor WebAssembly Standalone App: Creates a standalone client web app that can be deployed as a static site.
Select Next.
Install the latest version of Visual Studio with the ASP.NET and web development workload.
Create a new project:
- For a Blazor Server experience, choose the Blazor Server App template, which includes demonstration code and Bootstrap, or the Blazor Server App Empty template without demonstration code and Bootstrap. Select Next.
- For a standalone Blazor WebAssembly experience, choose the Blazor WebAssembly App template, which includes demonstration code and Bootstrap, or the Blazor WebAssembly App Empty template without demonstration code and Bootstrap. Select Next.
Install the latest version of Visual Studio with the ASP.NET and web development workload.
Create a new project:
- For a Blazor Server experience, choose the Blazor Server App template. Select Next.
- For a Blazor WebAssembly experience, choose the Blazor WebAssembly App template. Select Next.
Provide a Project name and confirm that the Location is correct.
For more information on the options in the Additional information dialog, see the Blazor project templates and template options section.
- For a hosted Blazor WebAssembly app, select the ASP.NET Core Hosted checkbox in the Additional information dialog.
- Select Create.
Visual Studio Code is an open source, cross-platform Integrated Development Environment (IDE) that can be used to develop Blazor apps.
Install the latest version of Visual Studio Code for your platform.
Install the C# Dev Kit for Visual Studio Code. For more information, see Debug ASP.NET Core Blazor apps.
If you're new to VS Code, see the VS Code documentation. If you're new to the .NET SDK, see What is the .NET SDK? and the associated articles in the .NET SDK documentation.
Create a new project:
Open VS Code.
Go to the Explorer view and select the Create .NET Project button. Alternatively, you can bring up the Command Palette using Ctrl+Shift+P, and then type "
.NET" and find and select the .NET: New Project command.Select the Blazor project template from the list.
In the Project Location dialog, create or select a folder for the project.
In the Command Palette, provide a name for the project or accept the default name.
Select Create project to create the project or adjust the project's options by selecting Show all template options. For more information on the templates and options, see the Blazor project templates and template options section.
Press F5 on the keyboard to run the app with the debugger or Ctrl+F5 to run the app without the debugger.
The Command Palette asks you to select a debugger. Select C# from the list.
Next, select the https launch configuration.
To stop the app, press Shift+F5 on the keyboard.
The Visual Studio Code (VS Code) instructions for ASP.NET Core development in some parts of the Blazor documentation use the .NET CLI, which is part of the .NET SDK. .NET CLI commands are issued in VS Code's integrated Terminal, which defaults to a PowerShell command shell. The Terminal is opened by selecting New Terminal from the Terminal menu in the menu bar.
For more information on Visual Studio Code configuration and use, see the Visual Studio Code documentation.
Hosted Blazor WebAssembly launch and task configuration
For hosted Blazor WebAssembly solutions, add (or move) the .vscode folder with launch.json and tasks.json files to the solution's parent folder, which is the folder that contains the typical project folders: Client, Server, and Shared. Update or confirm that the configuration in the launch.json and tasks.json files execute a hosted Blazor WebAssembly app from the Server project.
Examine the Properties/launchSettings.json file and determine the URL of the app from the applicationUrl property. Depending on the framework version, the URL protocol is either secure (HTTPS) https://localhost:{PORT} or insecure (HTTP) http://localhost:{PORT}, where the {PORT} placeholder is an assigned port. Note the URL for use in the launch.json file.
In the launch configuration of the .vscode/launch.json file:
- Set the current working directory (
cwd) to the Server project folder. - Indicate the app's URL with the
urlproperty. Use the value recorded earlier from theProperties/launchSettings.jsonfile.
"cwd": "${workspaceFolder}/{SERVER APP FOLDER}",
"url": "{URL}"
In the preceding configuration:
- The
{SERVER APP FOLDER}placeholder is the Server project's folder, typically Server. - The
{URL}placeholder is the app's URL, which is specified in the app'sProperties/launchSettings.jsonfile in theapplicationUrlproperty.
If Google Chrome is preferred over Microsoft Edge, update or add an additional property of "browser": "chrome" to the configuration.
The following example .vscode/launch.json file:
- Sets the current working directory to the Server folder.
- Sets the URL for the app to
http://localhost:7268. - Changes the default browser from Microsoft Edge to Google Chrome.
"cwd": "${workspaceFolder}/Server",
"url": "http://localhost:7268",
"browser": "chrome"
The complete .vscode/launch.json file:
{
  "version": "0.2.0",
  "configurations": [
    {
      "type": "blazorwasm",
      "name": "Launch and Debug Blazor WebAssembly Application",
      "request": "launch",
      "cwd": "${workspaceFolder}/Server",
      "url": "http://localhost:7268",
      "browser": "chrome"
    }
  ]
}
In .vscode/tasks.json, add a build argument that specifies the path to the Server app's project file:
"${workspaceFolder}/{SERVER APP FOLDER}/{PROJECT NAME}.csproj",
In the preceding argument:
- The
{SERVER APP FOLDER}placeholder is the Server project's folder, typically Server. - The
{PROJECT NAME}placeholder is the app's name, typically based on the solution's name followed by.Serverin an app generated from the Blazor WebAssembly project template.
An example .vscode/tasks.json file with a Server project named BlazorHosted in the Server folder of the solution:
{
  "version": "2.0.0",
  "tasks": [
    {
      "label": "build",
      "command": "dotnet",
      "type": "process",
        "args": [
          "build",
          "${workspaceFolder}/Server/BlazorHosted.Server.csproj",
          "/property:GenerateFullPaths=true",
          "/consoleloggerparameters:NoSummary",
        ],
        "group": "build",
        "presentation": {
          "reveal": "silent"
        },
        "problemMatcher": "$msCompile"
    }
  ]
}
Note
Only browser debugging is supported at this time.
You can't automatically rebuild the backend Server app of a hosted Blazor WebAssembly solution during debugging, for example by running the app with dotnet watch run.
.vscode/launch.json (launch configuration):
...
"cwd": "${workspaceFolder}/{SERVER APP FOLDER}",
...
In the preceding configuration for the current working directory (cwd), the {SERVER APP FOLDER} placeholder is the Server project's folder, typically "Server".
If Microsoft Edge is used and Google Chrome isn't installed on the system, add an additional property of "browser": "edge" to the configuration.
Example for a project folder of Server and that spawns Microsoft Edge as the browser for debug runs instead of the default browser Google Chrome:
...
"cwd": "${workspaceFolder}/Server",
"browser": "edge"
...
.vscode/tasks.json (dotnet command arguments):
...
"${workspaceFolder}/{SERVER APP FOLDER}/{PROJECT NAME}.csproj",
...
In the preceding argument:
- The
{SERVER APP FOLDER}placeholder is the Server project's folder, typically "Server". - The
{PROJECT NAME}placeholder is the app's name, typically based on the solution's name followed by ".Server" in an app generated from the Blazor project template.
The following example from the tutorial for using SignalR with a Blazor WebAssembly app uses a project folder name of Server and a project name of BlazorWebAssemblySignalRApp.Server:
...
"args": [
  "build",
    "${workspaceFolder}/Server/BlazorWebAssemblySignalRApp.Server.csproj",
    ...
],
...
The .NET SDK is a set of libraries and tools that developers use to create .NET applications and libraries.
Install the .NET SDK. Commands are issued in a command shell using the .NET CLI.
If you previously installed one or more .NET SDKs and want to see your active version, execute the following command in a command shell:
dotnet --version
If you're new to the .NET SDK, see What is the .NET SDK? and the associated articles in the .NET SDK documentation.
Create a new project:
Change to the directory using the
cdcommand to where you want to create the project folder (for example,cd c:/users/Bernie_Kopell/Documents).For a Blazor Web App experience with default interactive server-side rendering (interactive SSR), execute the following command:
dotnet new blazor -o BlazorAppFor a standalone Blazor WebAssembly experience, execute the following command in a command shell that uses the
blazorwasmtemplate:dotnet new blazorwasm -o BlazorApp
Create a new project:
Change to the directory using the
cdcommand to where you want to create the project folder (for example,cd c:/users/Bernie_Kopell/Documents).For a Blazor Server experience with demonstration code and Bootstrap, execute the following command:
dotnet new blazorserver -o BlazorAppFor a standalone Blazor WebAssembly experience with demonstration code and Bootstrap, execute the following command:
dotnet new blazorwasm -o BlazorAppFor a hosted Blazor WebAssembly experience with demonstration code and Bootstrap, add the hosted option (
-ho/--hosted) to the command:dotnet new blazorwasm -o BlazorApp -ho
Create a new project:
Change to the directory using the
cdcommand to where you want to create the project folder (for example,cd c:/users/Bernie_Kopell/Documents).For a Blazor WebAssembly experience, execute the following command:
dotnet new blazorwasm -o BlazorAppFor a hosted Blazor WebAssembly experience, add the hosted option (
-hoor--hosted) option to the command:dotnet new blazorwasm -o BlazorApp -hoFor a Blazor Server experience, execute the following command:
dotnet new blazorserver -o BlazorApp
For more information on the templates and options, see the Blazor project templates and template options section.
Run the app
Important
When executing a Blazor Web App, run the app from the solution's server project, which is the project with a name that doesn't end in .Client.
Important
When executing a hosted Blazor WebAssembly app, run the app from the solution's Server project.
Press Ctrl+F5 on the keyboard to run the app without the debugger.
Visual Studio displays the following dialog when a project isn't configured to use SSL:
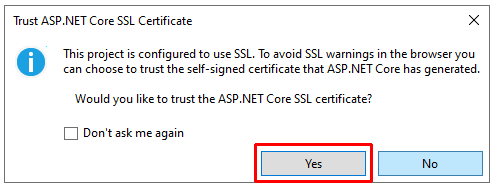
Select Yes if you trust the ASP.NET Core SSL certificate.
The following dialog is displayed:
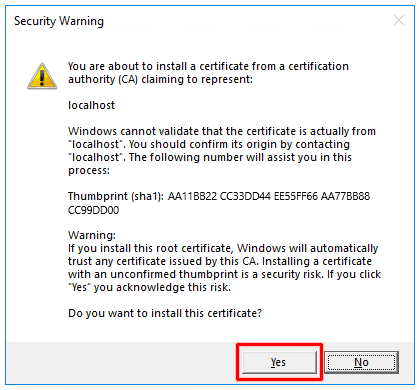
Select Yes to acknowledge the risk and install the certificate.
For information on trusting the HTTPS development certificate for the Firefox browser, see Enforce HTTPS in ASP.NET Core.
Visual Studio:
- Compiles and runs the app.
- Launches the default browser at
https://localhost:{PORT}, which displays the app's UI. The{PORT}placeholder is the random port assigned at app creation. If you need to change the port due to a local port conflict, change the port in the project'sProperties/launchSettings.jsonfile.
For information on trusting the HTTPS development certificate for browsers other than Firefox, see the HTTPS development certificate trust guidance. When using the Firefox browser, see the certificate trust guidance for Firefox.
In VS Code, press Ctrl+F5 (Windows) or ⌘+F5 (macOS) to run the app without debugging.
At the Select debugger prompt in the Command Palette at the top of the VS Code UI, select C#. At the next prompt, select the HTTPS profile ([https]).
The default browser is launched at https://localhost:{PORT}, which displays the app's UI. The {PORT} placeholder is the random port assigned at app creation. If you need to change the port due to a local port conflict, change the port in the project's Properties/launchSettings.json file.
For information on trusting the HTTPS development certificate for browsers other than Firefox, see the HTTPS development certificate trust guidance. When using the Firefox browser, see the certificate trust guidance for Firefox section of that article.
In a command shell opened to the project's root folder, execute the dotnet watch command to compile and start the app:
dotnet watch
The default browser is launched at https://localhost:{PORT}, which displays the app's UI. The {PORT} placeholder is the random port assigned at app creation. If you need to change the port due to a local port conflict, change the port in the project's Properties/launchSettings.json file.
When an app created from the Blazor Web App project template is run with the .NET CLI, the app runs at an HTTP (insecure) endpoint because the first profile found in the app's launch settings file (Properties/launchSettings.json) is the HTTP (insecure) profile, which is named http. The HTTP profile was placed in the first position to ease the transition of adopting SSL/HTTPS security for non-Windows users.
One approach for running the app with SSL/HTTPS is to pass the -lp|--launch-profile option with the https profile name to the dotnet watch command:
dotnet watch -lp https
An alternative approach is to move the https profile above the http profile in the Properties/launchSettings.json file and save the change. After changing the profile order in the file, the dotnet watch command always uses the https profile by default.
Stop the app
Stop the app using either of the following approaches:
- Close the browser window.
- In Visual Studio, either:
Use the Stop button in Visual Studio's menu bar:

Press Shift+F5 on the keyboard.
Stop the app using the following approach:
- Close the browser window.
- In VS Code, either:
- From the Run menu, select Stop Debugging.
- Press Shift+F5 on the keyboard.
Stop the app using the following approach:
- Close the browser window.
- In the command shell, press Ctrl+C (Windows) or ⌘+C (macOS).
Visual Studio solution file (.sln)
A solution is a container to organize one or more related code projects. Solution files use a unique format and aren't intended to be edited directly.
Visual Studio and Visual Studio Code (VS Code) use a solution file (.sln) to store settings for a solution. The .NET CLI doesn't organize projects using a solution file, but it can create solution files and list/modify the projects in solution files via the dotnet sln command. Other .NET CLI commands use the path of the solution file for various publishing, testing, and packaging commands.
Throughout the Blazor documentation, solution is used to describe apps created from the Blazor WebAssembly project template with the ASP.NET Core Hosted option enabled or from a Blazor Hybrid project template. Apps produced from these project templates include a solution file (.sln) by default. For hosted Blazor WebAssembly apps where the developer isn't using Visual Studio, the solution file can be ignored or deleted if it isn't used with .NET CLI commands.
For more information, see the following resources:
- Introduction to projects and solutions (Visual Studio documentation)
- What are solutions and projects in Visual Studio? (Visual Studio documentation)
- Project management (VS Code documentation)
Blazor project templates and template options
The Blazor framework provides project templates for creating new apps. The templates are used to create new Blazor projects and solutions regardless of the tooling that you select for Blazor development (Visual Studio, Visual Studio Code, or the .NET command-line interface (CLI)):
- Blazor Web App project template:
blazor - Standalone Blazor WebAssembly app project template:
blazorwasm
- Blazor Server project templates:
blazorserver,blazorserver-empty - Blazor WebAssembly project templates:
blazorwasm,blazorwasm-empty
- Blazor Server project template:
blazorserver - Blazor WebAssembly project template:
blazorwasm
For more information on Blazor project templates, see ASP.NET Core Blazor project structure.
Rendering terms and concepts used in the following subsections are introduced in the following sections of the Fundamentals overview article:
Detailed guidance on render modes is provided by the ASP.NET Core Blazor render modes article.
Interactive render mode
- Interactive server-side rendering (interactive SSR) is enabled by default with the Server option.
- To only enable interactivity with client-side rendering (CSR), use the WebAssembly option.
- To enable both interactive rendering modes and the ability to automatically switch between them at runtime, use the Auto (Server and WebAssembly) (automatic) render mode option.
- If interactivity is set to
None, the generated app has no interactivity. The app is only configured for static server-side rendering.
The Interactive Auto render mode initially uses interactive SSR while the .NET app bundle and runtime are download to the browser. After the .NET WebAssembly runtime is activated, the render mode switches to Interactive WebAssembly rendering.
By default, the Blazor Web App template enables both static and interactive SSR using a single project. If you also enable CSR, the project includes an additional client project (.Client) for your WebAssembly-based components. The built output from the client project is downloaded to the browser and executed on the client. Any components using the WebAssembly or automatic render modes must be built from the client project.
Important
When using a Blazor Web App, most of the Blazor documentation example components require interactivity to function and demonstrate the concepts covered by the articles. When you test an example component provided by an article, make sure that either the app adopts global interactivity or the component adopts an interactive render mode.
Interactivity location
Interactivity location options:
- Per page/component: The default sets up interactivity per page or per component.
- Global: Using this option sets up interactivity globally for the entire app.
Interactivity location can only be set if Interactive render mode isn't None and authentication isn't enabled.
Sample pages
To include sample pages and a layout based on Bootstrap styling, use the Include sample pages option. Disable this option for project without sample pages and Bootstrap styling.
Additional guidance on template options
- ASP.NET Core Blazor render modes
- The .NET default templates for dotnet new article in the .NET Core documentation:
- Passing the help option (
-hor--help) to thedotnet newCLI command in a command shell:dotnet new blazor -hdotnet new blazorwasm -h
For more information on template options, see the following resources:
- The .NET default templates for dotnet new article in the .NET Core documentation:
blazorserver(includesblazorserver-emptyoptions)blazorwasm(includesblazorwasm-emptyoptions)
- Passing the help option (
-hor--help) to thedotnet newCLI command in a command shell:dotnet new blazorserver -hdotnet new blazorserver-empty -hdotnet new blazorwasm -hdotnet new blazorwasm-empty -h
For more information on template options, see the following resources:
- The .NET default templates for dotnet new article in the .NET Core documentation:
- Passing the help option (
-hor--help) to thedotnet newCLI command in a command shell:dotnet new blazorserver -hdotnet new blazorwasm -h
Additional resources
- Visual Studio
- Visual Studio Code
- ASP.NET Core Blazor WebAssembly build tools and ahead-of-time (AOT) compilation
- .NET command-line interface (CLI)
- .NET SDK
- .NET Hot Reload support for ASP.NET Core
- ASP.NET Core Blazor hosting models
- ASP.NET Core Blazor project structure
- ASP.NET Core Blazor Hybrid tutorials
ASP.NET Core
Feedback
Coming soon: Throughout 2024 we will be phasing out GitHub Issues as the feedback mechanism for content and replacing it with a new feedback system. For more information see: https://aka.ms/ContentUserFeedback.
Submit and view feedback for