Note
Access to this page requires authorization. You can try signing in or changing directories.
Access to this page requires authorization. You can try changing directories.
Get started using Azure AI Content Safety to create a custom text blocklist and use it to detect harmful content in text.
Caution
The sample data and code may contain offensive content. User discretion is advised.
Prerequisites
- An Azure account. If you don't have one, you can create one for free.
- An Azure AI resource.
Setup
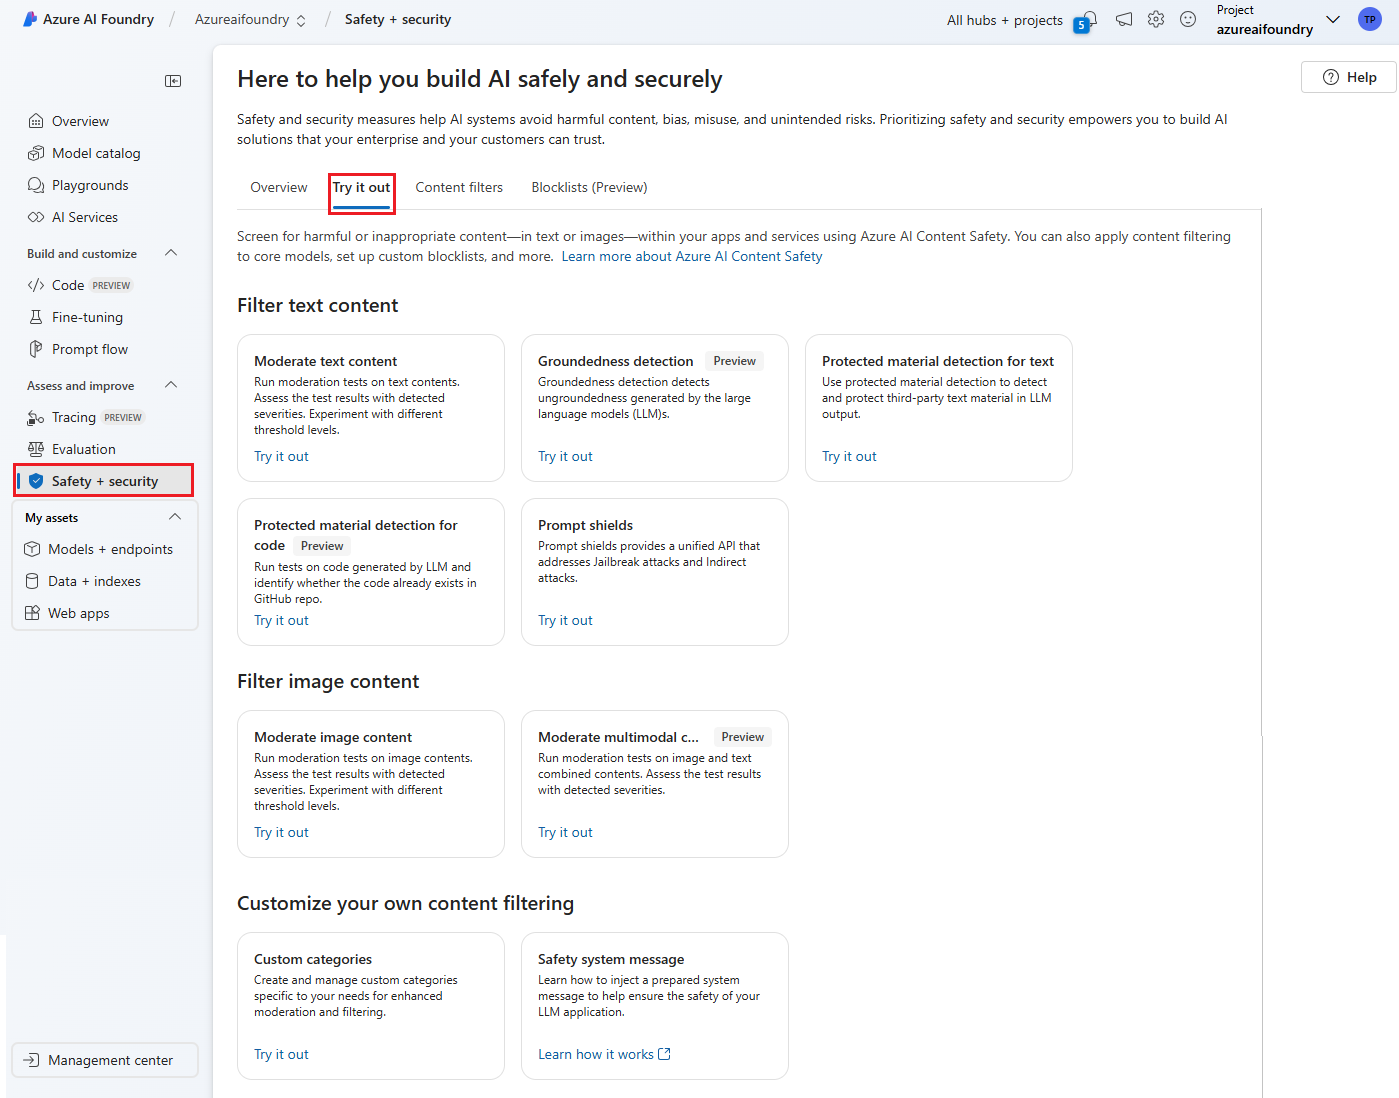
Follow these steps to use the Content Safety try it out page:
- Go to Azure AI Foundry and navigate to your project/hub. Then select the Guardrails + controls tab on the left nav and select the Try it out tab.
- On the Try it out page, you can experiment with various Guardrails & controls features such as text and image content, using adjustable thresholds to filter for inappropriate or harmful content.
Use a blocklist
The Use blocklist tab lets you create, edit, and add a blocklist to the moderation workflow. If you have a blocklist enabled when you run the test, you get a Blocklist detection panel under Results. It reports any matches with the blocklist.

Prerequisites
- An Azure subscription - Create one for free
- Once you have your Azure subscription, create a Content Safety resource in the Azure portal to get your key and endpoint. Enter a unique name for your resource, select your subscription, and select a resource group, supported region (see Region availability), and supported pricing tier. Then select Create.
- The resource takes a few minutes to deploy. After it finishes, Select go to resource. In the left pane, under Resource Management, select Subscription Key and Endpoint. The endpoint and either of the keys are used to call APIs.
- cURL installed
Create a blocklist
The following section walks through a sample request with cURL. Paste the command below into a text editor, and make the following changes.
- Replace
<endpoint>with the endpoint URL associated with your resource. - Replace
<your_subscription_key>with one of the keys that come with your resource. - Replace
<your_blocklist_name>with a name for your blocklist. - Optionally, replace the
"description"field in the body with your own description of the list.
curl --location --request PATCH '<endpoint>/contentsafety/text/blocklists/<your_blocklist_name>?api-version=2024-09-01' --header 'Ocp-Apim-Subscription-Key: <your_subscription_key>' --header 'Content-Type: application/json' --data-raw '{"description": "This is a violence list"}'
The below fields must be included in the url:
| Name | Required | Description | Type |
|---|---|---|---|
| API Version | Required | This is the API version to be checked. The current version is: api-version=2024-09-01. Example: <endpoint>/contentsafety/text:analyze?api-version=2024-09-01 |
String |
See the following sample request body:
{
  "description": "Test Blocklist"
}
Open a command prompt window, paste in the edited cURL command, and run it.
Output
You should see the results displayed as JSON data in the console output. For example:
{
  "blocklistName": "TestBlocklist",
  "description": "Test Blocklist"
}
Add items to a blocklist
The following section walks through a sample request with cURL. Paste the command below into a text editor, and make the following changes.
- Replace
<endpoint>with the endpoint URL associated with your resource. - Replace
<your_subscription_key>with one of the keys that come with your resource. - Replace
<your_blocklist_name>with a name for your blocklist. - Optionally, replace the
"description"and"text"fields in the body with your own blocklist item and description.
curl --request POST <endpoint>/contentsafety/text/blocklists/<your_blocklist_name>:addOrUpdateBlocklistItems?api-version=2024-09-01 --header 'Ocp-Apim-Subscription-Key: <your_subscription_key>' --header 'Content-Type: application/json' --data-raw '{"blocklistItems": [{"description": "string", "text": "bleed"}]}'
The below fields must be included in the url:
| Name | Required | Description | Type |
|---|---|---|---|
| API Version | Required | This is the API version to be checked. The current version is: api-version=2024-09-01. Example: <endpoint>/contentsafety/text:analyze?api-version=2024-09-01 |
String |
See the following sample request body:
{
  "blocklistItems": [
    {
      "description": "Hate word",
      "text": "hate"
    },
    {
      "description": "A regular expression that matches harmful words.",
      "text": "b[i1][a@][s\\$]",
      "isRegex": true
    }
  ]
}
Open a command prompt window, paste in the edited cURL command, and run it.
Output
You should see the results displayed as JSON data in the console output. For example:
{
  "blocklistItems": [
    {
      "blocklistItemId": "9511969e-f1e3-4604-9127-05ee16c509ec",
      "description": "Hate word",
      "text": "hate",
      "isRegex": false
    },
    {
      "blocklistItemId": "d9b2d63d-a233-4123-847a-7d1b5b3b8a8e",
      "description": "A regular expression that matches harmful words.",
      "text": "b[i1][a@][s\\$]",
      "isRegex": true
    }
  ]
}
Analyze text against a blocklist
Note
After you edit a blocklist, it can take a few minutes before text analysis reflects the changes. If you don't see matches right away, retry the analyze call after a short delay.
The following section walks through a sample request with cURL. Paste the command below into a text editor, and make the following changes.
- Replace
<endpoint>with the endpoint URL associated with your resource. - Replace
<your_subscription_key>with one of the keys that come with your resource. - Replace
<your_blocklist_name>with a name for your blocklist. - Replace
<sample_text>with the text you want to analyze against the blocklist.
curl --request POST '<endpoint>/contentsafety/text:analyze?api-version=2024-09-01' --header 'Ocp-Apim-Subscription-Key: <your_subscription_key>' --header 'Content-Type: application/json' --data-raw '{ "text": "<sample_text>", "categories": [ "Hate", "Sexual", "SelfHarm", "Violence" ], "blocklistNames":["<your_blocklist_name>"], "haltOnBlocklistHit": false,"outputType": "FourSeverityLevels"}'
The below fields must be included in the url:
| Name | Required | Description | Type |
|---|---|---|---|
| API Version | Required | This is the API version to be checked. The current version is: api-version=2024-09-01. Example: <endpoint>/contentsafety/text:analyze?api-version=2024-09-01 |
String |
See the following sample request body:
{
  "text": "<sample_text>",
  "categories": [
    "Hate",
    "Sexual",
    "SelfHarm",
    "Violence"
  ],
  "blocklistNames": [
    "<your_blocklist_name>"
  ],
  "haltOnBlocklistHit": false,
  "outputType": "FourSeverityLevels"
}
Open a command prompt window, paste in the edited cURL command, and run it.
Output
You should see the analyze results displayed as JSON data in the console output. For example:
{
  "blocklistsMatch": [
    {
      "blocklistName": "my-list",
      "blocklistItemId": "877bd6a0-236d-40f5-b6c2-07a6a1886ab1",
      "blocklistItemText": "bleed"
    }
  ],
  "categoriesAnalysis": [
    {
      "category": "Hate",
      "severity": 2
    },
    {
      "category": "Sexual",
      "severity": 0
    },
    {
      "category": "SelfHarm",
      "severity": 0
    },
    {
      "category": "Violence",
      "severity": 4
    }
  ]
}
Reference documentation | Library source code | Package (NuGet) | Samples
Prerequisites
- An Azure subscription - Create one for free
- The Visual Studio IDE with workload .NET desktop development enabled. Or if you don't plan on using Visual Studio IDE, you need the current version of .NET Core.
- Once you have your Azure subscription, create a Content Safety resource in the Azure portal to get your key and endpoint. Enter a unique name for your resource, select your subscription, and select a resource group, supported region (see Region availability), and supported pricing tier. Then select Create.
- The resource takes a few minutes to deploy. After it finishes, Select go to resource. In the left pane, under Resource Management, select Subscription Key and Endpoint. The endpoint and either of the keys are used to call APIs.
Set up application
Create a new C# application.
Open Visual Studio, and under Get started select Create a new project. Set the template filters to C#/All Platforms/Console. Select Console App (command-line application that can run on .NET on Windows, Linux and macOS) and choose Next. Update the project name to ContentSafetyQuickstart and choose Next. Select .NET 6.0 or above, and choose Create to create the project.
Install the client SDK
Once you've created a new project, install the client SDK by right-clicking on the project solution in the Solution Explorer and selecting Manage NuGet Packages. In the package manager that opens select Browse, and search for Azure.AI.ContentSafety. Select Install.
Create environment variables
In this example, you'll write your credentials to environment variables on the local machine running the application.
To set the environment variable for your key and endpoint, open a console window and follow the instructions for your operating system and development environment.
- To set the
CONTENT_SAFETY_KEYenvironment variable, replaceYOUR_CONTENT_SAFETY_KEYwith one of the keys for your resource. - To set the
CONTENT_SAFETY_ENDPOINTenvironment variable, replaceYOUR_CONTENT_SAFETY_ENDPOINTwith the endpoint for your resource.
Important
Use API keys with caution. Don't include the API key directly in your code, and never post it publicly. If you use an API key, store it securely in Azure Key Vault. For more information about using API keys securely in your apps, see API keys with Azure Key Vault.
For more information about AI services security, see Authenticate requests to Azure AI services.
setx CONTENT_SAFETY_KEY 'YOUR_CONTENT_SAFETY_KEY'
setx CONTENT_SAFETY_ENDPOINT 'YOUR_CONTENT_SAFETY_ENDPOINT'
After you add the environment variables, you might need to restart any running programs that will read the environment variables, including the console window.
Create and use a blocklist
From the project directory, open the Program.cs file that was created previously. Paste in the following code. This code creates a new blocklist, adds items to it, and then analyzes a text string against the blocklist.
using System;
using Azure.AI.ContentSafety;
using Azure;
using Azure.Core;

class ContentSafetyBlocklist
{
    public static void UseBlocklist()
    {

        string endpoint = Environment.GetEnvironmentVariable("CONTENT_SAFETY_ENDPOINT");
        string key = Environment.GetEnvironmentVariable("CONTENT_SAFETY_KEY");
        Console.WriteLine("Endpoint: "+ endpoint);
        Console.WriteLine("Key: "+ key);

        BlocklistClient blocklistClient = new BlocklistClient(new Uri(endpoint), new AzureKeyCredential(key));

        var blocklistName = "ProductSaleBlocklist";
        var blocklistDescription = "Contains terms related to the sale of a product.";

        var data = new
        {
            description = blocklistDescription,
        };

        // create blocklist
        var createResponse = blocklistClient.CreateOrUpdateTextBlocklist(blocklistName, RequestContent.Create(data));

        if (createResponse.Status == 201)
        {
            Console.WriteLine("\nBlocklist {0} created.", blocklistName);
        }

        // Add blocklistItems

        string blocklistItemText1 = "price";
        string blocklistItemText2 = "offer";

        var blocklistItems = new TextBlocklistItem[] { new TextBlocklistItem(blocklistItemText1), new TextBlocklistItem(blocklistItemText2) };
        var addedBlocklistItems = blocklistClient.AddOrUpdateBlocklistItems(blocklistName, new AddOrUpdateTextBlocklistItemsOptions(blocklistItems));

        if (addedBlocklistItems != null && addedBlocklistItems.Value != null)
        {
            Console.WriteLine("\nBlocklistItems added:");
            foreach (var addedBlocklistItem in addedBlocklistItems.Value.BlocklistItems)
            {
                Console.WriteLine("BlocklistItemId: {0}, Text: {1}, Description: {2}", addedBlocklistItem.BlocklistItemId, addedBlocklistItem.Text, addedBlocklistItem.Description);
            }
        }

        // Analyze text
        ContentSafetyClient client = new ContentSafetyClient(new Uri(endpoint), new AzureKeyCredential(key));

        // After you edit your blocklist, it usually takes effect in 5 minutes, please wait some time before analyzing with blocklist after editing.
        var request = new AnalyzeTextOptions("You can order a copy now for the low price of $19.99.");
        request.BlocklistNames.Add(blocklistName);
        request.HaltOnBlocklistHit  = true;

        Response<AnalyzeTextResult> response;
        try
        {
            response = client.AnalyzeText(request);
        }
        catch (RequestFailedException ex)
        {
            Console.WriteLine("Analyze text failed.\nStatus code: {0}, Error code: {1}, Error message: {2}", ex.Status, ex.ErrorCode, ex.Message);
            throw;
        }

        if (response.Value.BlocklistsMatch != null)
        {
            Console.WriteLine("\nBlocklist match result:");
            foreach (var matchResult in response.Value.BlocklistsMatch)
            {
                Console.WriteLine("BlocklistName: {0}, BlocklistItemId: {1}, BlocklistText: {2}, ", matchResult.BlocklistName, matchResult.BlocklistItemId, matchResult.BlocklistItemText);
            }
        }
    }
    static void Main()
    {
        UseBlocklist();
    }
}
Optionally replace the blocklist name and items with your own.
Build and run the application by selecting Start Debugging from the Debug menu at the top of the IDE window (or press F5).
Reference documentation | Library source code | Artifact (Maven) | Samples
Prerequisites
- An Azure subscription - Create one for free
- The current version of the Java Development Kit (JDK)
- The Gradle build tool, or another dependency manager.
- Once you have your Azure subscription, create a Content Safety resource in the Azure portal to get your key and endpoint. Enter a unique name for your resource, select your subscription, and select a resource group, supported region (see Region availability), and supported pricing tier. Then select Create.
- The resource takes a few minutes to deploy. After it finishes, Select go to resource. In the left pane, under Resource Management, select Subscription Key and Endpoint. The endpoint and either of the keys are used to call APIs.
Set up application
Create a new Gradle project.
In a console window (such as cmd, PowerShell, or Bash), create a new directory for your app, and navigate to it.
mkdir myapp && cd myapp
Run the gradle init command from your working directory. This command will create essential build files for Gradle, including build.gradle.kts, which is used at runtime to create and configure your application.
gradle init --type basic
When prompted to choose a DSL, select Kotlin.
Install the client SDK
This quickstart uses the Gradle dependency manager. You can find the client library and information for other dependency managers on the Maven Central Repository.
Locate build.gradle.kts and open it with your preferred IDE or text editor. Then copy in the following build configuration. This configuration defines the project as a Java application whose entry point is the class ContentSafetyBlocklistQuickstart. It imports the Azure AI Content Safety library.
plugins {
    java
    application
}
application {
    mainClass.set("ContentSafetyBlocklistQuickstart")
}
repositories {
    mavenCentral()
}
dependencies {
    implementation(group = "com.azure", name = "azure-ai-contentsafety", version = "1.0.0")
}
Create environment variables
In this example, you'll write your credentials to environment variables on the local machine running the application.
To set the environment variable for your key and endpoint, open a console window and follow the instructions for your operating system and development environment.
- To set the
CONTENT_SAFETY_KEYenvironment variable, replaceYOUR_CONTENT_SAFETY_KEYwith one of the keys for your resource. - To set the
CONTENT_SAFETY_ENDPOINTenvironment variable, replaceYOUR_CONTENT_SAFETY_ENDPOINTwith the endpoint for your resource.
Important
Use API keys with caution. Don't include the API key directly in your code, and never post it publicly. If you use an API key, store it securely in Azure Key Vault. For more information about using API keys securely in your apps, see API keys with Azure Key Vault.
For more information about AI services security, see Authenticate requests to Azure AI services.
setx CONTENT_SAFETY_KEY 'YOUR_CONTENT_SAFETY_KEY'
setx CONTENT_SAFETY_ENDPOINT 'YOUR_CONTENT_SAFETY_ENDPOINT'
After you add the environment variables, you might need to restart any running programs that will read the environment variables, including the console window.
Create and use a blocklist
From your working directory, run the following command to create a project source folder:
mkdir -p src/main/java
Navigate to the new folder and create a file called ContentSafetyBlocklistQuickstart.java.
Open ContentSafetyBlocklistQuickstart.java in your preferred editor or IDE and paste in the following code. This code creates a new blocklist, adds items to it, and then analyzes a text string against the blocklist.
import com.azure.ai.contentsafety.*;


import com.azure.ai.contentsafety.models.AddOrUpdateTextBlocklistItemsOptions;
import com.azure.ai.contentsafety.models.AddOrUpdateTextBlocklistItemsResult;
import com.azure.ai.contentsafety.models.AnalyzeTextOptions;
import com.azure.ai.contentsafety.models.AnalyzeTextResult;
import com.azure.ai.contentsafety.models.RemoveTextBlocklistItemsOptions;
import com.azure.ai.contentsafety.models.TextBlocklist;
import com.azure.ai.contentsafety.models.TextBlocklistItem;
import com.azure.ai.contentsafety.models.TextBlocklistMatch;
import com.azure.core.credential.KeyCredential;
import com.azure.core.exception.HttpResponseException;
import com.azure.core.http.rest.PagedIterable;
import com.azure.core.http.rest.RequestOptions;
import com.azure.core.http.rest.Response;
import com.azure.core.util.BinaryData;
import com.azure.core.util.Configuration;

import java.util.HashMap;
import java.util.Map;
import java.util.List;
import java.util.Arrays;
import java.util.ArrayList;

public class ContentSafetyBlocklistQuickstart {
    public static void main(String[] args) {
        String endpoint = Configuration.getGlobalConfiguration().get("CONTENT_SAFETY_ENDPOINT");
        String key = Configuration.getGlobalConfiguration().get("CONTENT_SAFETY_KEY");

        BlocklistClient blocklistClient = new BlocklistClientBuilder()
            .credential(new KeyCredential(key))
            .endpoint(endpoint).buildClient();

        String blocklistName = "ProductSaleBlocklist";
        Map<String, String> description = new HashMap<>();
        description.put("description", "Contains terms related to the sale of a product.");
        BinaryData resource = BinaryData.fromObject(description);
        RequestOptions requestOptions = new RequestOptions();
        Response<BinaryData> response =
            blocklistClient.createOrUpdateTextBlocklistWithResponse(blocklistName, resource, requestOptions);
        if (response.getStatusCode() == 201) {
            System.out.println("\nBlocklist " + blocklistName + " created.");
        } else if (response.getStatusCode() == 200) {
            System.out.println("\nBlocklist " + blocklistName + " updated.");
        }

        String blockItemText1 = "price";
        String blockItemText2 = "offer";
        List<TextBlocklistItem> blockItems = Arrays.asList(
            new TextBlocklistItem(blockItemText1).setDescription("Price word"),
            new TextBlocklistItem(blockItemText2).setDescription("Offer word")
        );
        AddOrUpdateTextBlocklistItemsResult addedBlockItems = blocklistClient.addOrUpdateBlocklistItems(blocklistName,
            new AddOrUpdateTextBlocklistItemsOptions(blockItems));
        if (addedBlockItems != null && addedBlockItems.getBlocklistItems() != null) {
            System.out.println("\nBlockItems added:");
            for (TextBlocklistItem addedBlockItem : addedBlockItems.getBlocklistItems()) {
                System.out.println("BlockItemId: " + addedBlockItem.getBlocklistItemId() + ", Text: " + addedBlockItem.getText() + ", Description: " + addedBlockItem.getDescription());
            }
        }

        ContentSafetyClient contentSafetyClient = new ContentSafetyClientBuilder()
            .credential(new KeyCredential(key))
            .endpoint(endpoint).buildClient();
        AnalyzeTextOptions request = new AnalyzeTextOptions("You can order a copy now for the low price of $19.99.");
        request.setBlocklistNames(Arrays.asList(blocklistName));
        request.setHaltOnBlocklistHit(true);

        AnalyzeTextResult analyzeTextResult;
        try {
            analyzeTextResult = contentSafetyClient.analyzeText(request);
        } catch (HttpResponseException ex) {
            System.out.println("Analyze text failed.\nStatus code: " + ex.getResponse().getStatusCode() + ", Error message: " + ex.getMessage());
            throw ex;
        }

        if (analyzeTextResult.getBlocklistsMatch() != null) {
            System.out.println("\nBlocklist match result:");
            for (TextBlocklistMatch matchResult : analyzeTextResult.getBlocklistsMatch()) {
                System.out.println("BlocklistName: " + matchResult.getBlocklistName() + ", BlockItemId: " + matchResult.getBlocklistItemId() + ", BlockItemText: " + matchResult.getBlocklistItemText());
            }
        }
    }
}
Optionally replace the blocklist name and items with your own.
Navigate back to the project root folder, and build the app with:
gradle build
Then, run it with the gradle run command:
gradle run
Output
Blocklist ProductSaleBlocklist updated.

BlockItems added:
BlockItemId: 6155969c-1589-4c27-8cb0-61758985b2d9, Text: price, Description: Price word
BlockItemId: 0ca9ff49-d89b-4ecd-a451-28bd303342e1, Text: offer, Description: Offer word

Blocklist match result:
BlocklistName: ProductSaleBlocklist, BlockItemId: 6155969c-1589-4c27-8cb0-61758985b2d9, BlockItemText: price
Reference documentation | Library source code | Package (PyPI) | Samples |
Prerequisites
- An Azure subscription - Create one for free
- Once you have your Azure subscription, create a Content Safety resource in the Azure portal to get your key and endpoint. Enter a unique name for your resource, select your subscription, and select a resource group, supported region (see Region availability), and supported pricing tier. Then select Create.
- The resource takes a few minutes to deploy. After it finishes, Select go to resource. In the left pane, under Resource Management, select Subscription Key and Endpoint. The endpoint and either of the keys are used to call APIs.
- Python 3.x
- Your Python installation should include pip. You can check if you have pip installed by running
pip --versionon the command line. Get pip by installing the latest version of Python.
- Your Python installation should include pip. You can check if you have pip installed by running
Create environment variables
In this example, you'll write your credentials to environment variables on the local machine running the application.
To set the environment variable for your key and endpoint, open a console window and follow the instructions for your operating system and development environment.
- To set the
CONTENT_SAFETY_KEYenvironment variable, replaceYOUR_CONTENT_SAFETY_KEYwith one of the keys for your resource. - To set the
CONTENT_SAFETY_ENDPOINTenvironment variable, replaceYOUR_CONTENT_SAFETY_ENDPOINTwith the endpoint for your resource.
Important
Use API keys with caution. Don't include the API key directly in your code, and never post it publicly. If you use an API key, store it securely in Azure Key Vault. For more information about using API keys securely in your apps, see API keys with Azure Key Vault.
For more information about AI services security, see Authenticate requests to Azure AI services.
setx CONTENT_SAFETY_KEY 'YOUR_CONTENT_SAFETY_KEY'
setx CONTENT_SAFETY_ENDPOINT 'YOUR_CONTENT_SAFETY_ENDPOINT'
After you add the environment variables, you might need to restart any running programs that will read the environment variables, including the console window.
Create and use a blocklist
The code in this section creates a new blocklist, adds items to it, and then analyzes a text string against the blocklist.
Open a command prompt, navigate to your project folder, and create a new file named quickstart.py.
Run this command to install the Azure AI Content Safety library:
pip install azure-ai-contentsafetyCopy the following code into quickstart.py:
import os
from azure.ai.contentsafety import BlocklistClient
from azure.ai.contentsafety import ContentSafetyClient
from azure.core.credentials import AzureKeyCredential
from azure.core.exceptions import HttpResponseError
from azure.ai.contentsafety.models import (
    TextBlocklist, AddOrUpdateTextBlocklistItemsOptions, TextBlocklistItem, AnalyzeTextOptions
)
from azure.core.exceptions import HttpResponseError

key = os.environ["CONTENT_SAFETY_KEY"]
endpoint = os.environ["CONTENT_SAFETY_ENDPOINT"]

# Create a Blocklist client
client = BlocklistClient(endpoint, AzureKeyCredential(key))

blocklist_name = "<your-blocklist-name>"
blocklist_description = "<description>"

try:
    blocklist = client.create_or_update_text_blocklist(
        blocklist_name=blocklist_name,
        options=TextBlocklist(blocklist_name=blocklist_name, description=blocklist_description),
    )
    if blocklist:
        print("\nBlocklist created or updated: ")
        print(f"Name: {blocklist.blocklist_name}, Description: {blocklist.description}")
except HttpResponseError as e:
    print("\nCreate or update text blocklist failed: ")
    if e.error:
        print(f"Error code: {e.error.code}")
        print(f"Error message: {e.error.message}")
        raise
    print(e)
    raise


# add items
blocklist_item_text_1 = "<block_item_text_1>"
blocklist_item_text_2 = "<block_item_text_2>"

blocklist_items = [TextBlocklistItem(text=blocklist_item_text_1), TextBlocklistItem(text=blocklist_item_text_2)]
try:
    result = client.add_or_update_blocklist_items(
        blocklist_name=blocklist_name, options=AddOrUpdateTextBlocklistItemsOptions(blocklist_items=blocklist_items))
    for blocklist_item in result.blocklist_items:
        print(
            f"BlocklistItemId: {blocklist_item.blocklist_item_id}, Text: {blocklist_item.text}, Description: {blocklist_item.description}"
        )
except HttpResponseError as e:
    print("\nAdd blocklistItems failed: ")
    if e.error:
        print(f"Error code: {e.error.code}")
        print(f"Error message: {e.error.message}")
        raise
    print(e)
    raise

# analyze

# Create a Content Safety client
client = ContentSafetyClient(endpoint, AzureKeyCredential(key))

input_text = "<sample input text>"

try:
    # After you edit your blocklist, it usually takes effect in 5 minutes, please wait some time before analyzing
    # with blocklist after editing.
    analysis_result = client.analyze_text(
        AnalyzeTextOptions(text=input_text, blocklist_names=[blocklist_name], halt_on_blocklist_hit=False)
    )
    if analysis_result and analysis_result.blocklists_match:
        print("\nBlocklist match results: ")
        for match_result in analysis_result.blocklists_match:
            print(
                f"BlocklistName: {match_result.blocklist_name}, BlocklistItemId: {match_result.blocklist_item_id}, "
                f"BlocklistItemText: {match_result.blocklist_item_text}"
            )
except HttpResponseError as e:
    print("\nAnalyze text failed: ")
    if e.error:
        print(f"Error code: {e.error.code}")
        print(f"Error message: {e.error.message}")
        raise
    print(e)
    raise
Replace the following placeholders with your own values:
<your-blocklist-name>: A unique name for your blocklist.<description>: A description of your blocklist.<block_item_text_1>: The first item to add to your blocklist.<block_item_text_2>: The second item to add to your blocklist.<sample input text>: The text you want to analyze against the blocklist.
Then run the application with the
pythoncommand on your quickstart file.python quickstart.py
Reference documentation | Library source code | Package (npm) | Samples |
Prerequisites
- An Azure subscription - Create one for free
- Node.js LTS
- Visual Studio Code
- Once you have your Azure subscription, create a Content Safety resource in the Azure portal to get your key and endpoint. Enter a unique name for your resource, select your subscription, and select a resource group, supported region (see Region availability), and supported pricing tier. Then select Create.
- The resource takes a few minutes to deploy. After it finishes, select Go to resource. In the left pane, under Resource Management, select Subscription Key and Endpoint. The endpoint and either of the keys are used to call APIs.
Set up application
Create a new Node.js application. In a console window (such as cmd, PowerShell, or Bash), create a new directory for your app, and navigate to it.
mkdir myapp && cd myapp
Run the npm init command to create a node application with a package.json file.
npm init
Install the client SDK
Install the required npm packages:
npm install @azure-rest/ai-content-safety
Also install the dotenv module to use environment variables:
npm install dotenv
Your app's package.json file will be updated with the dependencies.
Create environment variables
In this example, you'll write your credentials to environment variables on the local machine running the application.
To set the environment variable for your key and endpoint, open a console window and follow the instructions for your operating system and development environment.
- To set the
CONTENT_SAFETY_KEYenvironment variable, replaceYOUR_CONTENT_SAFETY_KEYwith one of the keys for your resource. - To set the
CONTENT_SAFETY_ENDPOINTenvironment variable, replaceYOUR_CONTENT_SAFETY_ENDPOINTwith the endpoint for your resource.
Important
Use API keys with caution. Don't include the API key directly in your code, and never post it publicly. If you use an API key, store it securely in Azure Key Vault. For more information about using API keys securely in your apps, see API keys with Azure Key Vault.
For more information about AI services security, see Authenticate requests to Azure AI services.
setx CONTENT_SAFETY_KEY 'YOUR_CONTENT_SAFETY_KEY'
setx CONTENT_SAFETY_ENDPOINT 'YOUR_CONTENT_SAFETY_ENDPOINT'
After you add the environment variables, you might need to restart any running programs that will read the environment variables, including the console window.
Create and use a blocklist
Create a new file in your directory, index.js. Open it in your preferred editor or IDE and paste in the following code. This code creates a new blocklist, adds items to it, and then analyzes a text string against the blocklist.
Note
After you edit a blocklist, it can take a few minutes before text analysis reflects the changes. If you don't see matches right away, retry the analyze call after a short delay.
const ContentSafetyClient = require("@azure-rest/ai-content-safety").default;
const { AzureKeyCredential } = require("@azure/core-auth");
require("dotenv").config();


async function useBlocklist() {
    const endpoint = process.env["CONTENT_SAFETY_ENDPOINT"];
    const key = process.env["CONTENT_SAFETY_KEY"];
    const credential = new AzureKeyCredential(key);
    const client = ContentSafetyClient(endpoint, credential);

    const blocklistName = "ProductSaleBlocklist-Node";
    const blocklistDescription = "Contains terms related to the sale of a product.";

    // Create or update blocklist
    const createBlocklistResponse = await client
        .path("/text/blocklists/{blocklistName}", blocklistName)
        .patch({
            body: { description: blocklistDescription },
            contentType: "application/merge-patch+json"
        });

    // Wait for the blocklist to be available
    await new Promise(resolve => setTimeout(resolve, 5000)); // 5 seconds

    if (createBlocklistResponse.status === '201' || createBlocklistResponse.status === '200') {
        console.log(`Blocklist ${blocklistName} created or updated.`);
        console.log(`Blocklist name: ${createBlocklistResponse.body.blocklistName}`);
    } else {
        console.error("Failed to create or update blocklist. ", createBlocklistResponse);
        return;
    }

    // Add blocklist items
    const blocklistItems = [
        { text: "price" },
        { text: "offer" }
    ];

    const addItemsResponse = await client
        .path("/text/blocklists/{blocklistName}:addOrUpdateBlocklistItems", blocklistName)
        .post({ body: { blocklistItems }, contentType: "application/json" });

    // Wait for the add operation
    await new Promise(resolve => setTimeout(resolve, 5000)); // 5 seconds

    if (addItemsResponse.status === '200') {
        console.log("Blocklist items added:");
        for (const item of addItemsResponse.body.blocklistItems) {
            console.log(`BlocklistItemId: ${item.blocklistItemId}, Text: ${item.text}, Description: ${item.description}`);
        }
    } else {
        console.error("Failed to add blocklist items. ", addItemsResponse);
    }


    // Analyze text
    const analyzeTextOption = {
        text: "You can order a copy now for the low price of $19.99.",
        blocklistNames: [blocklistName],
        haltOnBlocklistHit: true
    };

    const analyzeResponse = await client
        .path("/text:analyze")
        .post({ body: analyzeTextOption, contentType: "application/json" });

    if (analyzeResponse.body.blocklistsMatch) {
        console.log("Blocklist match result:");
        for (const match of analyzeResponse.body.blocklistsMatch) {
            console.log(`BlocklistName: ${match.blocklistName}, BlocklistItemId: ${match.blocklistItemId}, BlocklistText: ${match.blocklistItemText}`);
        }
    }
}

useBlocklist().catch((err) => {
    console.error("The sample encountered an error:", err);
});
Optionally replace the blocklist name and items with your own.
Run the application
Run the application with the node command on your quickstart file.
node index.js
Reference documentation | Library source code | Package (npm) | Samples |
Prerequisites
- An Azure subscription - Create one for free
- Node.js LTS
- TypeScript
- Visual Studio Code
- Once you have your Azure subscription, create a Content Safety resource in the Azure portal to get your key and endpoint. Enter a unique name for your resource, select your subscription, and select a resource group, supported region (see Region availability), and supported pricing tier. Then select Create.
- The resource takes a few minutes to deploy. After it finishes, Select go to resource. In the left pane, under Resource Management, select Subscription Key and Endpoint. The endpoint and either of the keys are used to call APIs.
Set up local development environment
Create a new directory for your project and navigate to it:
mkdir content-safety-blocklist-analysis
cd content-safety-blocklist-analysis
code .
Create a new package for ESM modules in your project directory:
npm init -y
npm pkg set type=module
Install the required packages:
npm install @azure-rest/ai-content-safetyInstall development dependencies:
npm install typescript @types/node --save-devCreate a
tsconfig.jsonfile in your project directory:{ "compilerOptions": { "target": "es2022", "module": "esnext", "moduleResolution": "bundler", "rootDir": "./src", "outDir": "./dist/", "esModuleInterop": true, "forceConsistentCasingInFileNames": true, "strict": true, "skipLibCheck": true, "declaration": true, "sourceMap": true, "resolveJsonModule": true, "moduleDetection": "force", "allowSyntheticDefaultImports": true, "verbatimModuleSyntax": false }, "include": [ "src/**/*.ts" ], "exclude": [ "node_modules/**/*", "**/*.spec.ts" ] }Update
package.jsonto include a script for building TypeScript files:"scripts": { "build": "tsc", "start": "node dist/index.js" }Create a
srcdirectory for your TypeScript code.
Create environment variables
In this example, you'll write your credentials to environment variables on the local machine running the application.
To set the environment variable for your key and endpoint, open a console window and follow the instructions for your operating system and development environment.
- To set the
CONTENT_SAFETY_KEYenvironment variable, replaceYOUR_CONTENT_SAFETY_KEYwith one of the keys for your resource. - To set the
CONTENT_SAFETY_ENDPOINTenvironment variable, replaceYOUR_CONTENT_SAFETY_ENDPOINTwith the endpoint for your resource.
Important
Use API keys with caution. Don't include the API key directly in your code, and never post it publicly. If you use an API key, store it securely in Azure Key Vault. For more information about using API keys securely in your apps, see API keys with Azure Key Vault.
For more information about AI services security, see Authenticate requests to Azure AI services.
setx CONTENT_SAFETY_KEY 'YOUR_CONTENT_SAFETY_KEY'
setx CONTENT_SAFETY_ENDPOINT 'YOUR_CONTENT_SAFETY_ENDPOINT'
After you add the environment variables, you might need to restart any running programs that will read the environment variables, including the console window.
Create and use a blocklist
Create a new file in your src directory, index.ts and paste in the following code.
Note
After you edit a blocklist, it can take a few minutes before text analysis reflects the changes. If you don't see matches right away, retry the analyze call after a short delay.
import ContentSafetyClient, {
  isUnexpected,
  CreateOrUpdateTextBlocklistParameters,
  CreateOrUpdateTextBlocklist200Response,
  CreateOrUpdateTextBlocklist201Response,
  CreateOrUpdateTextBlocklistDefaultResponse,
  AddOrUpdateBlocklistItemsParameters,
  AddOrUpdateBlocklistItems200Response,
  AddOrUpdateBlocklistItemsDefaultResponse,
  AnalyzeTextParameters,
  AnalyzeText200Response,
  AnalyzeTextDefaultResponse,
  AnalyzeTextOptions,
  TextBlocklist,
  TextBlocklistItem
} from "@azure-rest/ai-content-safety";
import { AzureKeyCredential } from "@azure/core-auth";

// Get endpoint and key from environment variables
const key = process.env.CONTENT_SAFETY_KEY;
const endpoint = process.env.CONTENT_SAFETY_ENDPOINT;

if (!key || !endpoint) {
  throw new Error("Missing required environment variables: CONTENT_SAFETY_KEY or CONTENT_SAFETY_ENDPOINT");
}

// Define your blocklist information
// This creates a custom blocklist for words/phrases you want to specifically block
const blocklistName = "company-prohibited-terms";
const blocklistDescription = "Custom blocklist for company-specific prohibited terms and phrases";

// Define items to block - these are specific words or phrases you want to flag
// Even if Azure AI doesn't naturally flag them, these will be caught
const blocklistItemText1 = "confidential project alpha";
const blocklistItemText2 = "internal revenue data";

// Define sample text for analysis that contains one of our blocked terms
const inputText = "Please don't share the confidential project alpha details with external teams.";

/**
 * Step 1: Create or update a custom blocklist container
 */
async function createBlocklistContainer(
  client: ReturnType<typeof ContentSafetyClient>,
  name: string,
  description: string
): Promise<void> {

  const blocklistData: TextBlocklist = {
    blocklistName: name,
    description: description
  };

  const createBlocklistParams: CreateOrUpdateTextBlocklistParameters = {
    body: blocklistData,
    contentType: "application/merge-patch+json"
  };

  const blocklistResult: CreateOrUpdateTextBlocklist200Response | CreateOrUpdateTextBlocklist201Response | CreateOrUpdateTextBlocklistDefaultResponse =
    await client.path("/text/blocklists/{blocklistName}", name).patch(createBlocklistParams);

  if (isUnexpected(blocklistResult)) {
    throw blocklistResult;
  }

  console.log("✅ Blocklist created successfully!");
  console.log(`   Name: ${blocklistResult.body.blocklistName}`);
  console.log(`   Description: ${blocklistResult.body.description || "No description"}\n`);
}

/**
 * Step 2: Add specific prohibited terms to the blocklist
 */
async function addProhibitedTerms(
  client: ReturnType<typeof ContentSafetyClient>,
  blocklistName: string,
  terms: string[]
): Promise<void> {

  const blocklistItems: TextBlocklistItem[] = terms.map(text => ({ text }));

  const addItemsParams: AddOrUpdateBlocklistItemsParameters = {
    body: { blocklistItems: blocklistItems }
  };

  const addItemsResult: AddOrUpdateBlocklistItems200Response | AddOrUpdateBlocklistItemsDefaultResponse =
    await client.path("/text/blocklists/{blocklistName}:addOrUpdateBlocklistItems", blocklistName).post(addItemsParams);

  if (isUnexpected(addItemsResult)) {
    throw addItemsResult;
  }

  console.log("✅ Terms added to blocklist successfully!");
  for (const item of addItemsResult.body.blocklistItems) {
    console.log(`   BlocklistItemId: ${item.blocklistItemId}`);
    console.log(`   Text: "${item.text}"`);
    console.log(`   Description: ${item.description || "No description"}\n`);
  }
}

/**
 * Step 3: Wait for blocklist changes to propagate through Azure's system
 */
async function waitForBlocklistActivation(seconds: number = 5): Promise<void> {
  await new Promise(resolve => setTimeout(resolve, seconds * 1000));
}

/**
 * Step 4: Analyze text against the custom blocklist
 */
async function analyzeTextAgainstBlocklist(
  client: ReturnType<typeof ContentSafetyClient>,
  textToAnalyze: string,
  blocklistName: string
): Promise<AnalyzeText200Response | AnalyzeTextDefaultResponse> {

  const analyzeTextOption: AnalyzeTextOptions = {
    text: textToAnalyze,
    blocklistNames: [blocklistName], // Use our custom blocklist
    haltOnBlocklistHit: false // Continue analysis even if blocklist match found
  };

  const analyzeTextParams: AnalyzeTextParameters = { body: analyzeTextOption };

  const analysisResult: AnalyzeText200Response | AnalyzeTextDefaultResponse =
    await client.path("/text:analyze").post(analyzeTextParams);

  if (isUnexpected(analysisResult)) {
    throw analysisResult;
  }

  return analysisResult;
}

/**
 * Step 5: Display analysis results and explain what they mean
 */
function displayAnalysisResults(analysisResult: AnalyzeText200Response): void {

  if (analysisResult.body.blocklistsMatch && analysisResult.body.blocklistsMatch.length > 0) {
    console.log("🚨 BLOCKED CONTENT DETECTED!");
    console.log("The following prohibited terms were found:\n");

    for (const match of analysisResult.body.blocklistsMatch) {
      console.log(`   Blocklist: ${match.blocklistName}`);
      console.log(`   Matched Term: "${match.blocklistItemText}"`);
      console.log(`   Item ID: ${match.blocklistItemId}\n`);
    }

  } else {
    console.log("✅ No blocked content found.");
    console.log("The text does not contain any terms from your custom blocklist.");
  }
}

try {
  const credential = new AzureKeyCredential(key);
  const client = ContentSafetyClient(endpoint, credential);

  // Execute the five main steps
  await createBlocklistContainer(client, blocklistName, blocklistDescription);
  await addProhibitedTerms(client, blocklistName, [blocklistItemText1, blocklistItemText2]);

  console.log("⏳ Waiting for blocklist changes to take effect...");
  await waitForBlocklistActivation();

  const analysisResult = await analyzeTextAgainstBlocklist(client, inputText, blocklistName);

  displayAnalysisResults(analysisResult as AnalyzeText200Response);

} catch (error: any) {
  console.error("❌ An error occurred:", error.message);
  if (error.code) {
    console.error(`Error code: ${error.code}`);
  }
  if (error.details) {
    console.error("Error details:", error.details);
  }
}
This code:
- Creates a custom blocklist.
- Adds prohibited terms to it.
- Analyzes text against the blocklist.
The TypeScript implementation provides strong typing for better development experience and error checking.
Build and run the sample
Compile the TypeScript code:
npm run buildRun the compiled JavaScript:
npm start
Output
When you run the application, you should see output similar to this:
✅ Blocklist created successfully!
   Name: company-prohibited-terms
   Description: Custom blocklist for company-specific prohibited terms and phrases

✅ Terms added to blocklist successfully!
   BlocklistItemId: 6fe21688-f65d-4d0b-9ff5-c6e5859ea83a
   Text: "internal revenue data"
   Description: No description

   BlocklistItemId: b48f958b-a58b-4d49-9e33-8ece75fc6c3b
   Text: "confidential project alpha"
   Description: No description

🚨 BLOCKED CONTENT DETECTED!
The following prohibited terms were found:

   Blocklist: company-prohibited-terms
   Matched Term: "confidential project alpha"
   Item ID: b48f958b-a58b-4d49-9e33-8ece75fc6c3b
Troubleshooting
- 401/403 (authentication errors): Confirm that you're using a key for the same resource as the endpoint.
- 404 or invalid URL: Confirm that the endpoint starts with
https://and matches the endpoint shown for your Azure AI Content Safety resource. - Blocklist changes don't apply yet: Blocklist changes can take a few minutes to take effect. If you don't see matches right away, retry the analyze call after a short delay.
Clean up resources
If you want to clean up and remove an Azure AI services subscription, you can delete the resource or resource group. Deleting the resource group also deletes any other resources associated with it.
Next step
Follow the Blocklist how-to guide for more in-depth guidance on how you can use the blocklist APIs.