Tutorial: Register APIs in your API inventory
In this tutorial, start the API inventory in your organization's API center by registering APIs and assigning metadata using the Azure portal.
For background information about APIs, API versions, definitions, and other entities that you can inventory in Azure API Center, see Key concepts.
In this tutorial, you learn how to use the portal to:
- Register one or more APIs
- Add an API version with an API definition
Prerequisites
An API center in your Azure subscription. If you haven't created one already, see Quickstart: Create your API center.
One or more APIs that you want to register in your API center. Here are two examples, with links to their OpenAPI definitions:
Complete the previous tutorial, Define custom metadata, to define custom metadata for your APIs.
Register APIs
When you register (add) an API in your API center, the API registration includes:
- A title (name), type, and description
- Version information
- Optional links to documentation and contacts
- Built-in and custom metadata that you defined
After registering an API, you can add versions and definitions to the API.
The following steps register two sample APIs: Swagger Petstore API and Demo Conference API (see Prerequisites). If you prefer, register APIs of your own.
In the portal, navigate to your API center.
In the left menu, under Assets, select APIs > + Register an API.
In the Register an API page, add the following information for the Swagger Petstore API. You'll see the custom Line of business and Public-facing metadata that you defined in the previous tutorial at the bottom of the page.
Setting Value Description API title Enter Swagger Petstore API. Name you choose for the API. Identification After you enter the preceding title, Azure API Center generates this identifier, which you can override. Azure resource name for the API. API type Select REST from the dropdown. Type of API. Summary Optionally enter a summary. Summary description of the API. Description Optionally enter a description. Description of the API. Version Version title Enter a version title of your choice, such as v1. Name you choose for the API version. Version identification After you enter the preceding title, Azure API Center generates this identifier, which you can override. Azure resource name for the version. Version lifecycle Make a selection from the dropdown, for example, Testing or Production. Lifecycle stage of the API version. External documentation Optionally add one or more links to external documentation. Name, description, and URL of documentation for the API. License Optionally add license information. Name, URL, and ID of a license for the API. Contact information Optionally add information for one or more contacts. Name, email, and URL of a contact for the API. Line of business If you added this metadata in the previous tutorial, make a selection from the dropdown, such as Marketing. Custom metadata that identifies the business unit that owns the API. Public-facing If you added this metadata, select the checkbox. Custom metadata that identifies whether the API is public-facing or internal only. 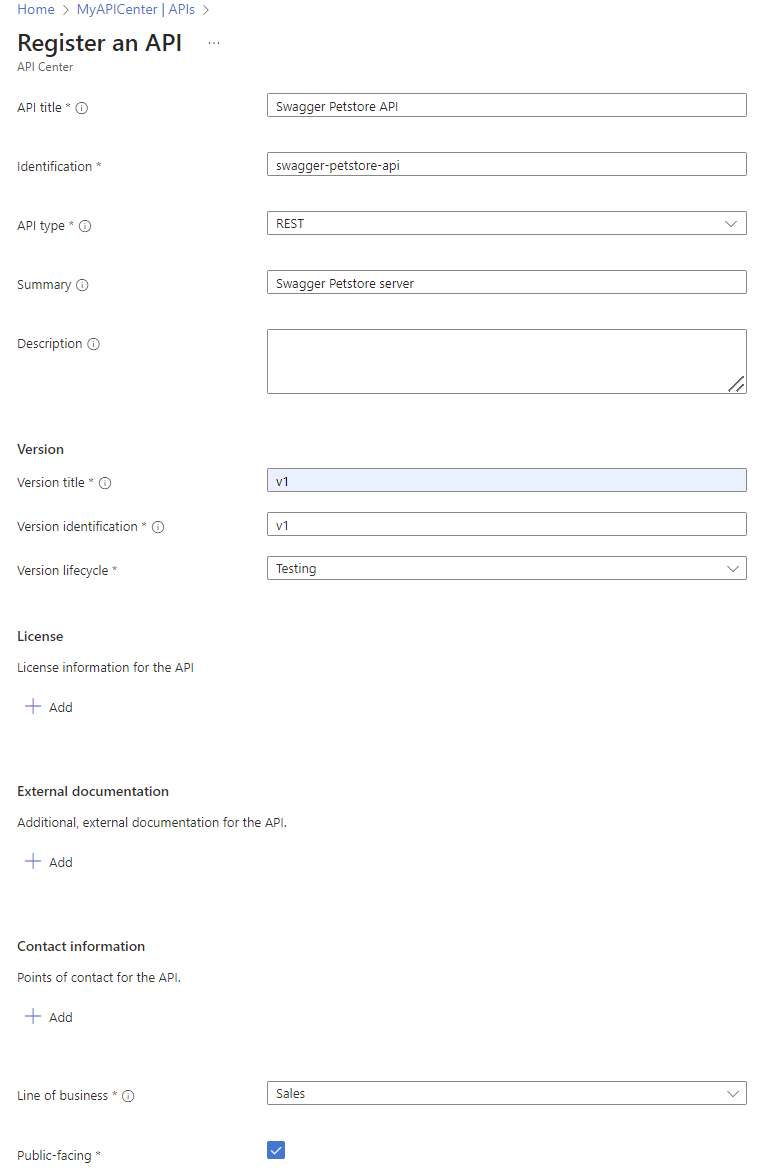
Select Create. The API is registered.
Repeat the preceding three steps to register another API, such as the Demo Conference API.
Tip
When you register an API in the portal, you can select any of the predefined API types or enter another type of your choice.
The APIs appear on the APIs page in the portal. When you've added a large number of APIs to the API center, use the search box and filters on this page to find the APIs you want.

After registering an API, you can view or edit the API's properties. On the APIs page, select the API to see pages to manage the API registration.
Add an API version
Throughout its lifecycle, an API could have multiple versions. You can add a version to an existing API in your API center, optionally with a definition file or files.
Here you add a version to one of your APIs:
In the portal, navigate to your API center.
In the left menu, select APIs, and then select an API, for example, Demo Conference API.
On the Demo Conference API page, under Details, select Versions > + Add version.

On the Add API version page:
Enter or select the following information:
Setting Value Description Version title Enter a version title of your choice, such as v2. Name you choose for the API version. Version identification After you enter the preceding title, Azure API Center generates this identifier, which you can override. Azure resource name for the version. Version lifecycle Make a selection from the dropdown, such as Production. Lifecycle stage of the API version. Select Create. The version is added.

Add a definition to your version
Usually you'll want to add an API definition to your API version. Azure API Center supports definitions in common text specification formats, such as OpenAPI 2 and 3 for REST APIs.
To add an API definition to your version:
On the Versions page of your API, select your API version.
In the left menu of your API version, under Details, select Definitions > + Add definition.
On the Add definition Page:
Enter or select the following information:
Setting Value Description Title Enter a title of your choice, such as v2 Definition. Name you choose for the API definition. Identification After you enter the preceding title, Azure API Center generates this identifier, which you can override. Azure resource name for the definition. Description Optionally enter a description. Description of the API definition. Specification name For the Demo Conference API, select OpenAPI. Specification format for the API. Specification version Enter a version identifier of your choice, such as 2.0. Specification version. Document Browse to a local definition file for the Demo Conference API, or enter a URL. Example URL: https://conferenceapi.azurewebsites.net?format=jsonAPI definition file. 
Select Create. The definition is added.

In this tutorial, you learned how to use the portal to:
- Register one or more APIs
- Add an API version with an API definition
As you build out your API inventory, take advantage of automated tools to register APIs, such as the Azure API Center extension for Visual Studio Code and the Azure CLI.
Next steps
Your API inventory is starting to take shape! Now you can add information about API environments and deployments.
Feedback
Coming soon: Throughout 2024 we will be phasing out GitHub Issues as the feedback mechanism for content and replacing it with a new feedback system. For more information see: https://aka.ms/ContentUserFeedback.
Submit and view feedback for