Note
Access to this page requires authorization. You can try signing in or changing directories.
Access to this page requires authorization. You can try changing directories.
APPLIES TO: All API Management tiers
API Management policies are a powerful capability of the system that allow the publisher to change the behavior of the API through configuration. Policies are a collection of statements that are executed sequentially on the request or response of an API. Policy statements can be constructed using literal text values, policy expressions, and named values.
Named values are a global collection of name/value pairs in each API Management instance. You can use named values to manage constant string values and secrets across all API configurations and policies.
Value types
| Type | Description |
|---|---|
| Plain | Literal string or policy expression |
| Secret | Literal string or policy expression that's encrypted by API Management |
| Key vault | Identifier of a secret stored in an Azure key vault. |
Plain values or secrets can contain policy expressions. For example, the expression @(DateTime.Now.ToString()) returns a string containing the current date and time.
For details about the named value attributes, see the API Management REST API reference.
Key vault secrets
Secret values can be stored either as encrypted strings in API Management (custom secrets) or by referencing secrets in Azure Key Vault.
We recommend using key vault secrets because they help improve API Management security:
Note
Currently, integration with key vault for this scenario isn't available in workspaces.
- You can reuse secrets stored in key vaults across services.
- You can apply granular access policies to secrets.
- Secrets updated in the key vault are automatically rotated in API Management. After update in the key vault, a named value in API Management is updated within four hours. You can also manually refresh the secret using the Azure portal or via the management REST API.
Note
The secrets stored in Azure Key Vault must be between 1 and 4096 characters, because API Management can't retrieve values that exceed this limit.
Prerequisites
- If you haven't created an API Management service instance yet, see Quickstart: Create a new Azure API Management instance by using the Azure portal.
Prerequisites for key vault integration
Note
Currently, this feature isn't available in workspaces.
If you don't already have a key vault, create one. For steps to create a key vault, see Quickstart: Create a key vault using the Azure portal.
To create or import a secret to the key vault, see Quickstart: Set and retrieve a secret from Azure Key Vault using the Azure portal.
Enable a system-assigned or user-assigned managed identity in the API Management instance.
Configure access to key vault
- In the Azure portal, go to your key vault.
- In the left menu, select Settings > Access configuration. Make a note of the configured Permission model.
- Depending on the permission model, configure either a key vault access policy or Azure RBAC access for an API Management managed identity.
To add a key vault access policy:
- In the left menu, select Access policies.
- On the Access policies page, select + Create.
- On the Permissions tab, under Secret permissions, select Get and List, and then select Next.
- On the Principal tab, search for the resource name of your managed identity, then select Next. If you're using a system-assigned identity, the principal is the name of your API Management instance.
- Select Next again. On the Review + create tab, select Create.
To configure Azure RBAC access:
- In the left menu, select Access control (IAM).
- On the Access control (IAM) page, select Add role assignment.
- On the Role tab, select Key Vault Secrets User, then select Next.
- On the Members tab, select Managed identity > + Select members.
- On the Select managed identity page, select the system-assigned managed identity or a user-assigned managed identity associated with your API Management instance, and then select Select.
- Select Review + assign.
Requirements for Key Vault firewall
If Key Vault firewall is enabled on your key vault, you must meet these requirements:
You must use the API Management instance's system-assigned managed identity to access the key vault.
In Key Vault firewall, enable the Allow Trusted Microsoft Services to bypass this firewall option:
- In your key vault, select Settings > Networking.
- Under Firewalls and virtual networks, select Allow public access from specific virtual networks and IP addresses.
- Under Exception, select Allow trusted Microsoft services to bypass this firewall.
API Management supports trusted service connectivity to access the key vault for control-plane options.
Ensure that your local client IP address is allowed to access the key vault temporarily. You must select a certificate or secret to add to Azure API Management. For more information, see Configure Azure Key Vault networking settings.
After you complete the configuration, you can block your client address in the key vault firewall.
Virtual network requirements
If the API Management instance is deployed in a virtual network, also configure the following network settings:
- Enable a service endpoint to Key Vault on the API Management subnet.
- Configure a network security group (NSG) rule to allow outbound traffic to the
AzureKeyVaultandAzureActiveDirectoryservice tags.
For more information, see Network configuration when setting up API Management in a virtual network.
Add or edit a named value
Add a key vault secret to API Management
See Prerequisites for key vault integration.
Important
When adding a key vault secret to your API Management instance, you must have permissions to list secrets from the key vault.
Caution
When using a key vault secret in API Management, be careful not to delete the secret, key vault, or managed identity used to access the key vault.
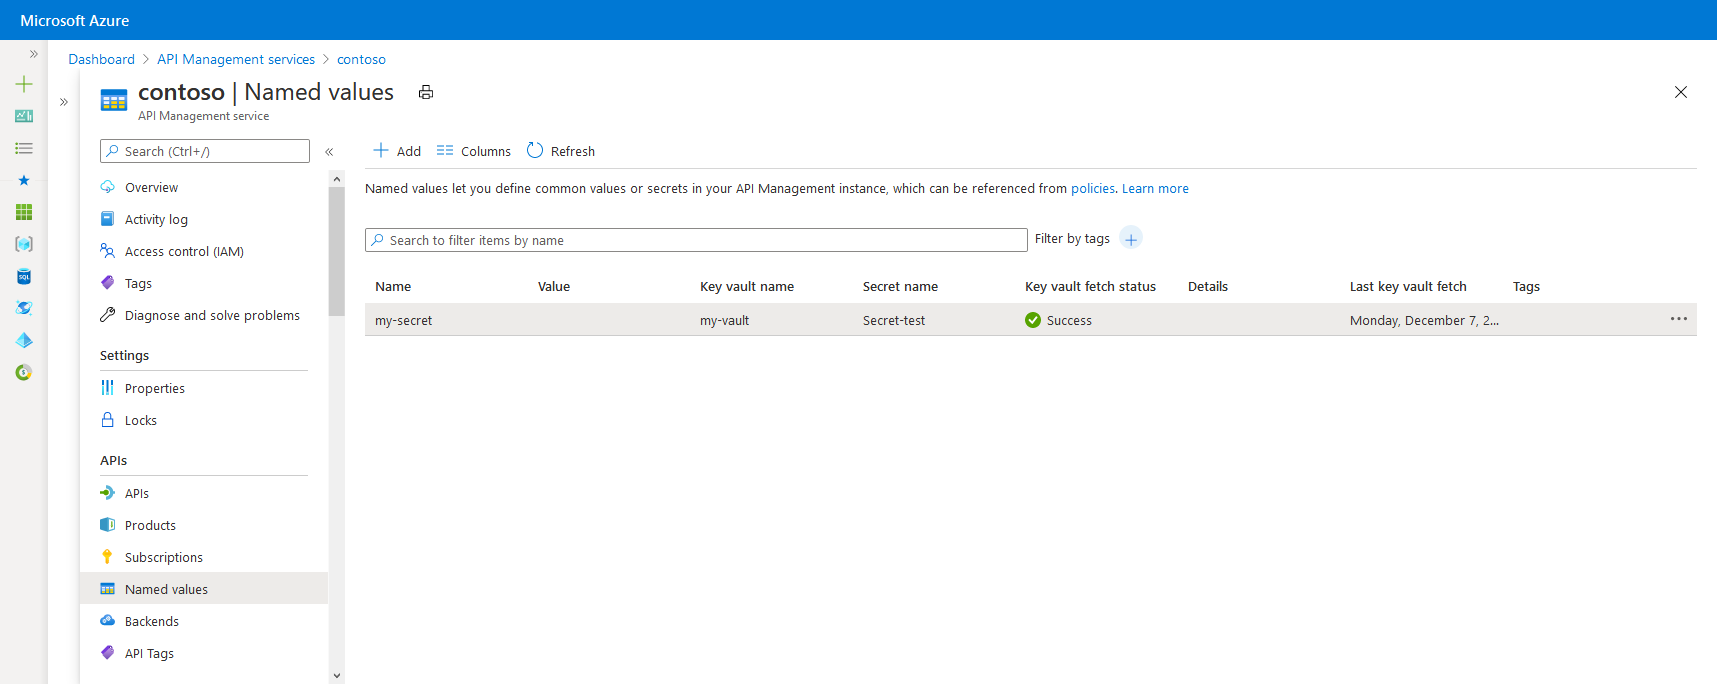
In the Azure portal, navigate to your API Management instance.
Under APIs, select Named values > + Add.
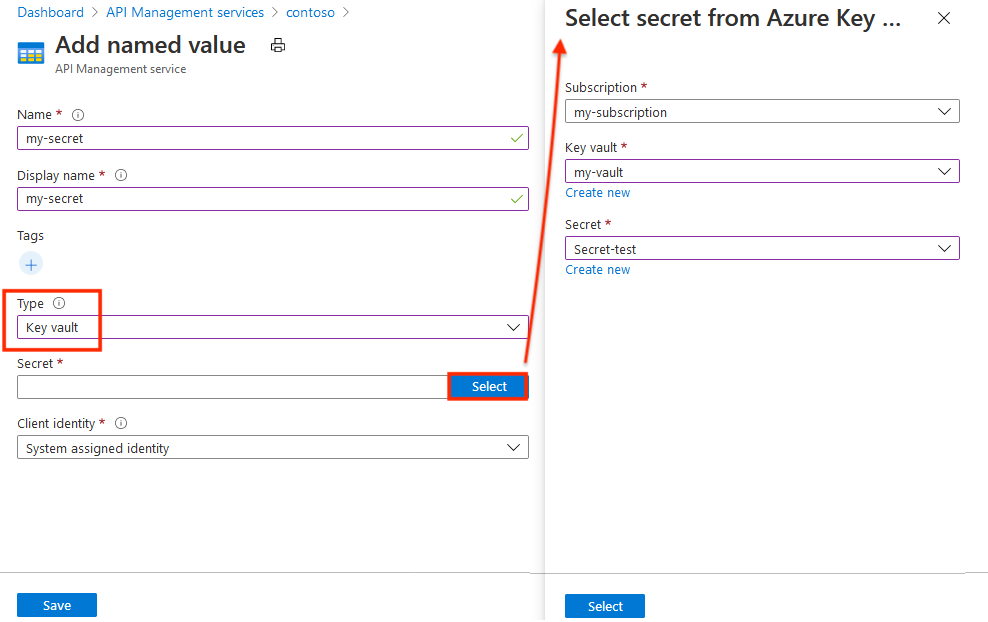
Enter a Name identifier, and enter a Display name used to reference the property in policies.
Add one or more optional Tags to help organize your named values.
In the Type drop-down, select Key vault.
Enter the identifier of a key vault secret (without version), or choose Select to select a secret from a key vault.
Important
If you enter a key vault secret identifier yourself, ensure that it doesn't have version information. Otherwise, the secret won't rotate automatically in API Management after an update in the key vault.
In Client identity, select a system-assigned or an existing user-assigned managed identity. Learn how to add or modify managed identities in your API Management service.
Note
The identity needs permissions to get and list secrets from the key vault. If you haven't already configured access to the key vault, API Management prompts you so it can automatically configure the identity with the necessary permissions.
Select Save, then select Create.
Add a plain or secret value to API Management
- In the Azure portal, navigate to your API Management instance.
- Under APIs, select Named values > +Add.
- Enter a Name identifier, and enter a Display name used to reference the property in policies.
- In the Type drop-down, select Plain or Secret.
- In Value, enter a string or policy expression.
- Add one or more optional tags to help organize your named values, then Save.
- Select Create.
Once the named value is created, you can edit it by selecting the name. If you change the display name, any policies that reference that named value are automatically updated to use the new display name.

Use a named value
The examples in this section use the named values shown in the following table.
| Name | Value | Secret |
|---|---|---|
| ContosoHeader | TrackingId |
False |
| ContosoHeaderValue | •••••••••••••••••••••• | True |
| ExpressionProperty | @(DateTime.Now.ToString()) |
False |
| ContosoHeaderValue2 | This is a header value. |
False |
To use a named value in a policy, place its display name inside a double pair of braces like {{ContosoHeader}}, as shown in the following example:
<set-header name="{{ContosoHeader}}" exists-action="override">
  <value>{{ContosoHeaderValue}}</value>
</set-header>
In this example, ContosoHeader is used as the name of a header in a set-header policy, and ContosoHeaderValue is used as the value of that header. When this policy is evaluated during a request or response to the API Management gateway, {{ContosoHeader}} and {{ContosoHeaderValue}} are replaced with their respective values.
You can use named values as complete attribute or element values as shown in the previous example, but they can also be inserted into or combined with part of a literal text expression as shown in the following example:
<set-header name = "CustomHeader{{ContosoHeader}}" ...>
Named values can also contain policy expressions. In the following example, the ExpressionProperty expression is used.
<set-header name="CustomHeader" exists-action="override">
    <value>{{ExpressionProperty}}</value>
</set-header>
When this policy is evaluated, {{ExpressionProperty}} is replaced with its value, @(DateTime.Now.ToString()). Because the value is a policy expression, the expression is evaluated and the policy proceeds with its execution.
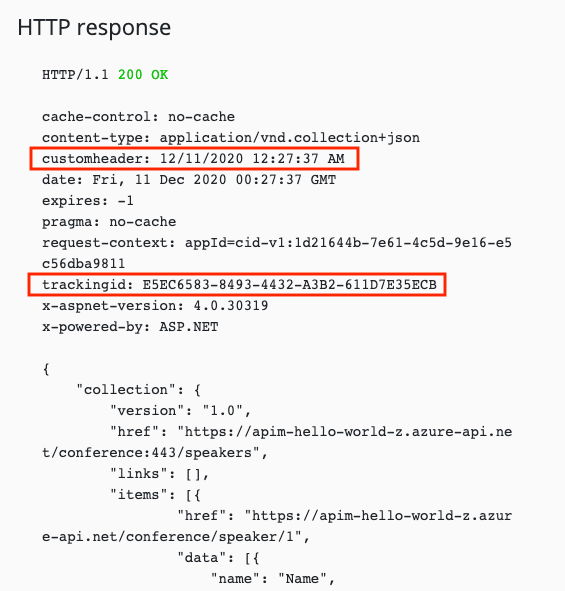
You can test this in the Azure portal or the developer portal by calling an operation that has a policy with named values in scope. In the following example, an operation is called with the two previous example set-header policies with named values. Notice that the response contains two custom headers that were configured using policies with named values.
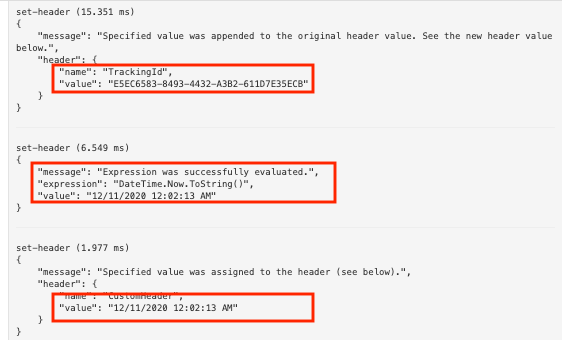
If you look at the outbound API trace for a call that includes the two previous sample policies with named values, you can see the two set-header policies with the named values inserted as well as the policy expression evaluation for the named value that contained the policy expression.
You can also use string interpolation with named values.
<set-header name="CustomHeader" exists-action="override">
    <value>@($"The URL encoded value is {System.Net.WebUtility.UrlEncode("{{ContosoHeaderValue2}}")}")</value>
</set-header>
The value for CustomHeader will be The URL encoded value is This+is+a+header+value..
Caution
If a policy references a secret in Azure Key Vault, the value from the key vault is visible to users who have access to subscriptions enabled for API request tracing.
While named values can contain policy expressions, they can't contain other named values. If text containing a named value reference is used for a value, such as Text: {{MyProperty}}, that reference won't be resolved and replaced.
Delete a named value
To delete a named value, select the name, then select Delete from the context menu (...).
Important
If the named value is referenced by any API Management policies, you can't delete it until you remove the named value from all policies that use it.
Related content
Learn more about working with policies: