Configure manual backups for Azure NetApp Files
Azure NetApp Files backup supports policy-based (scheduled) backups and manual (on-demand) backups at the volume level. You can use both types of backups in the same volume. During the configuration process, you need to assign a backup vault to Azure NetApp Files volume before policy-based backups or manual backups can be created.
This article shows you how to configure manual backups. For policy-based backup configuration, see Configure policy-based backups.
About manual backups
Every Azure NetApp Files volume must have a backup vault assigned before any backups (policy-based or manual) can be taken.
After you assign a backup vault, you can choose to manually back up a volume. A manual backup takes a point-in-time snapshot of the active file system and backs up that snapshot to the Azure storage account.
The following list summarizes manual backup behaviors:
You can create manual backups on a volume even if the volume is already assigned to a backup vault and configured with backup policies. However, there can be only one outstanding manual-backup request for the volume. If you assign a backup policy and if the baseline transfer is still in progress, then the creation of a manual backup is blocked until the baseline transfer is complete.
Unless you specify an existing snapshot to use for a backup, creating a manual backup automatically generates a snapshot on the volume. The snapshot is then transferred to Azure storage. The snapshot created on the volume will be retained until the next manual backup is created. During the subsequent manual backup operation, older snapshots are cleaned up. You can't delete the snapshot generated for the latest manual backup.
Register the feature
Azure NetApp Files backup is currently in preview. You must register the feature before using it for the first time.
Register the feature
Register-AzProviderFeature -ProviderNamespace Microsoft.NetApp -FeatureName ANFBackupPreviewCheck the status of the feature registration:
Note
The RegistrationState may be in the
Registeringstate for up to 60 minutes before changing toRegistered. Wait until the status isRegisteredbefore continuing.Get-AzProviderFeature -ProviderNamespace Microsoft.NetApp -FeatureName ANFBackupPreview
You can also use Azure CLI commands az feature register and az feature show to register the feature and display the registration status.
Requirements
- Azure NetApp Files requires you to assign a backup vault before allowing backup creation on a volume. To configure a backup vault, see Manage backup vaults for more information.
- If you need to delete a resource group or subscription that contains backups, you should delete any backups first. Deleting the resource group or subscription doesn't delete the backups. You can remove backups by manually deleting the backups.
Configure backups
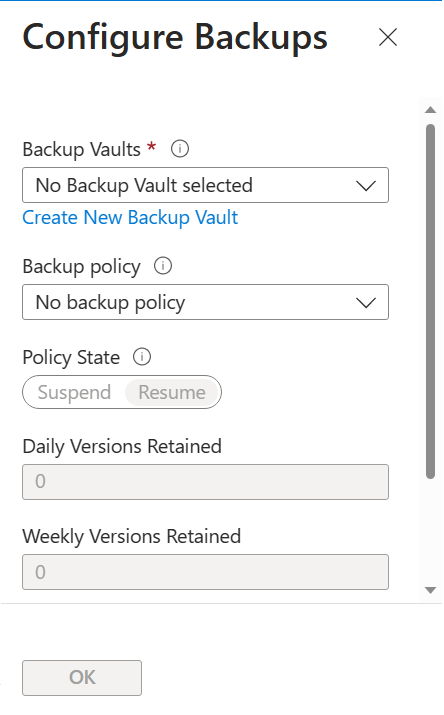
If you haven’t done so, assign a backup vault to the volume before creating manual backups:
- Go to Volumes and select the specific volume for which you want to configure backups.
- Select Configure.
- In the Configure Backup page, select the backup vault from the dropdown menu.
- Select OK.
Create a manual backup for a volume
Go to Volumes and select the volume for which you want to create a manual backup.
Select Add Backup.
In the New Backup window that appears:
Specify a backup name in the Name field.
Manual backup names must be 3 to 256 characters in length.
As a best practice, prepend a prefix in the following format before the actual backup name. Doing so helps you identify the manual backup if the volume is deleted (with backups retained).
NetAppAccountName-CapacityPoolName-VolumeNameFor example, assume that the NetApp account is
account1, the capacity pool ispool1, the volume name isvol1. A manual backup can be named as follows:account1-pool1-vol1-backup1If you're using a shorter form for the backup name, ensure that it includes information that identifies the NetApp account, capacity pool, and volume name for display in the backup list.
If you want to use an existing snapshot for the backup, select the Use Existing Snapshot option. When you use this option, ensure that the Name field matches the existing snapshot name that is being used for the backup.
Select Create.
When you create a manual backup, a snapshot is also created on the volume using the same name you specified for the backup. This snapshot represents the current state of the active file system. It's transferred to Azure storage. Once the backup completes, the manual backup entry appears in the list of backups for the volume.

Next steps
- Understand Azure NetApp Files backup
- Requirements and considerations for Azure NetApp Files backup
- Resource limits for Azure NetApp Files
- Configure policy-based backups
- Manage backup policies
- Search backups
- Restore a backup to a new volume
- Delete backups of a volume
- Volume backup metrics
- Azure NetApp Files backup FAQs
Feedback
Coming soon: Throughout 2024 we will be phasing out GitHub Issues as the feedback mechanism for content and replacing it with a new feedback system. For more information see: https://aka.ms/ContentUserFeedback.
Submit and view feedback for